
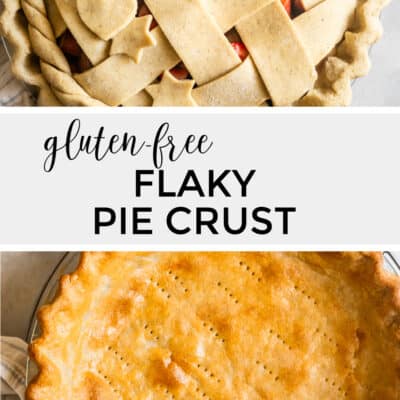
The flakiest all-butter gluten-free pie crust from scratch with gluten-free whole grain flours. With step-by-step photos and troubleshooting tips, you can have a flaky homemade gluten-free pie crust that rivals all traditional pie crusts. This crust is the best part of any pie!
Over the years, I've made a lot of pies and have been testing variations of this pie crust recipe to finally develop what I think is the perfect gluten-free pie crust. It's buttery, ultra-flakey, and so flavorful all on its own.
With this recipe and detailed step-by-step instructions, you no longer need to be intimidated by homemade gluten-free pie crust. It's so easy to make with very little hands-on time!
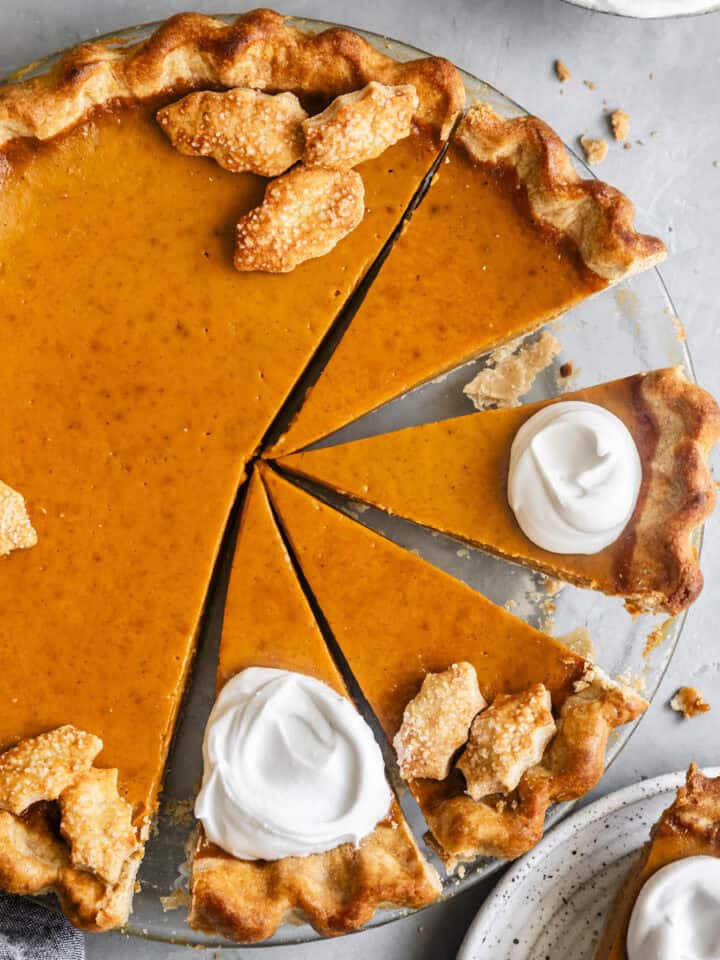
Fill this crust with my gluten-free triple berry pie or gluten-free pear persimmon pie (a family favorite!), or use it to make gluten-free peach hand pies or gluten-free strawberry galettes!
Why you'll love this recipe
- Ultra flakey and tender all-butter crust. This crust bakes up tender and crisp with flakey golden brown layers.
- Better than traditional pie crust. That's a bold statement, but the flavorful whole-grain flours make this pie crust the best part of any pie!
- Simple to make. No special tools are required. Just follow the steps to laminate the dough to create layers. The dough is really easy to work with and not too delicate to roll out or manipulate into fun decorations.
- Make-ahead. It can be made in advance and frozen to make your holidays a breeze.
Ingredients for gluten-free pie crust
This recipe uses a combination of gluten-free flours and starches that work together to create the most flavorful, tender, and flaky pie crust.
Here's everything you'll need to make this recipe:
- Sorghum flour
- Millet flour
- Tapioca flour
- Potato starch
- Xanthan gum
- Sugar
- Kosher salt
- Cold unsalted butter
- Ice water
Visit the recipe card for exact quantities and see below for substitution recommendations.
Tip for Recipe Success
The biggest key to success for a crisp flaky gluten-free pie crust is to keep your ingredients cold every step of the way. If things get too warm, your butter will melt entirely into the dough, before it hits the oven. Instead, we want the butter to be laminated in sheets throughout the dough, so it melts in the oven, creating steam that separates the dough into layers.
If your kitchen is particularly warm, pause and chill the dough after each step. Chill in the freezer to make these steps go quicker!
When in doubt: chill. (<--- life motto right there)

How to Make Homemade Gluten-Free Pie Crust
With this step-by-step guide, you're guaranteed to have success making your own homemade gluten-free pie crust. I've included detailed pictures so you can follow along with every step.
Start by preparing your ice water so it's ready when you need it!
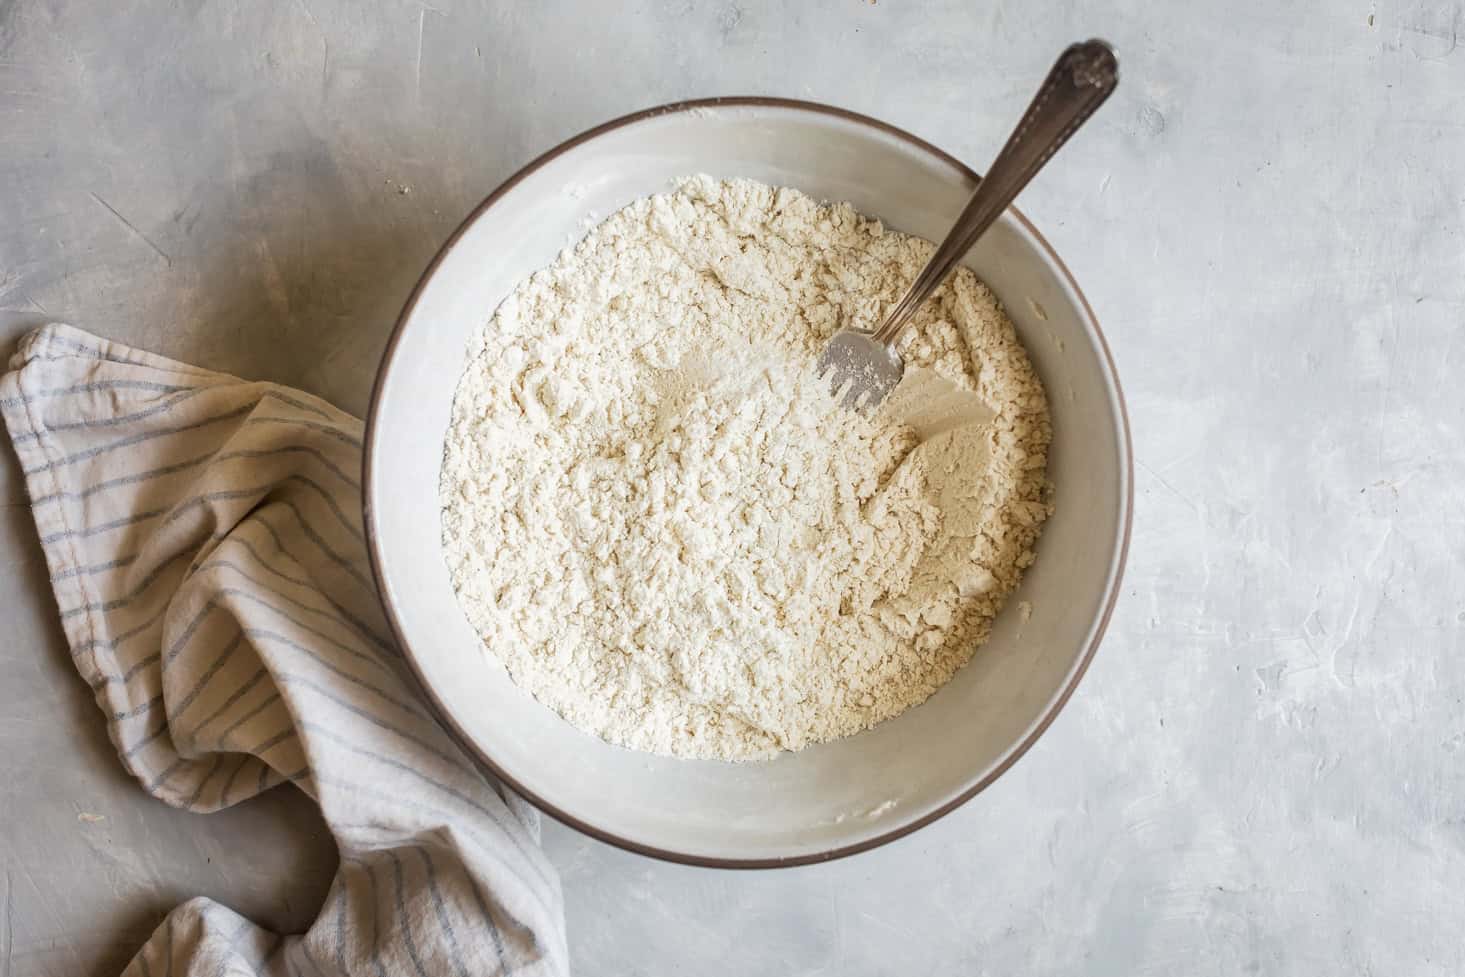
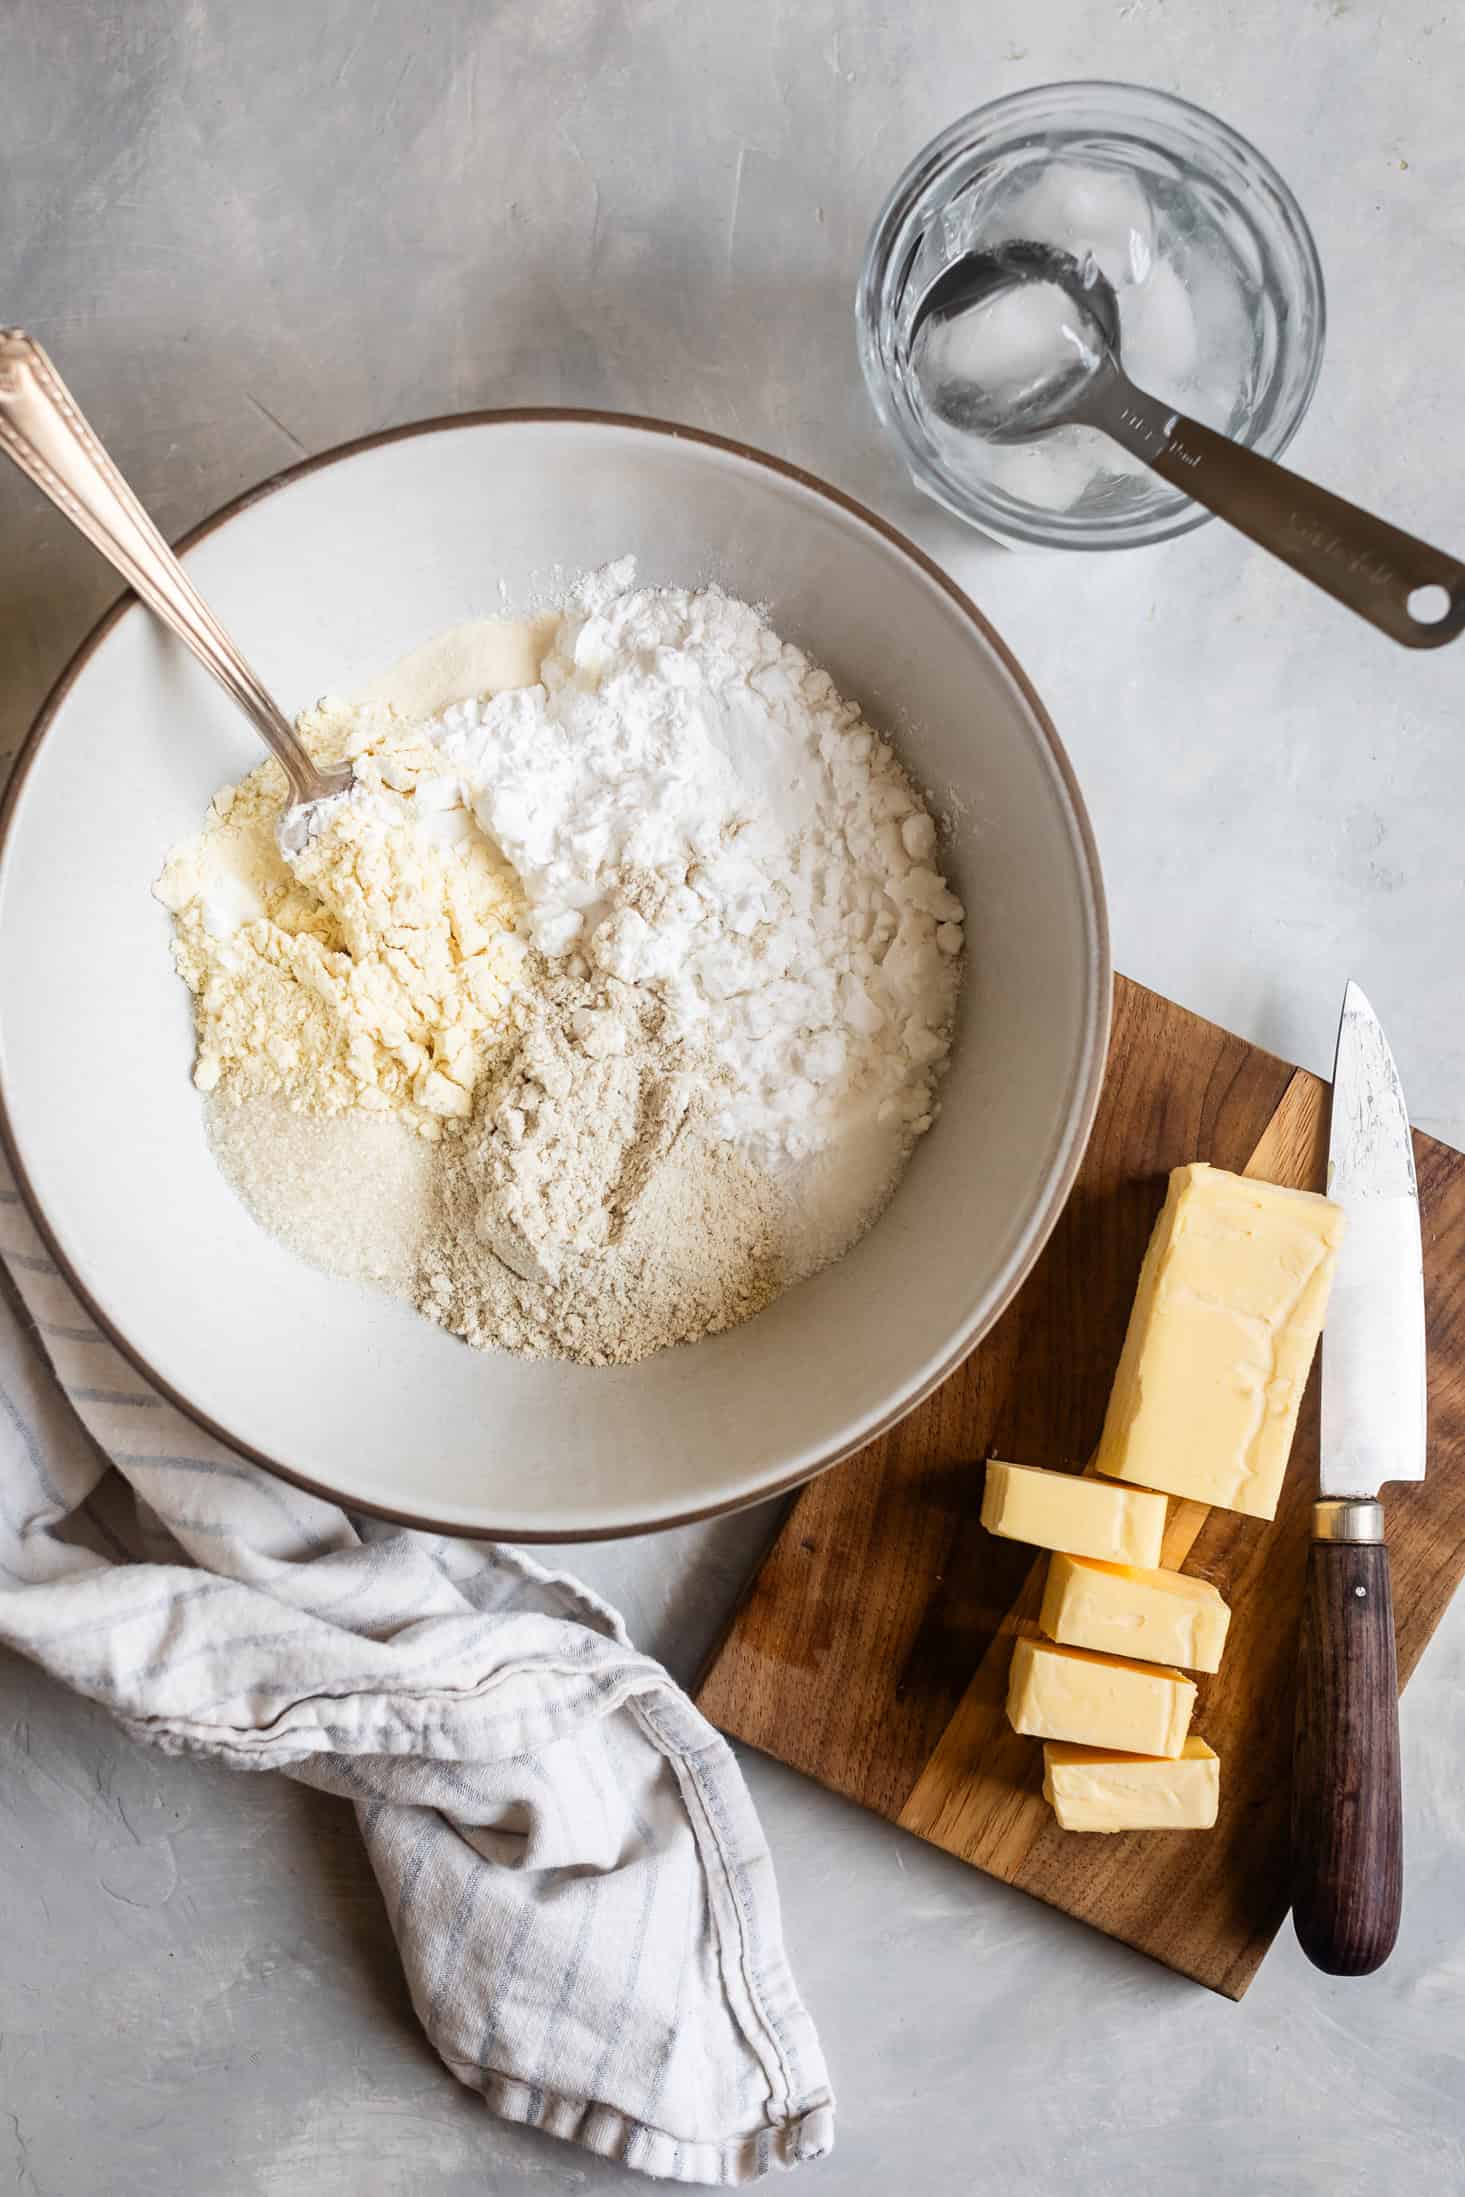
Sift together all the dry ingredients.
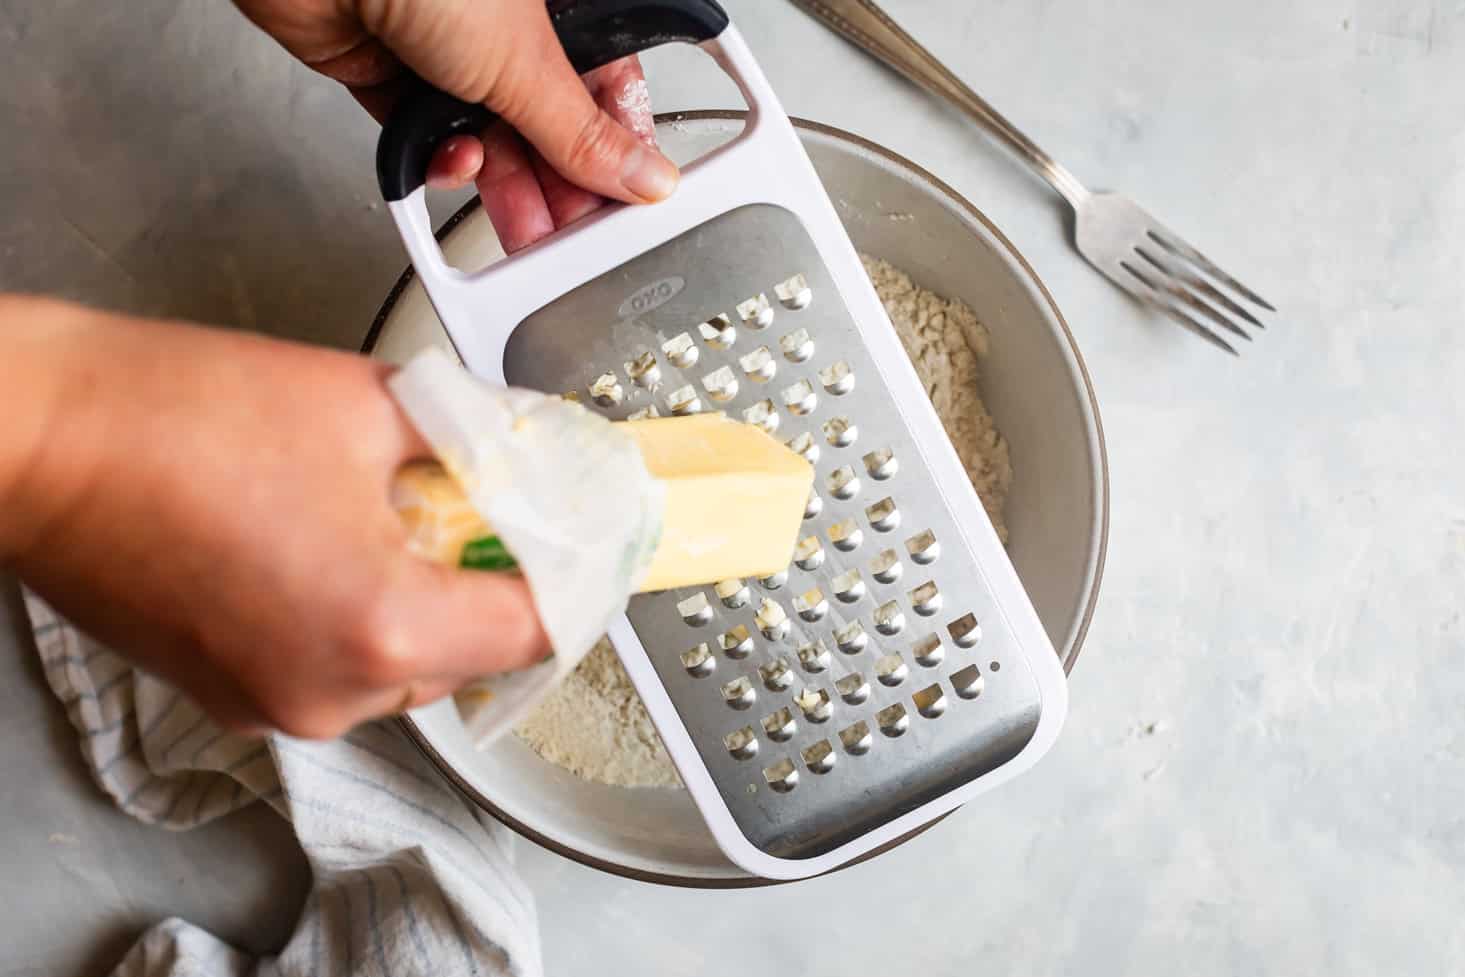
Grate ⅓ of the frozen butter into the dry ingredients.
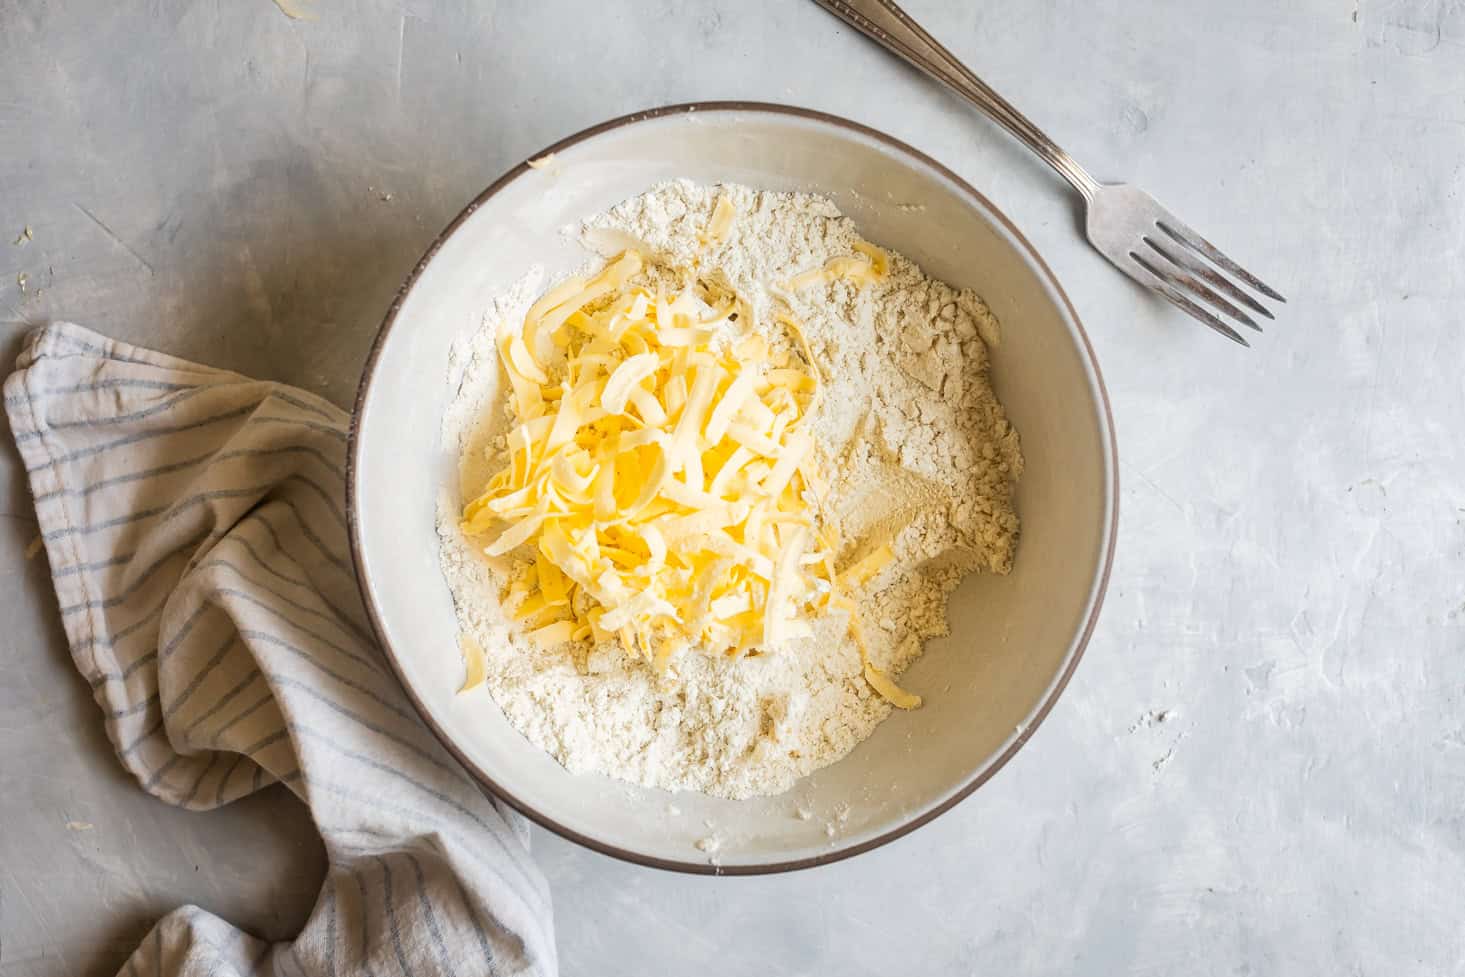
Using frozen butter is key as otherwise it will melt too quickly from the heat of your hands.
Lightly toss the grated butter with the flour to coat.
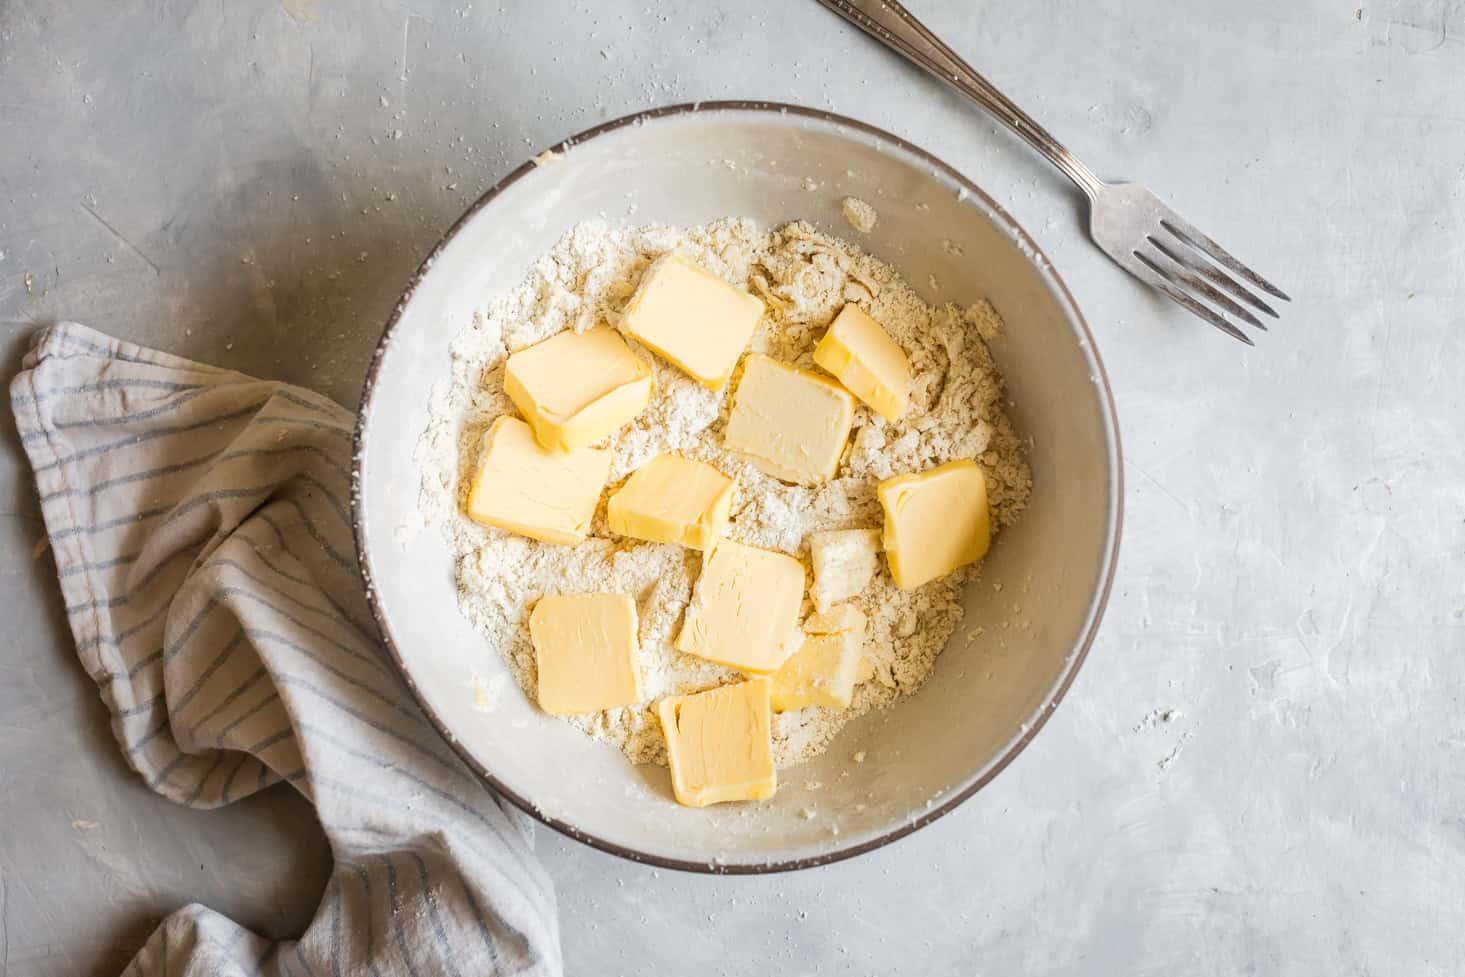
Slice the remaining butter into ¼-inch thick slices and add to the dry ingredients.
Lightly toss the butter slices with the flour to coat.
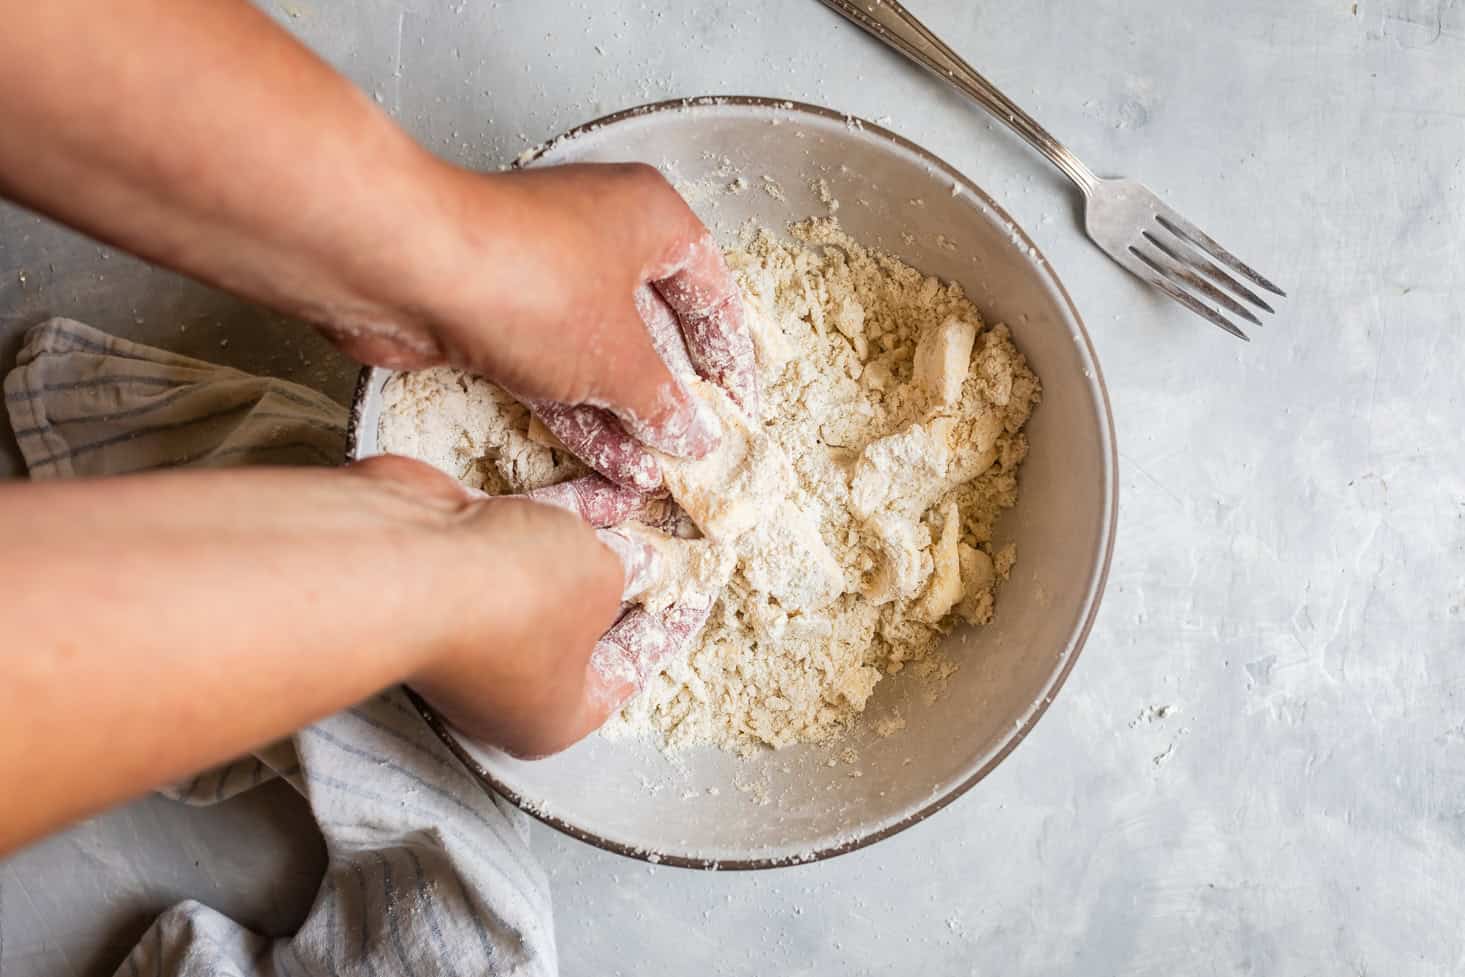
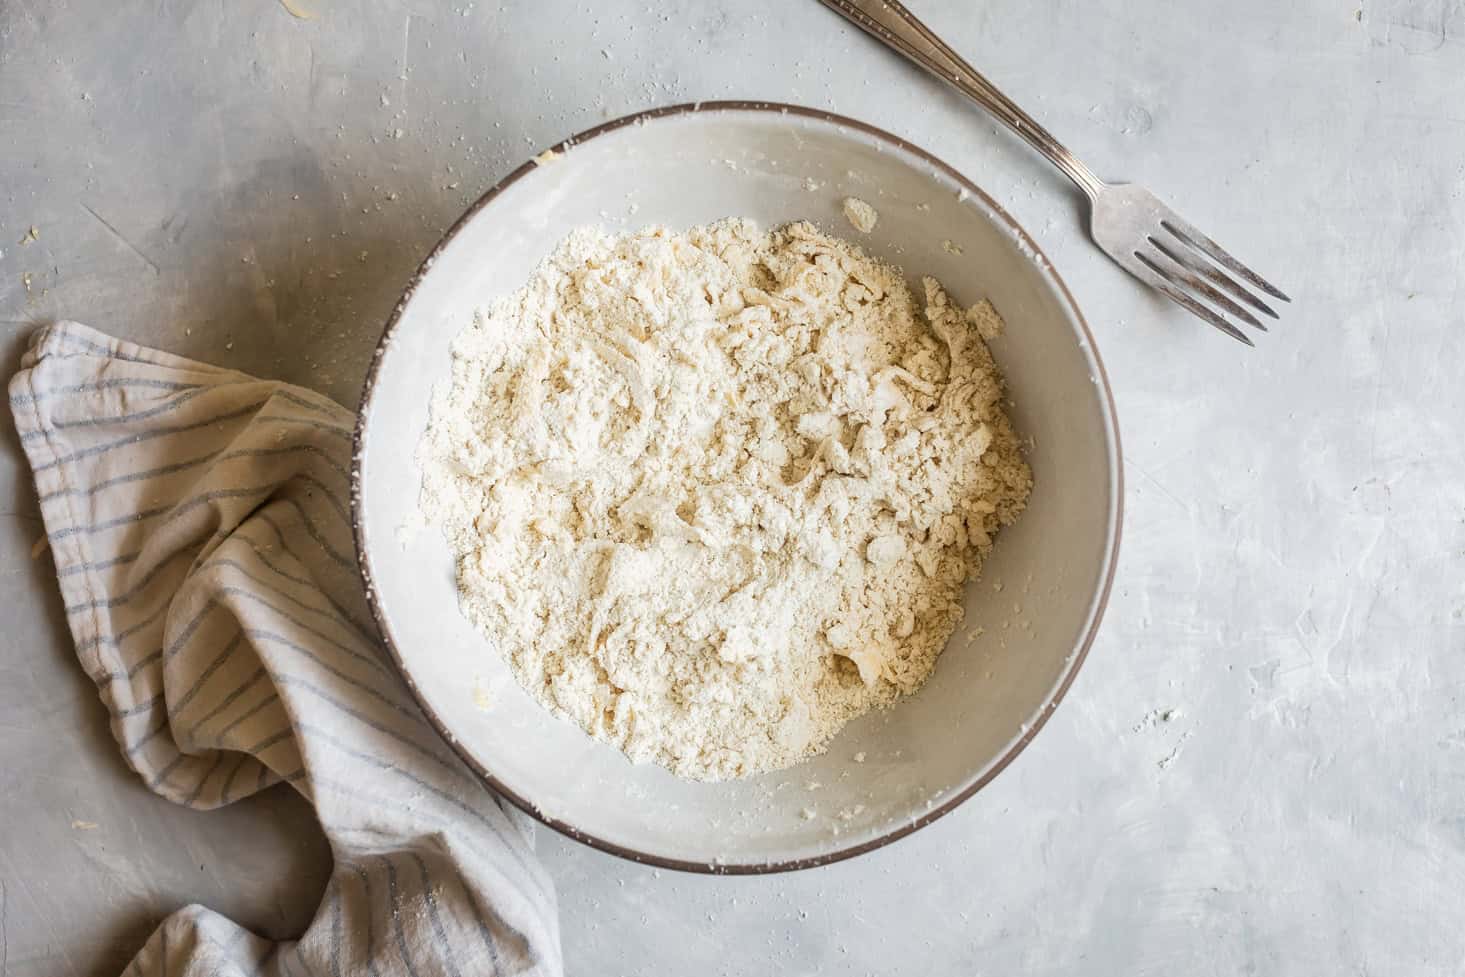
Use your hands to quickly massage the butter into the flour, pinching and smashing the butter into thin sheets.
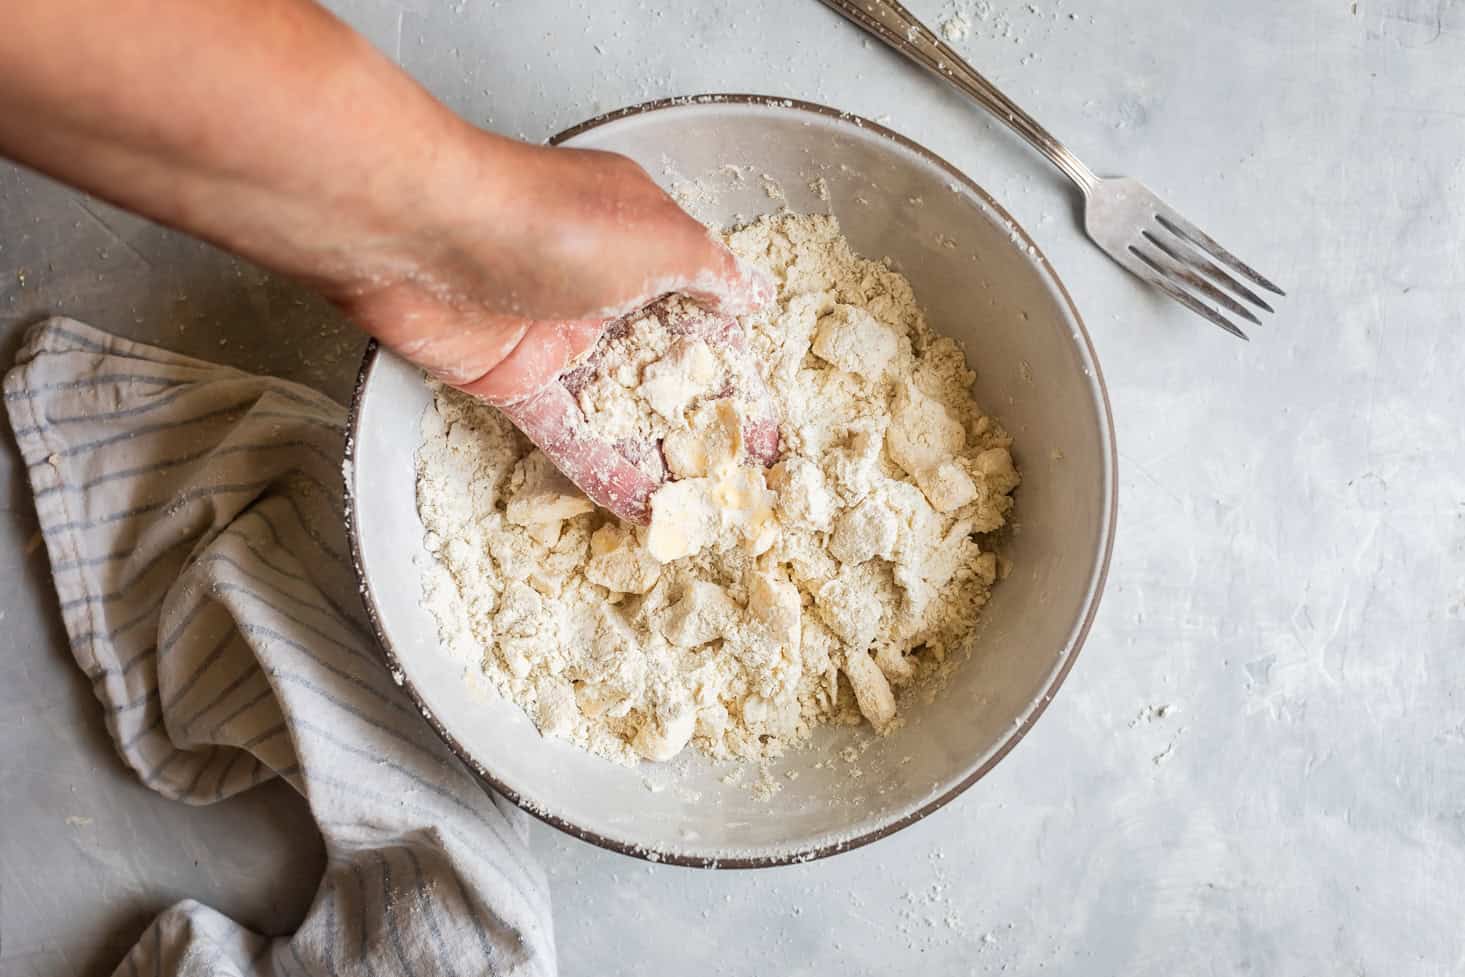
The largest sheets of butter should still be the size of a quarter.
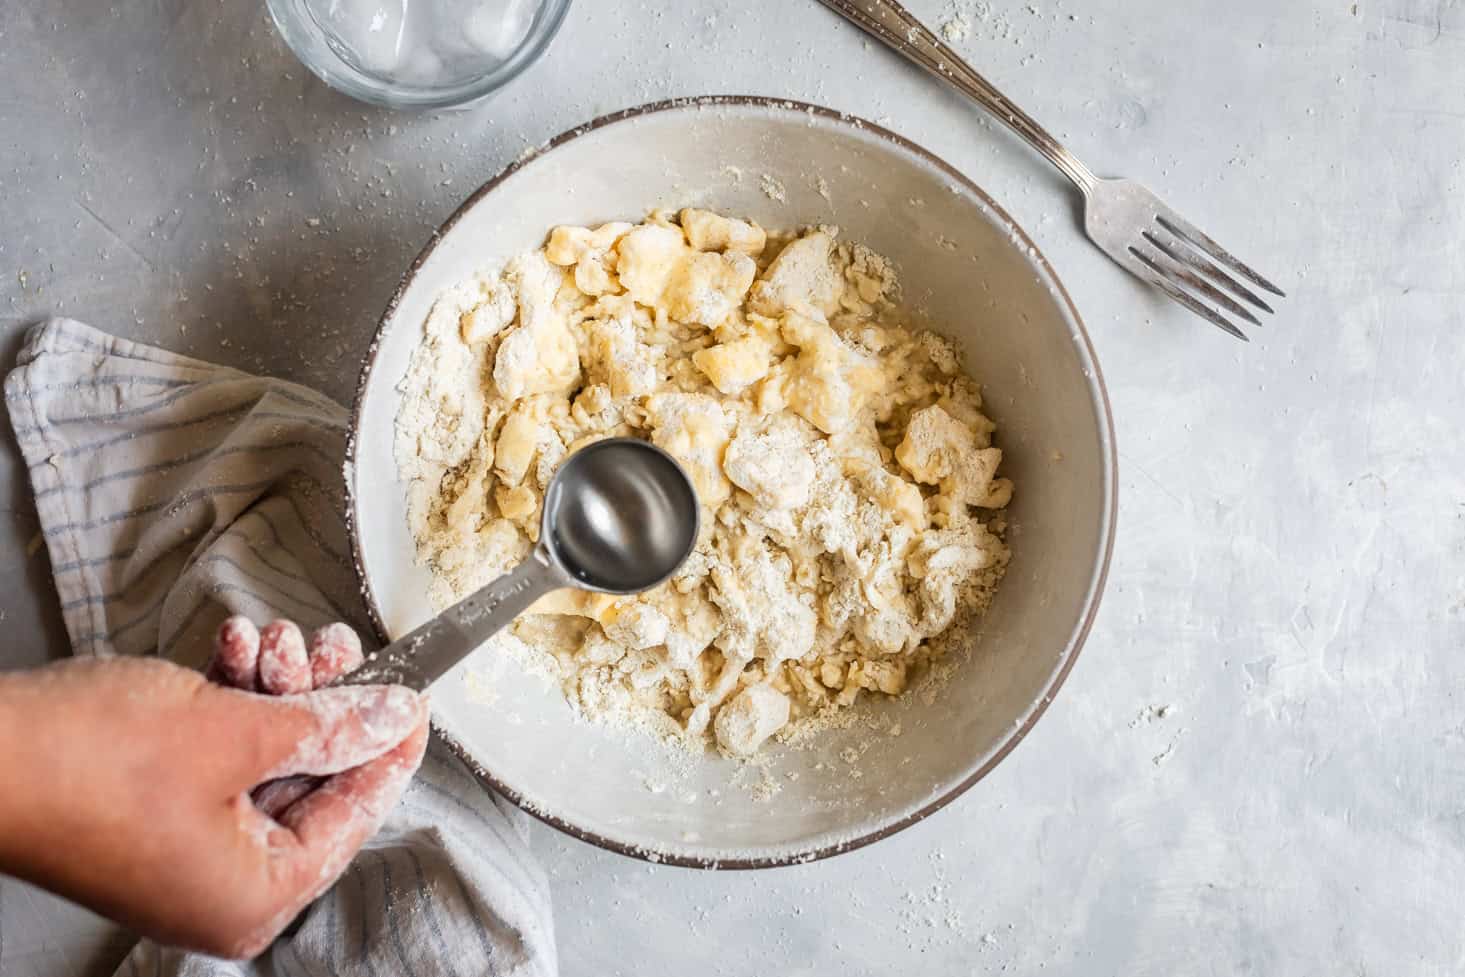
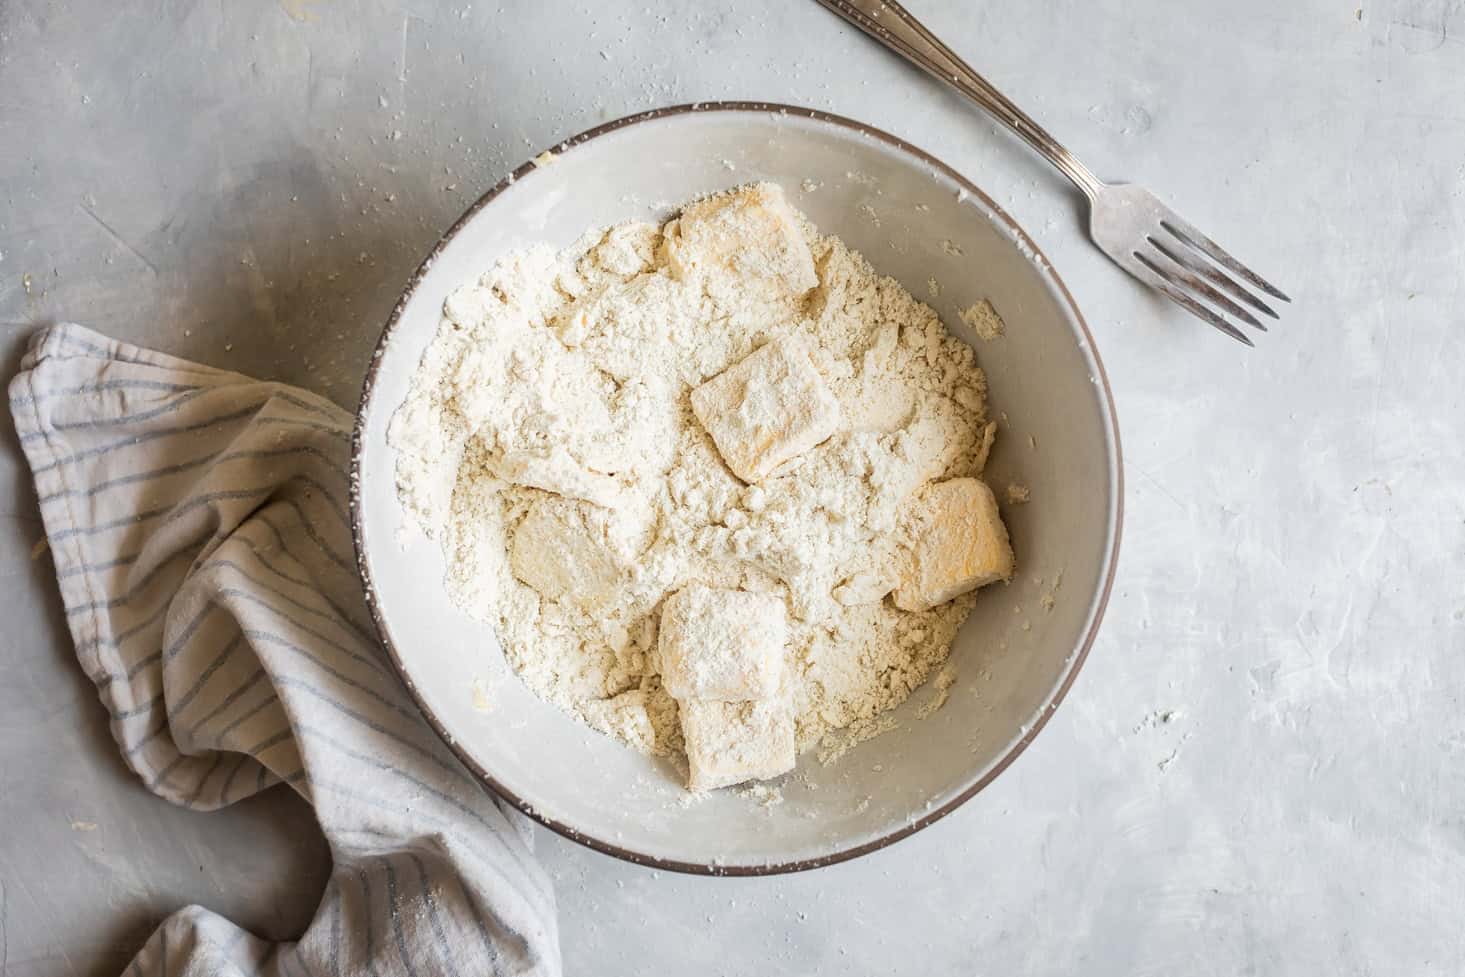
Drizzle the ice water over top, starting with just 6 tablespoons.
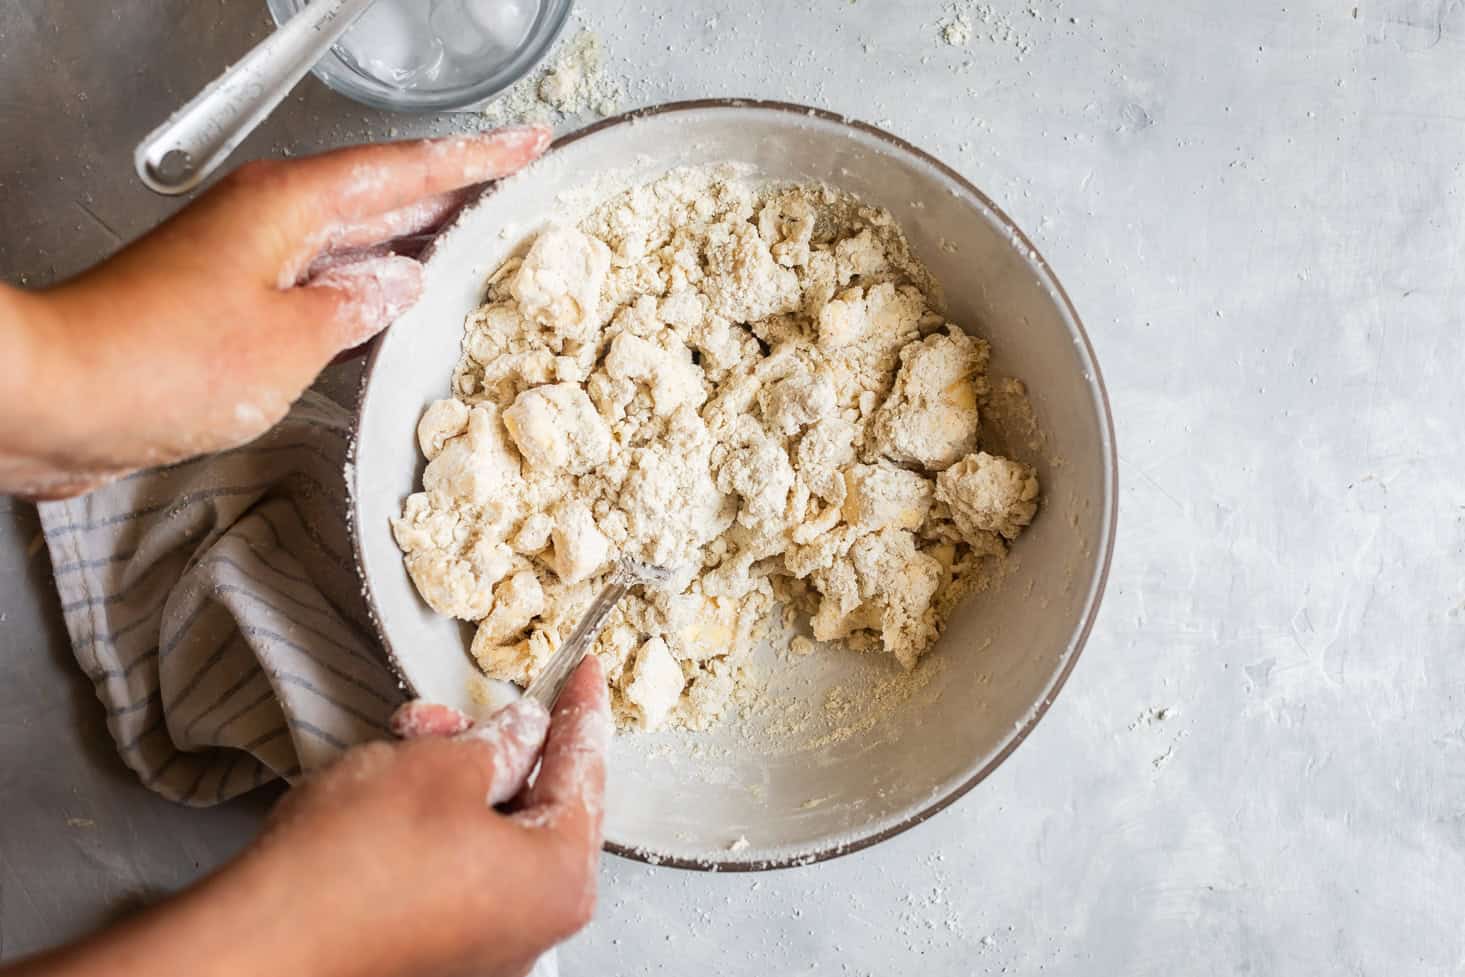
Begin mixing the water into the dough with a fork, until it is no longer super sticky.
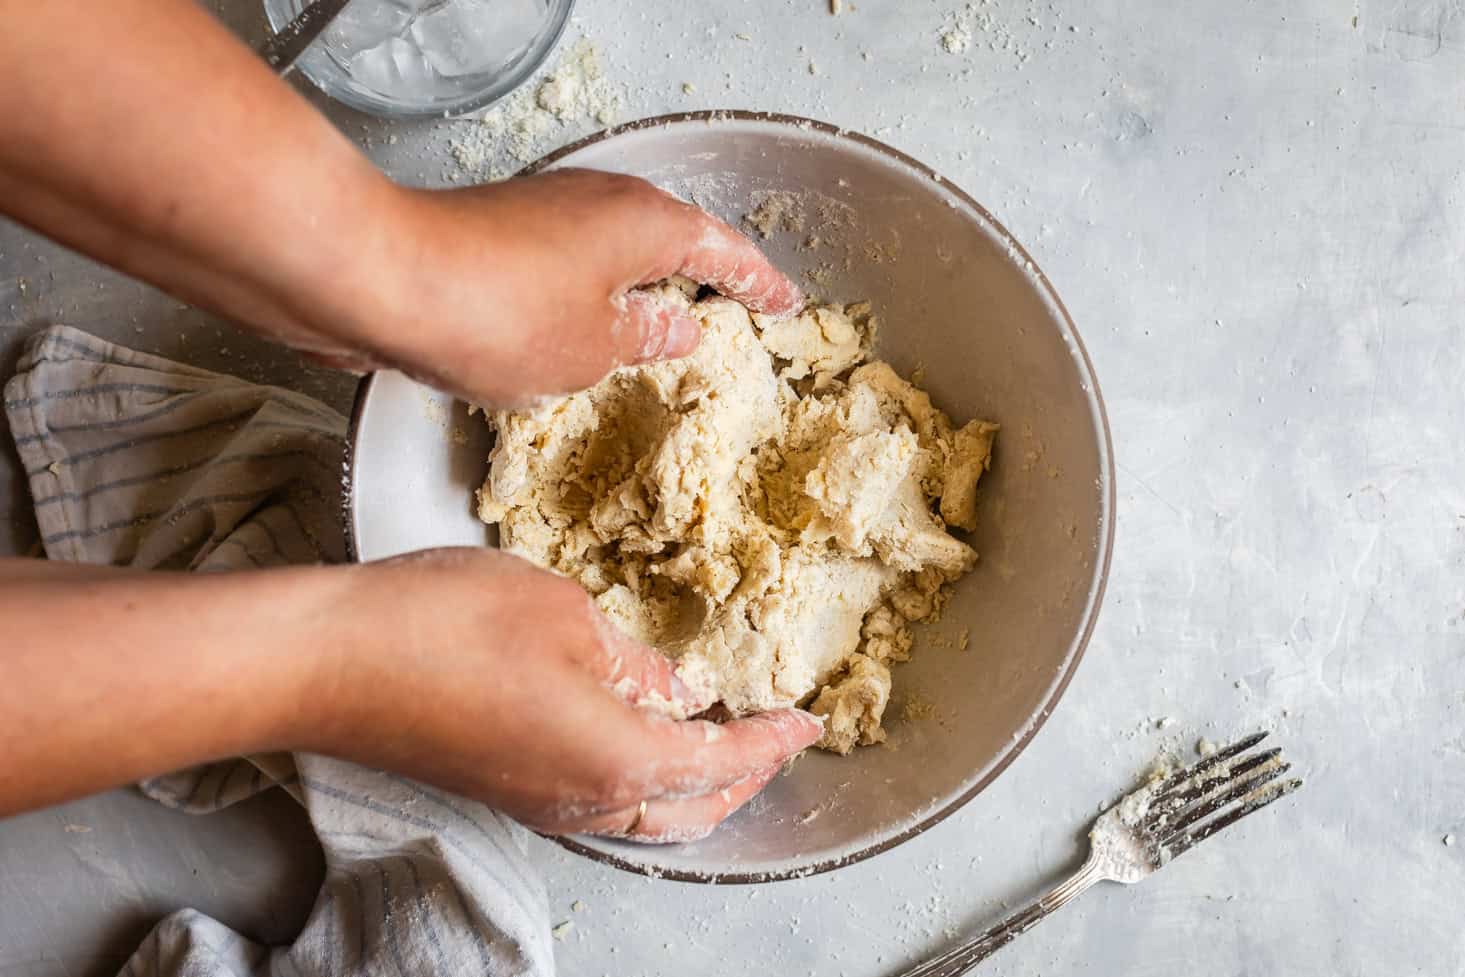
Working quickly, use your hands to pinch and knead the dough until it just holds together into one piece when pinched. There will still be dry areas, but that's okay - the dough will hydrate in the fridge.

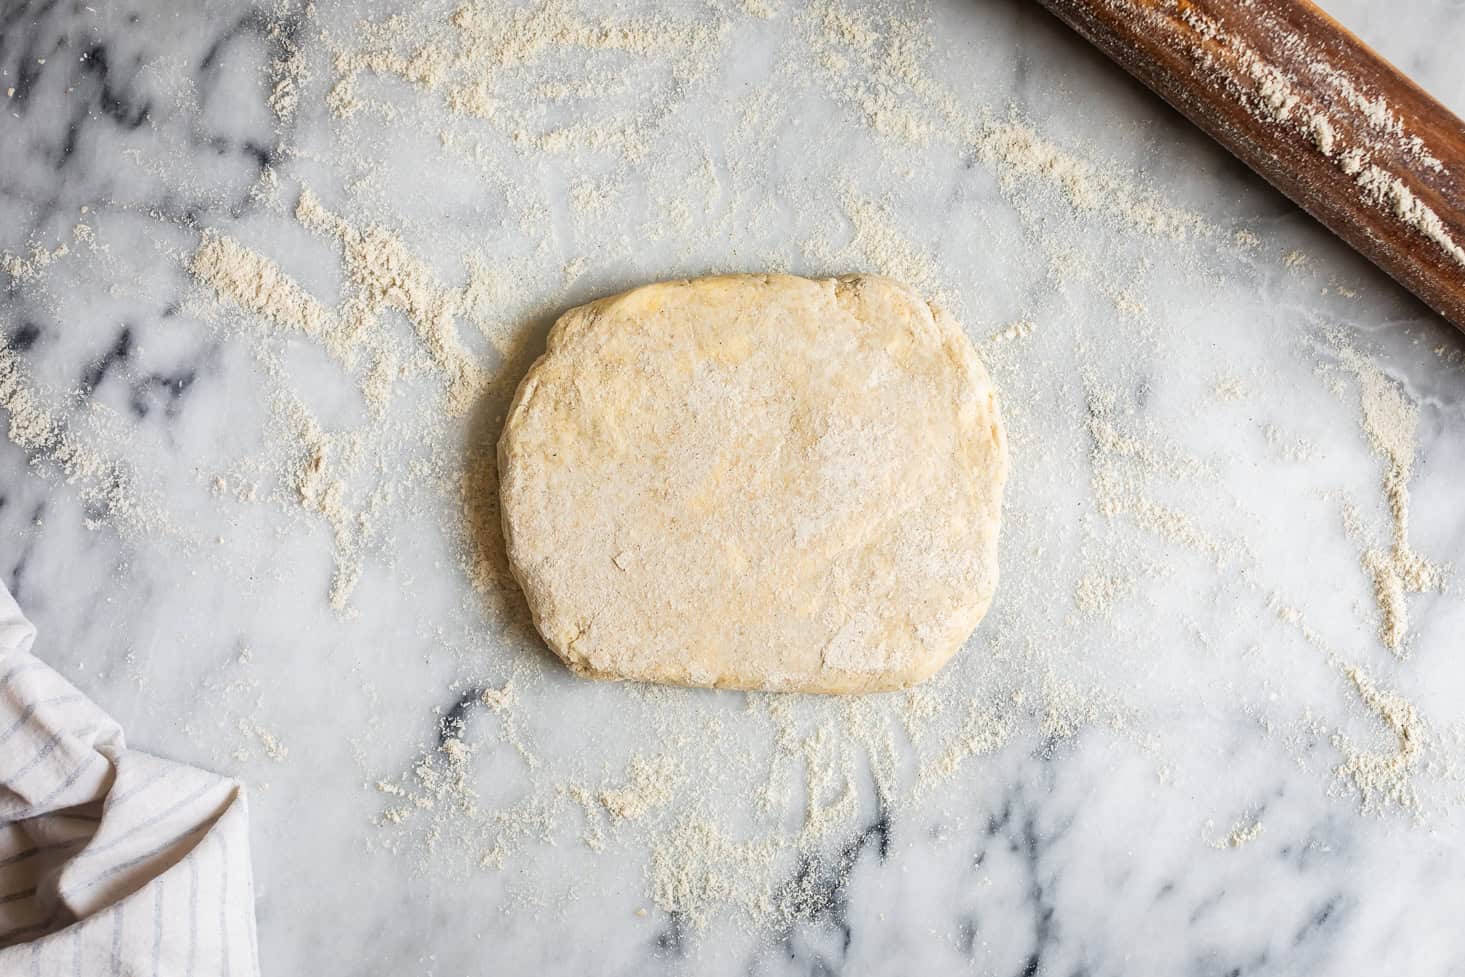
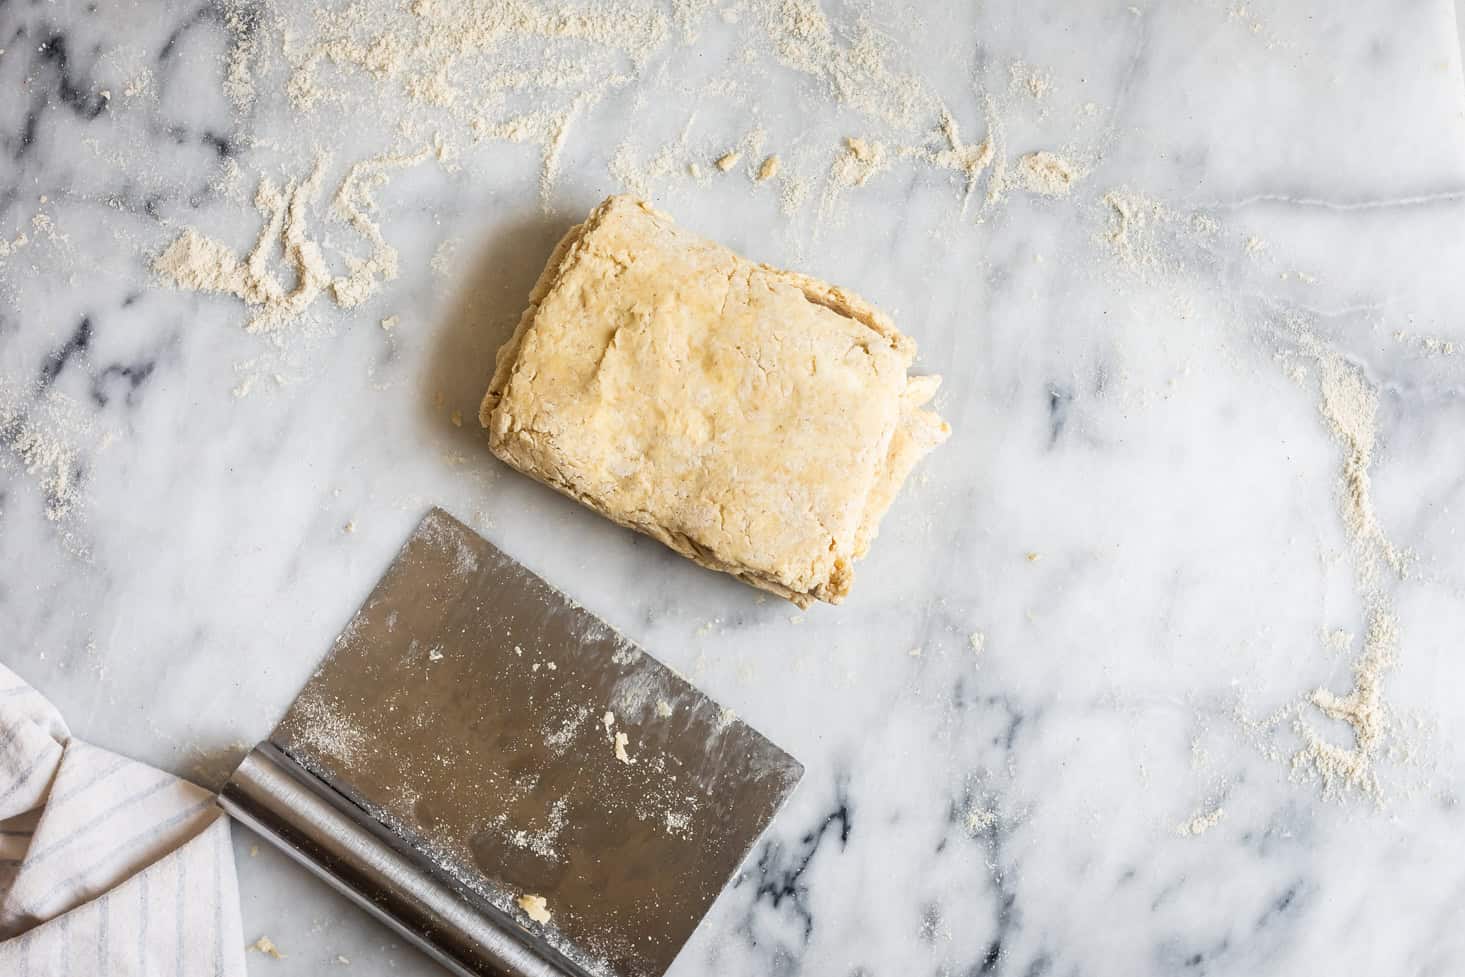
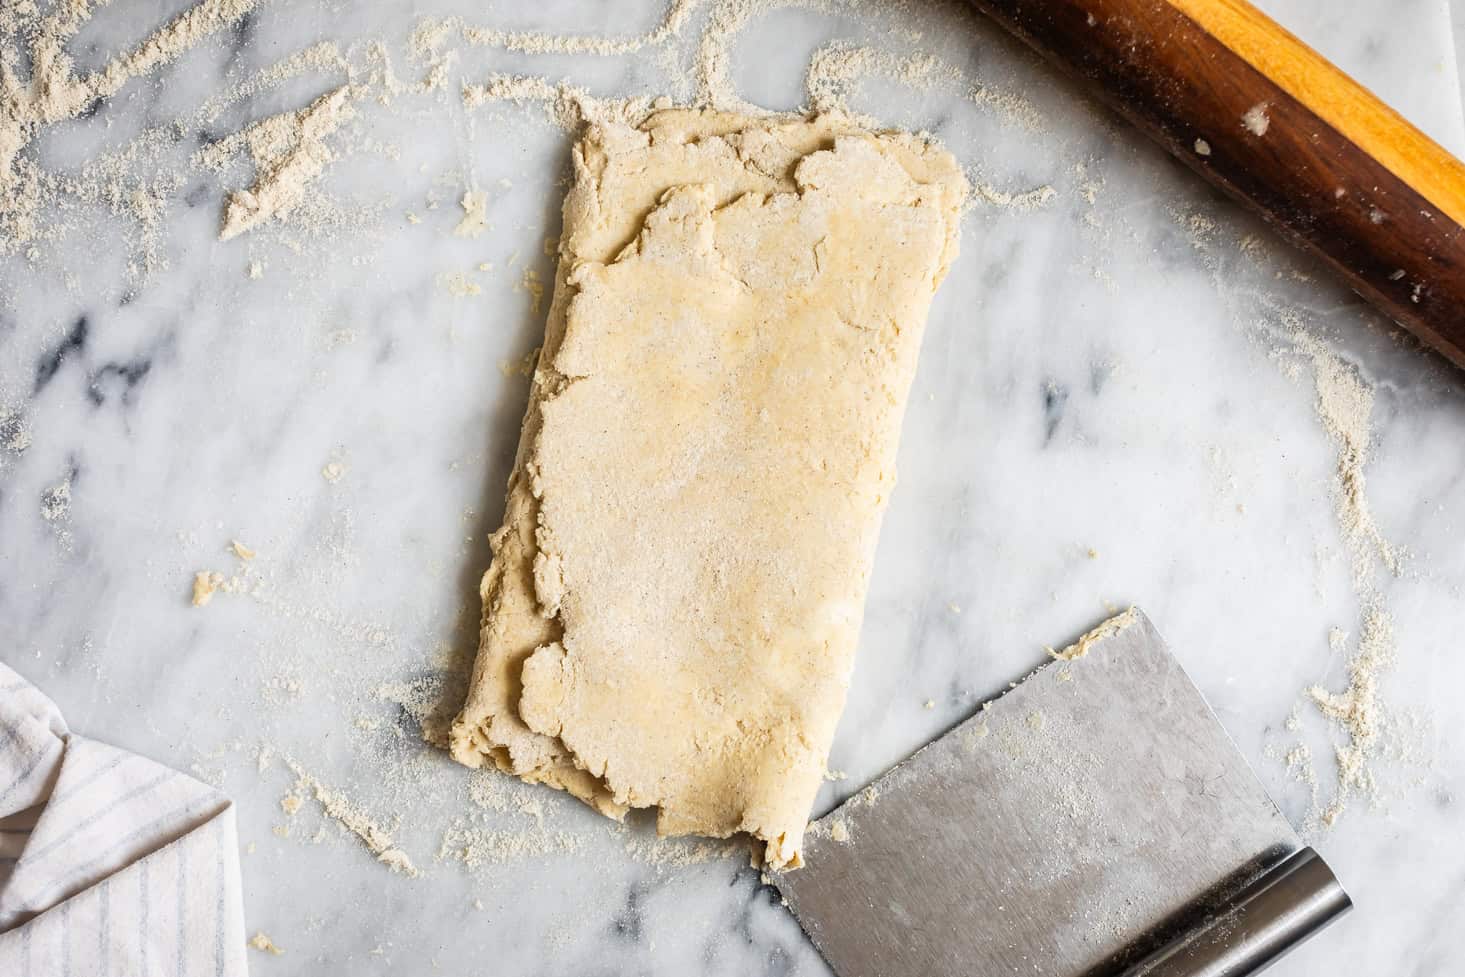
Dump the dough onto your work surface.
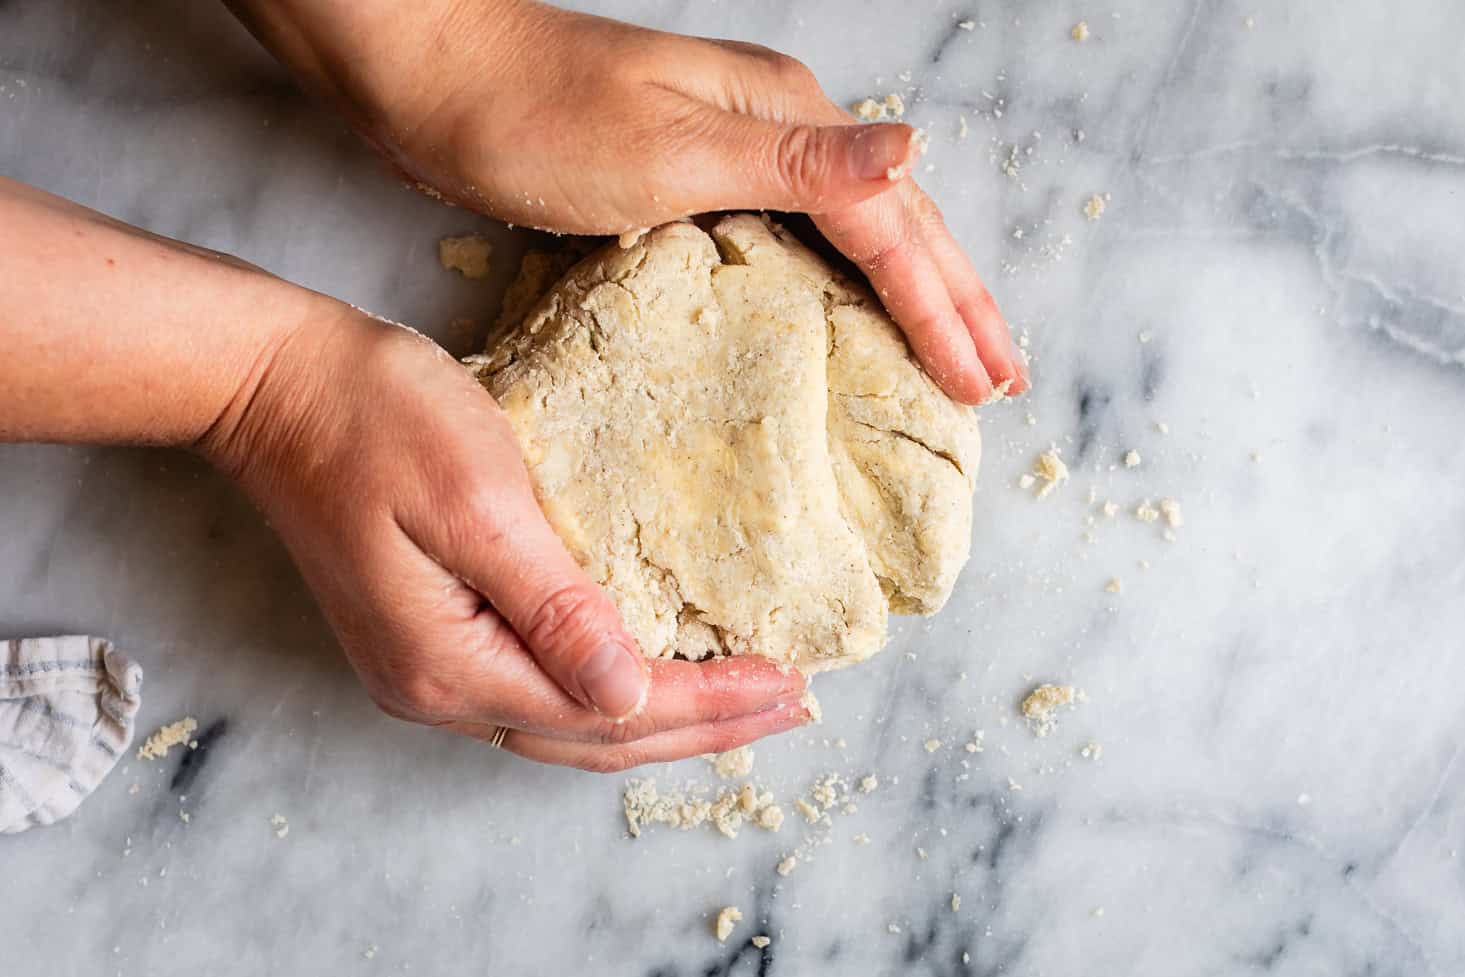
Use your hands to knead until the dough just forms a disk, about ¾-inch thick and holds together completely.
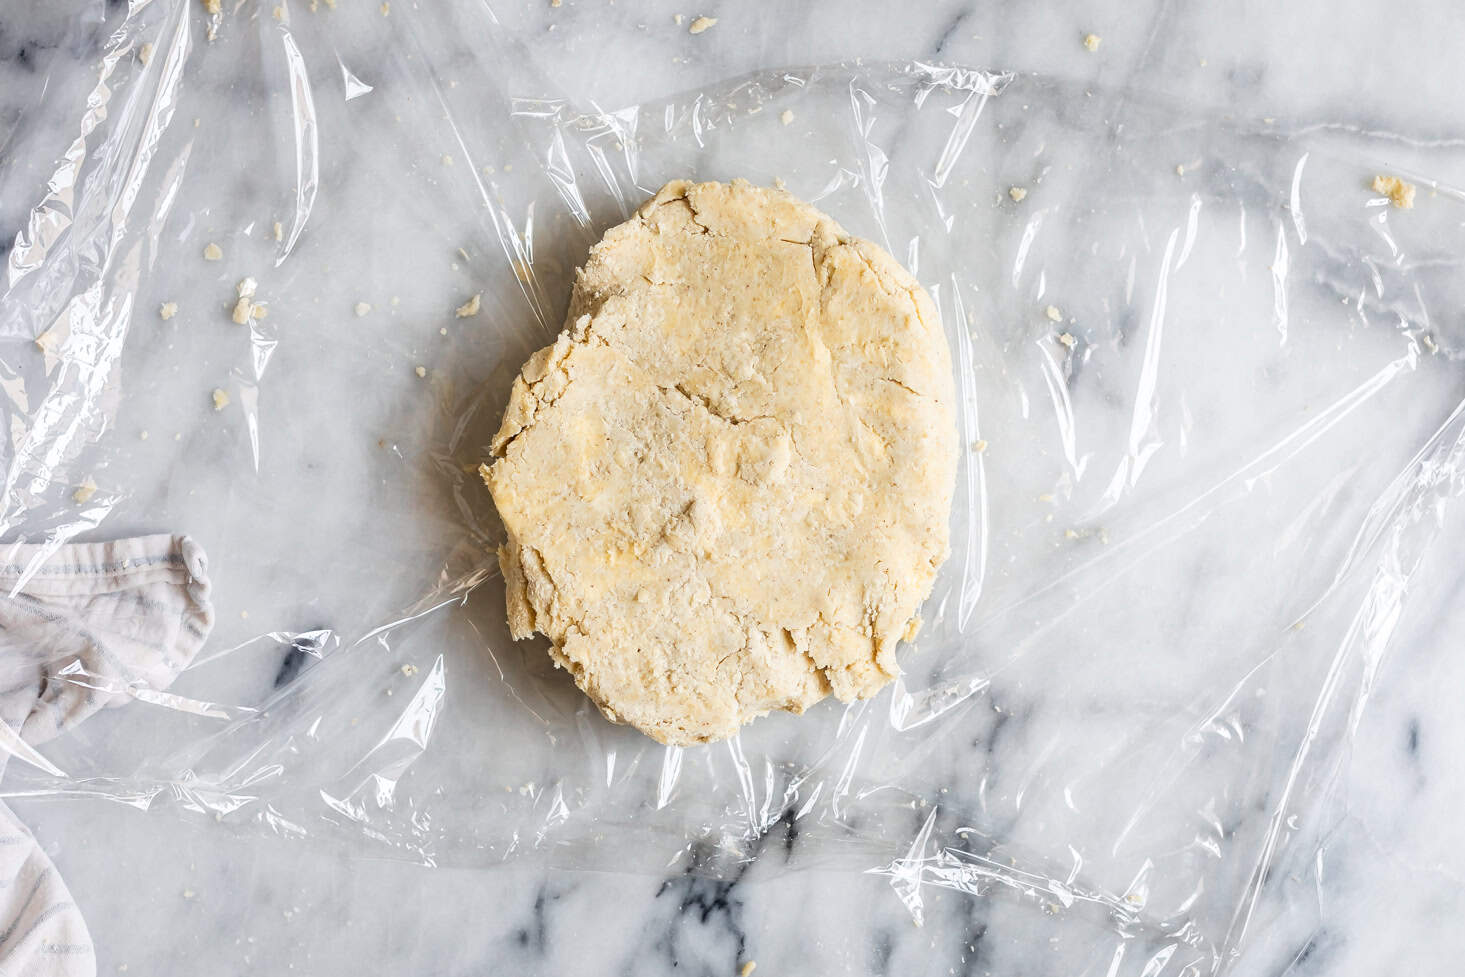
Wrap the dough in plastic wrap.
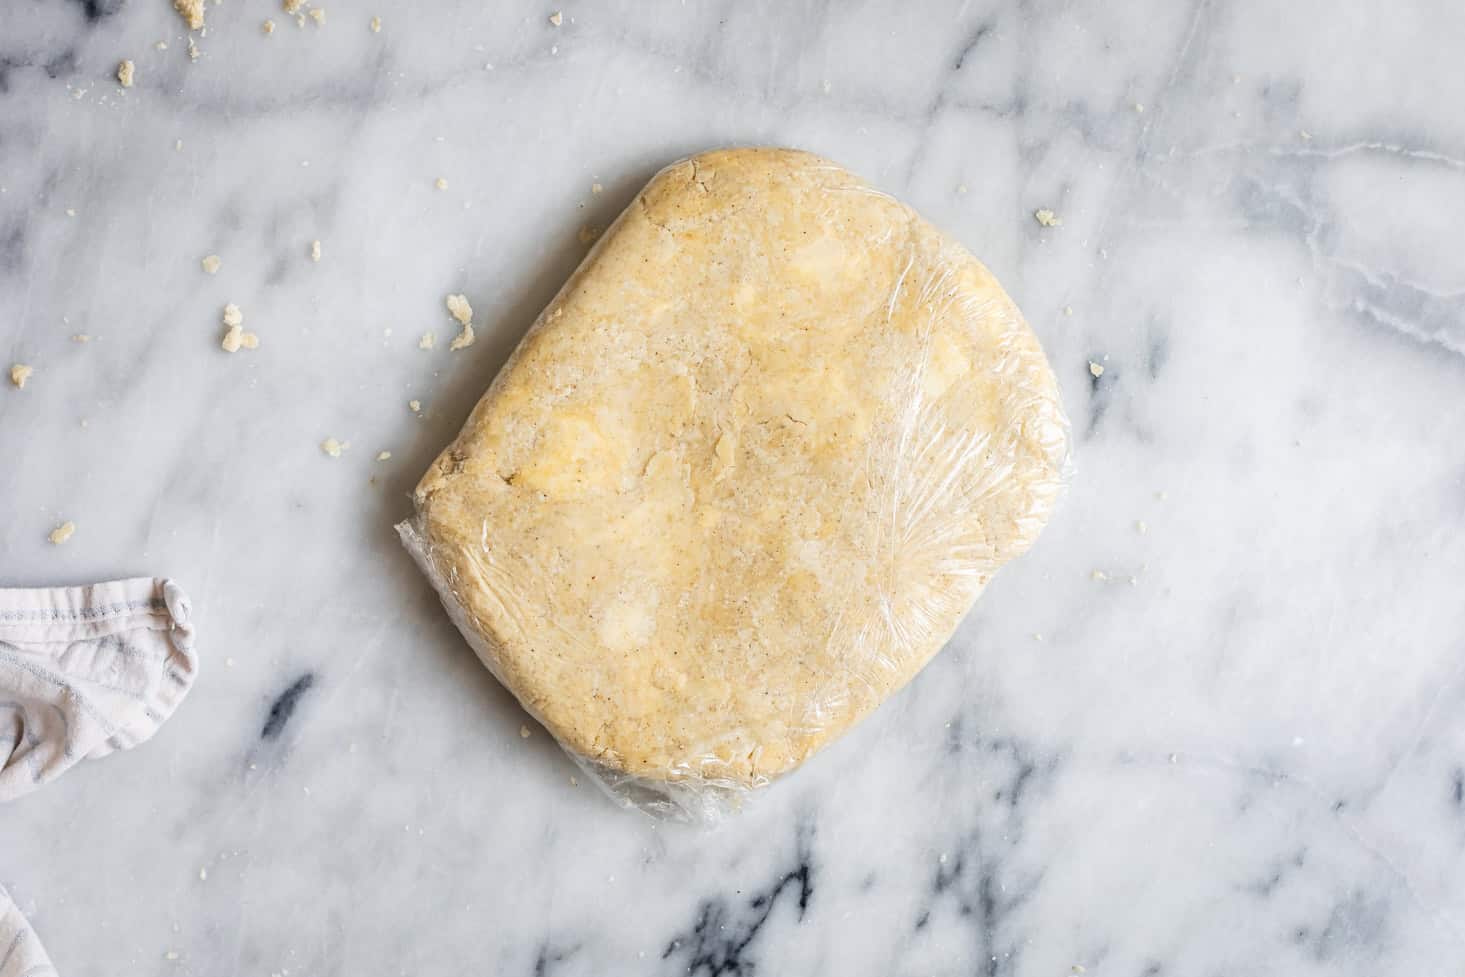
Press the dough flat into the plastic wrap and chill for at least 30 minutes or up to overnight.
Once chilled, you'll laminate the dough using the letter fold method!
Tip: Take care not to over-knead the dough. This will cause the butter to melt and incorporate into the flour too much, eliminating those delicious flakes!
How to Laminate Gluten-Free Pie Dough
The key to creating those flaky layers is to laminate the dough. This is the process by which the butter gets rolled and folded into the dough multiple times to create thin layers of butter and dough that create ultra-flakey layers when baked. The water in the fat (butter) turns into steam in the oven, pushing the layers of dough apart, creating thin flaky layers of delicious pie dough.
My favorite method is the letter fold method (shown below), as it's super easy and foolproof!
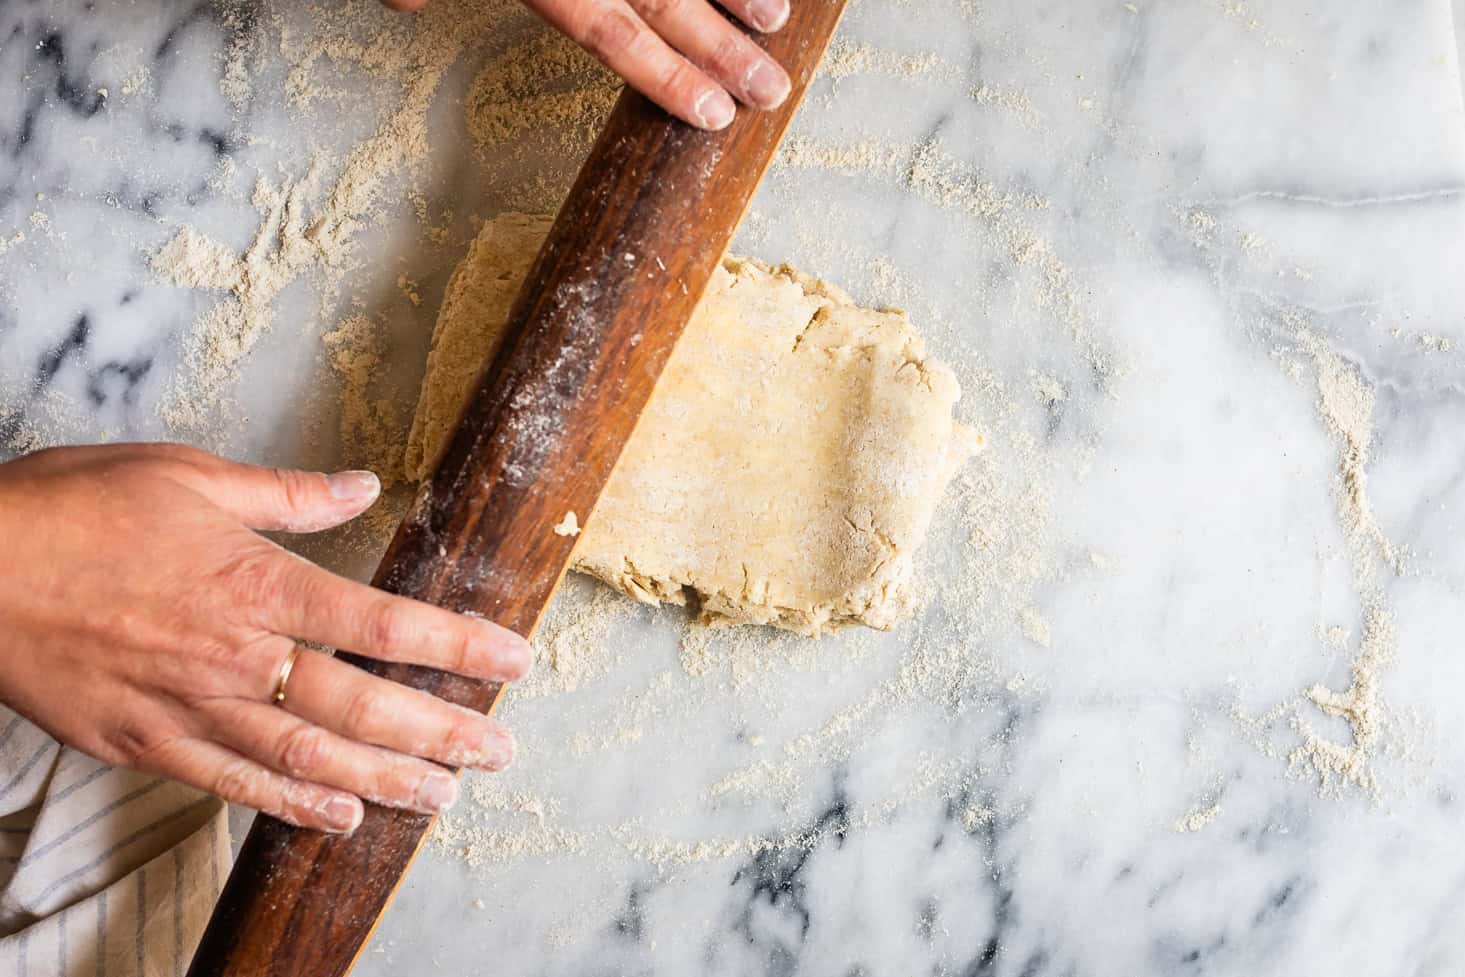
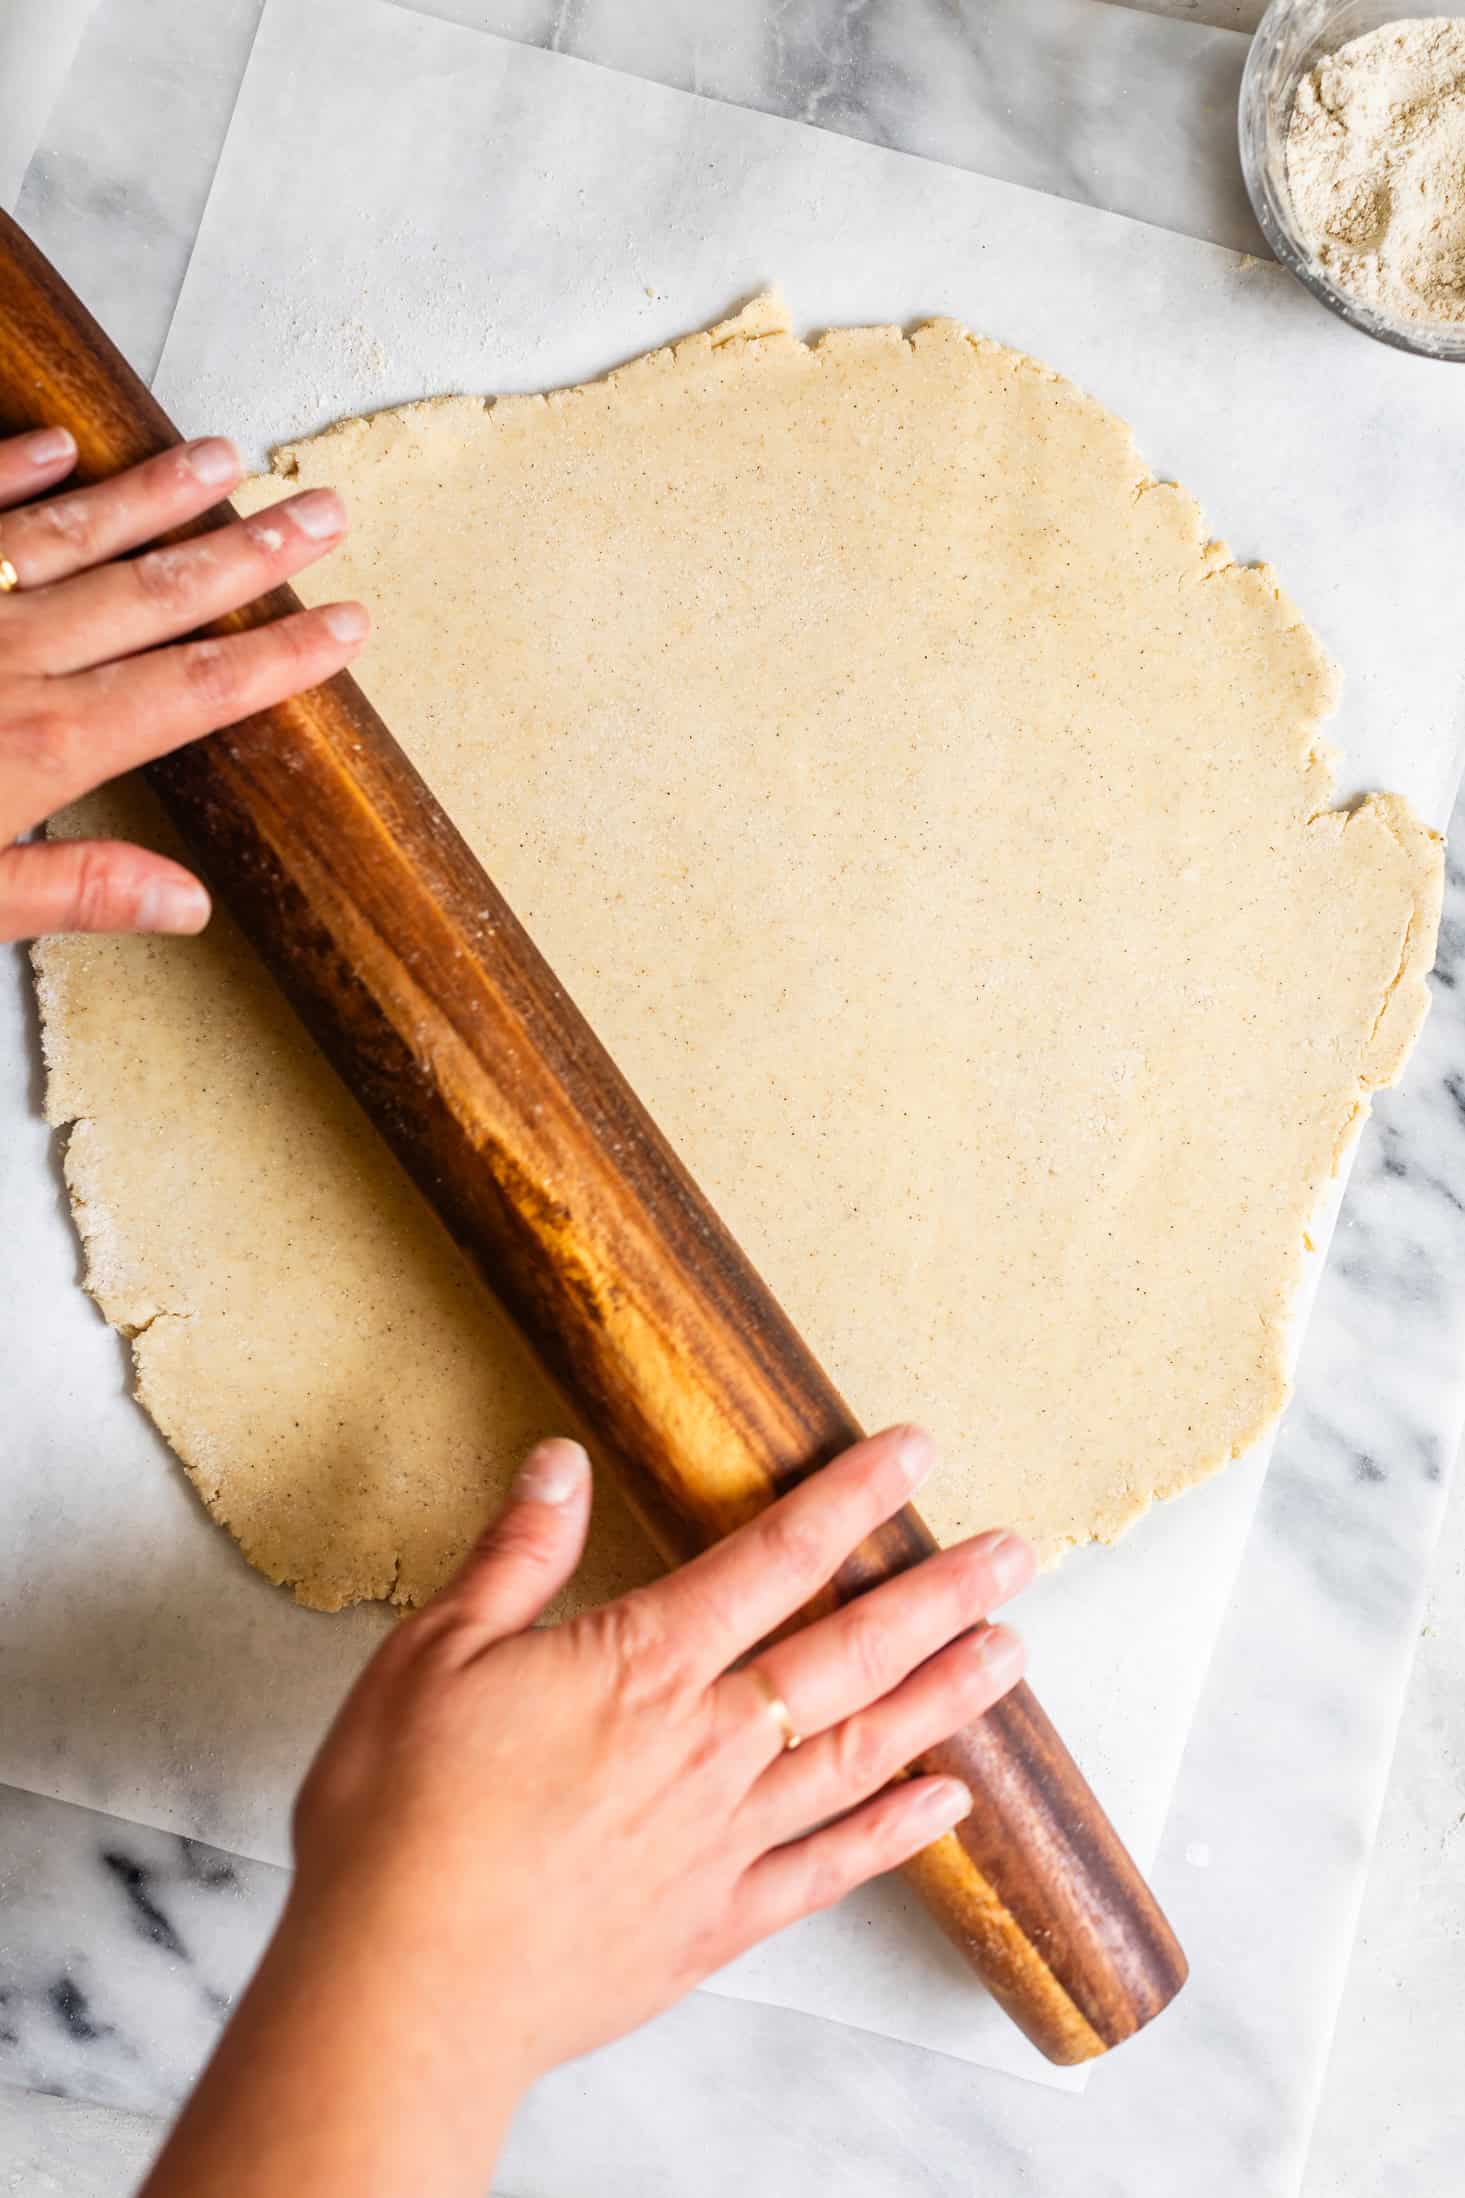
Place the chilled pie dough on a surface, lightly floured with sorghum flour. Brush the top with sorghum flour as well, to prevent the rolling pin from sticking.
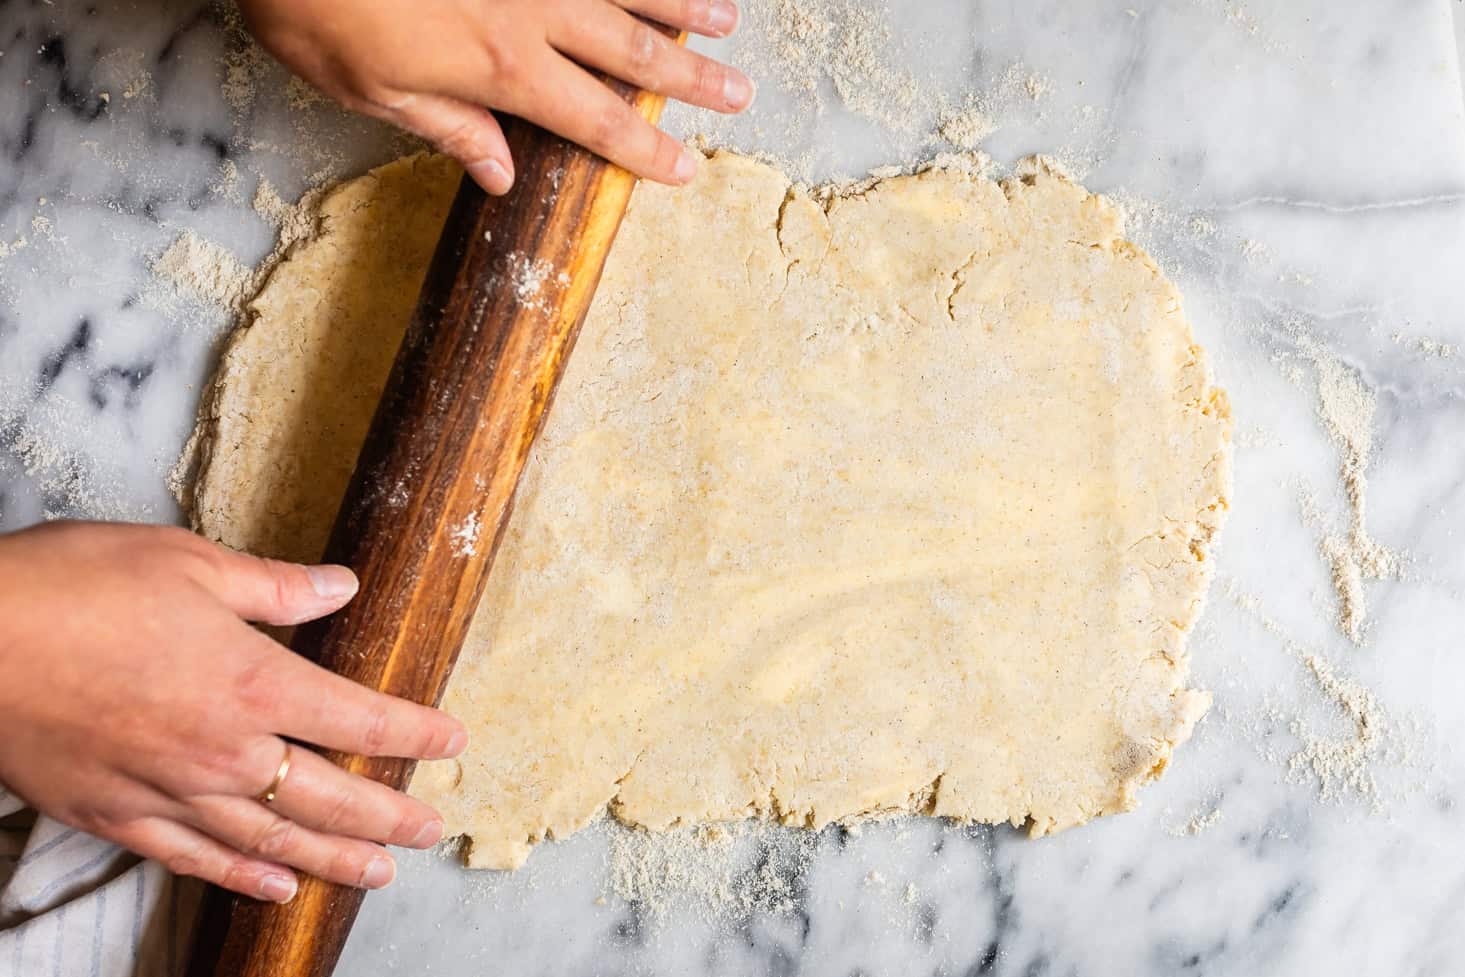
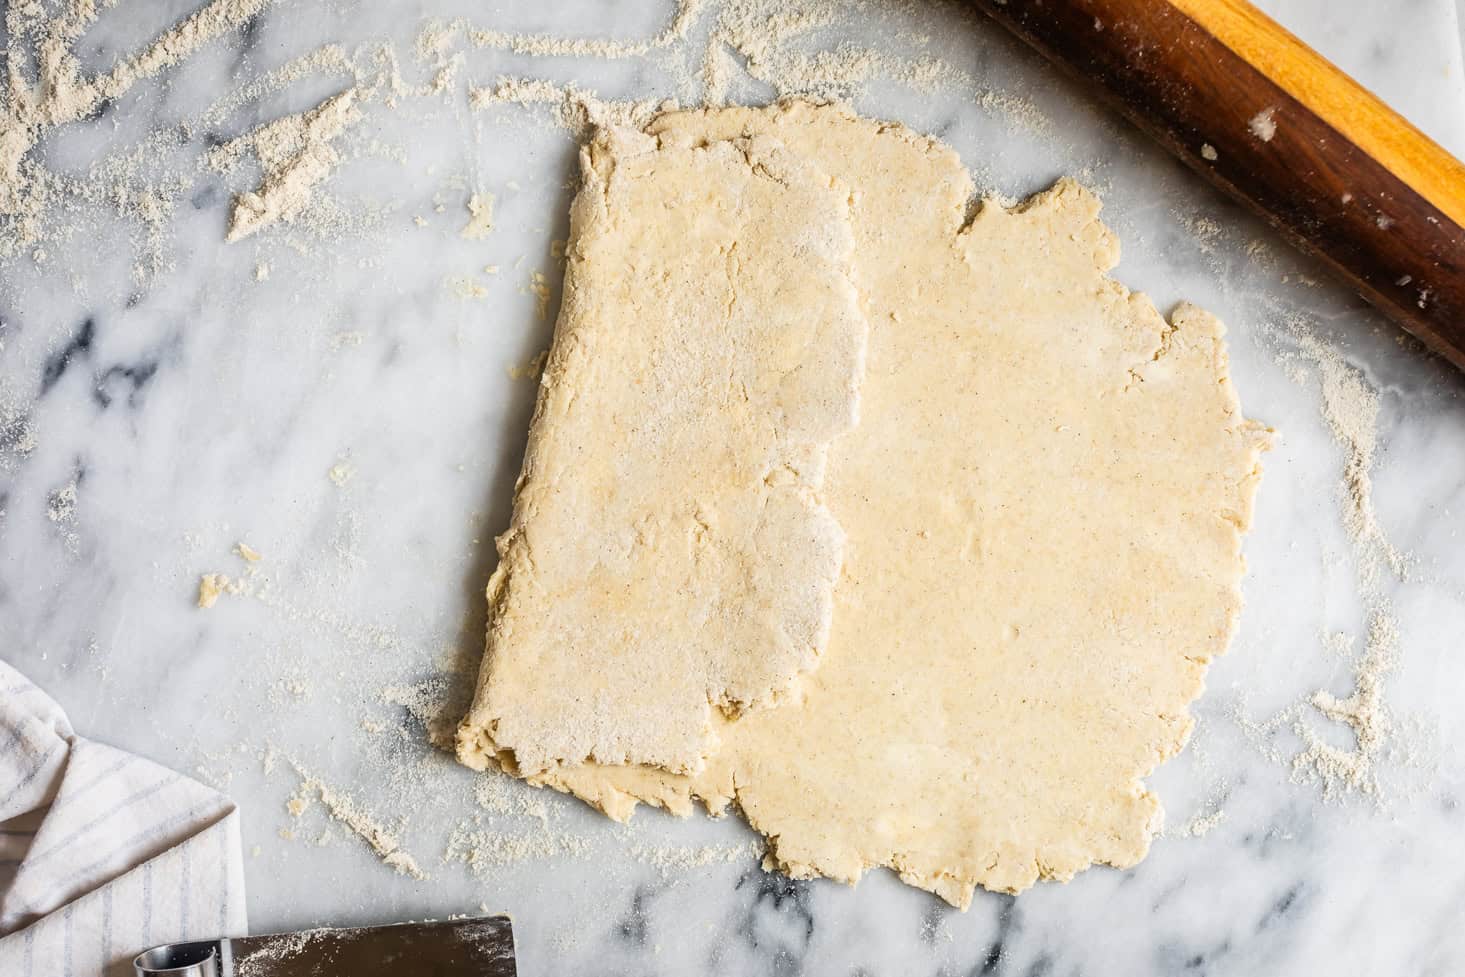
Roll the dough into a rectangle, about ¼-inch thick, lifting and flipping as you roll, and lightly dusting with more flour as need to prevent the dough from sticking.
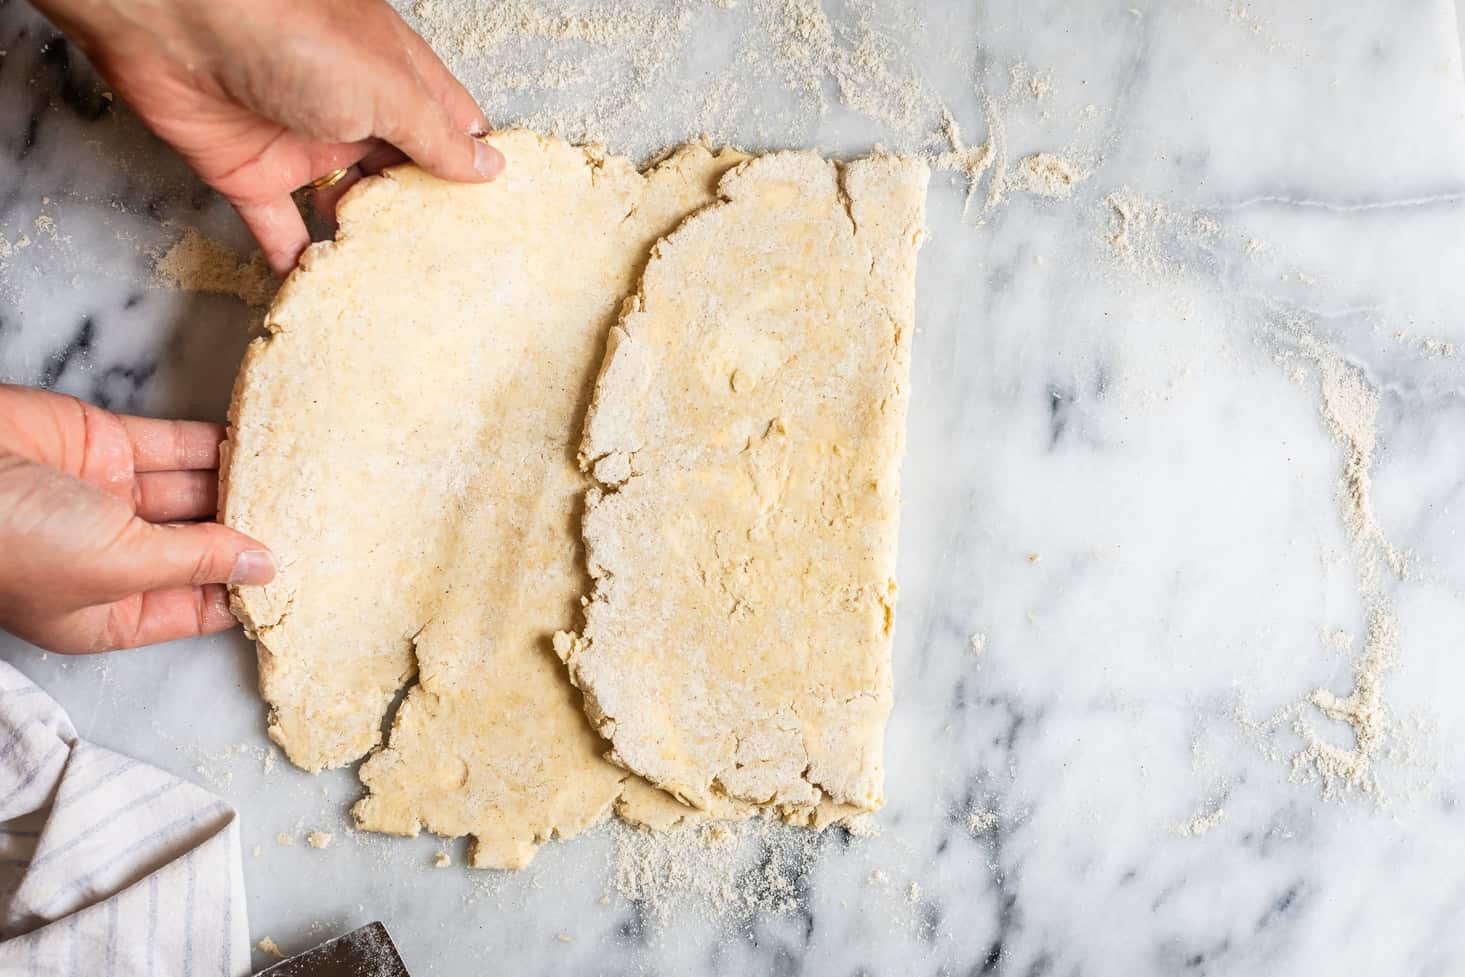
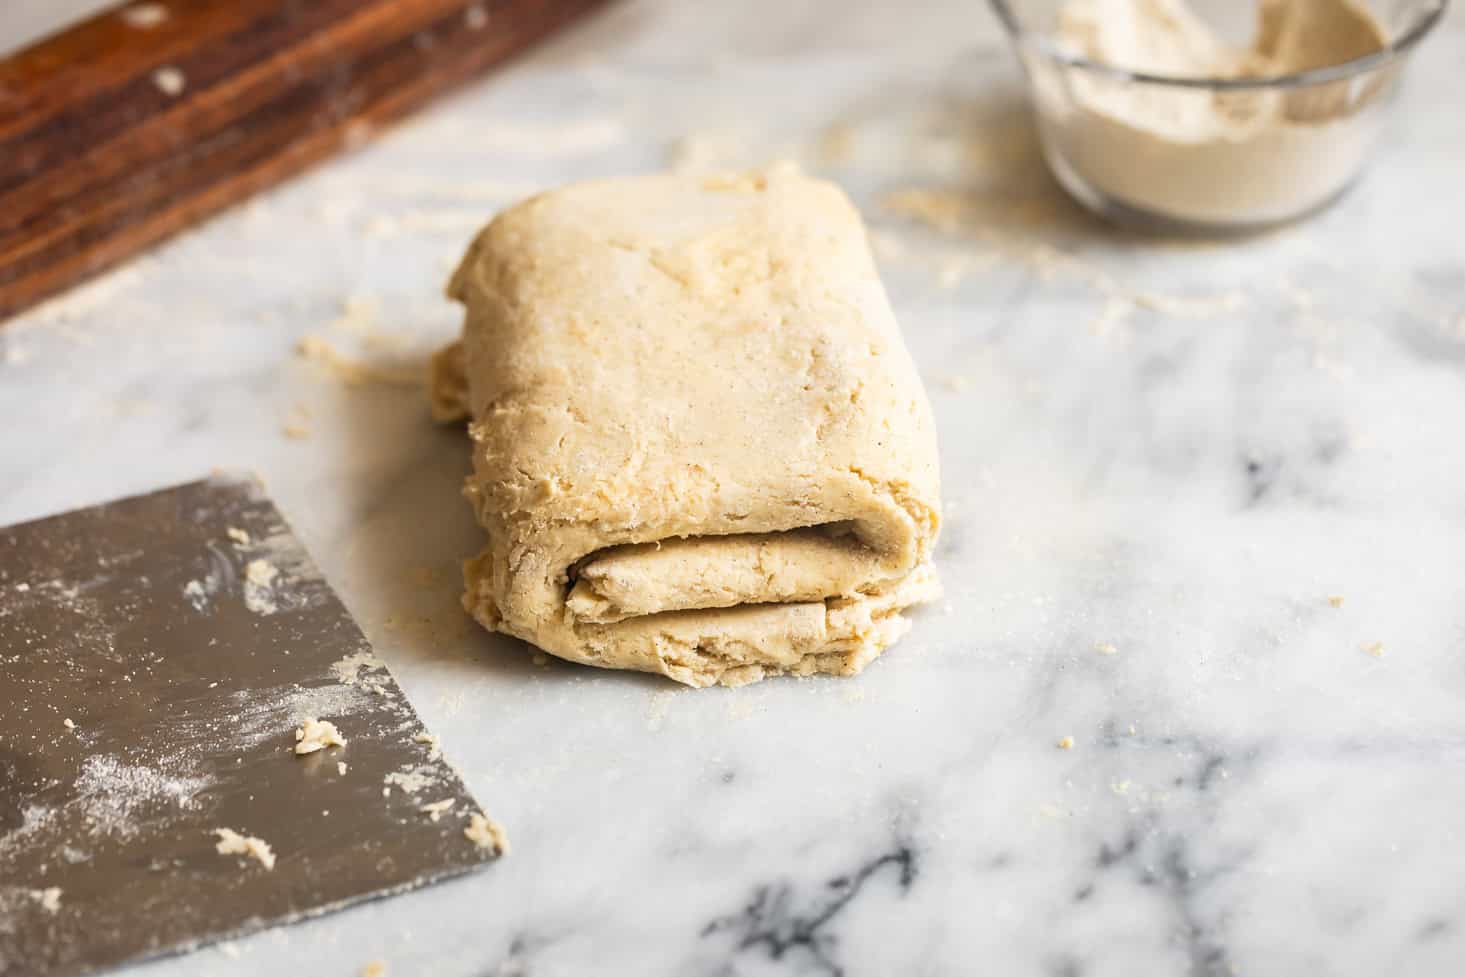
Fold it as you would a letter. First, fold ⅓ of the length of the dough over the top, using a bench scraper or knife to help remove the dough from the surface, as needed.
Repeat by folding the other ⅓ of the length of dough over the top as you would a letter.

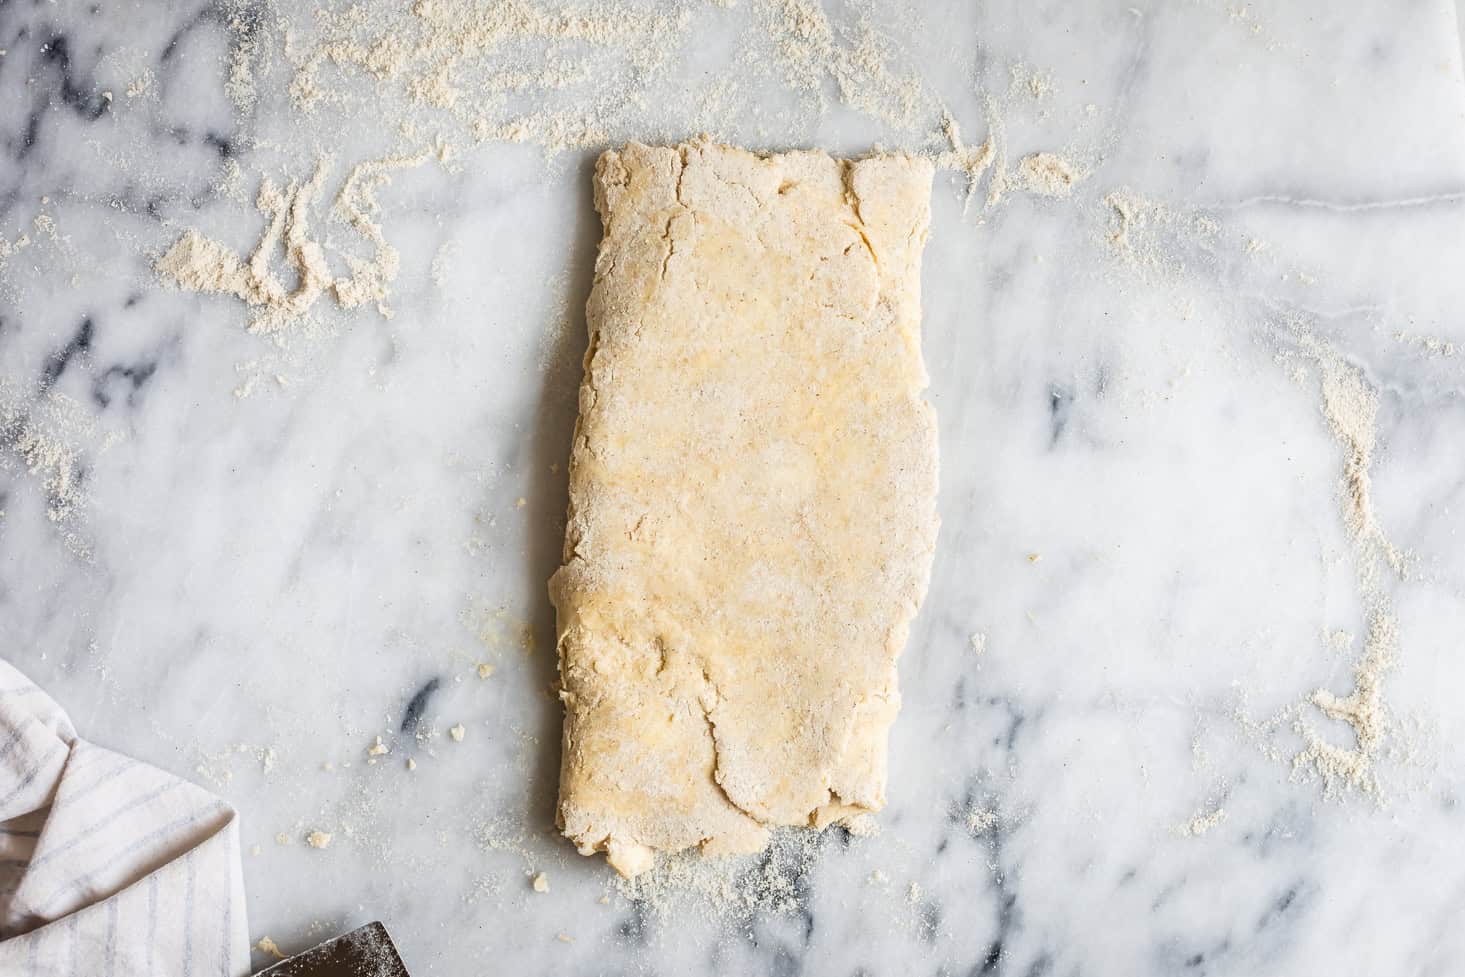
Repeat the tri-fold one more time, this time folding ⅓ of the height of the dough over top.
Repeat once more, folding the remaining ⅓ of the dough over top.
Repeat the whole letter fold process once more. Dust lightly with sorghum flour and roll the dough out again.
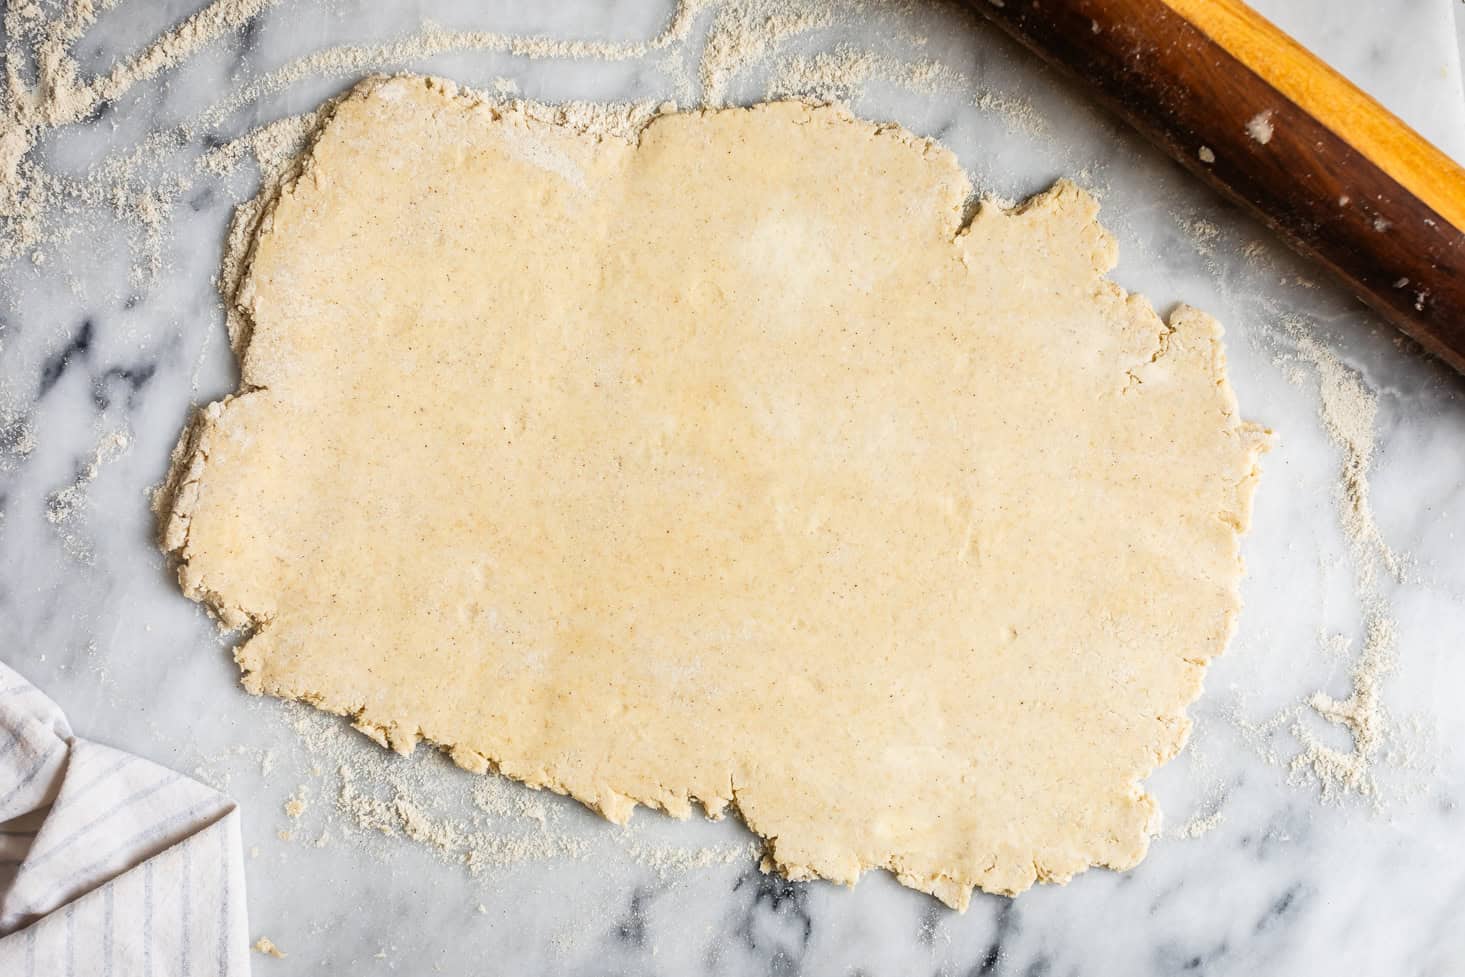
Roll into another rectangle, about ¼-inch thick.
Repeat the tri-fold letter fold length-wise by folding ⅓ of the length of the dough over top.
Fold the other ⅓ of the length of the dough over top.
Repeat the letter fold again, as you did above, creating a tri-fold along the height of the dough.
Wrap the dough in plastic again and chill for at least another 30 minutes or up to a week in the fridge.
How to Roll out and Assemble Gluten-Free Pie Dough
When your dough is chilled, you're ready to roll it out into your ultra-flaky pie crust!
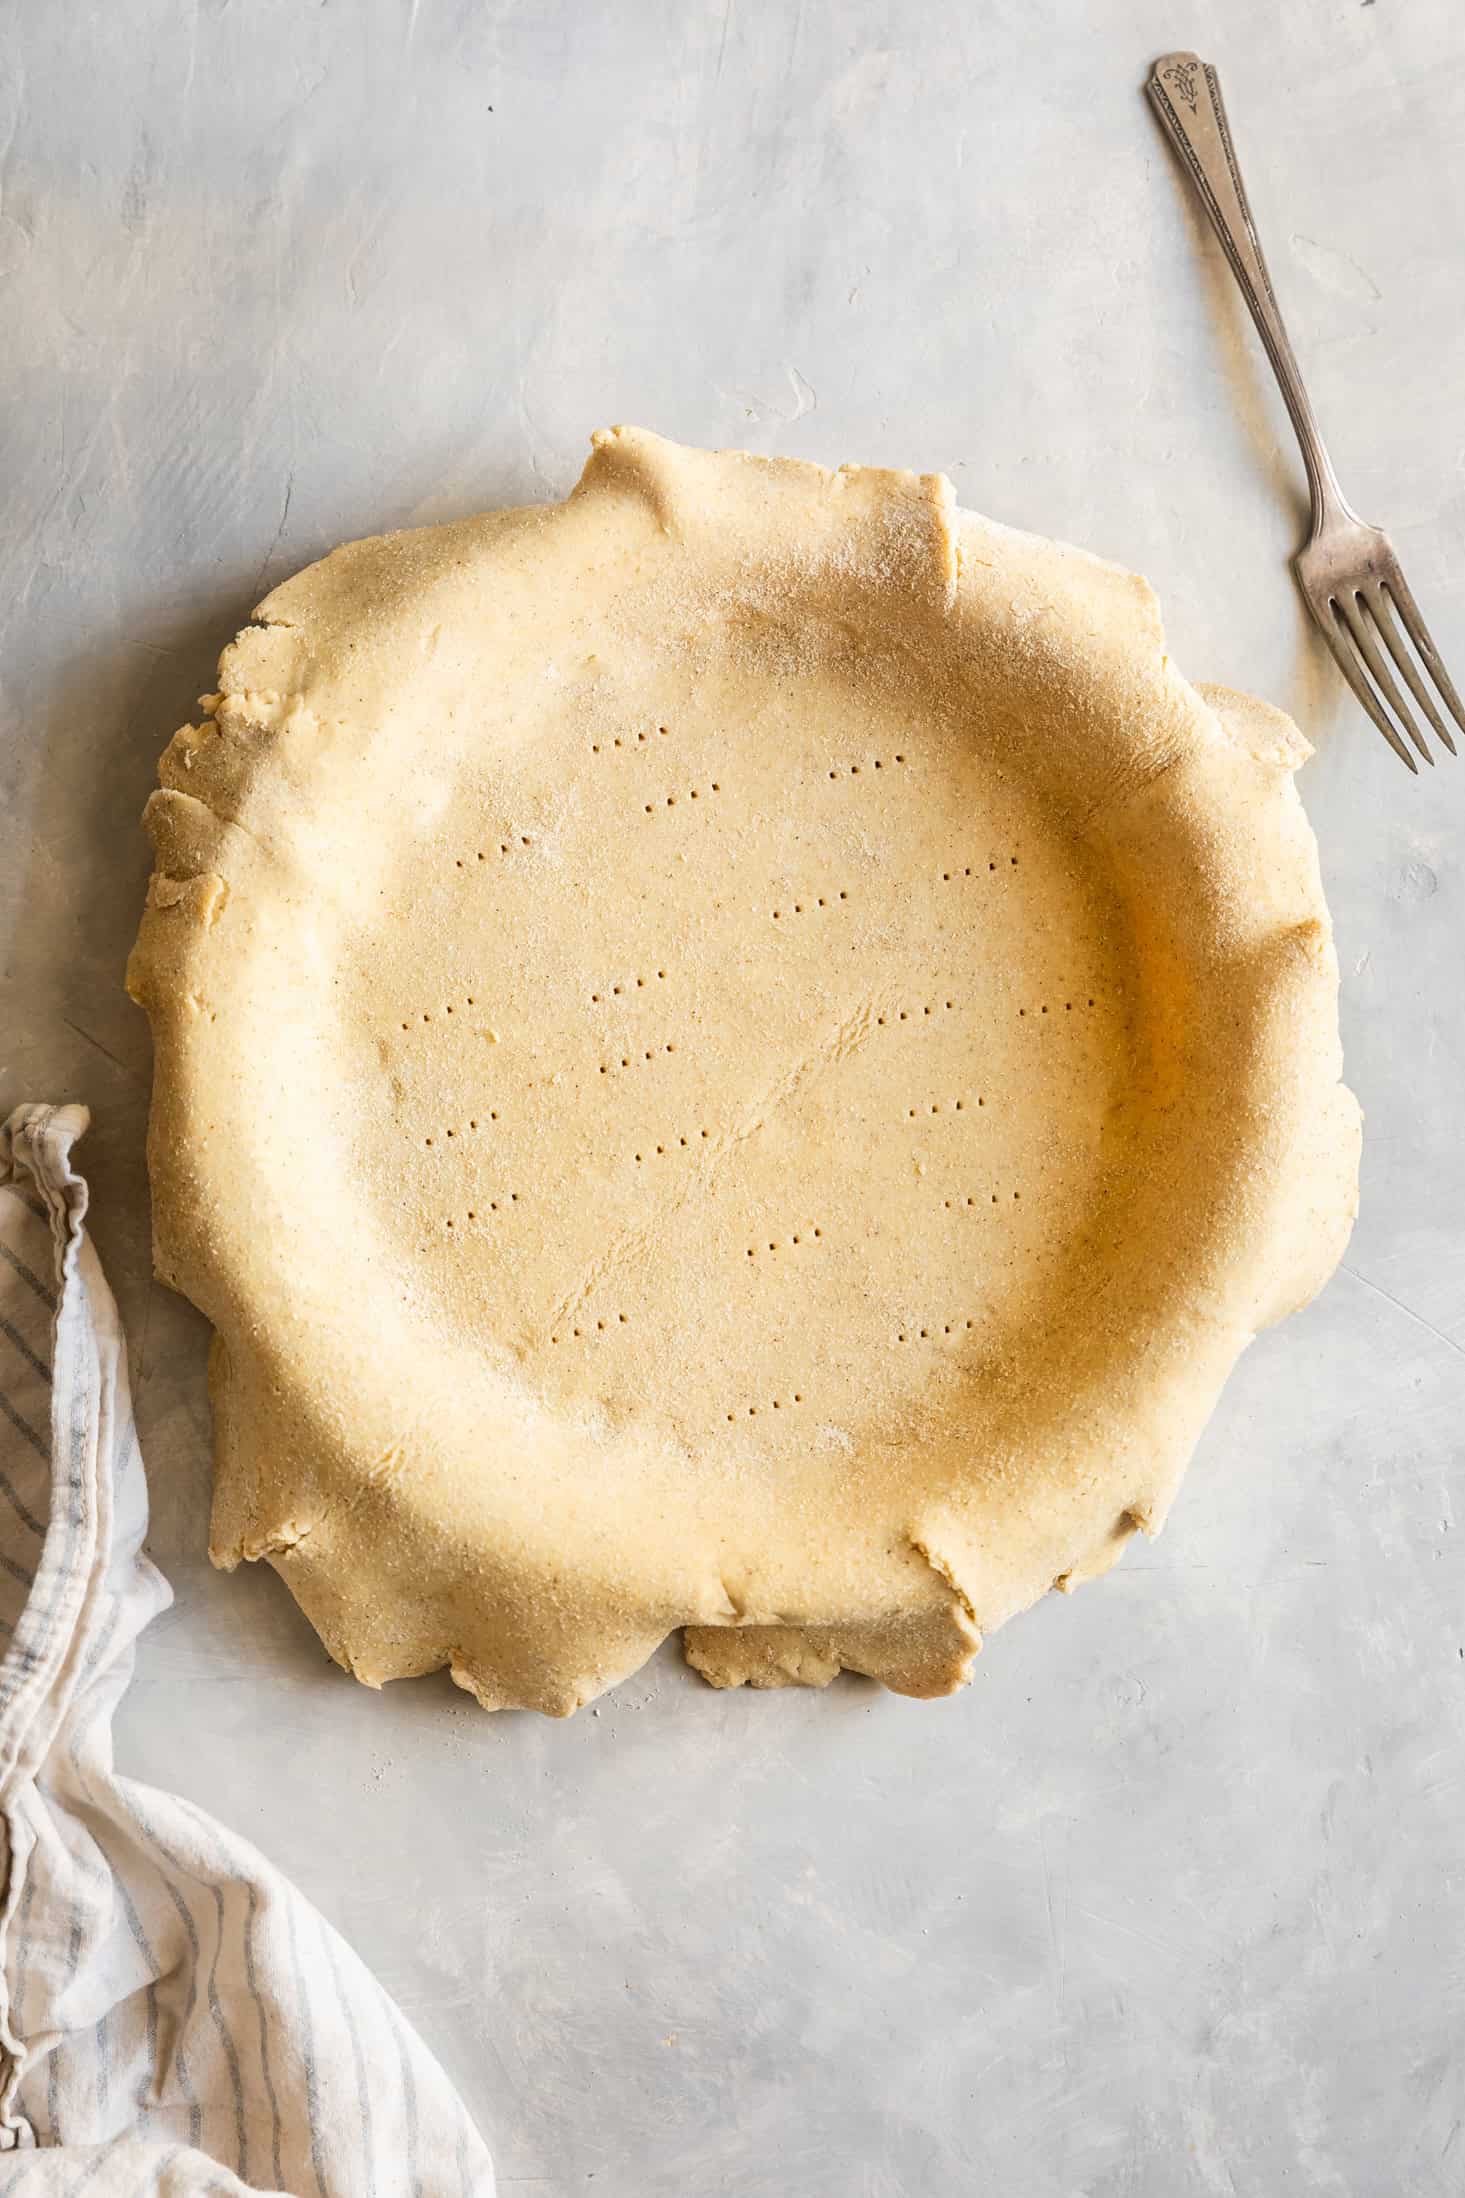
Lightly dust a sheet of parchment paper with sorghum flour. Remove the dough from the fridge (one disc at a time, if you're doing a double crust) and let it rest for 5 minutes. Carefully roll into a 12-inch round on the floured parchment paper, dusting with sorghum flour and flipping or rotating the dough to keep it from sticking, and repairing any cracks as you roll.
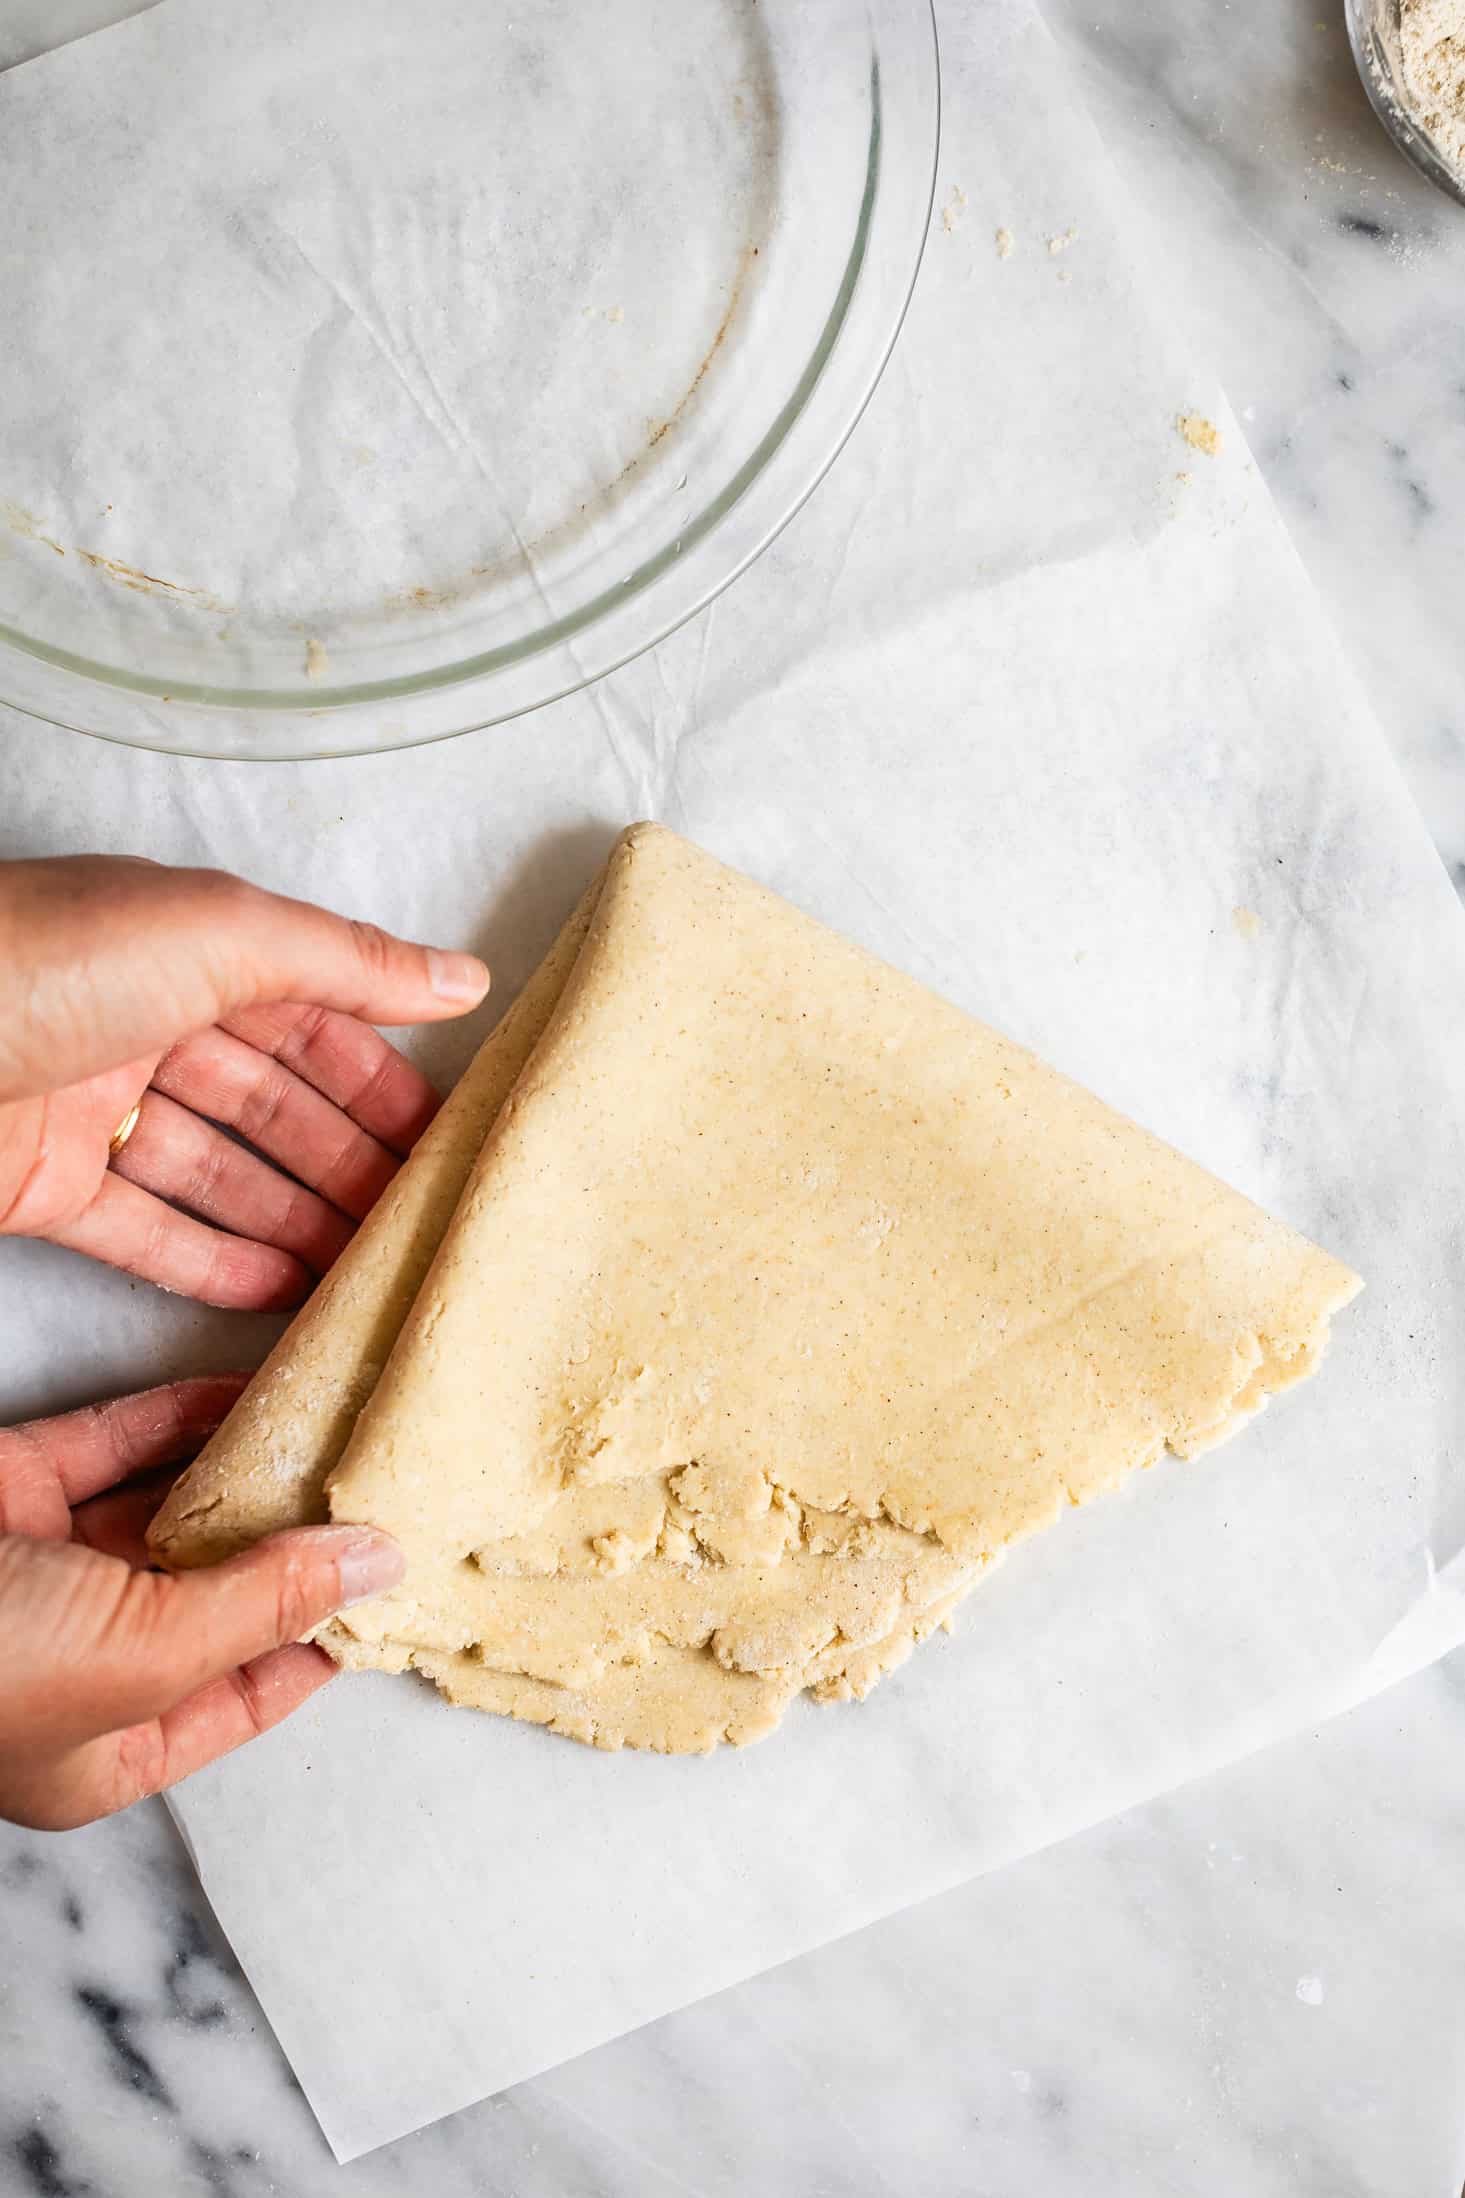
Lightly dust the top of the dough with sorghum flour, then lightly fold it in half and then in half again to form a triangle. Alternatively, you can use the parchment paper to invert the pie dough round into the pie pan, then remove the parchment paper.
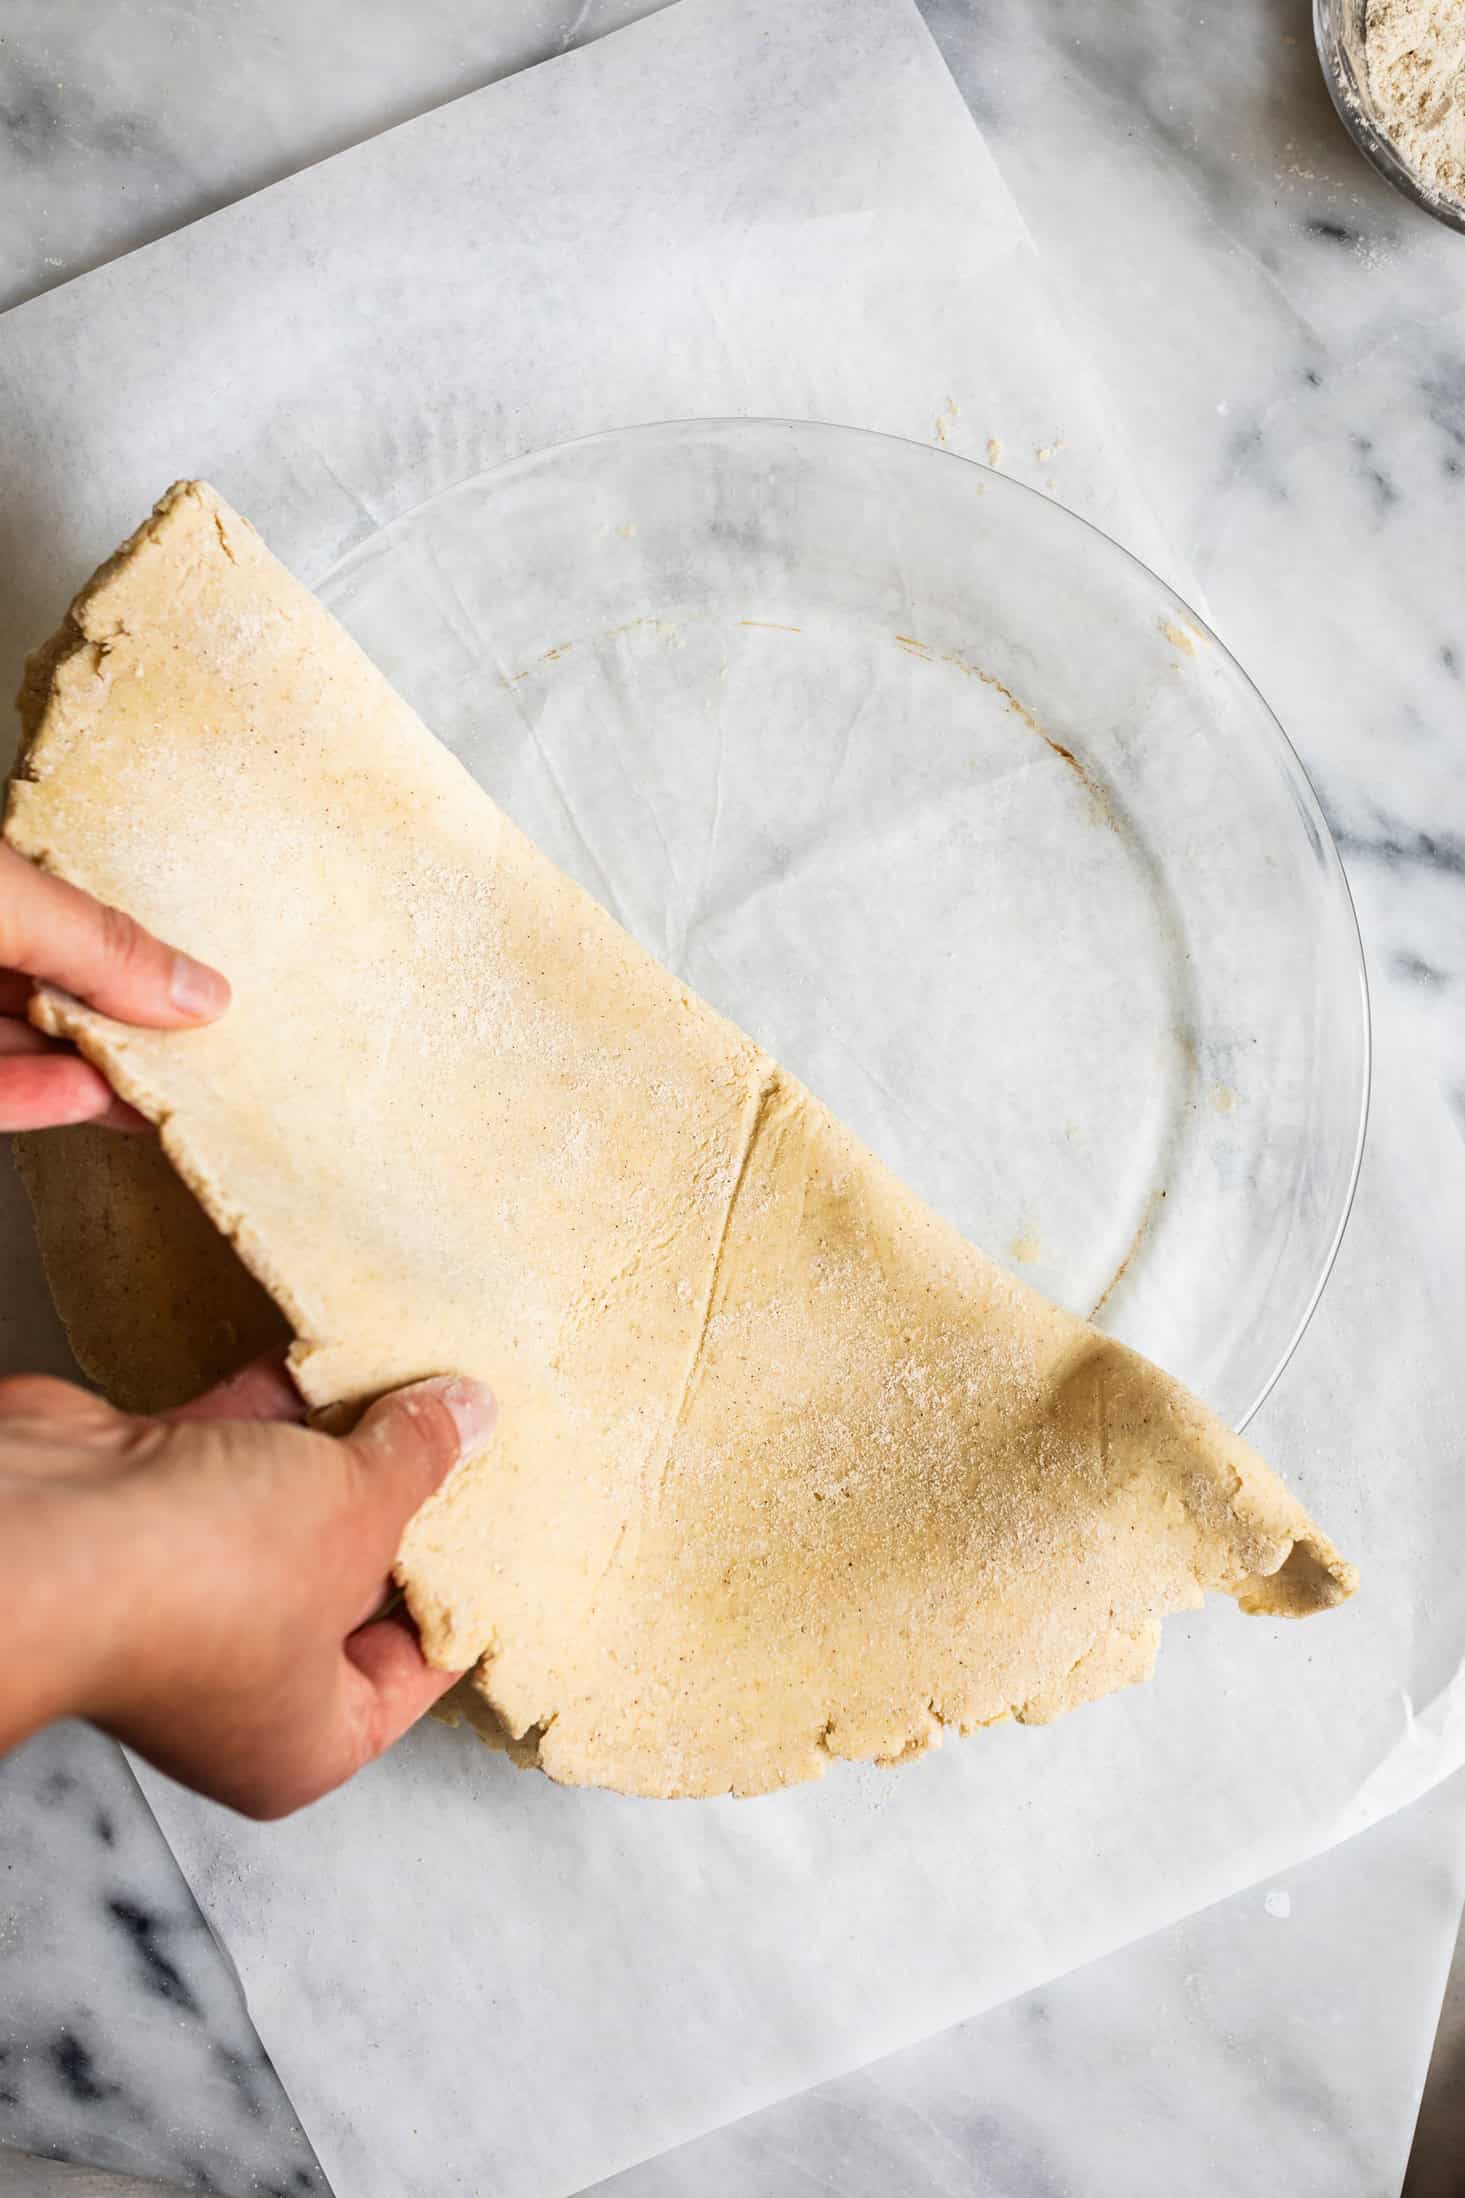
Transfer the dough to your pie pan, placing the point of the triangle in the center of the pan, then carefully unfold it into the pie pan.
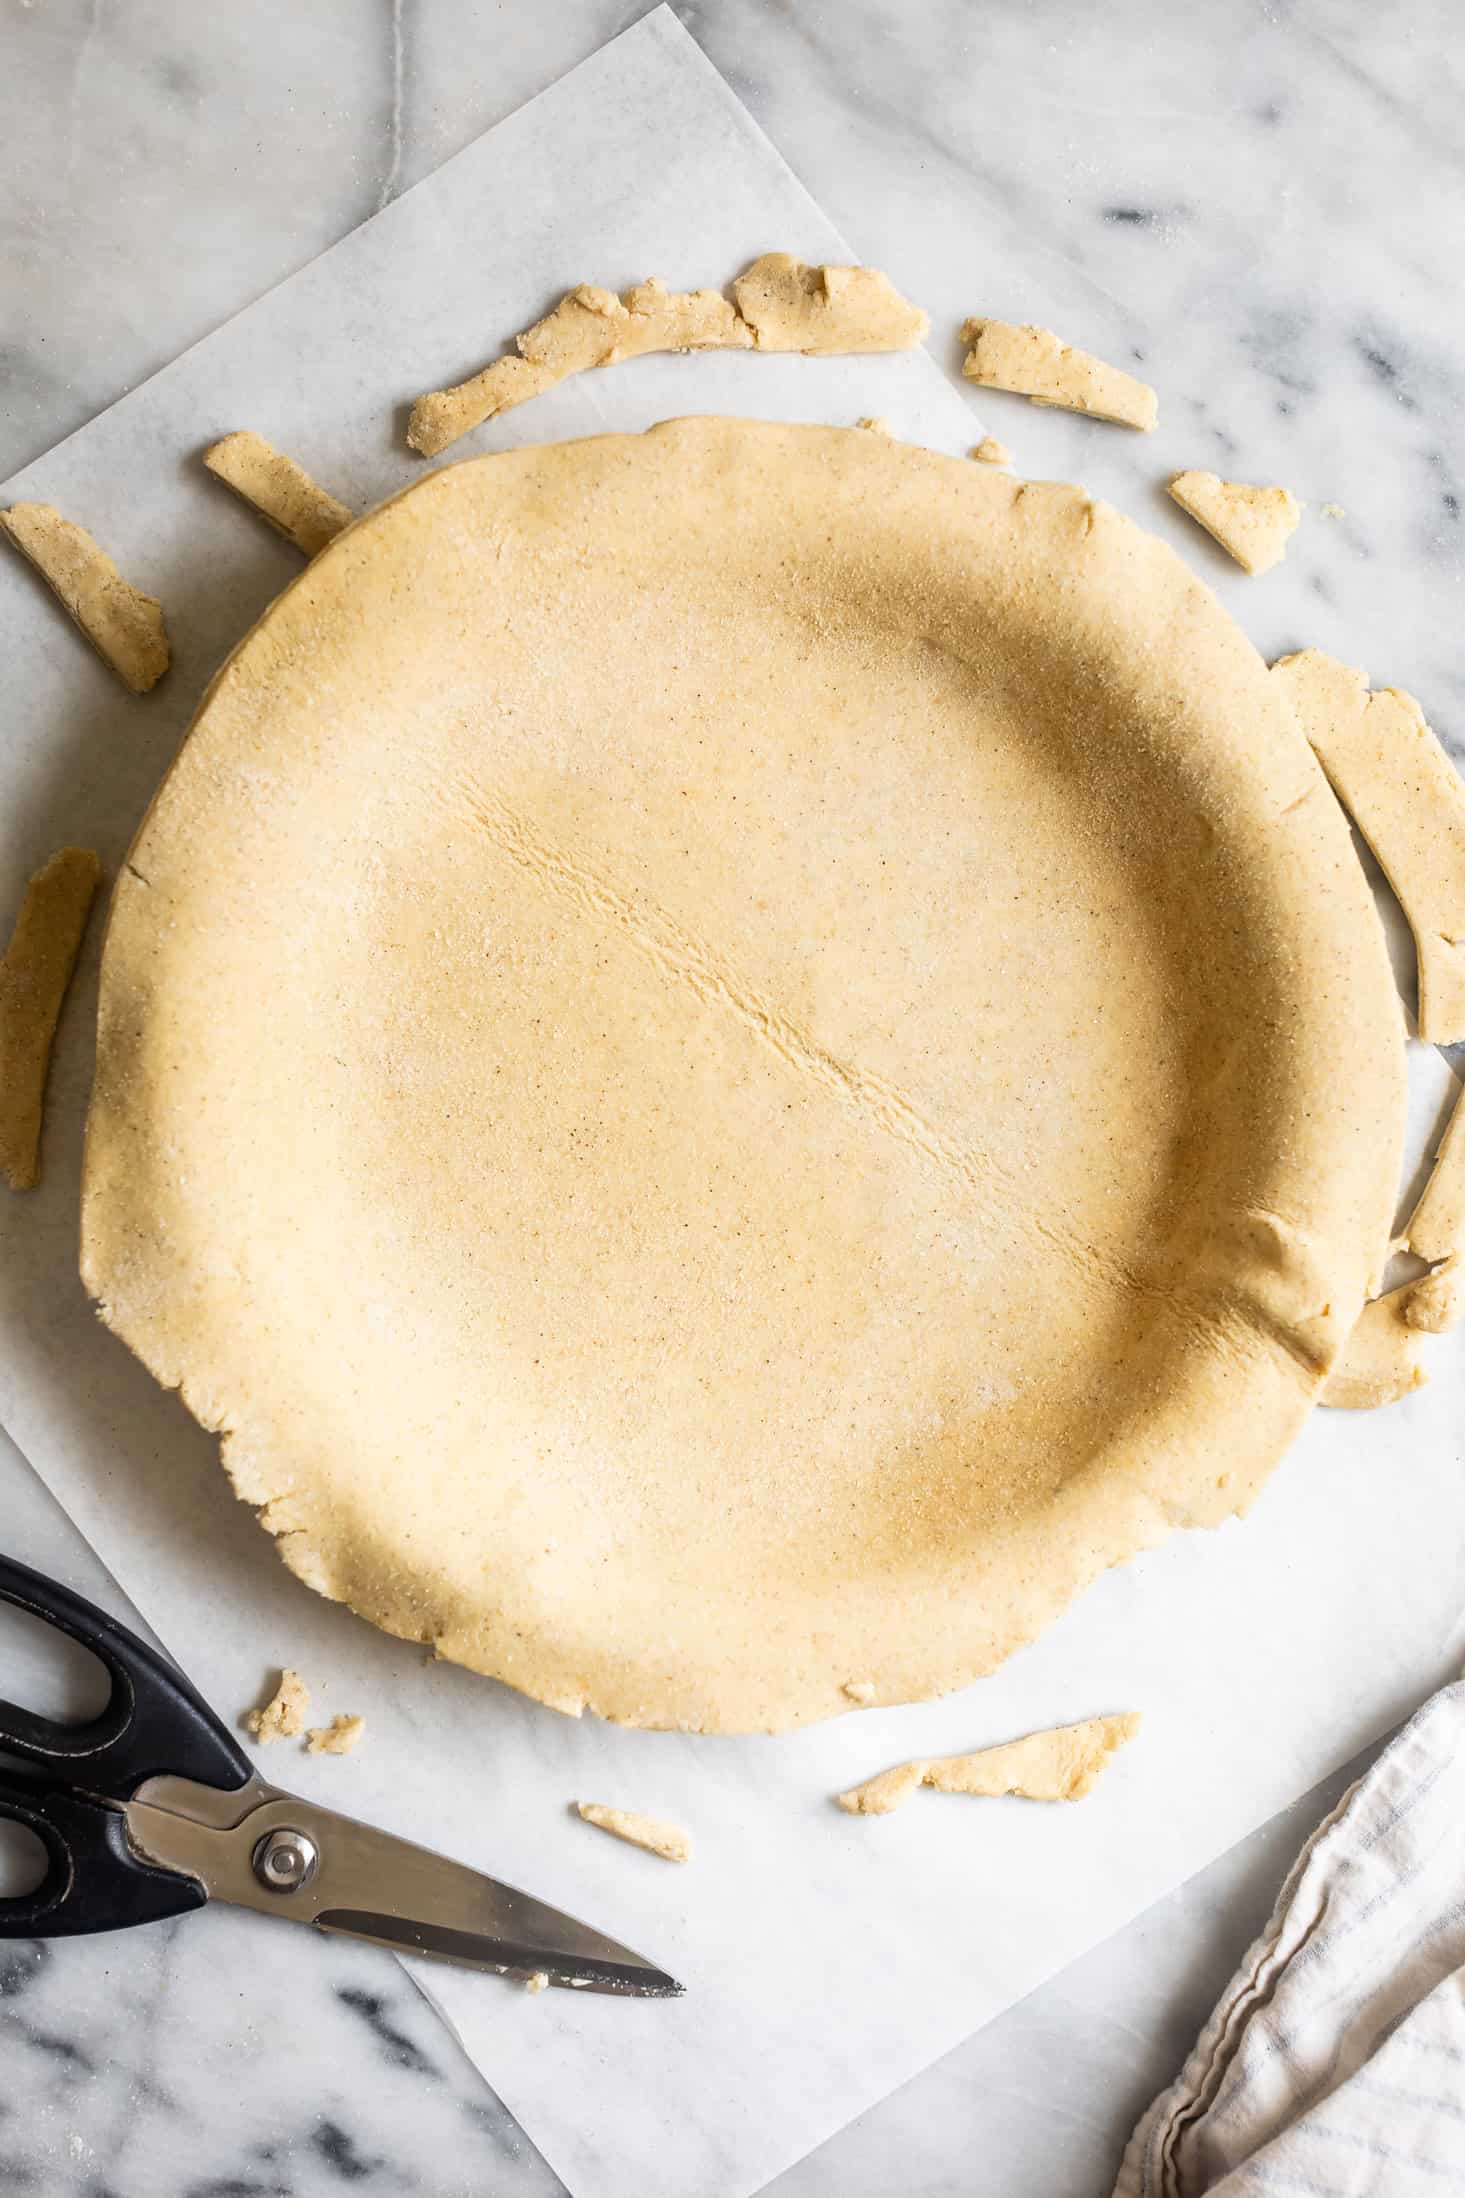
Gently pressing the dough down into the edges of the pan.
For a single pie crust, trim the edges so there is just ½-to-¾-inch of overhang all around. Save the scraps in plastic wrap for decorations, if desired.
See below for preparing a double pie crust.
Blind Baking Gluten-Free Pie Crust
Depending on the type of pie you're making, you may want to par-bake or blind-bake your pie crust. While both are the same technique, one refers to partially baking the crust while the other to fully baking the crust.
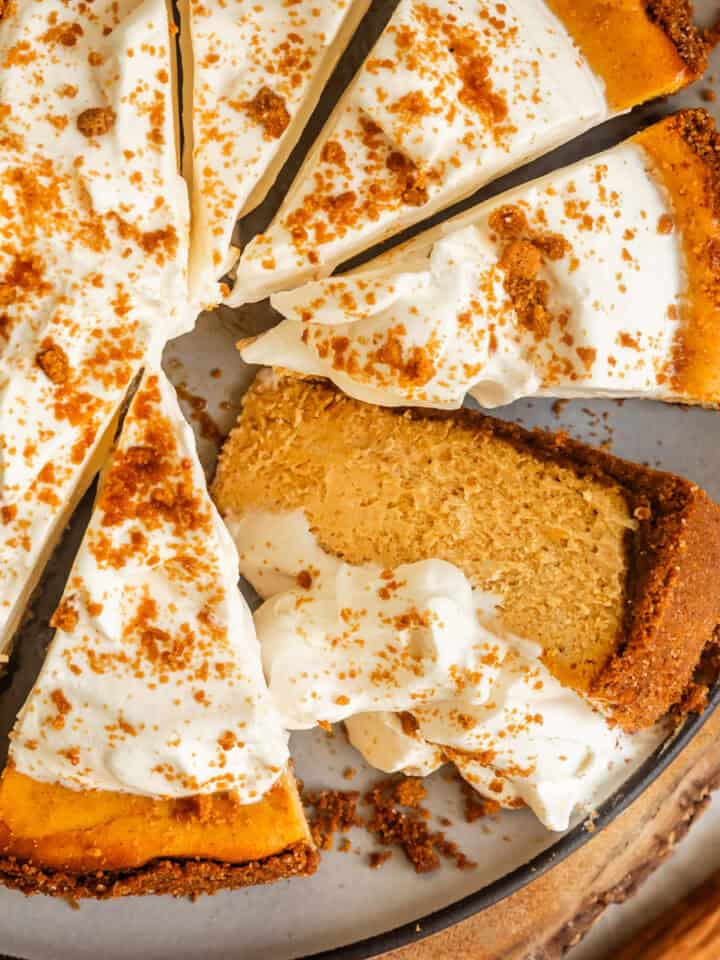
Par-baking is done when you're going to bake the filling, such as with a pumpkin pie or pecan pie. Par-baking gives the crust a head start in the oven before you add the filling and stick it back in the oven. This gives the crust enough time in the oven to crisp up without overcooking the filling and helps prevent soggy bottoms.
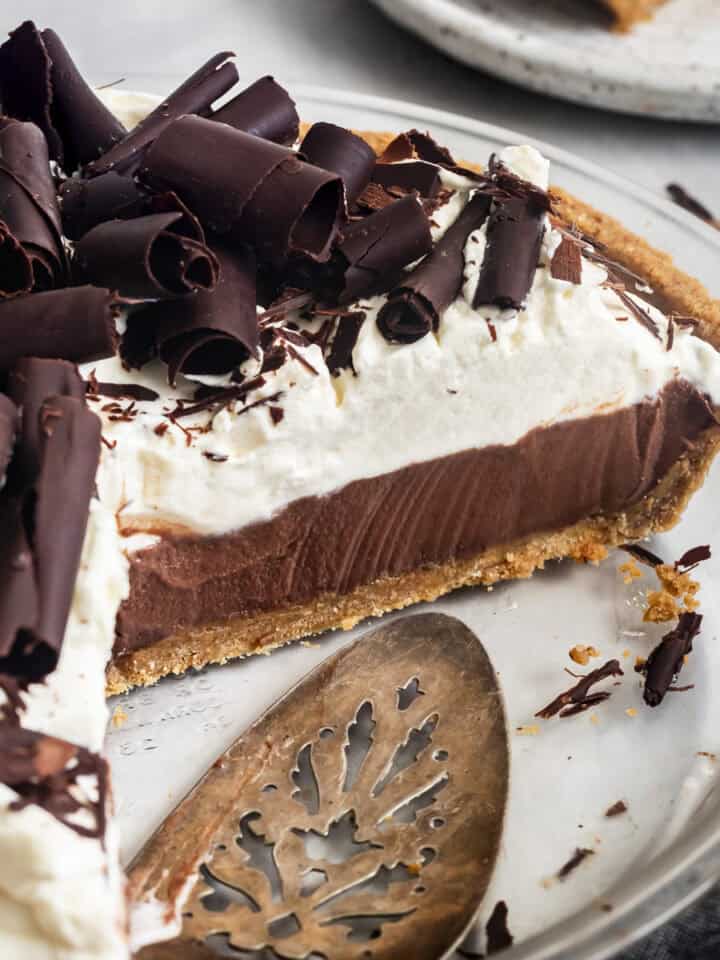
Blind baking is done when your pie has a no-bake filling, such as with a key lime pie. Blind baking allows the crust to fully bake and crisp up with flaky layers before adding the filling.
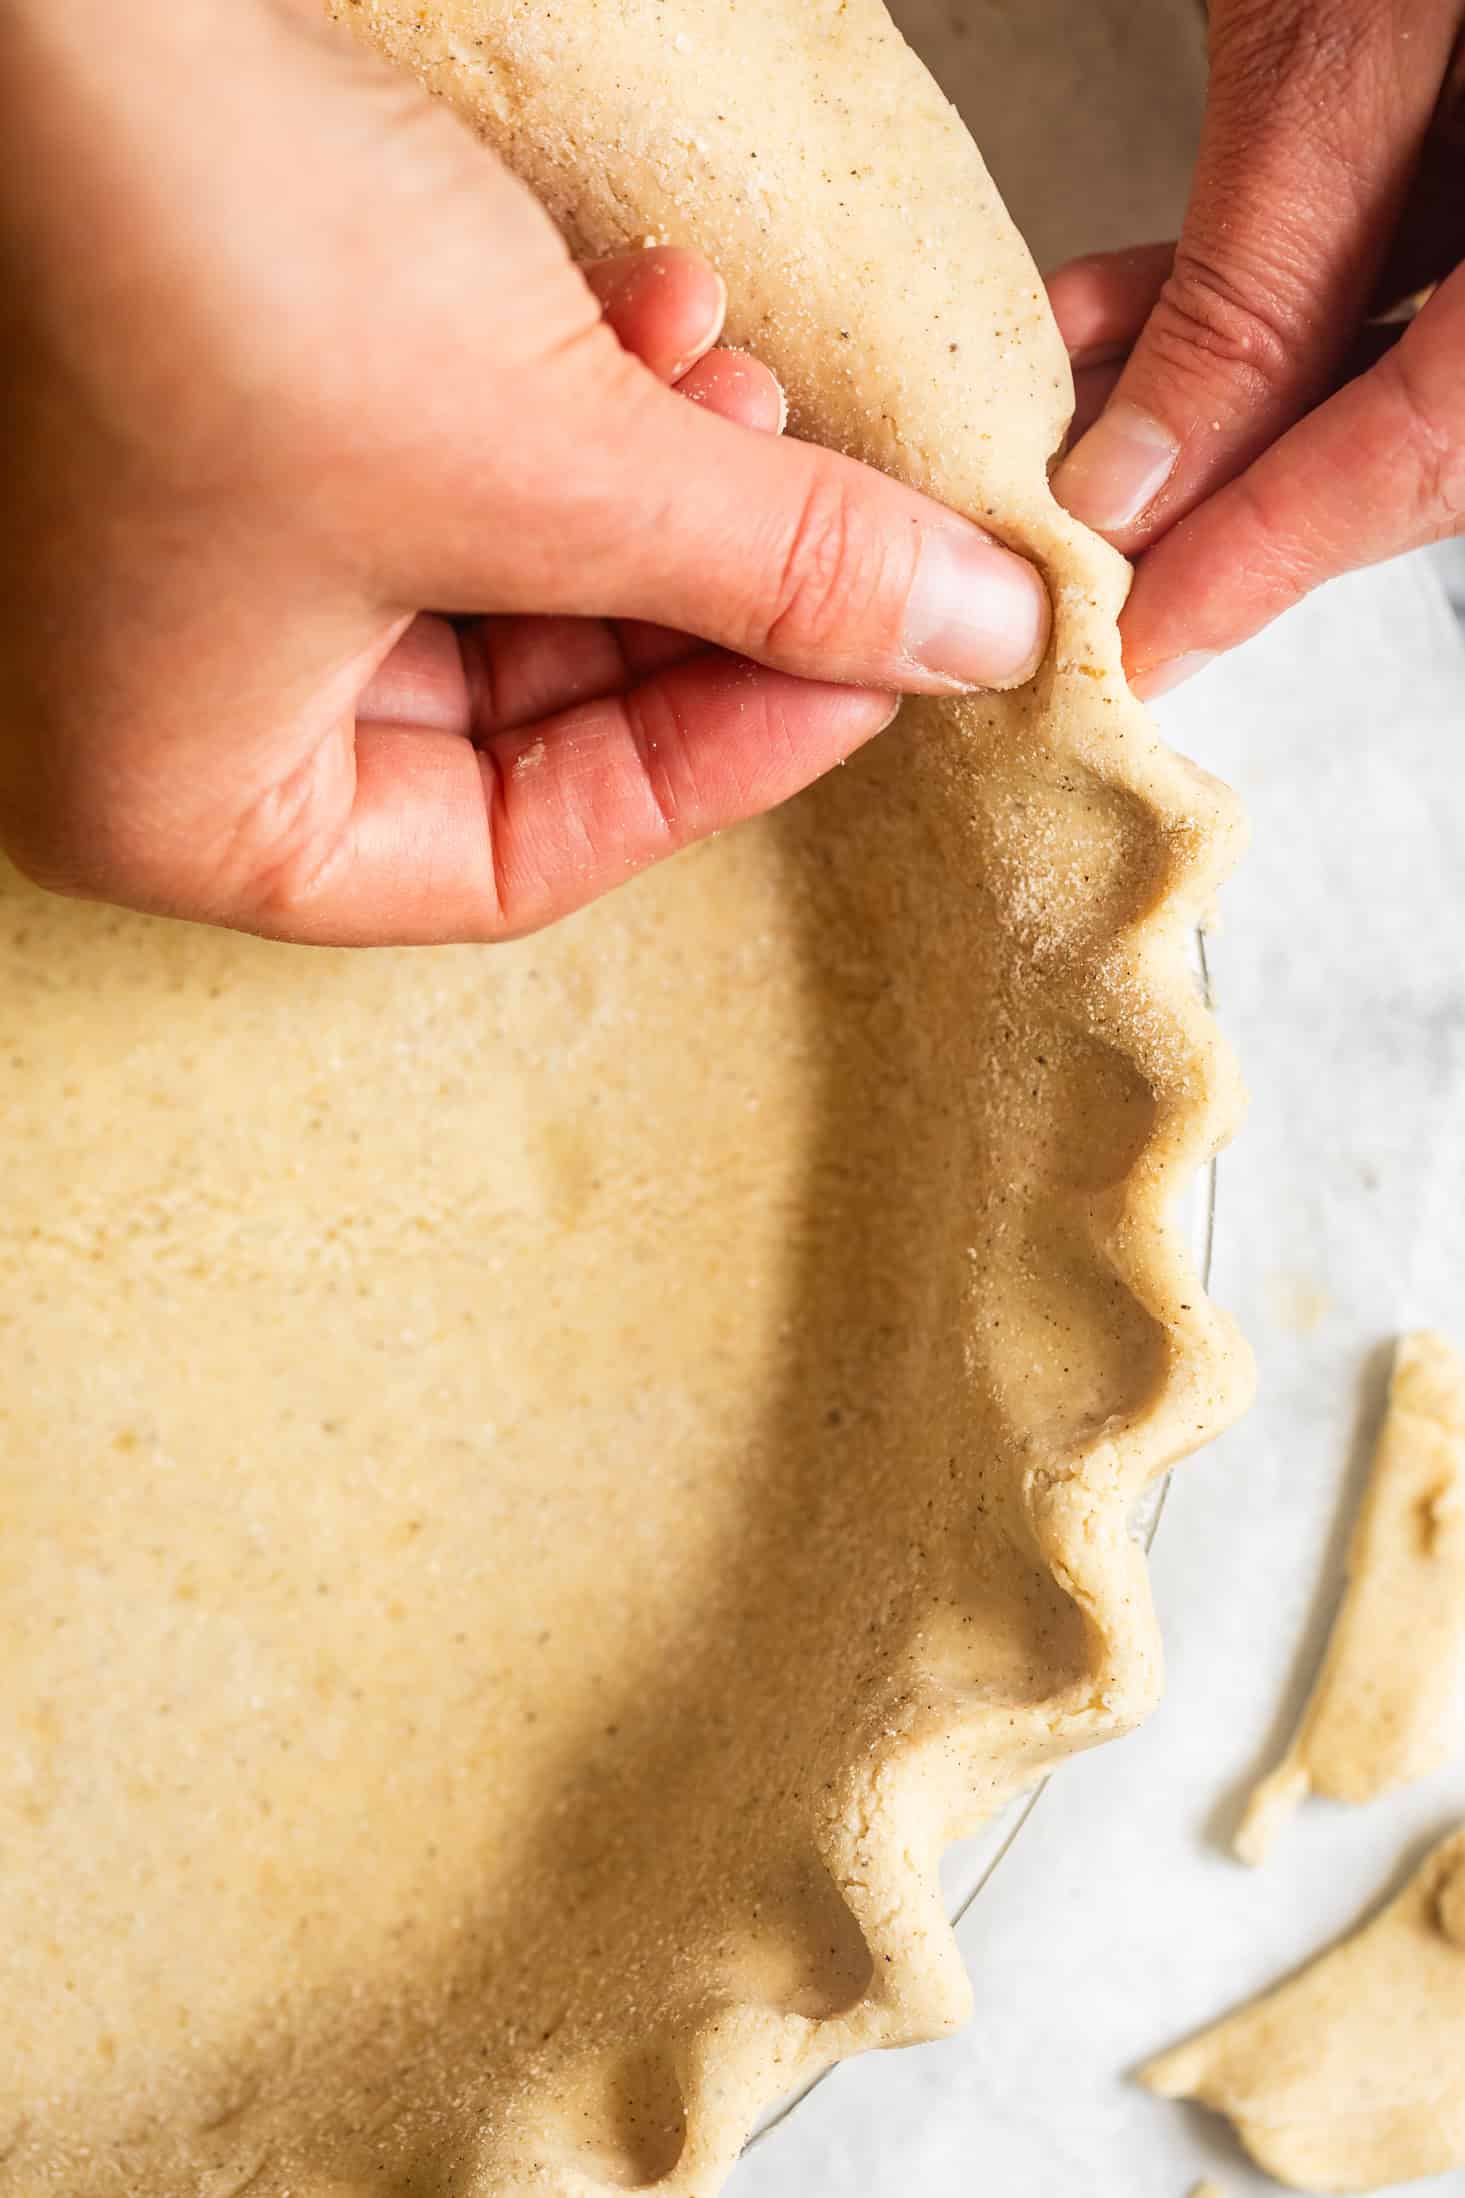
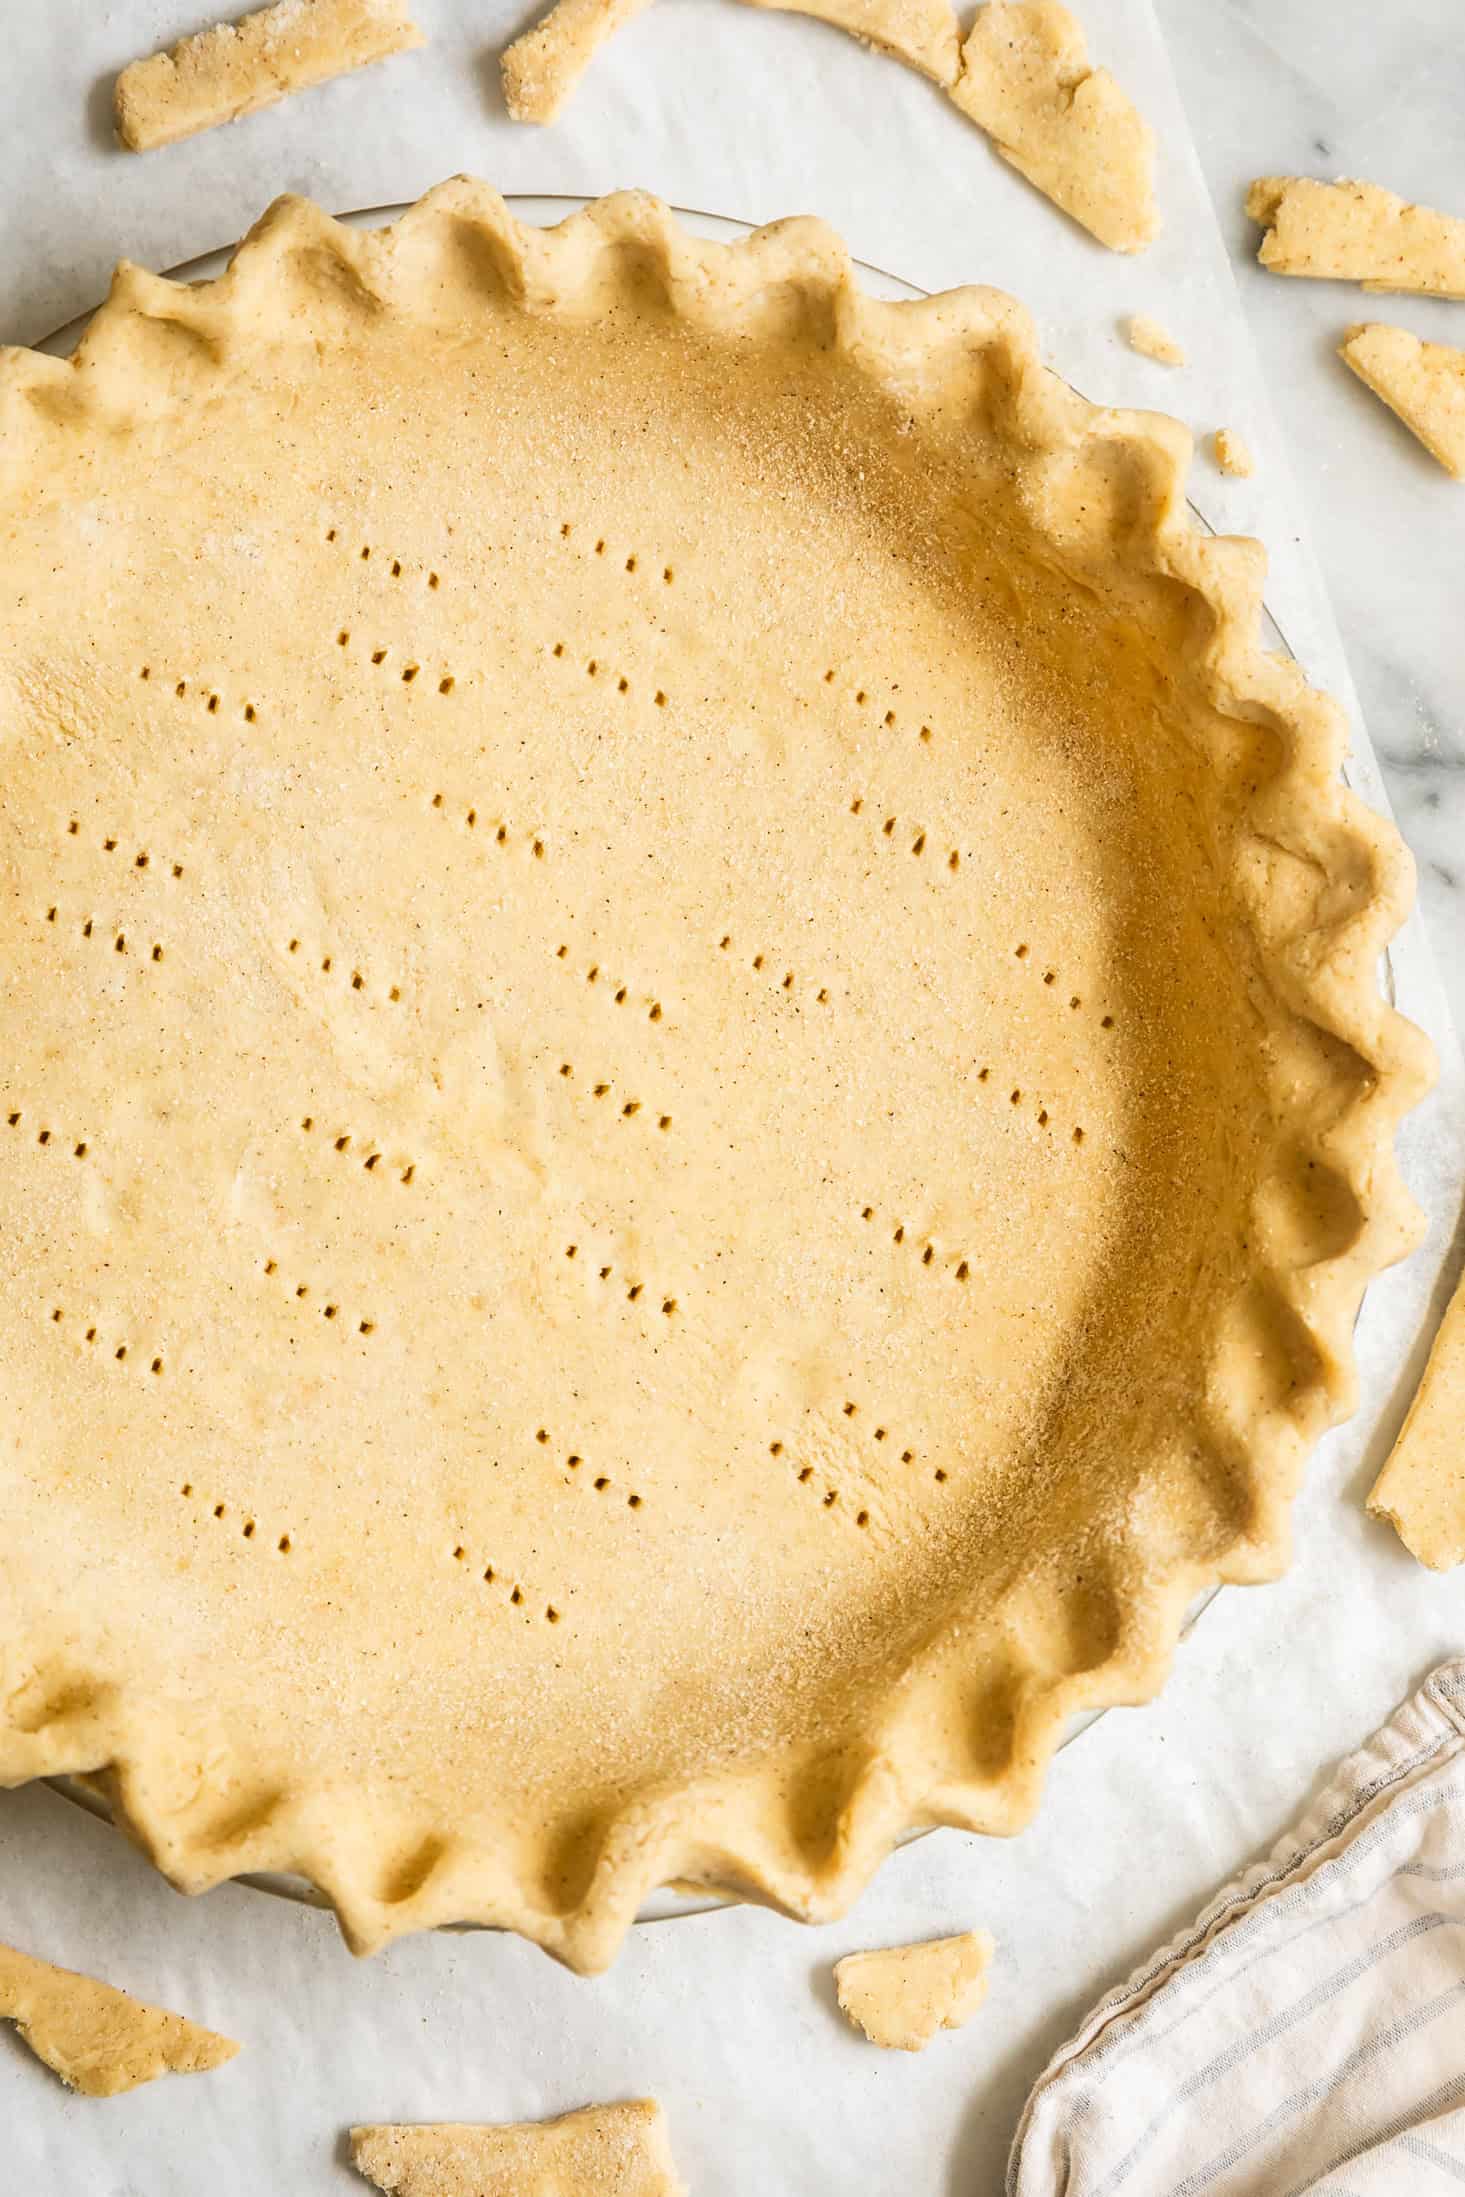
First, fold the overhang under and use your thumbs and index finger to crimp the edges of the pie into a fluted pattern.
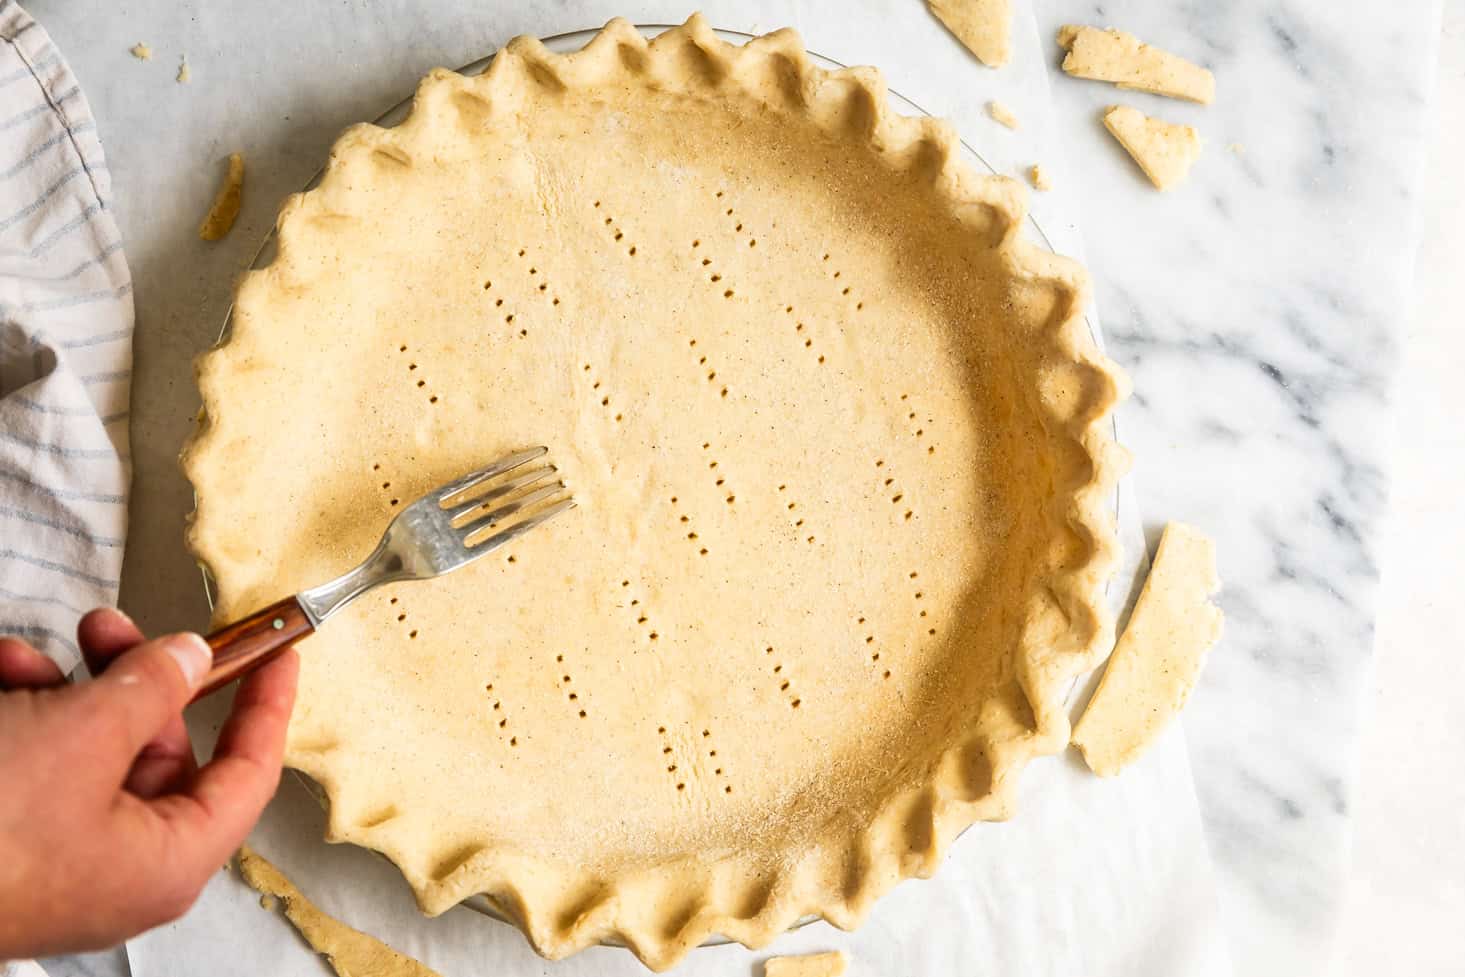
Dock the bottom of the pie with a fork to prevent it from puffing up too much in the oven and chill in the fridge for at least another 30 minutes, or in the freezer for 10 minutes.
Meanwhile, preheat the oven to 425°F and place the rack on the bottom of the oven.
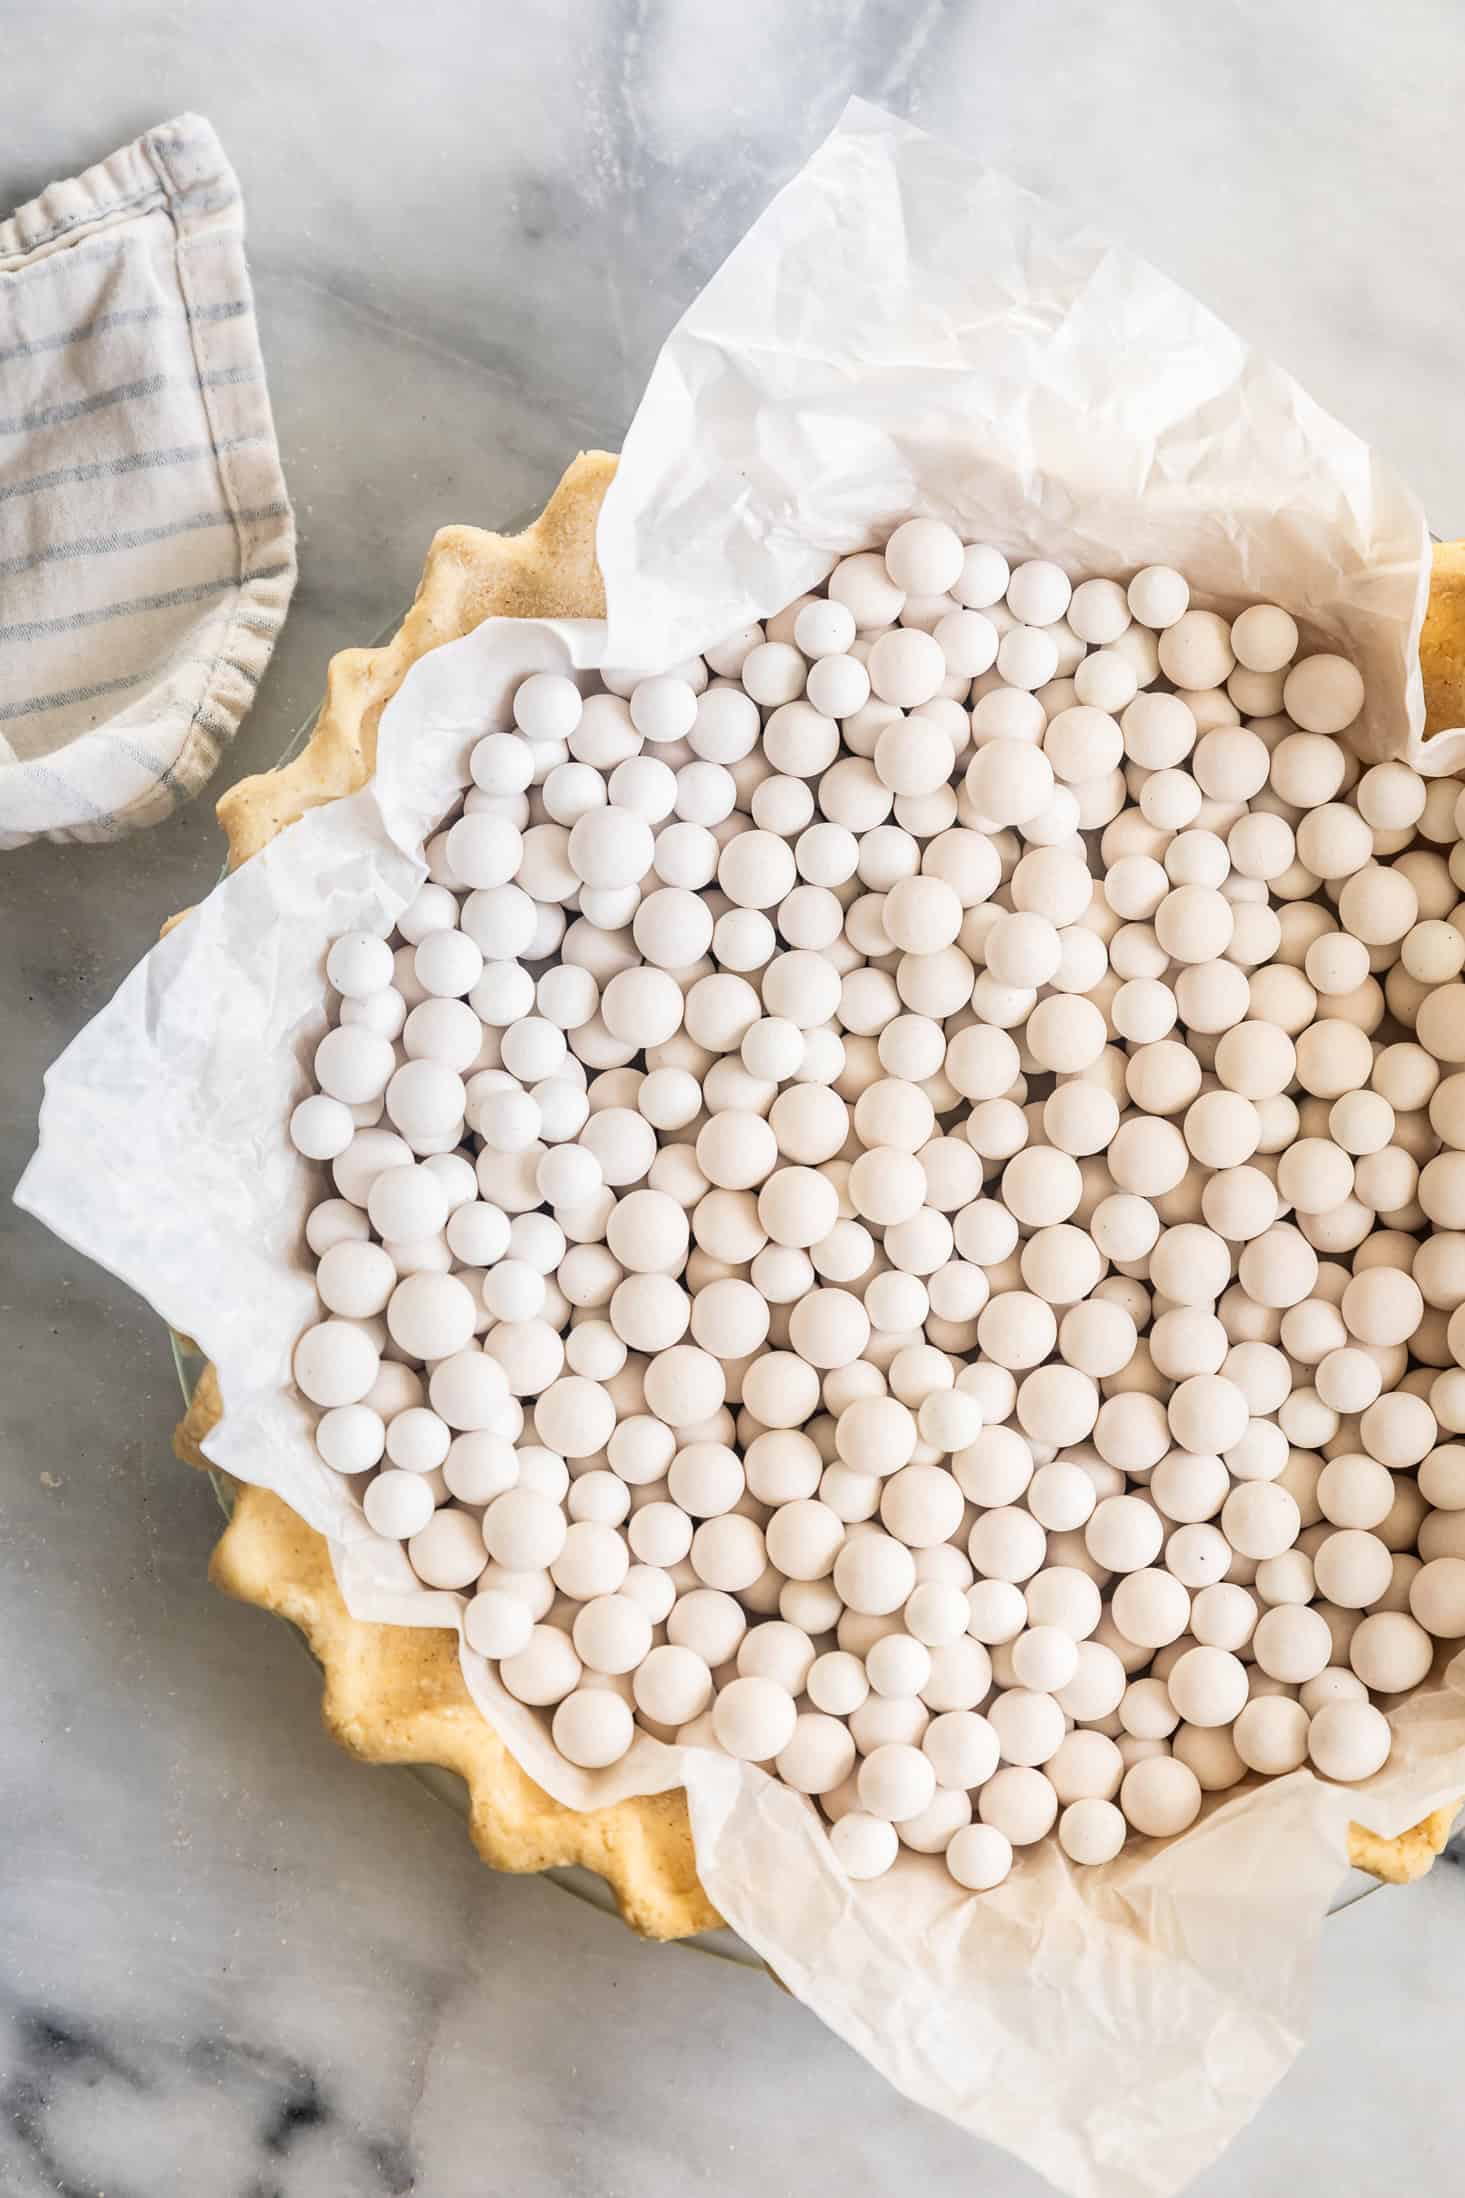
When you're ready to bake, crumple up a square of parchment paper and spread it over the pie crust. Fill the cavity with pie weights, rice, or dried beans.
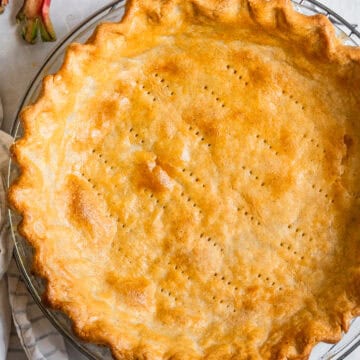
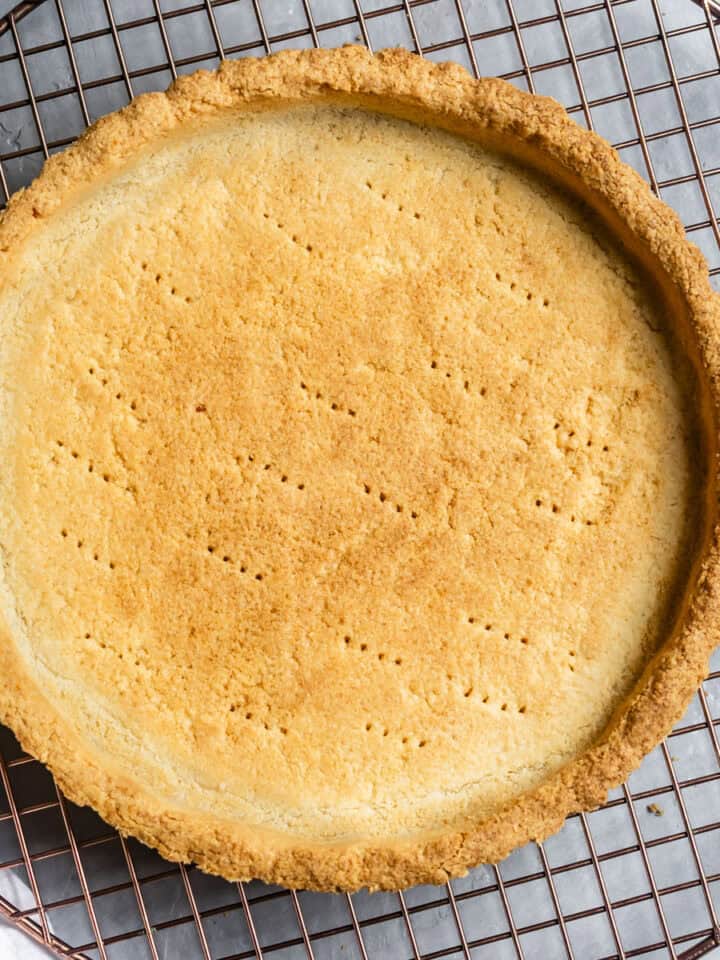
Bake for 15-20 minutes, until the edges and sides look fully set and slightly golden brown.
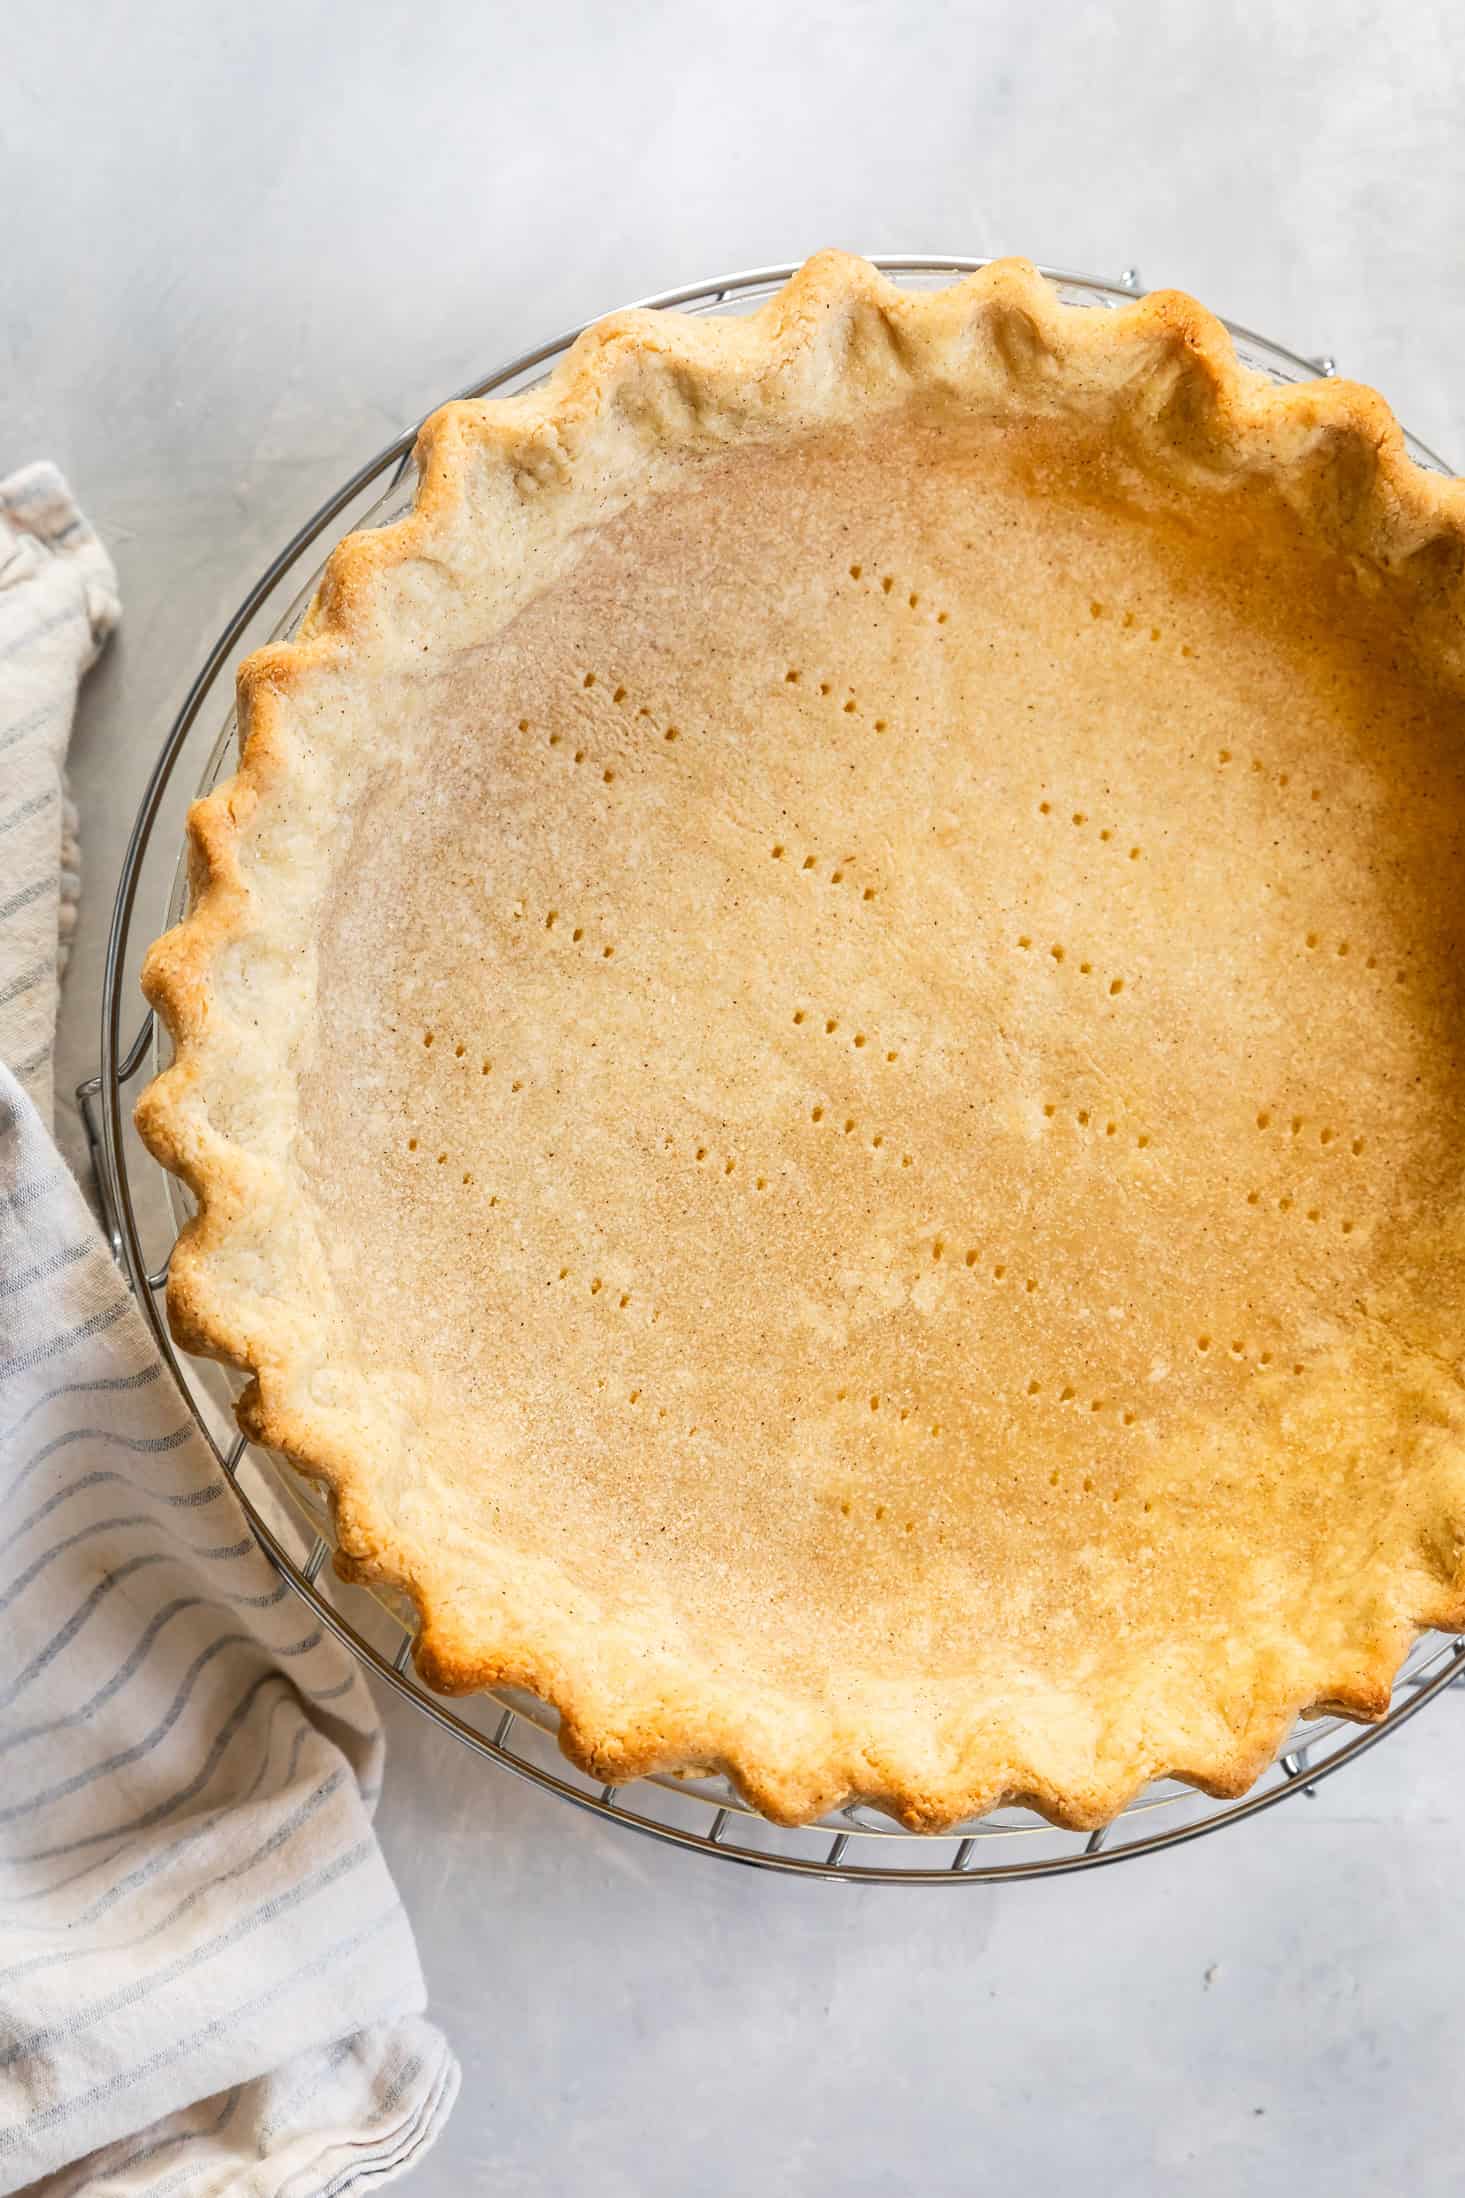
Carefully use the parchment paper to lift the pie weights from the pan. Reduce the oven temperature to 375°F. For a par-baked crust, return the pie to the oven for another 2-3 minutes.
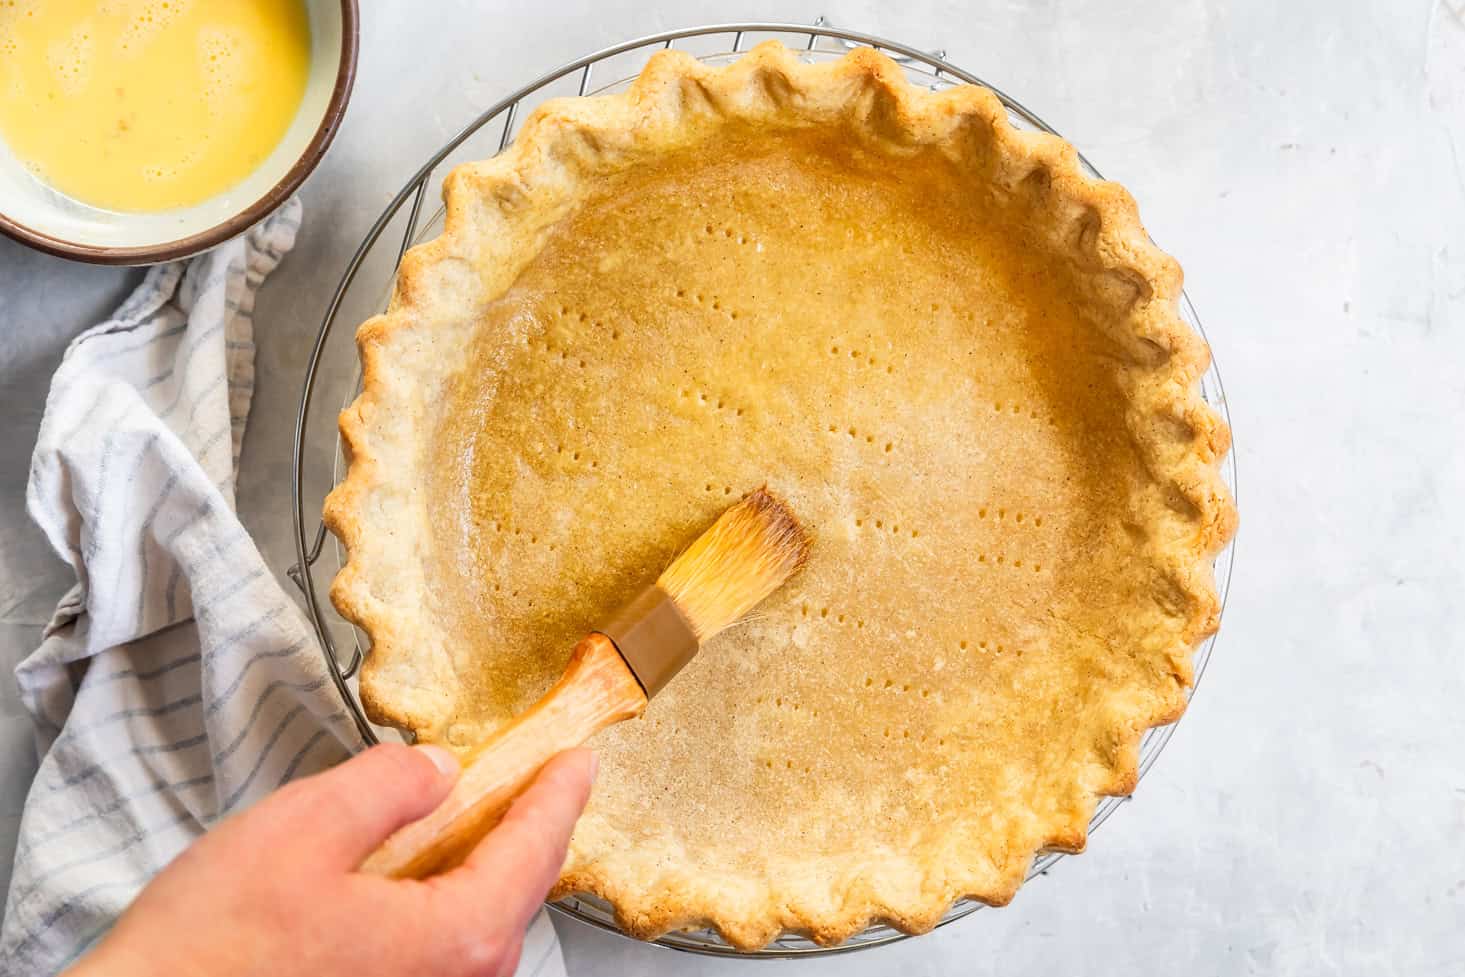
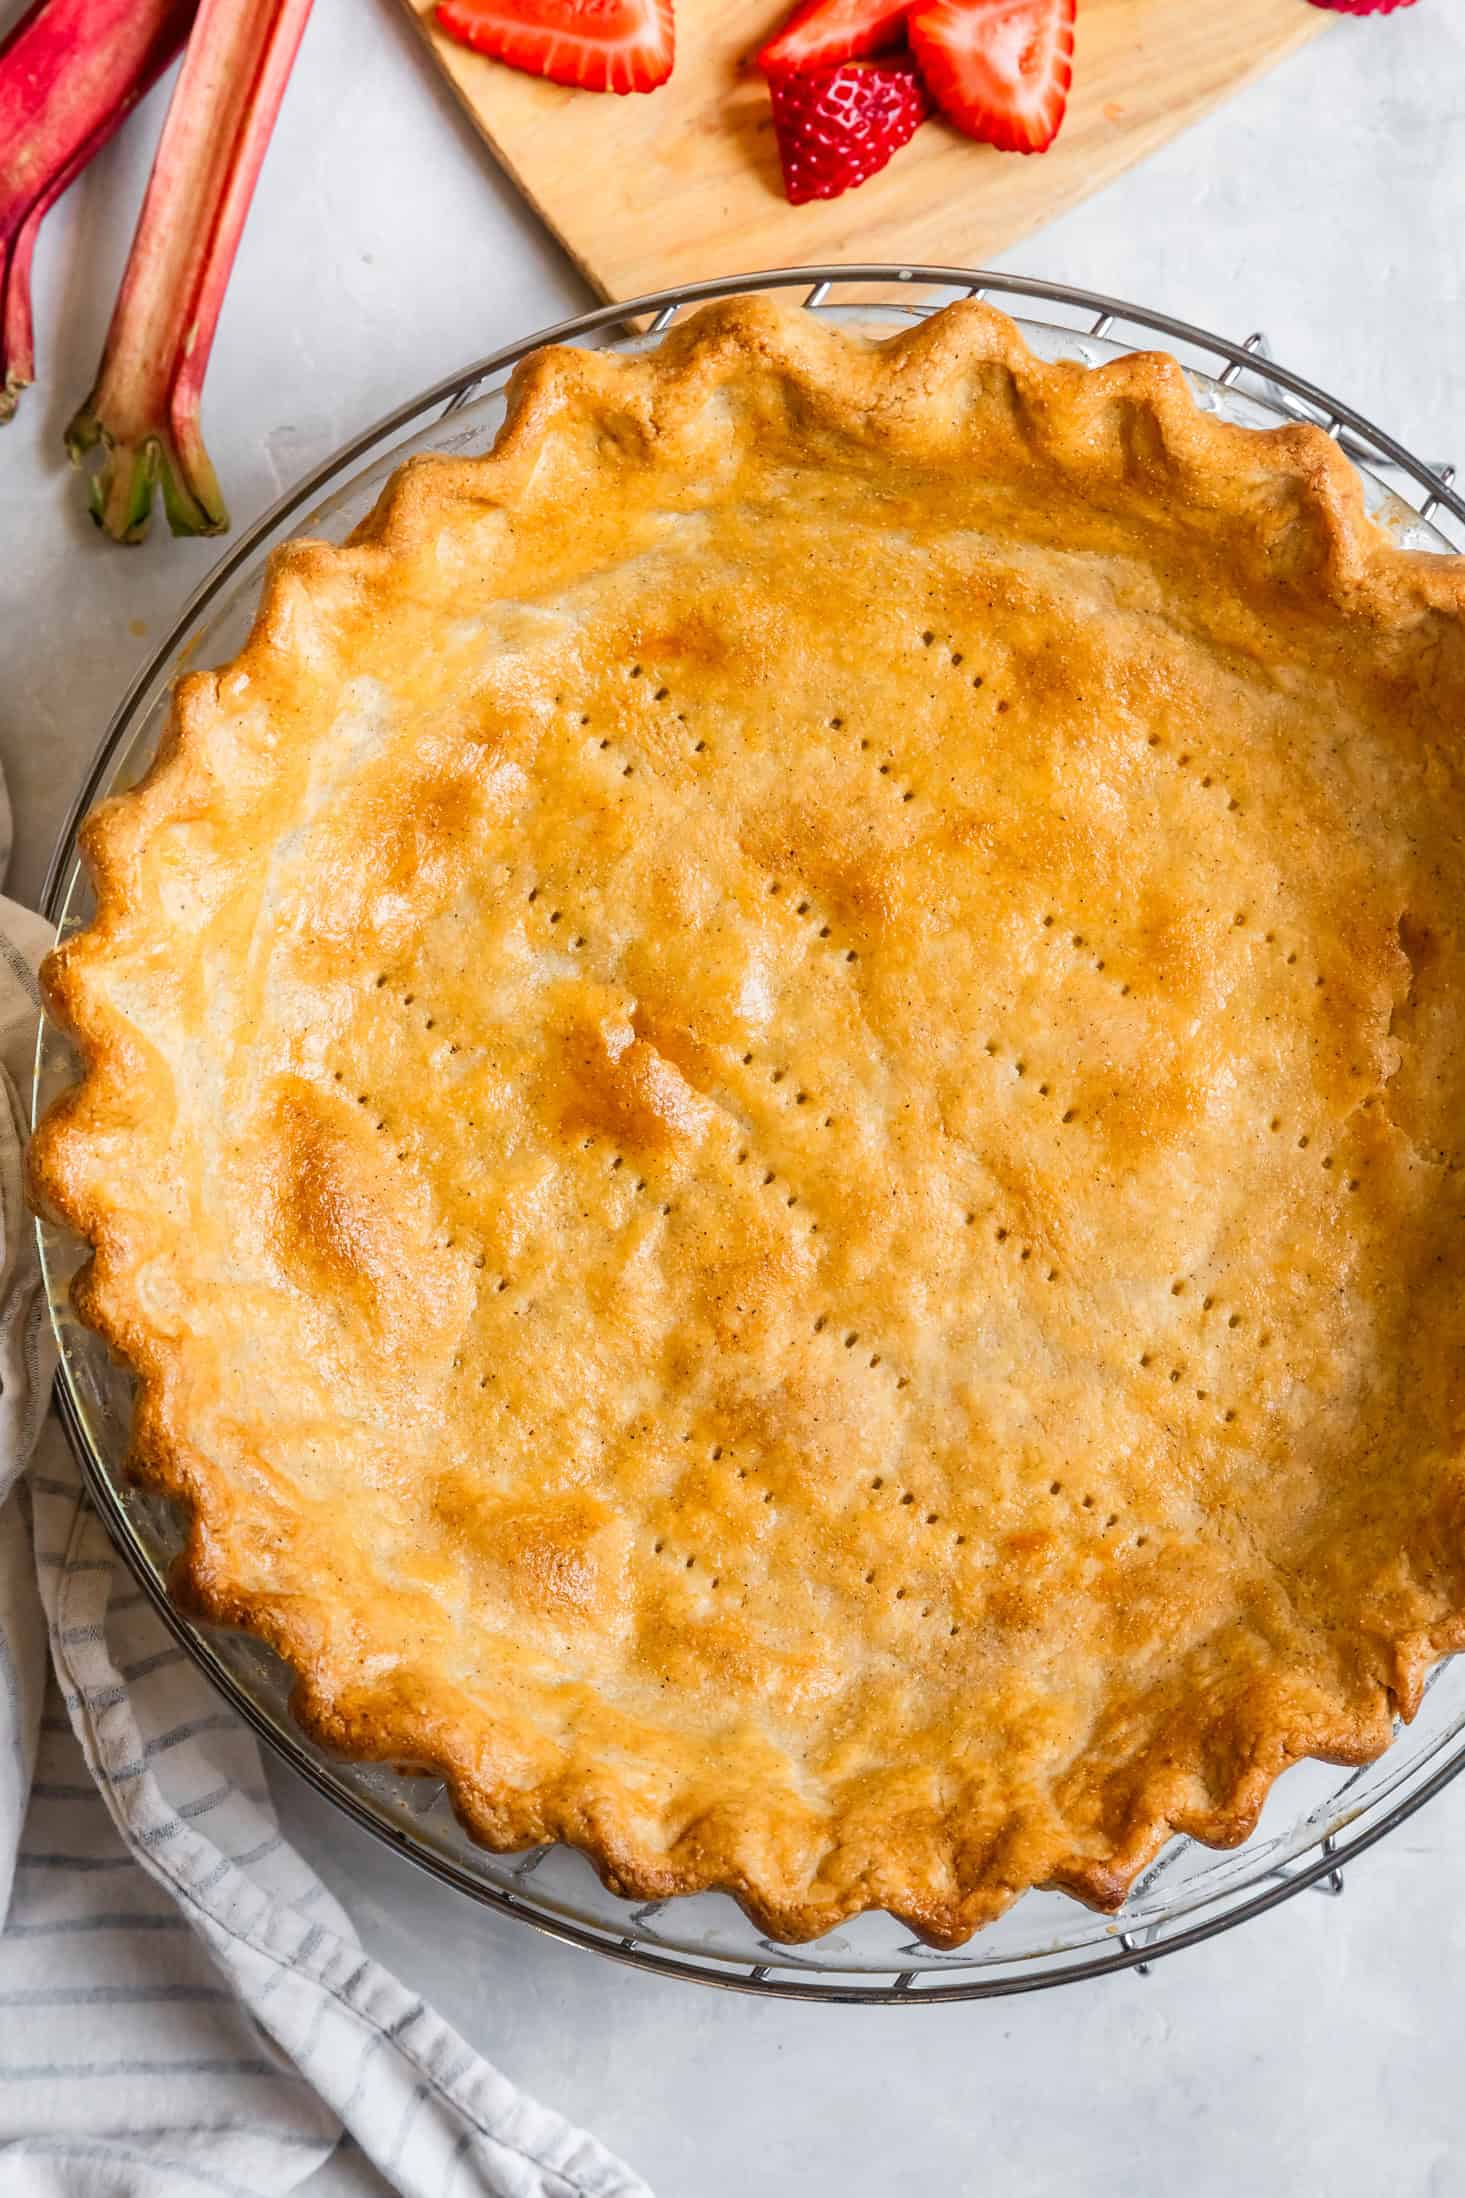
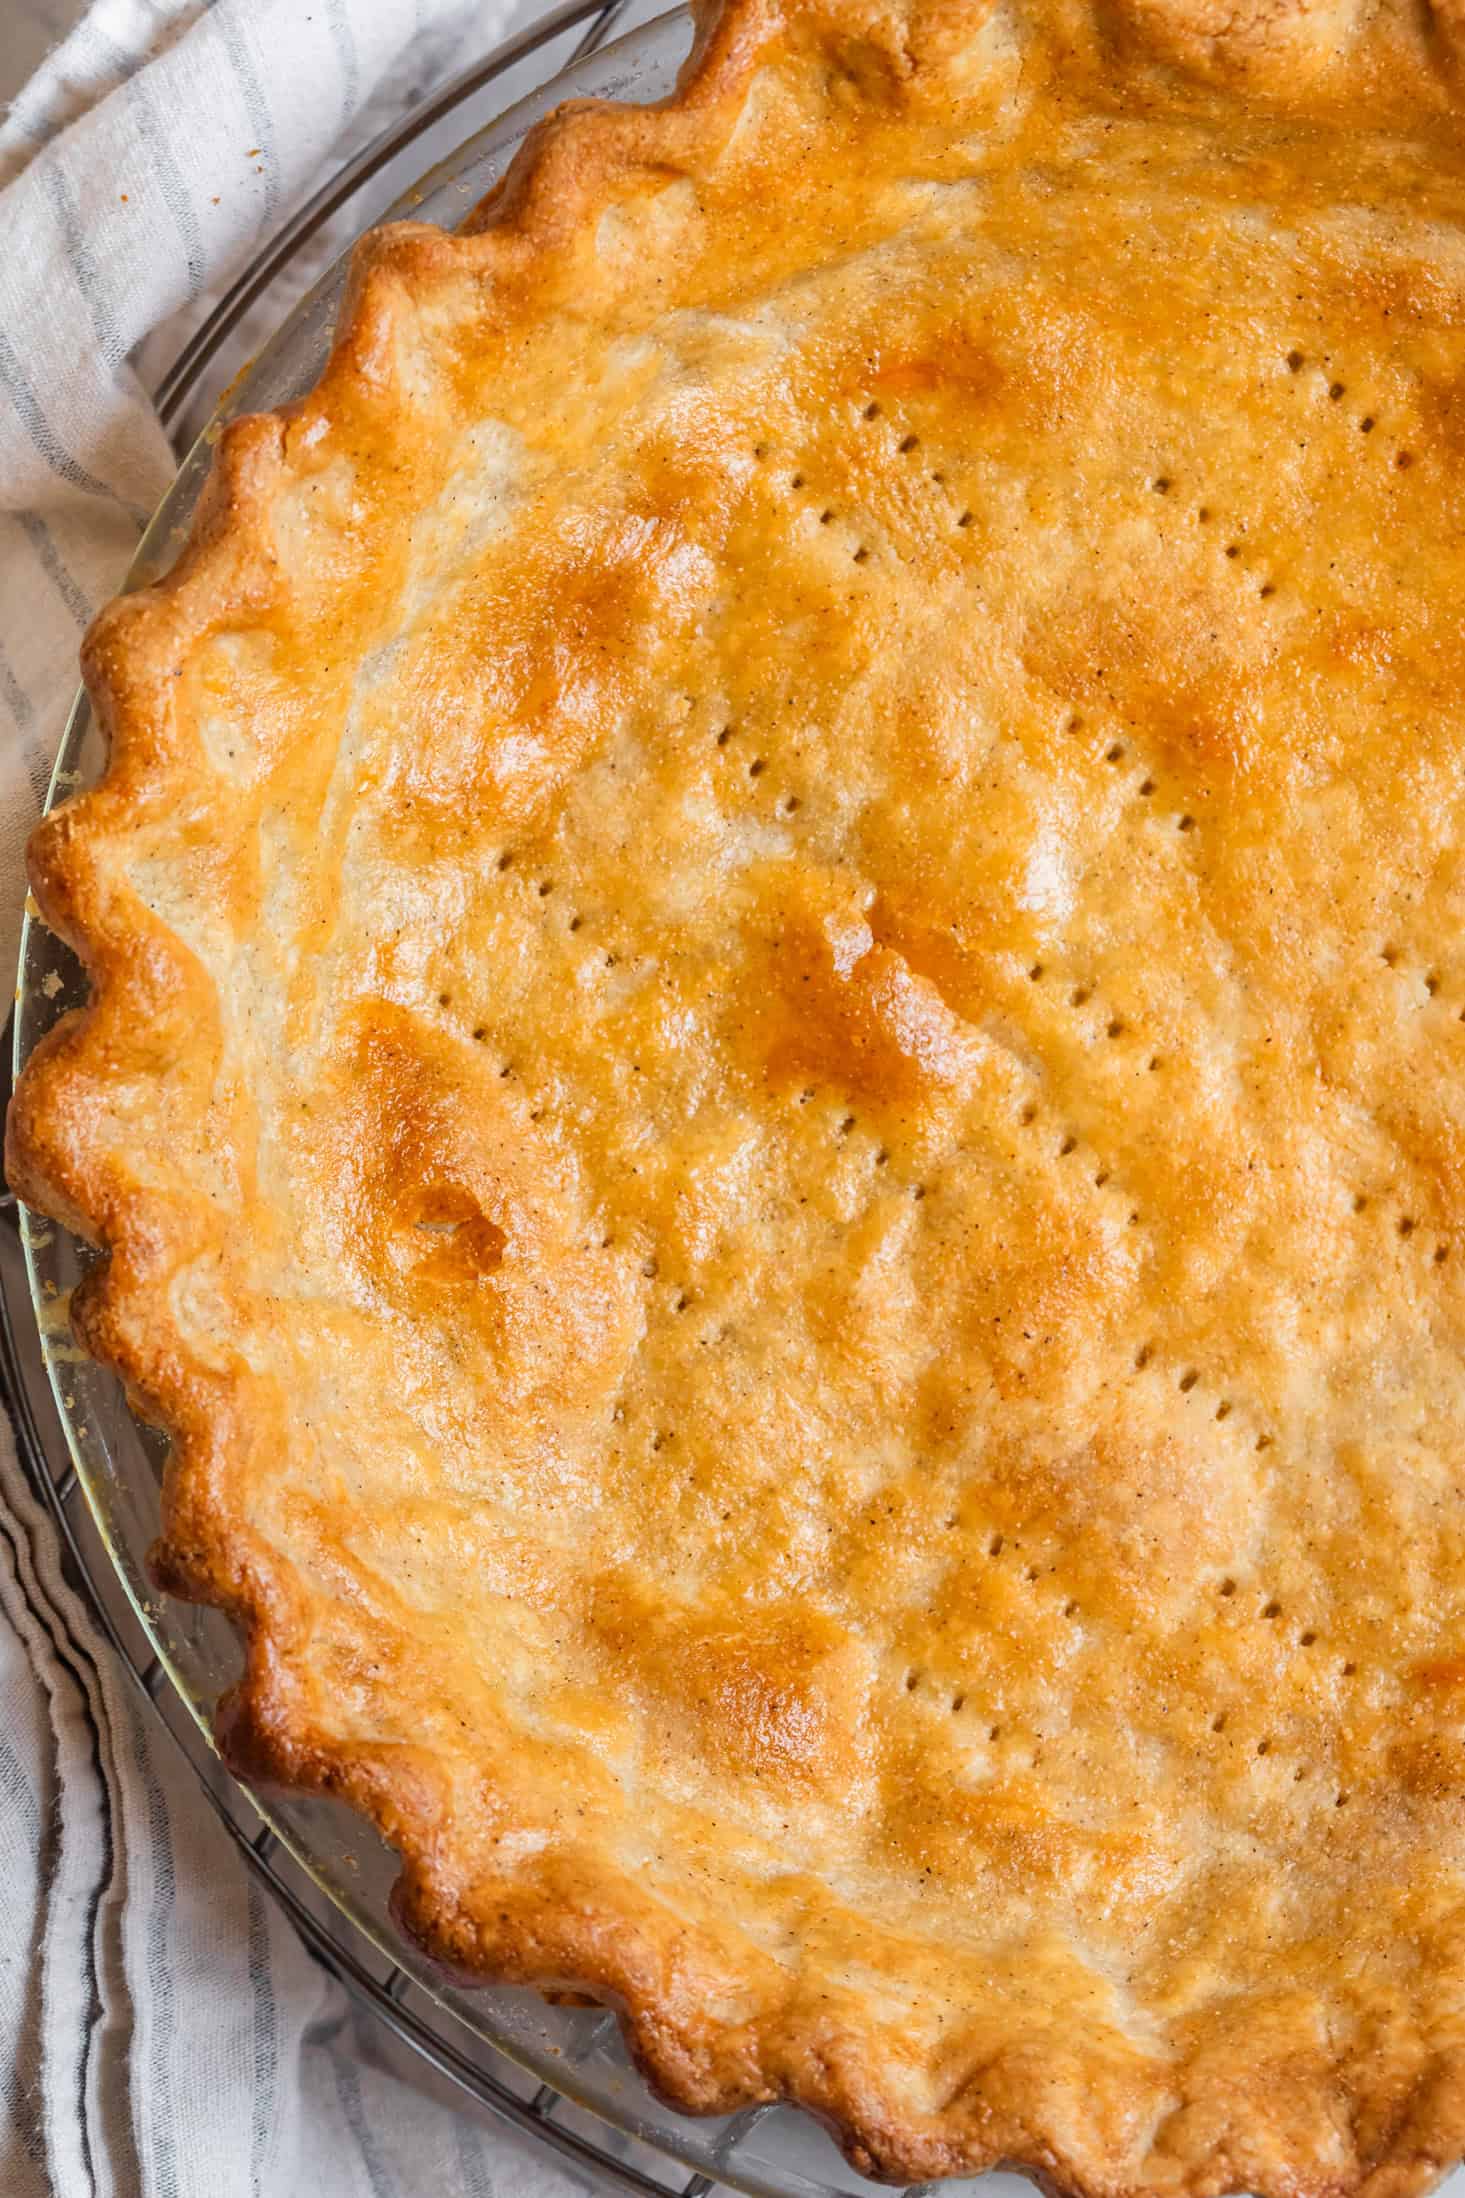
For a fully-baked, or blind-baked, crust, you can optionally brush the pie with an egg wash (1 egg whisked well with 1 tablespoon cream, milk, or water). This gives it that glossy golden-brown sheen as shown below.
Return the pie to the oven for 12-20 minutes, or until the bottom is golden brown and fully baked.
Let cool completely before filling.
Tip: If the edges get too dark, you can use a pie shield or foil to cover the fluted edges while the bottom continues baking.
Double-Crusted Gluten-Free Pie
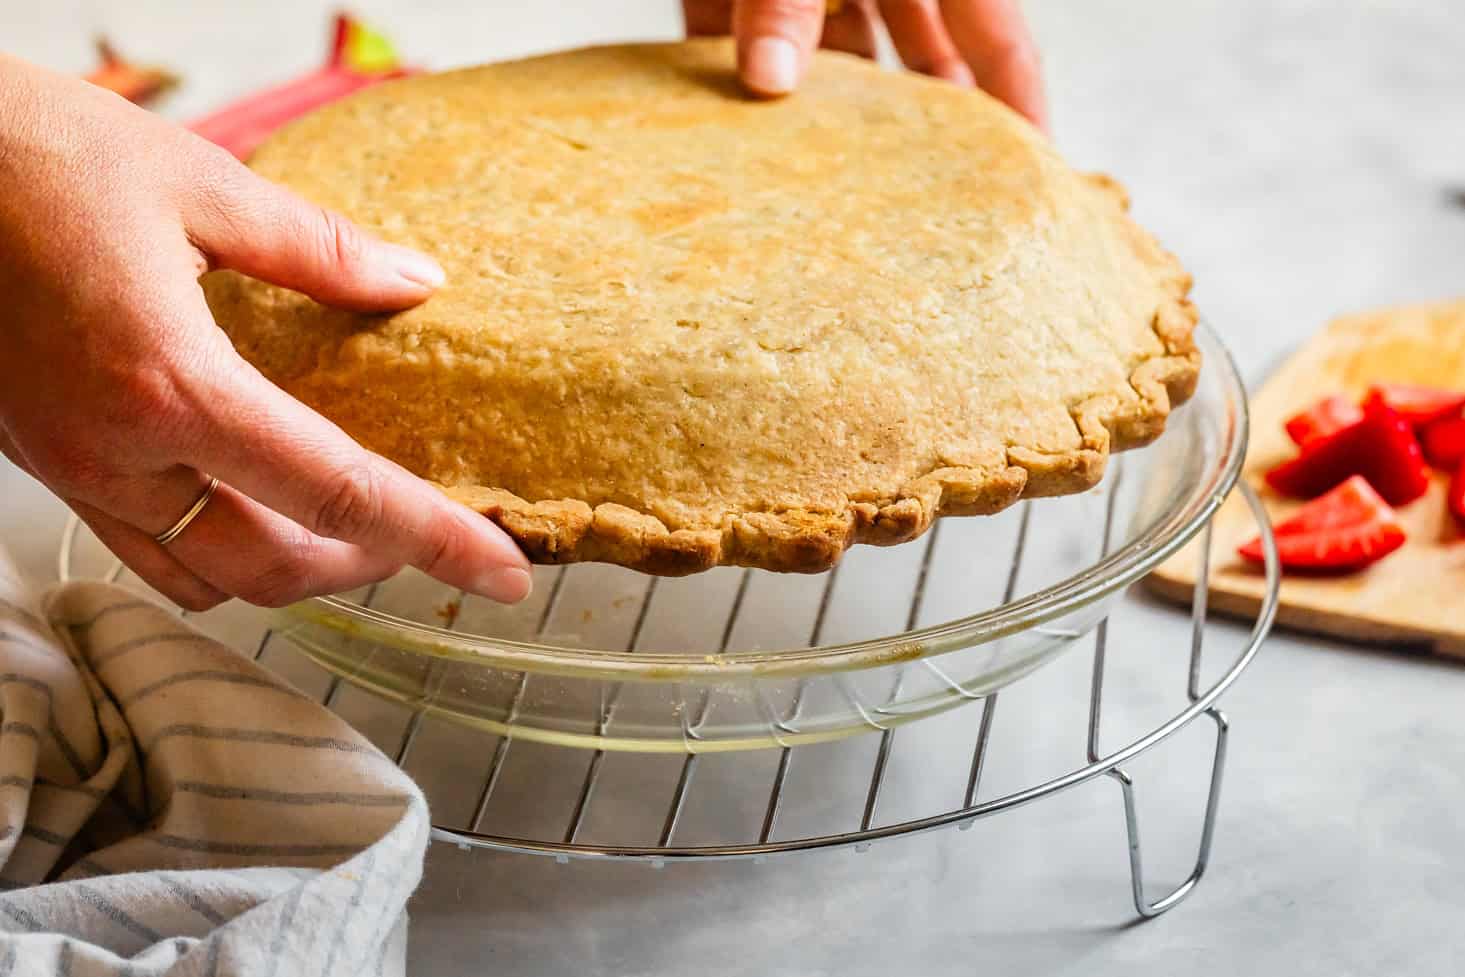
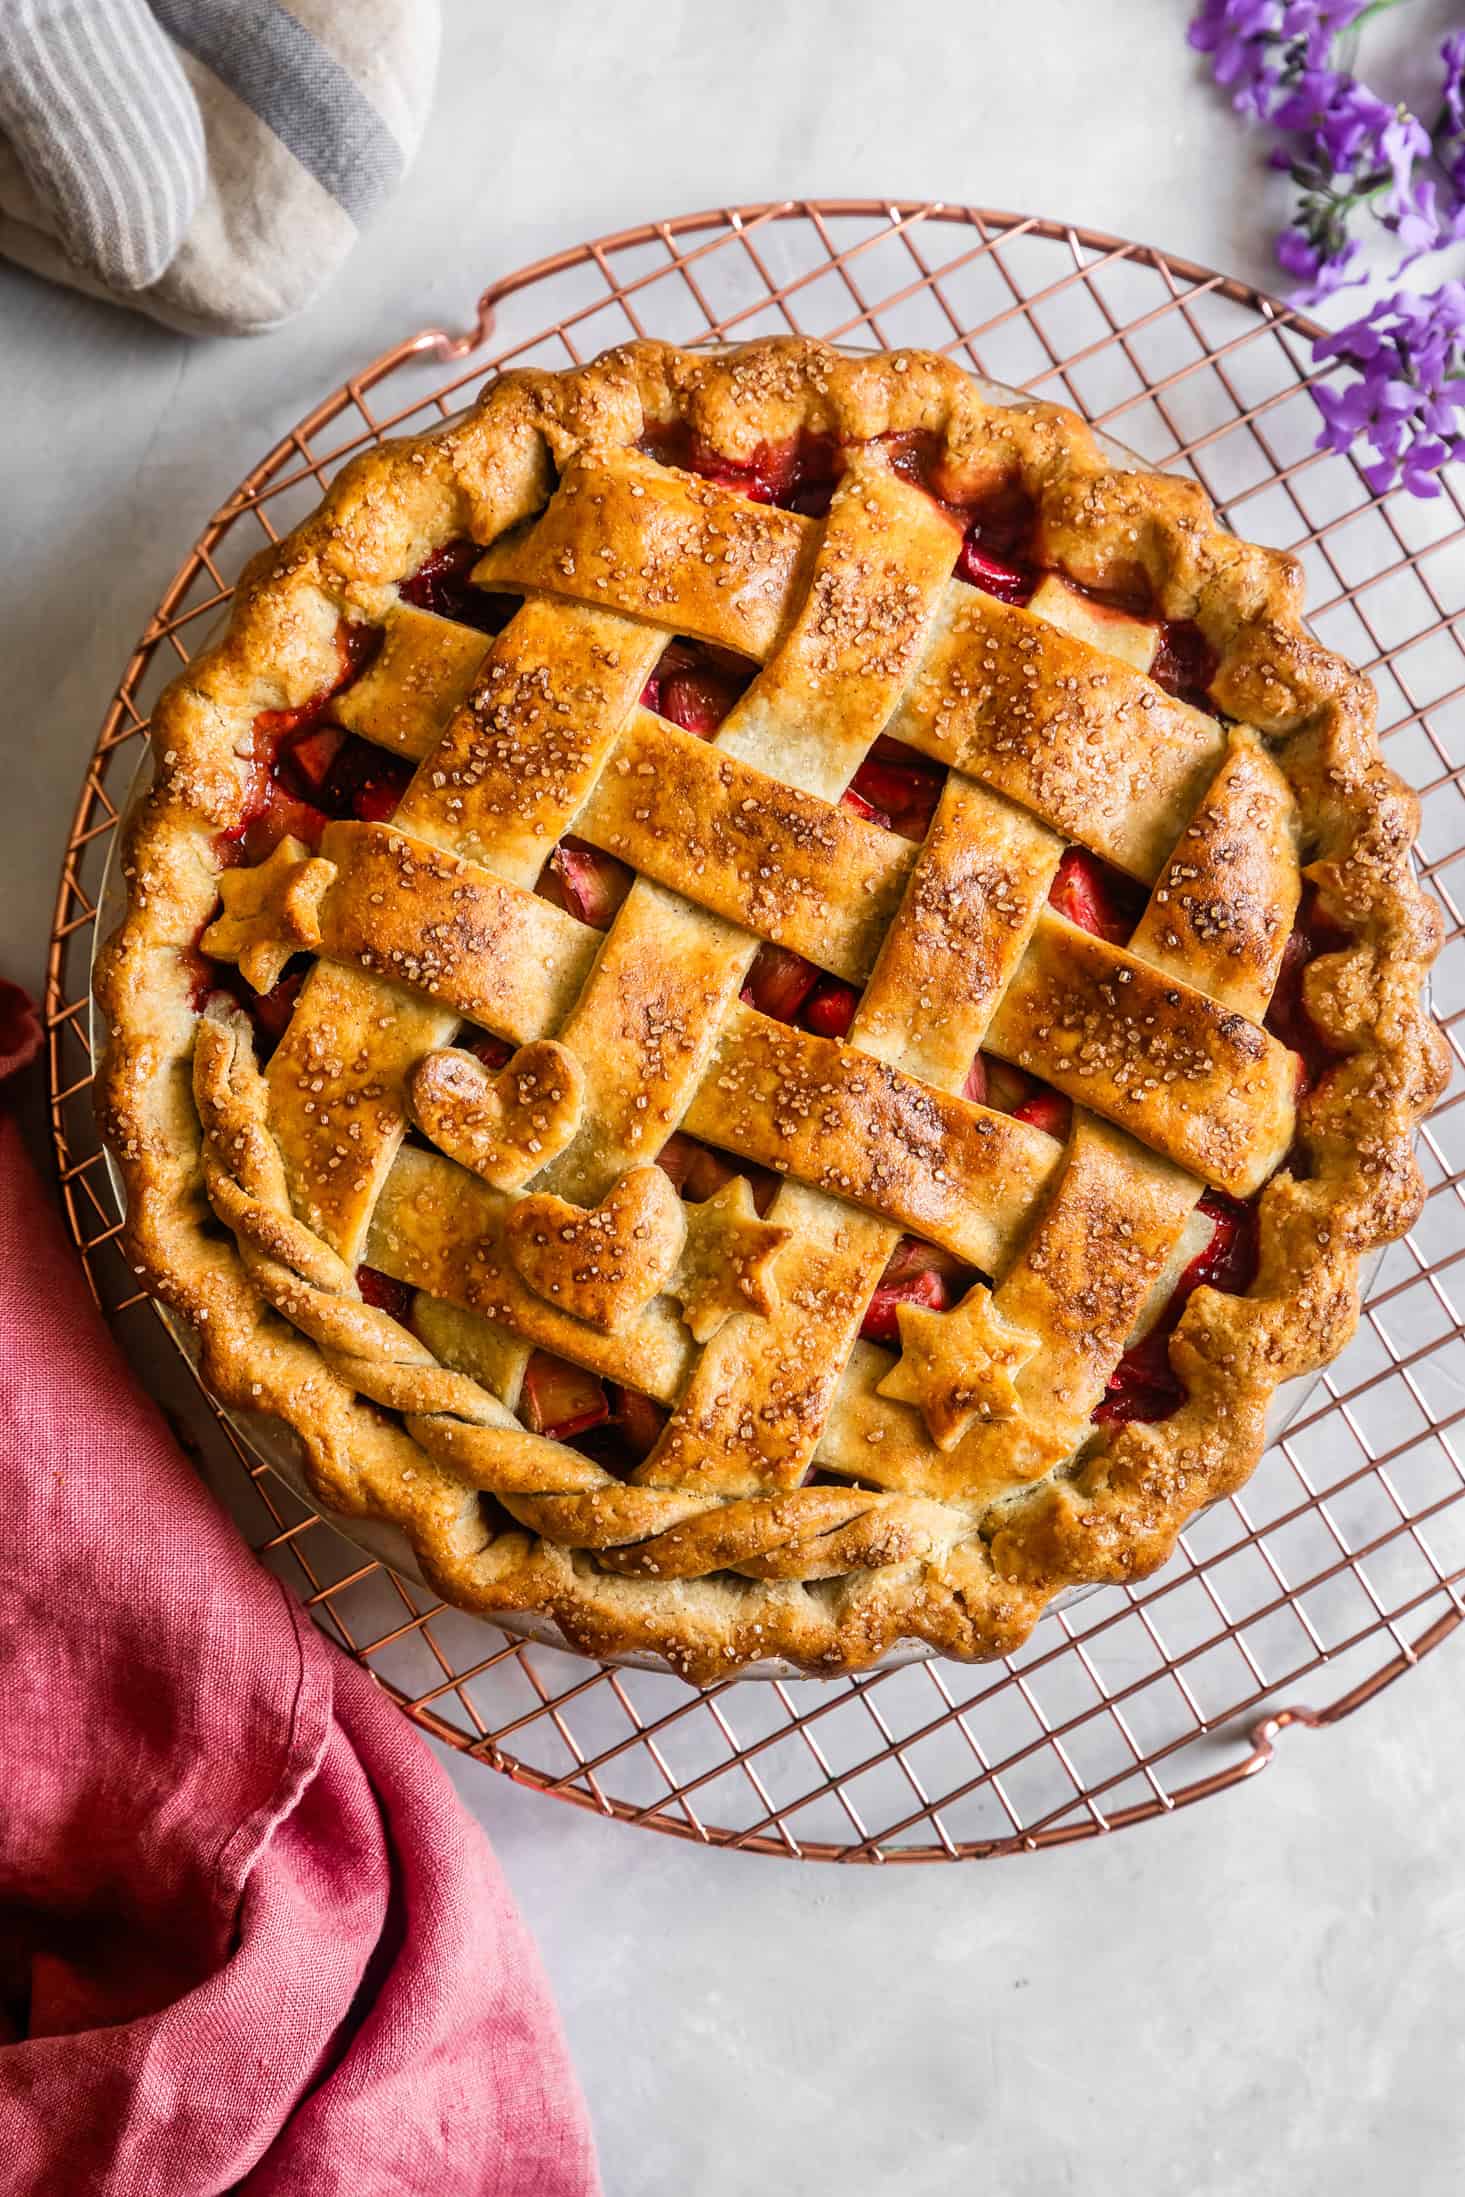
For a double-crusted pie, such as strawberry rhubarb, peach pie, triple berry pie, or vanilla bean pear persimmon. You'll wait to bake until the pie is filled and the second crust is placed on top.
Prepare the bottom as instructed above, waiting to trim the edges. Chill for at least 30 minutes before adding the filling.
Prepare the filling, but do not put it in the crust yet.
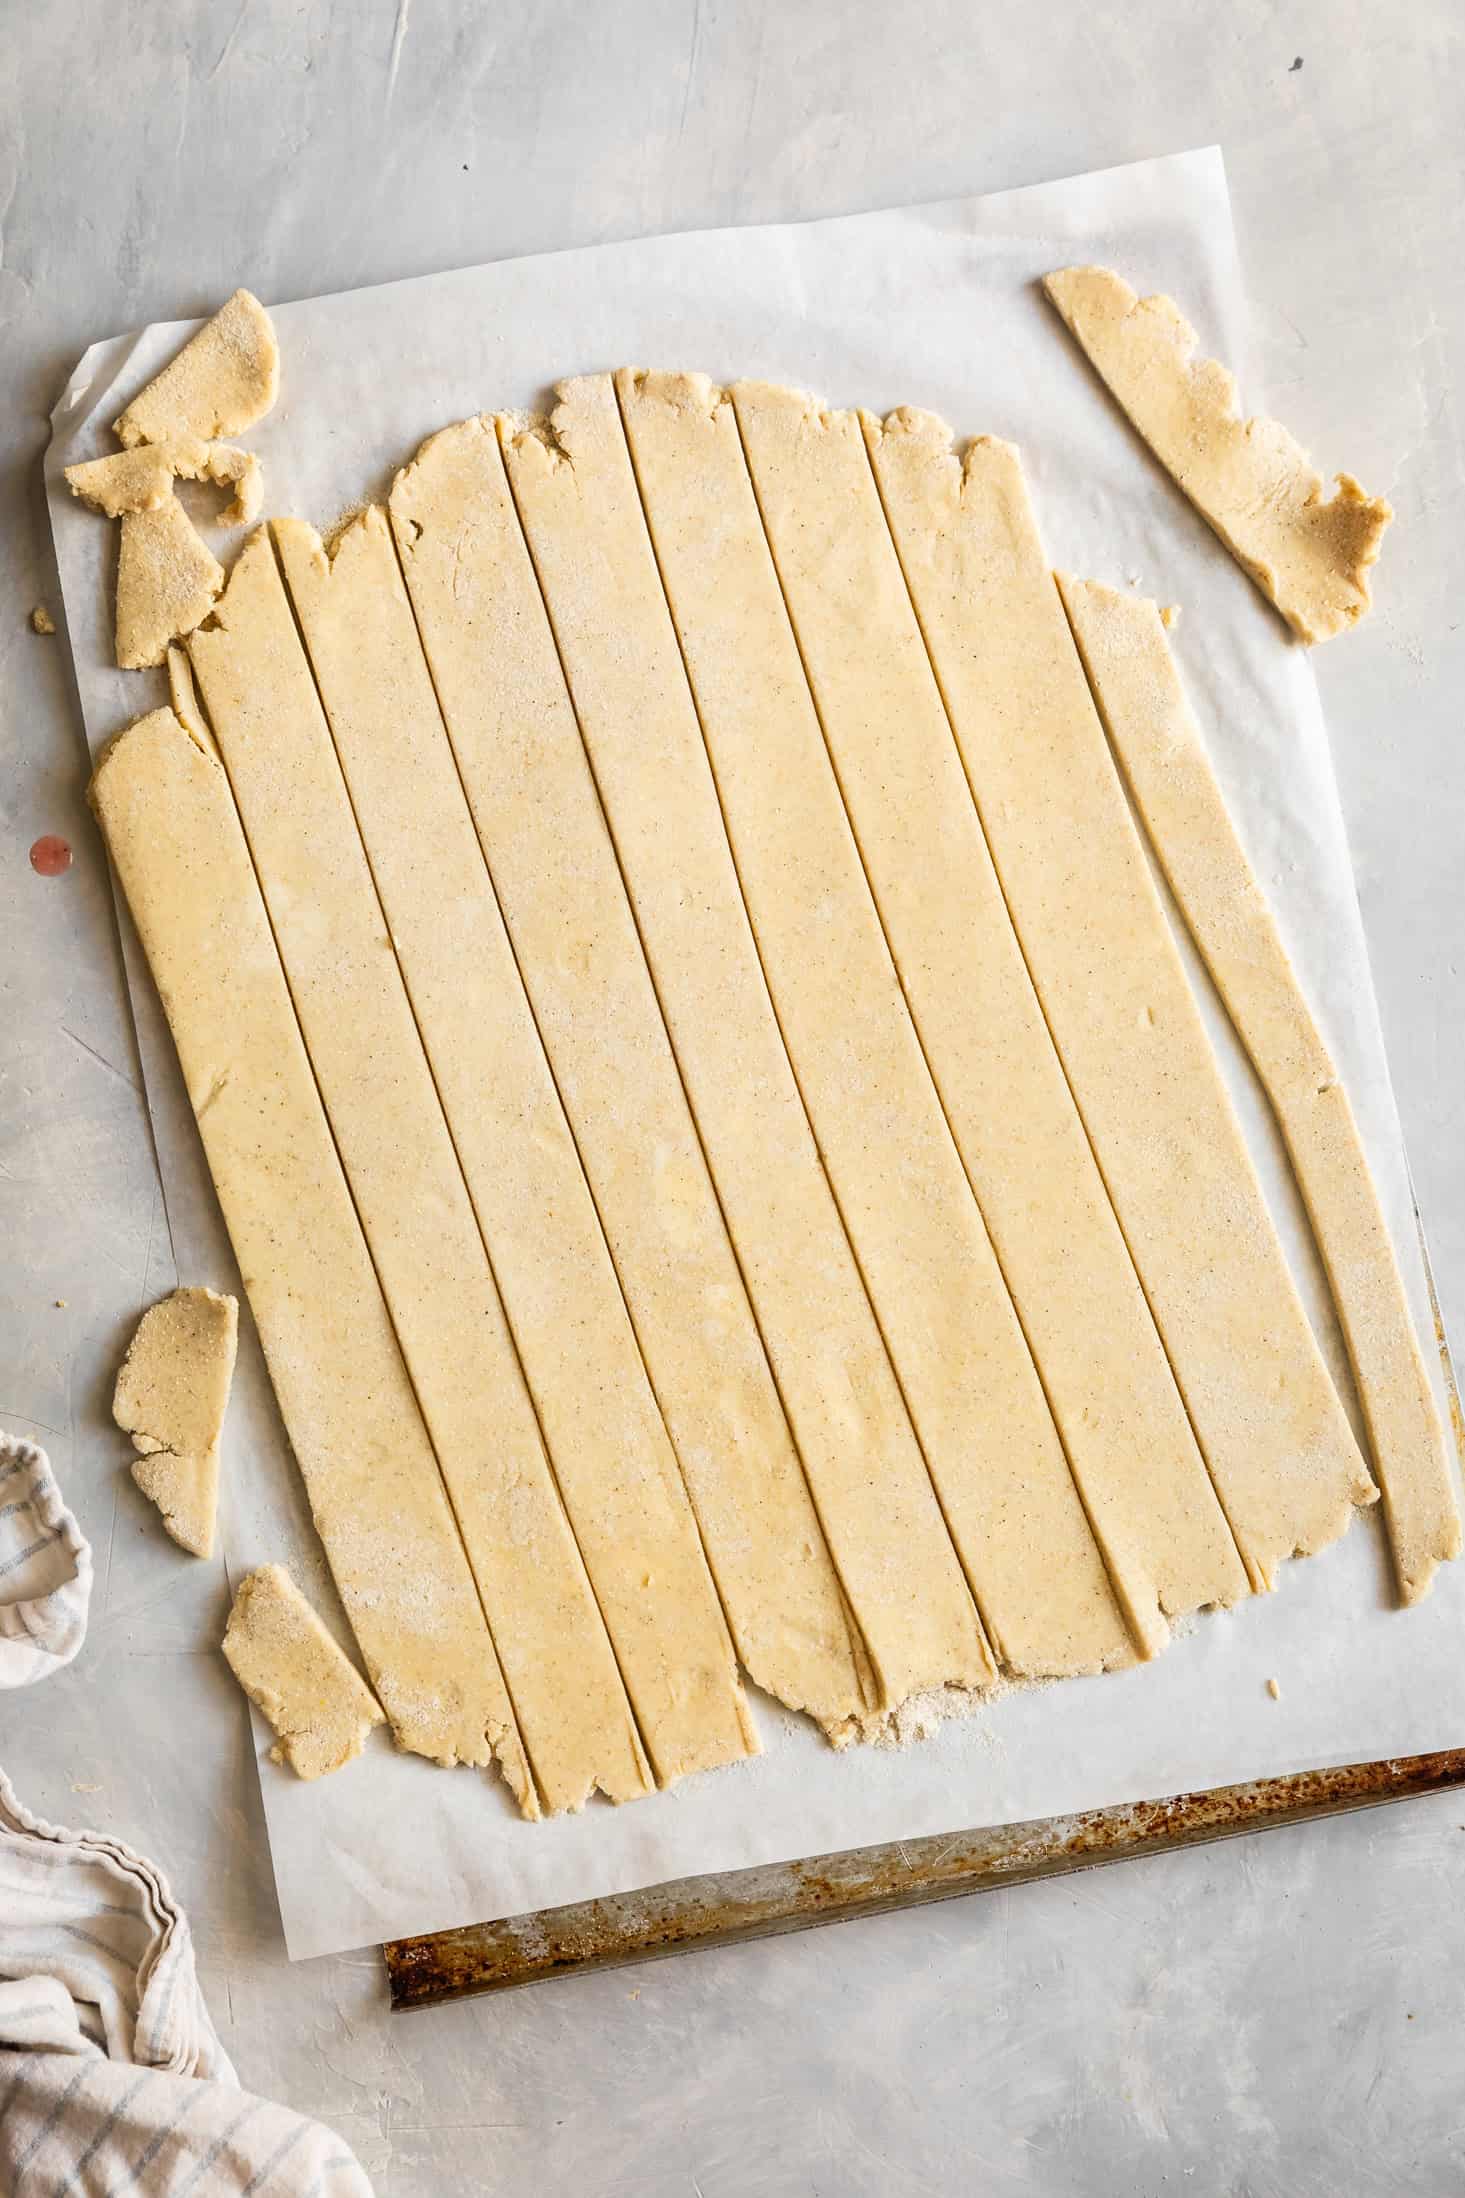
Meanwhile, remove the second disk of pie crust from the fridge, let it rest for 5 minutes, then roll it as below on floured parchment paper into a 12x14-inch oval about ¼-inch thick. Slice into an even number of strips.
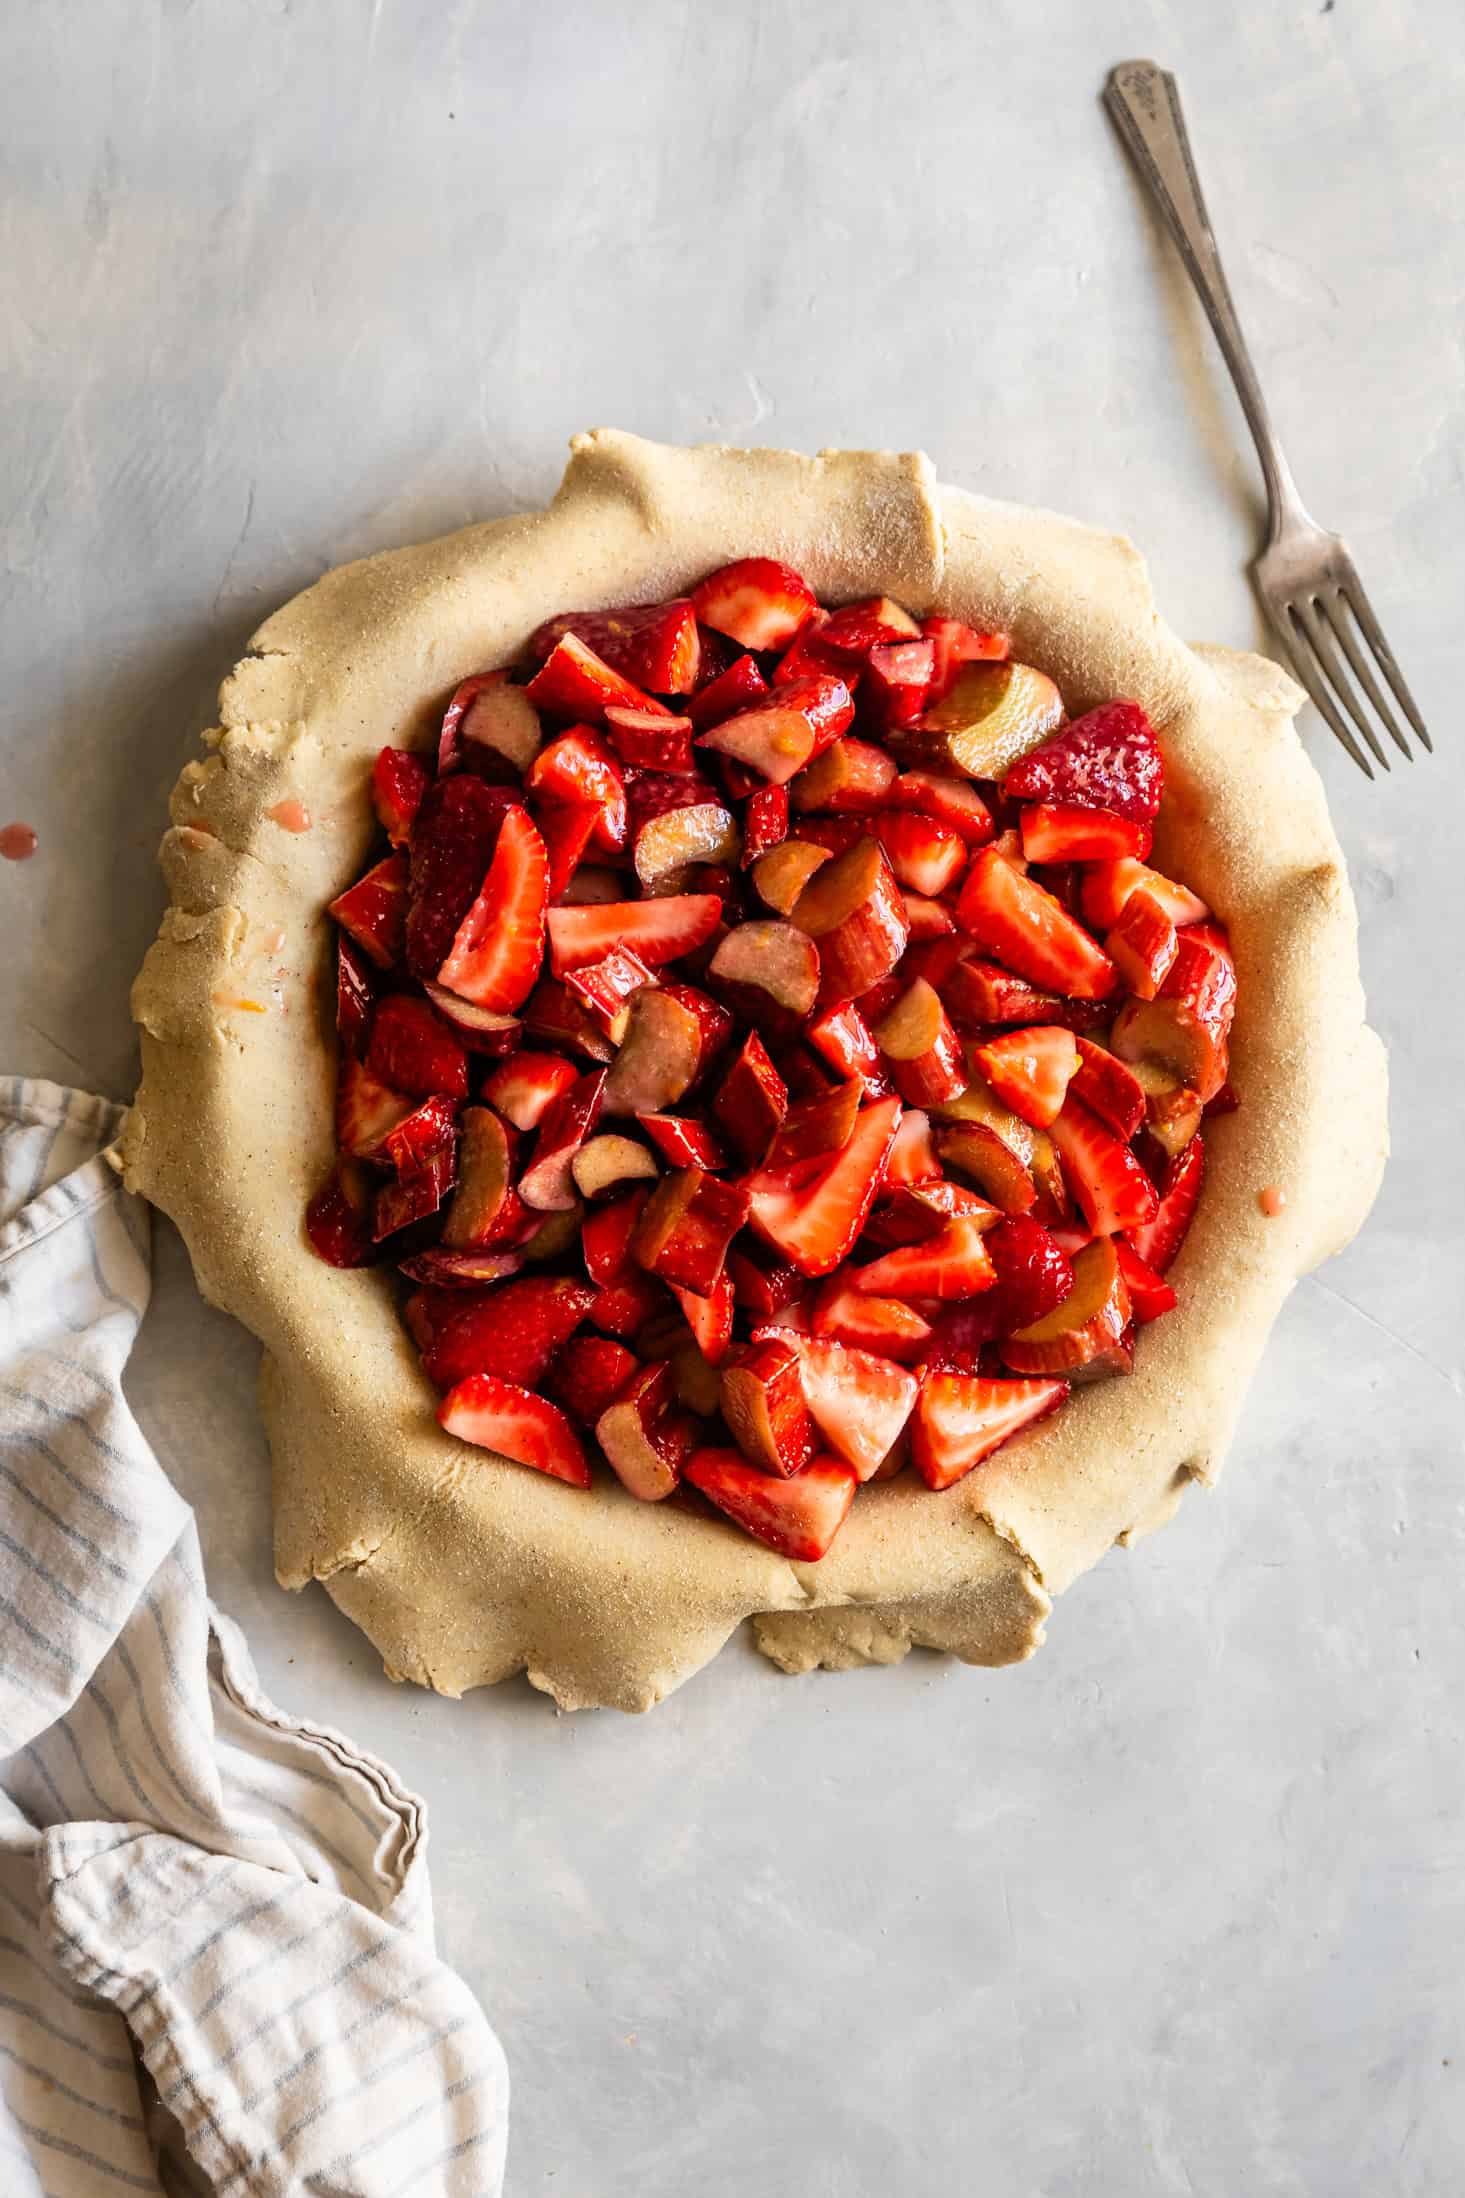
Add the filling to the pie crust, leaving behind any juices in the bowl.
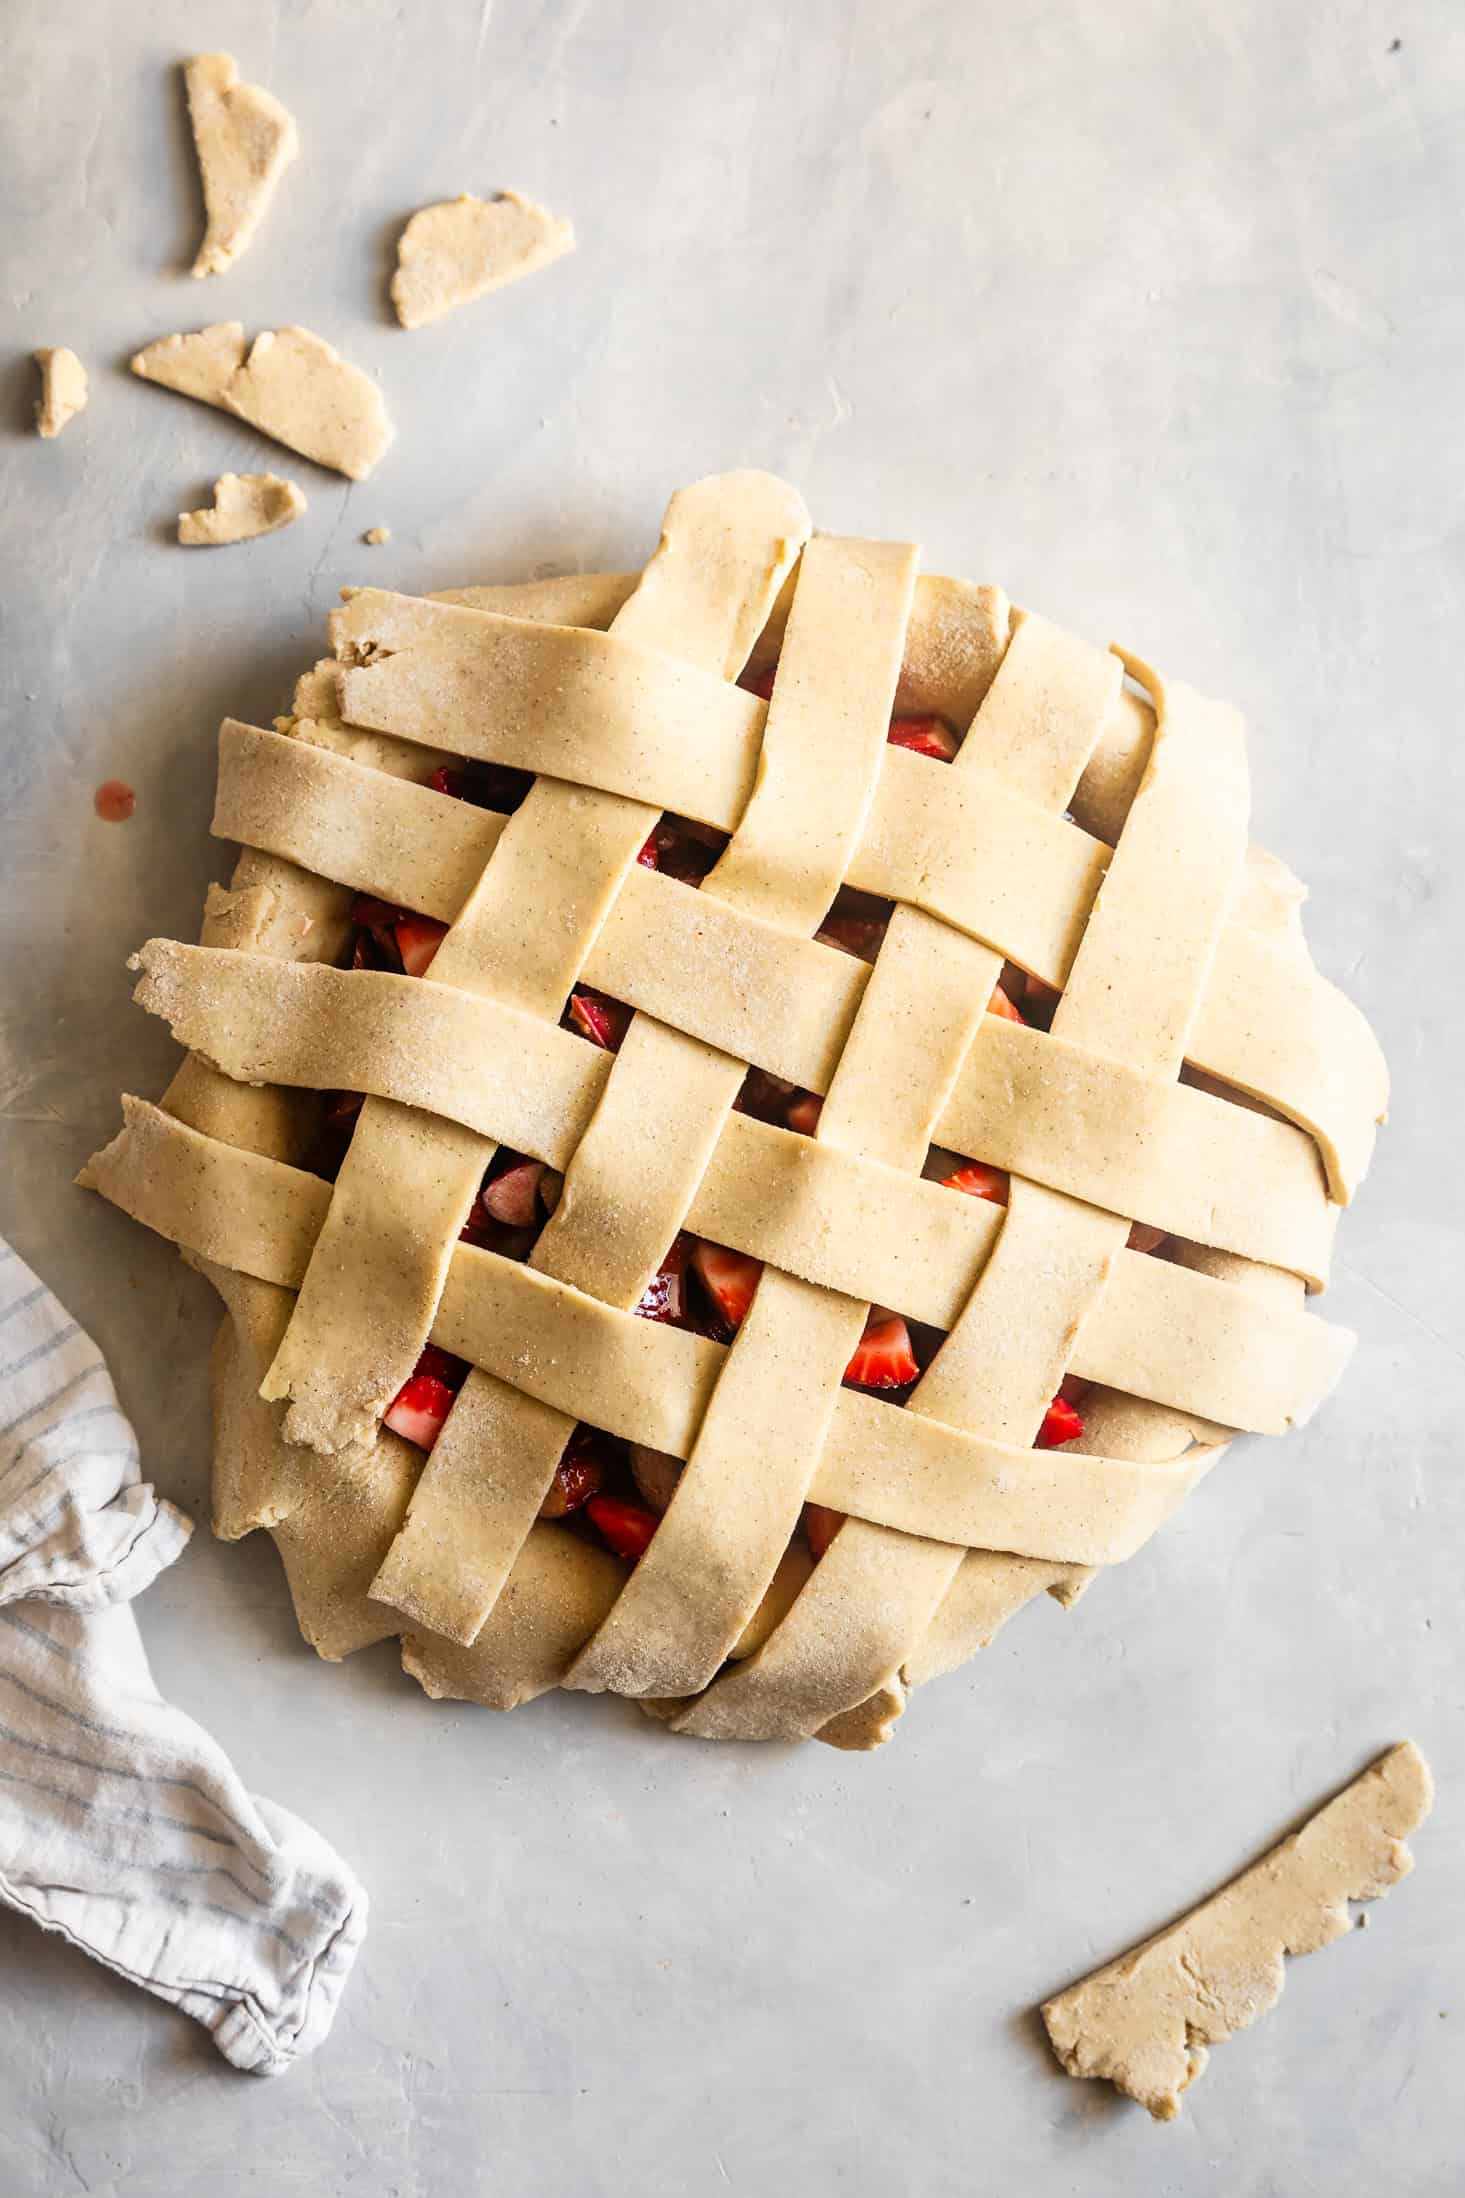
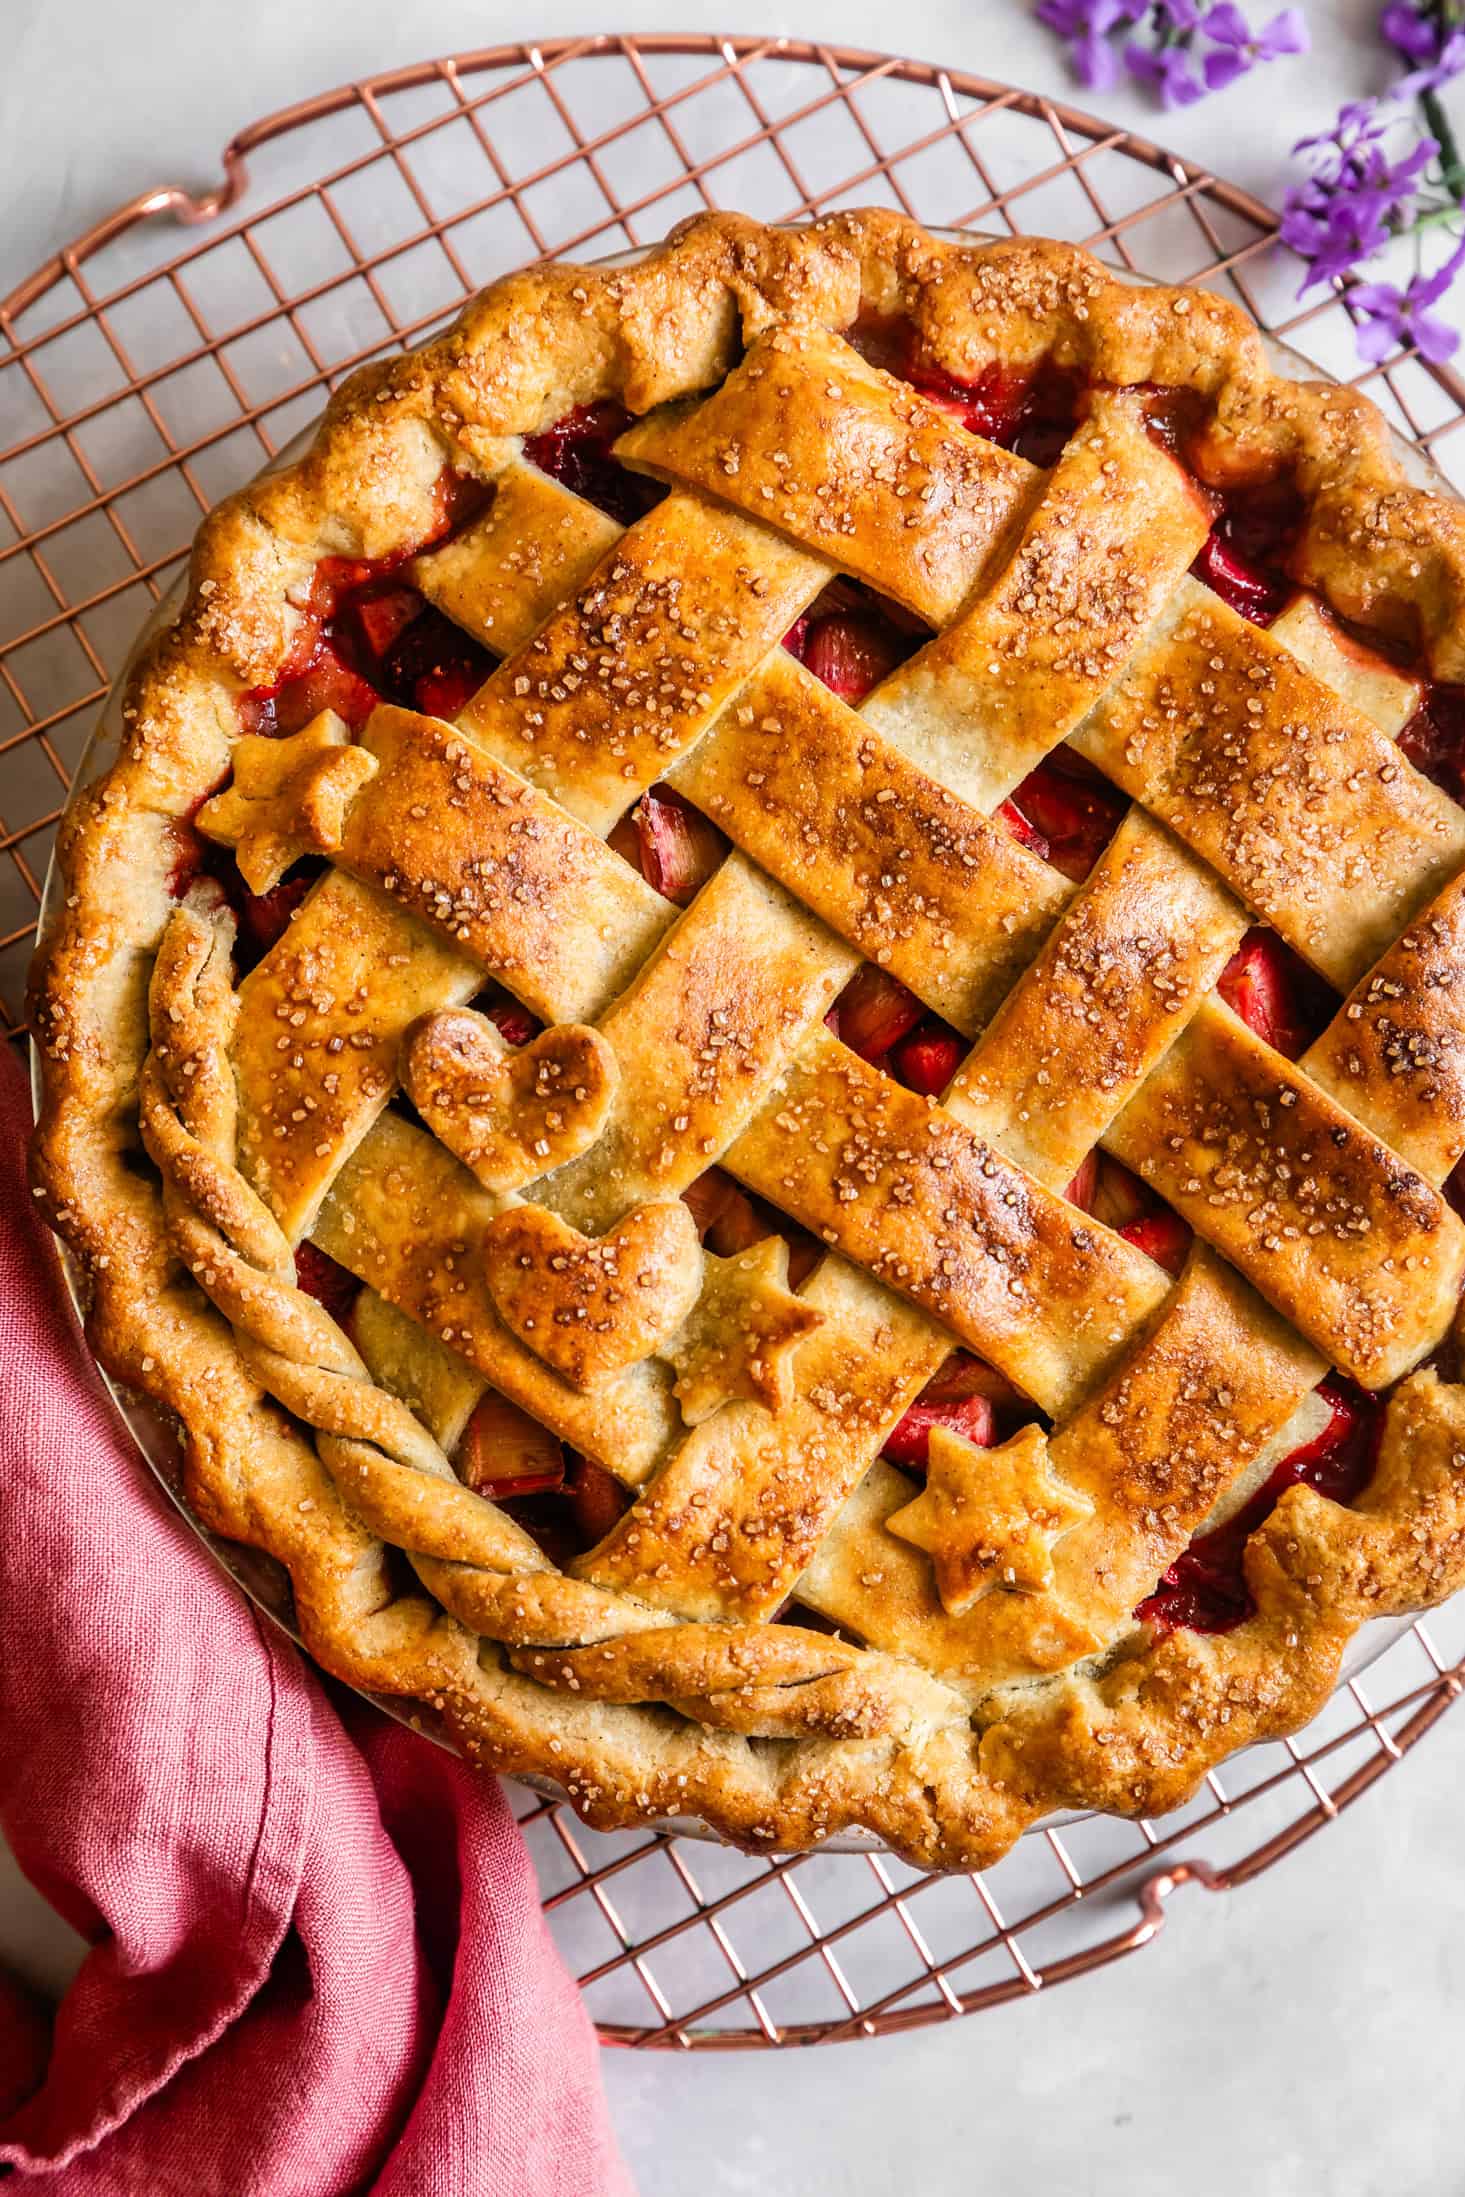
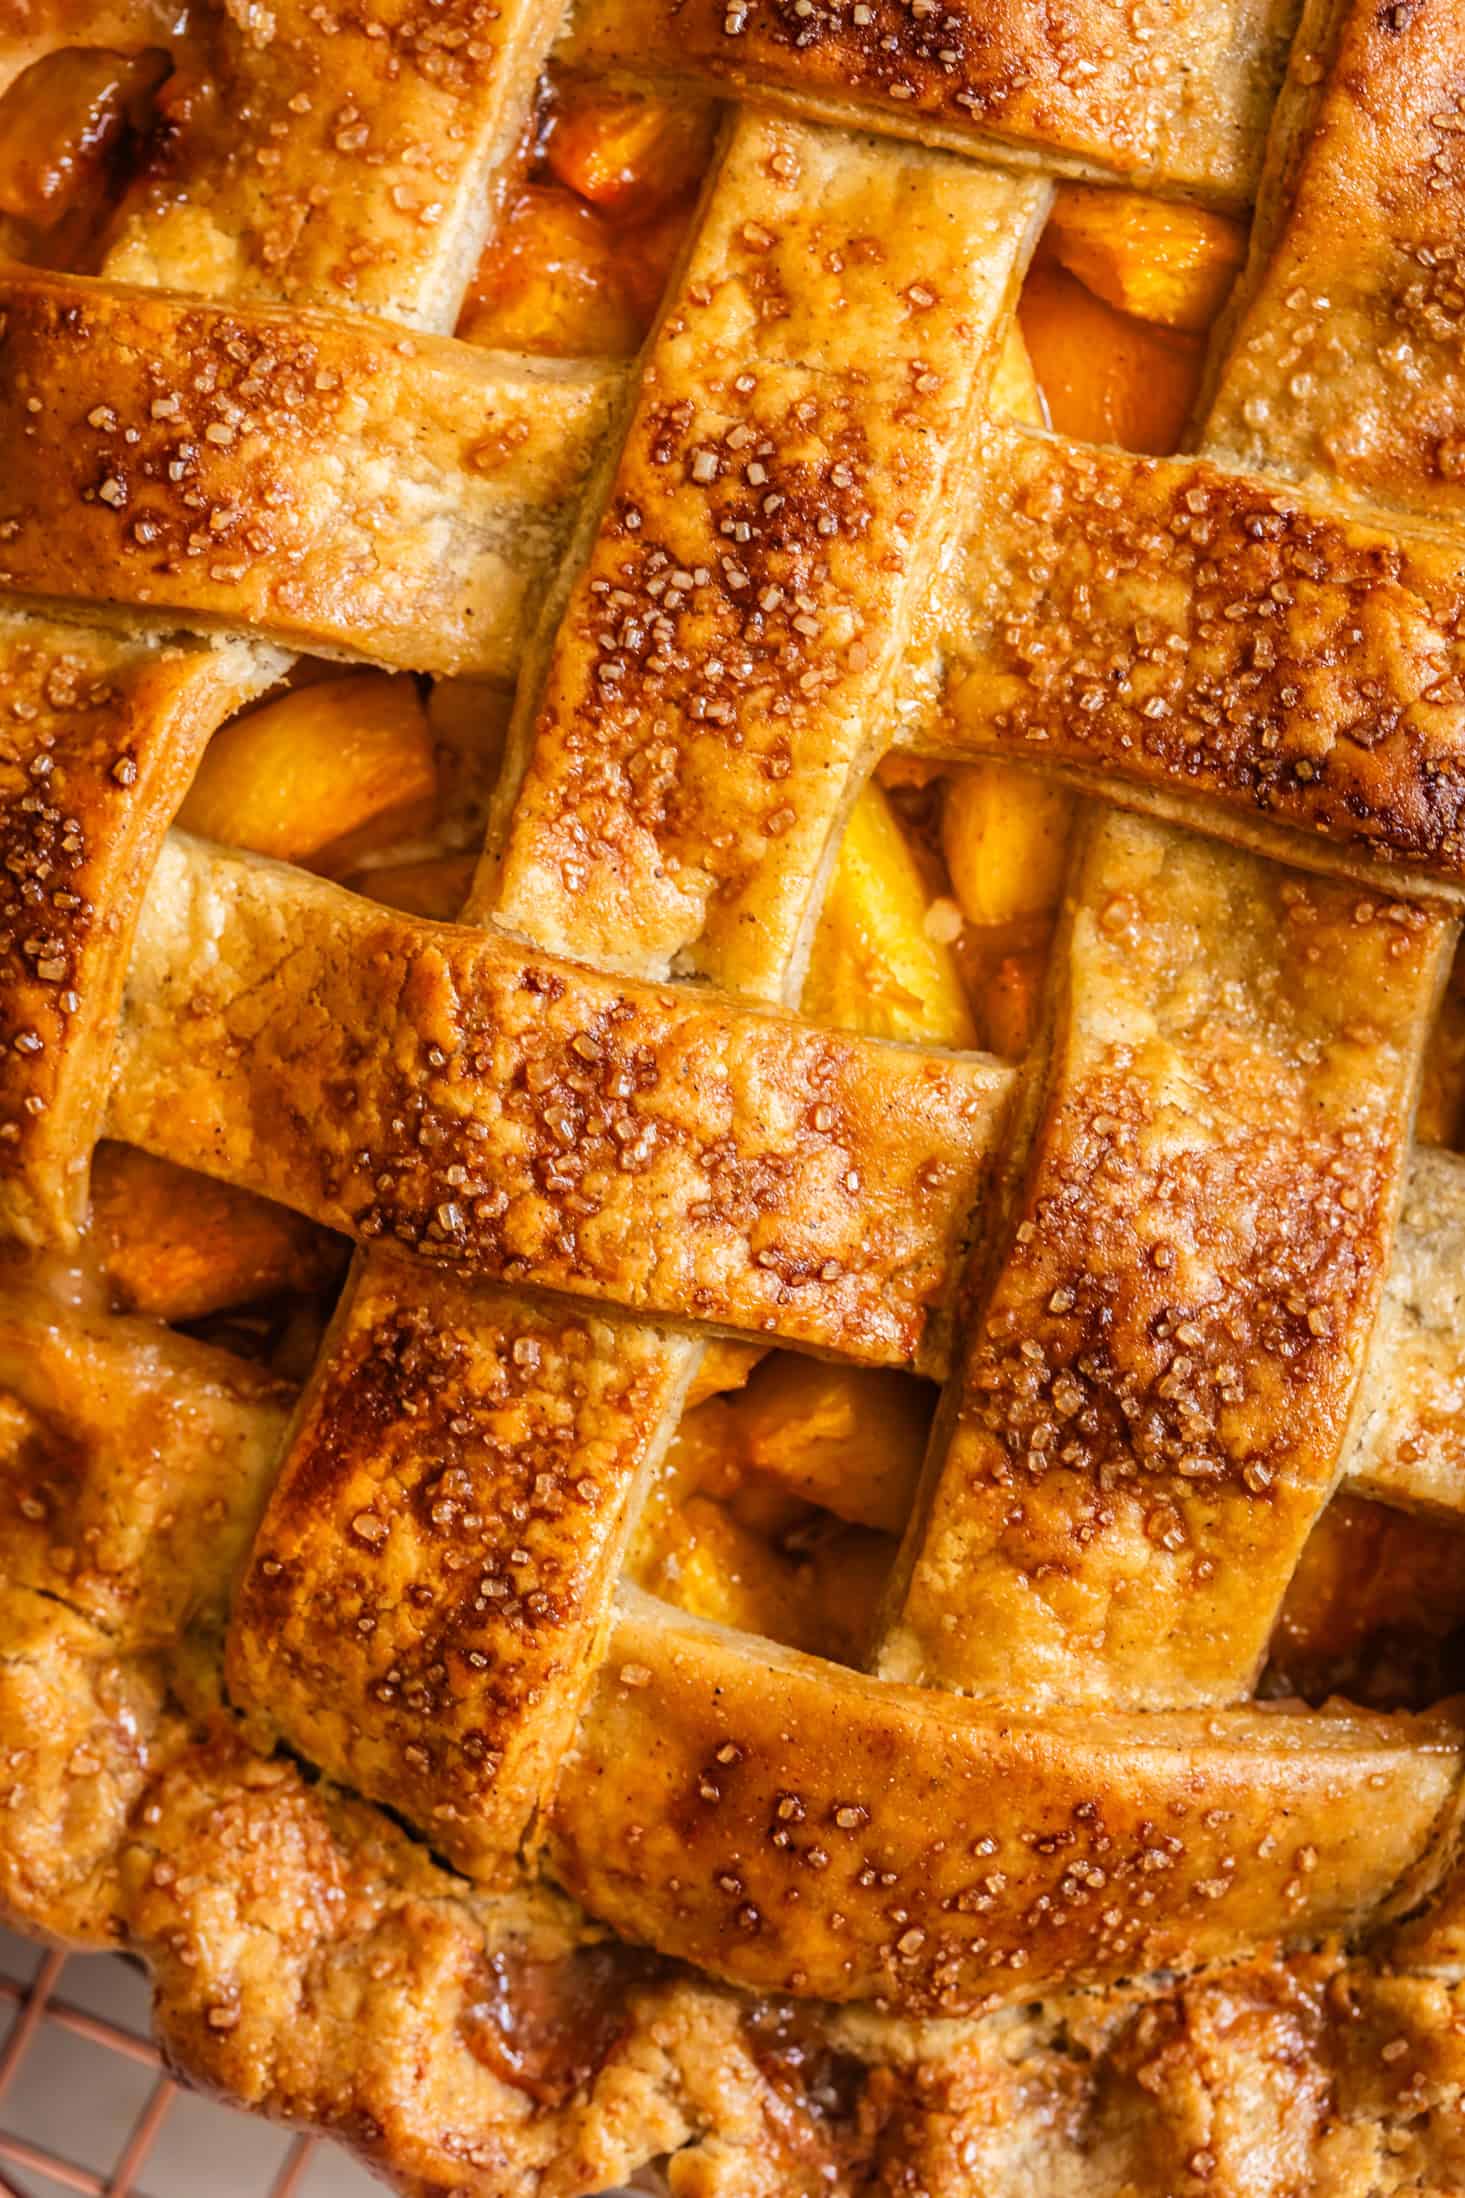
First, use every other cut strip from your oval to place half the strips evenly spaced lengthwise over the pie. To weave the lattice, lift and lightly fold two alternating strips back halfway. Grab one of your remaining center (longer) strips, place crosswise, then fold the lifted strips back over the top of this new strip. Lift the other two strips ¼ of the way, and place on of remaining shorter strips crosswise and fold the lifted trips back. Rotate the pie and repeat these steps with the remaining two strips. (Here's a video showing this process).
Trim the crust and strips to a 1-inch overhang, saving the scraps for decoration, if desired.
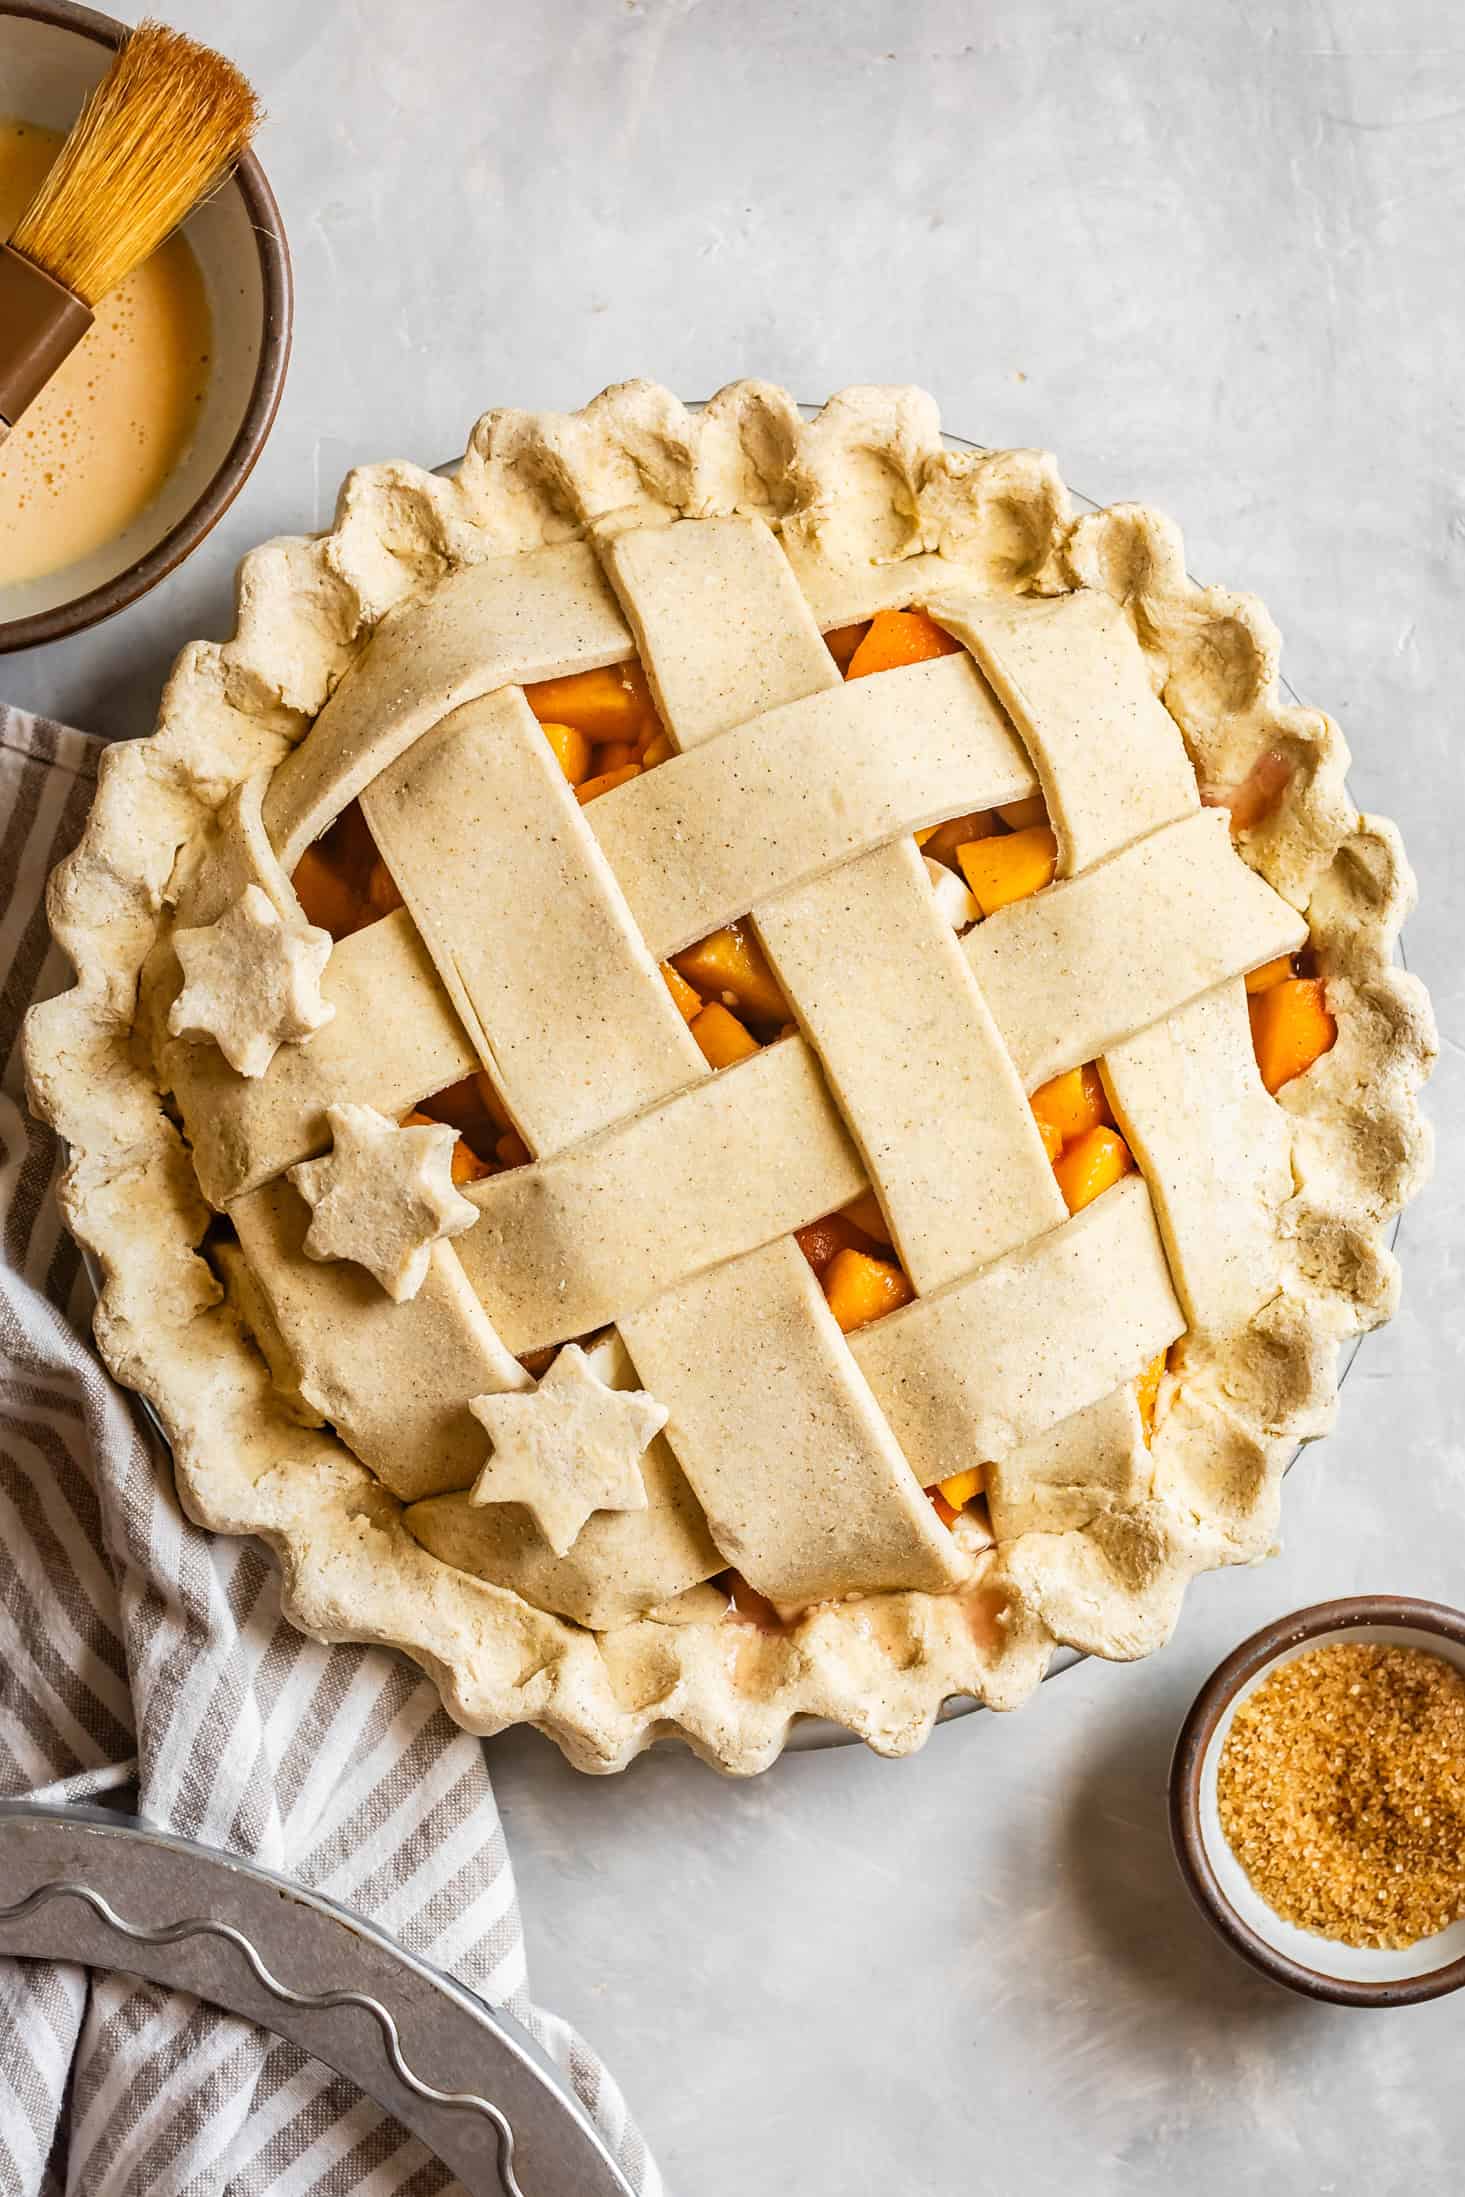
Fold the edge overhang of the crust over itself and the lattice edges, using your thumbs and index finger to crimp the crust (alternatively use a fork to add a pattern to the crust edge).
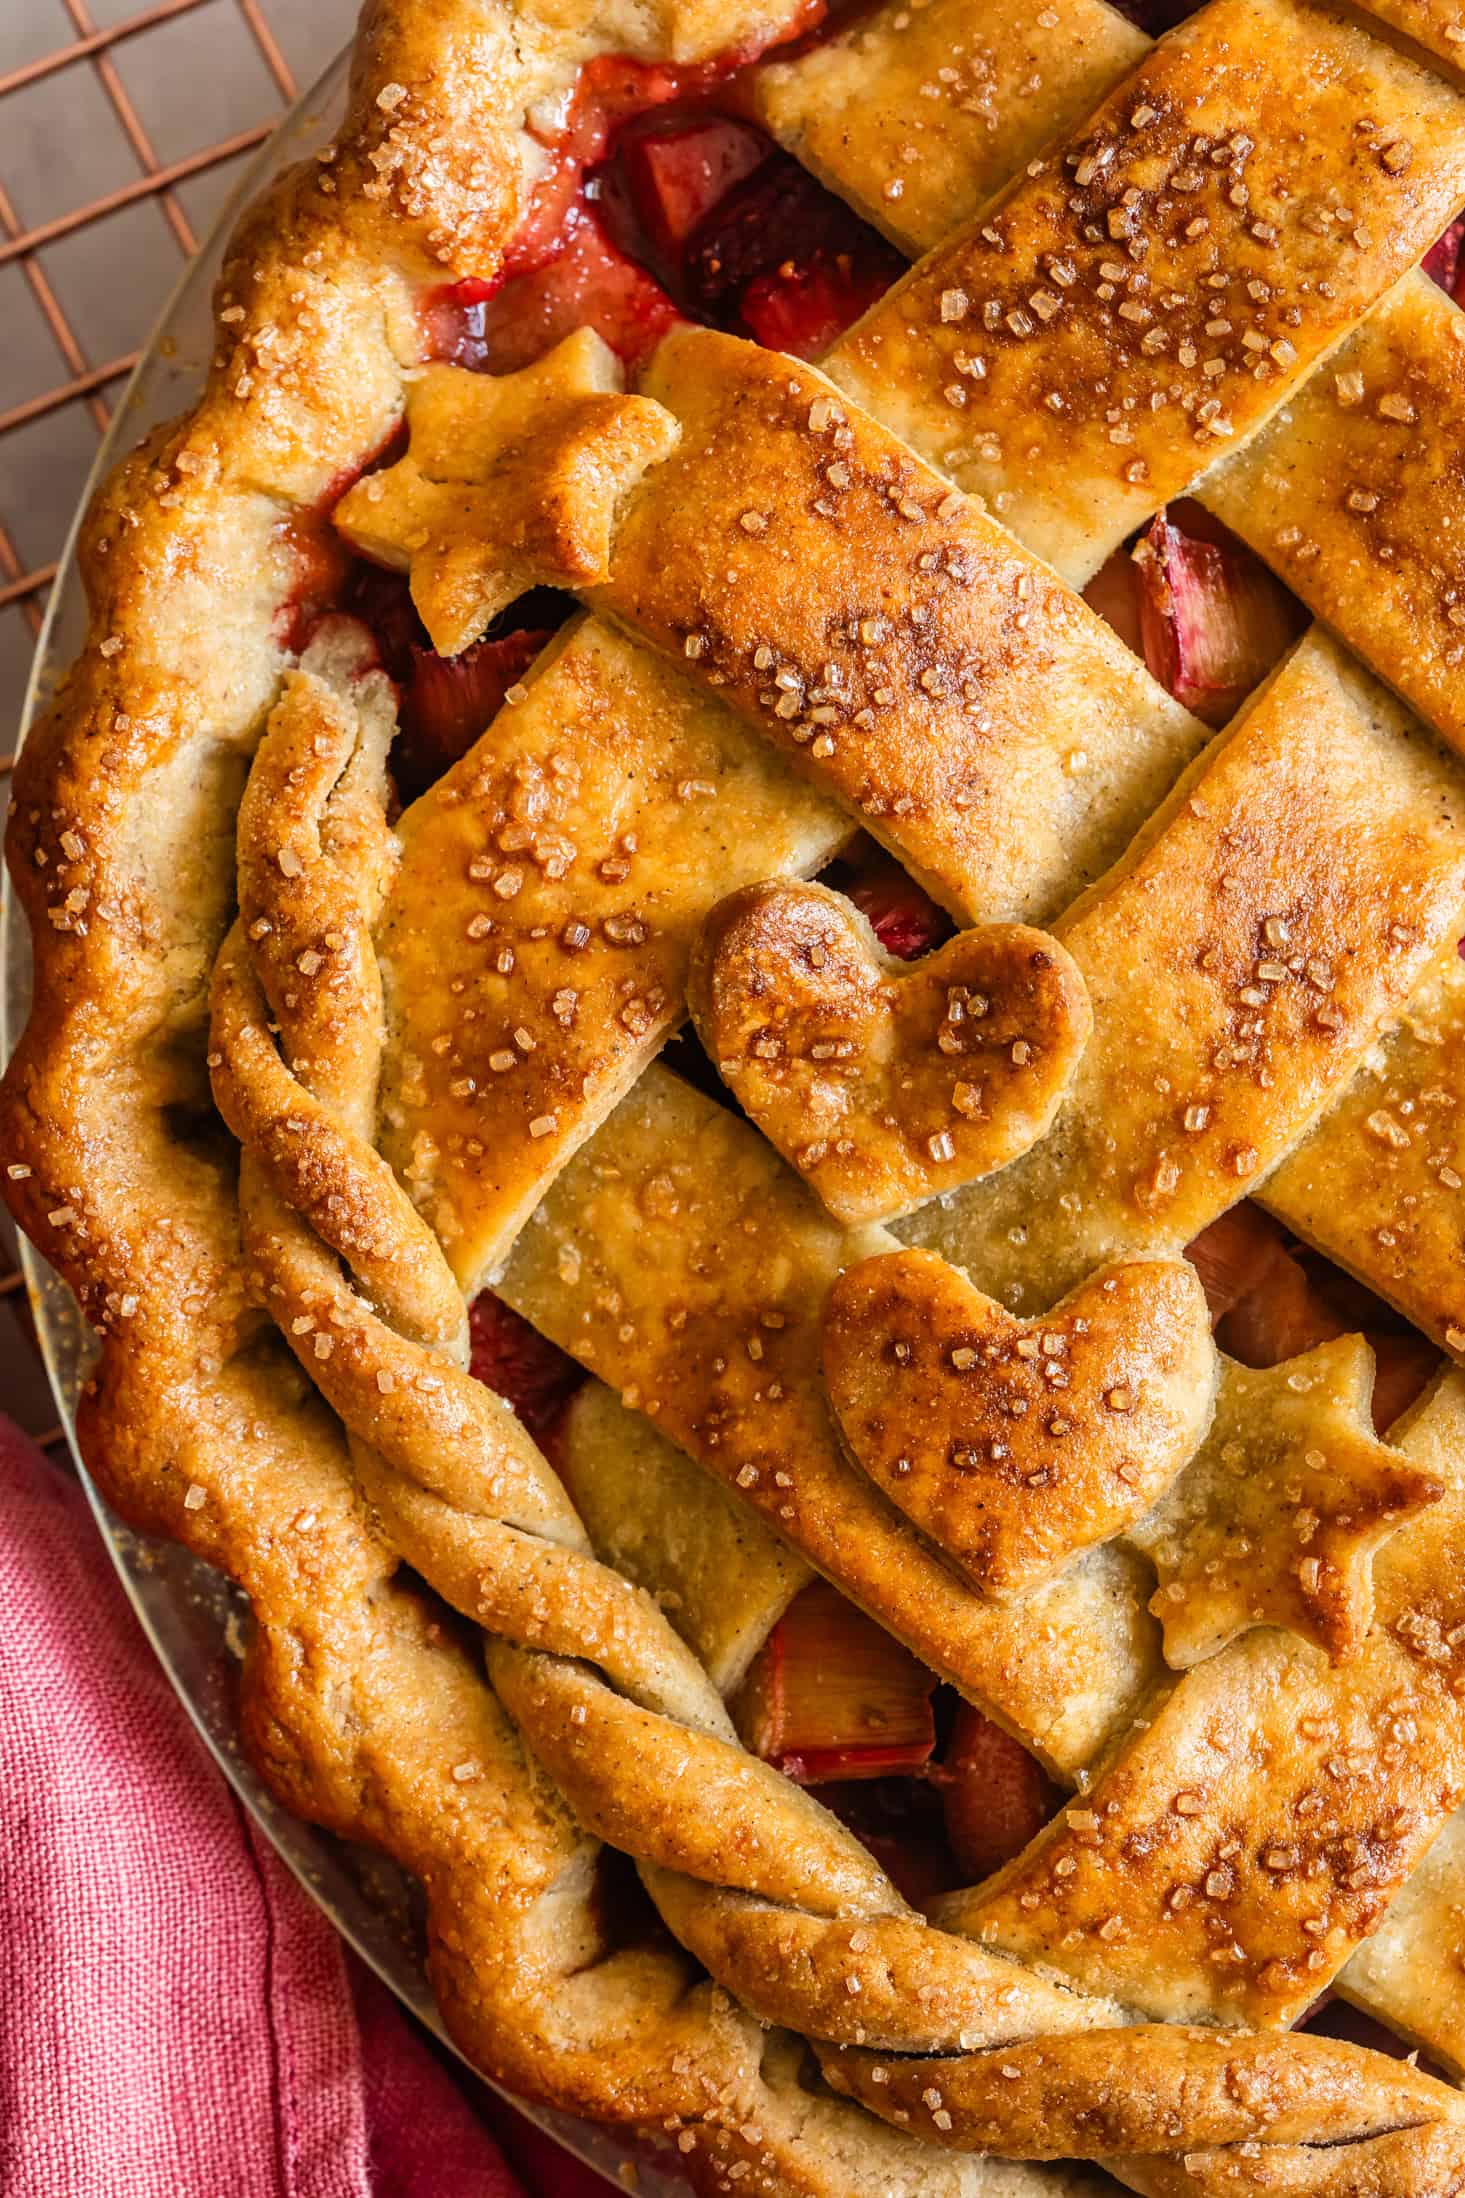
Optional: Roll the remaining dough scraps out until it is ¼ inch thick and use a cookie cutter to cut out shapes to place on top of your pie, or roll any remaining bits of dough into long strips and braid them. Place them on top of your pie as you desire.
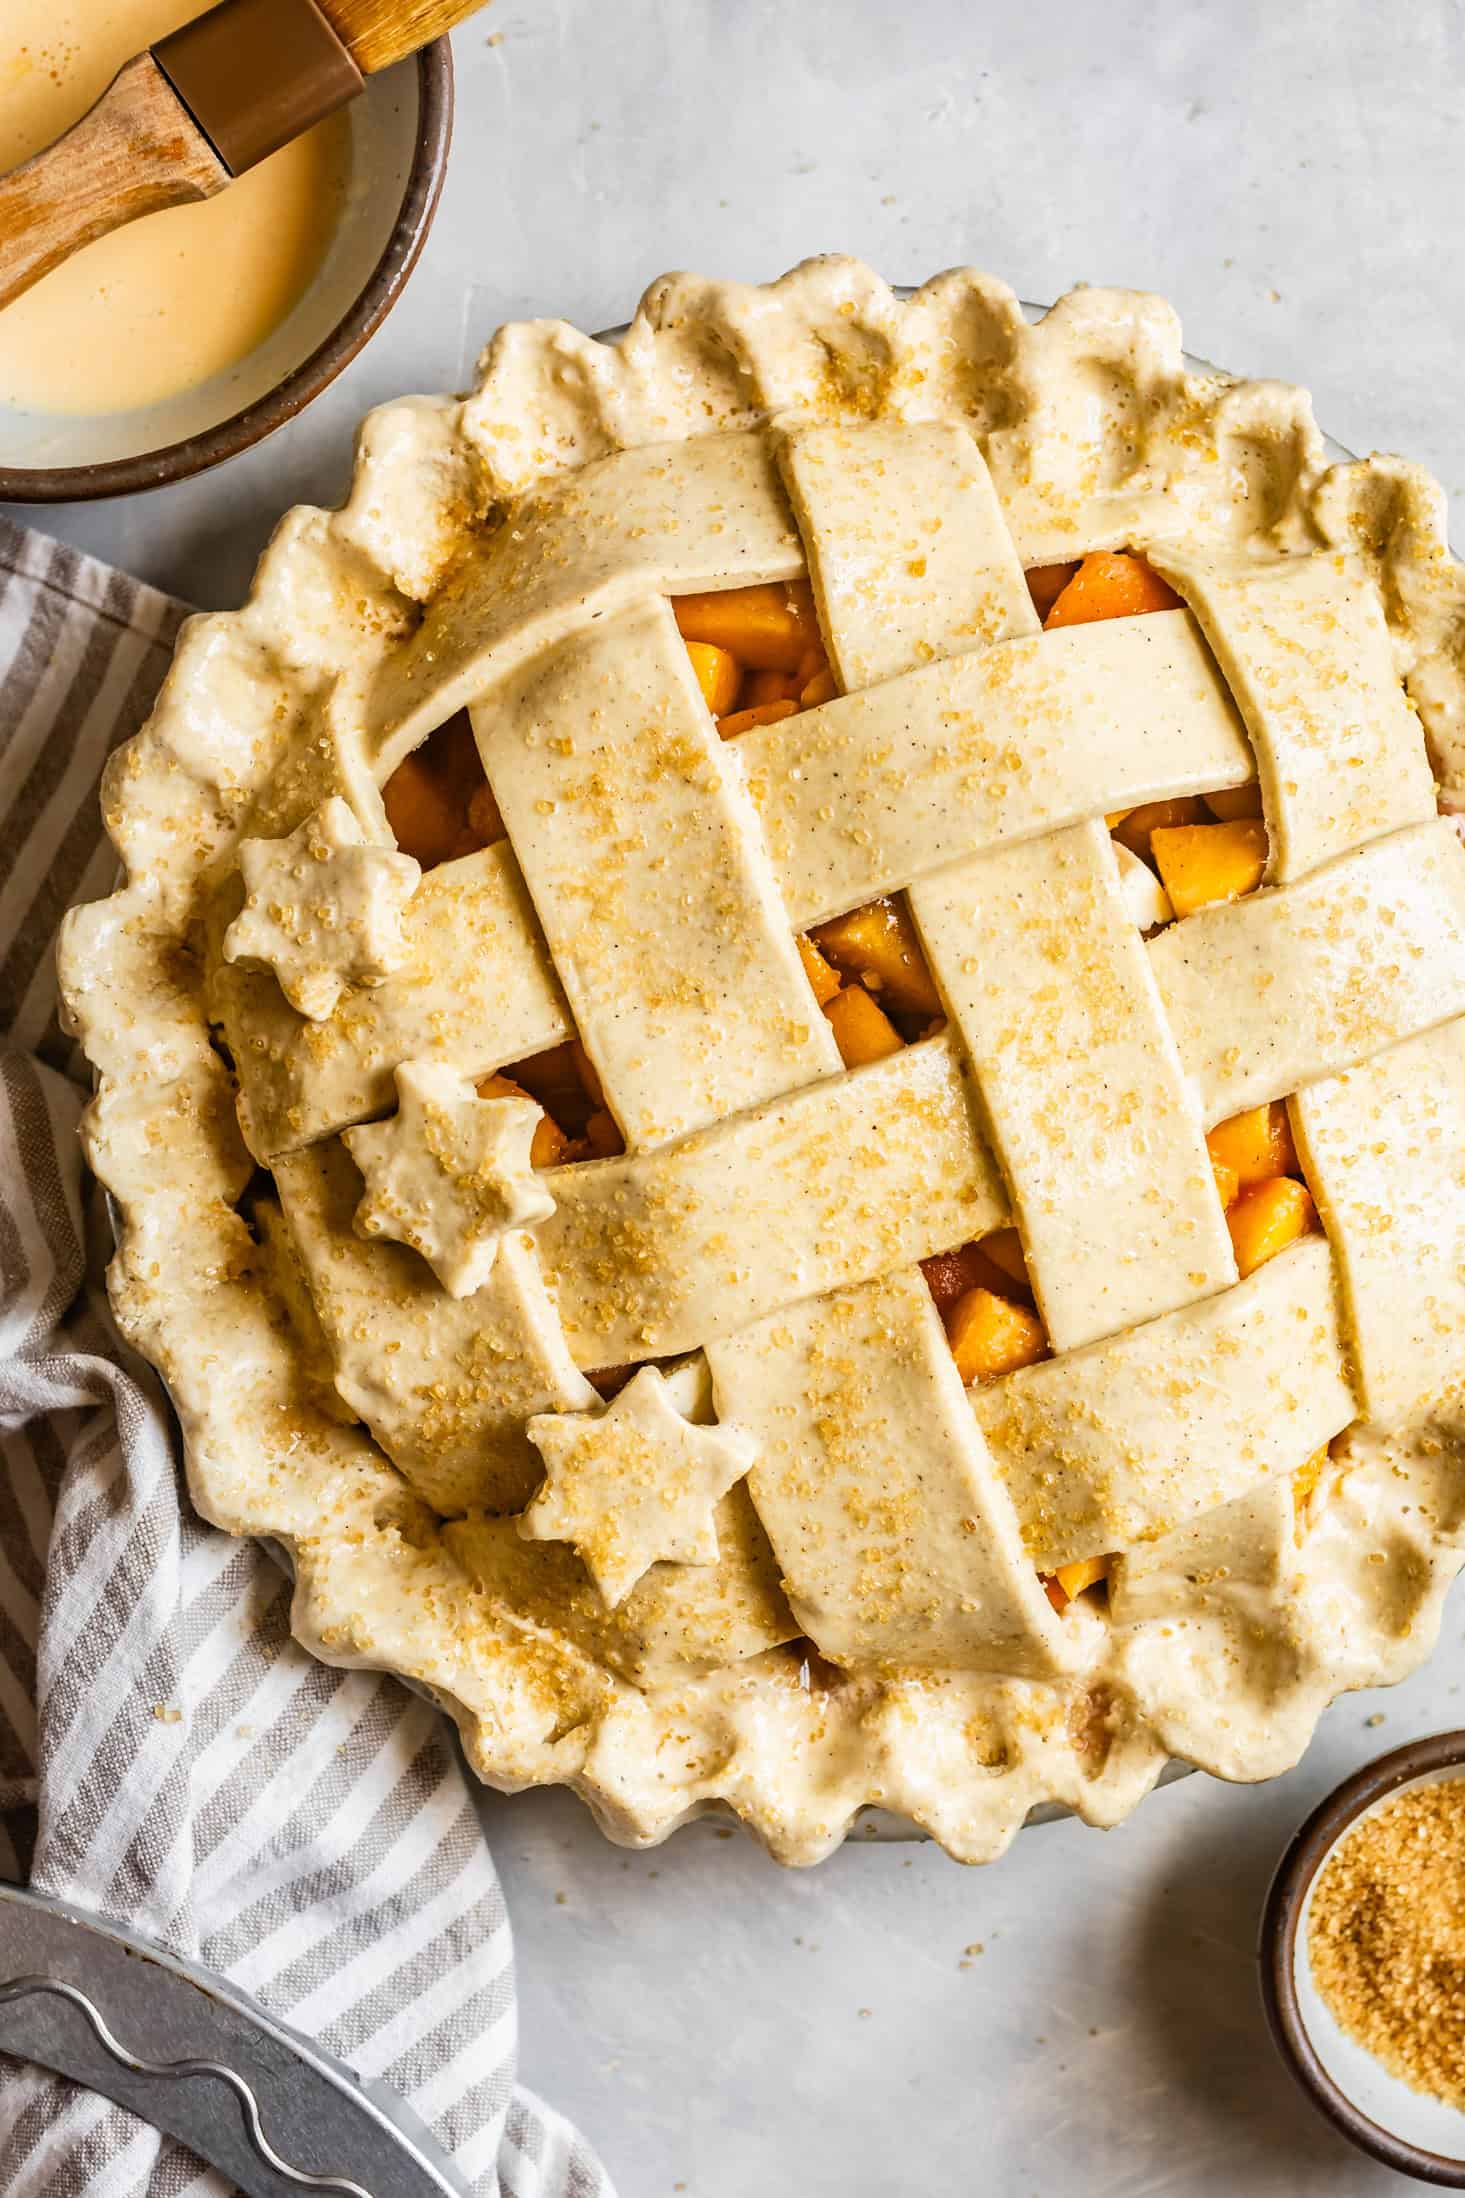
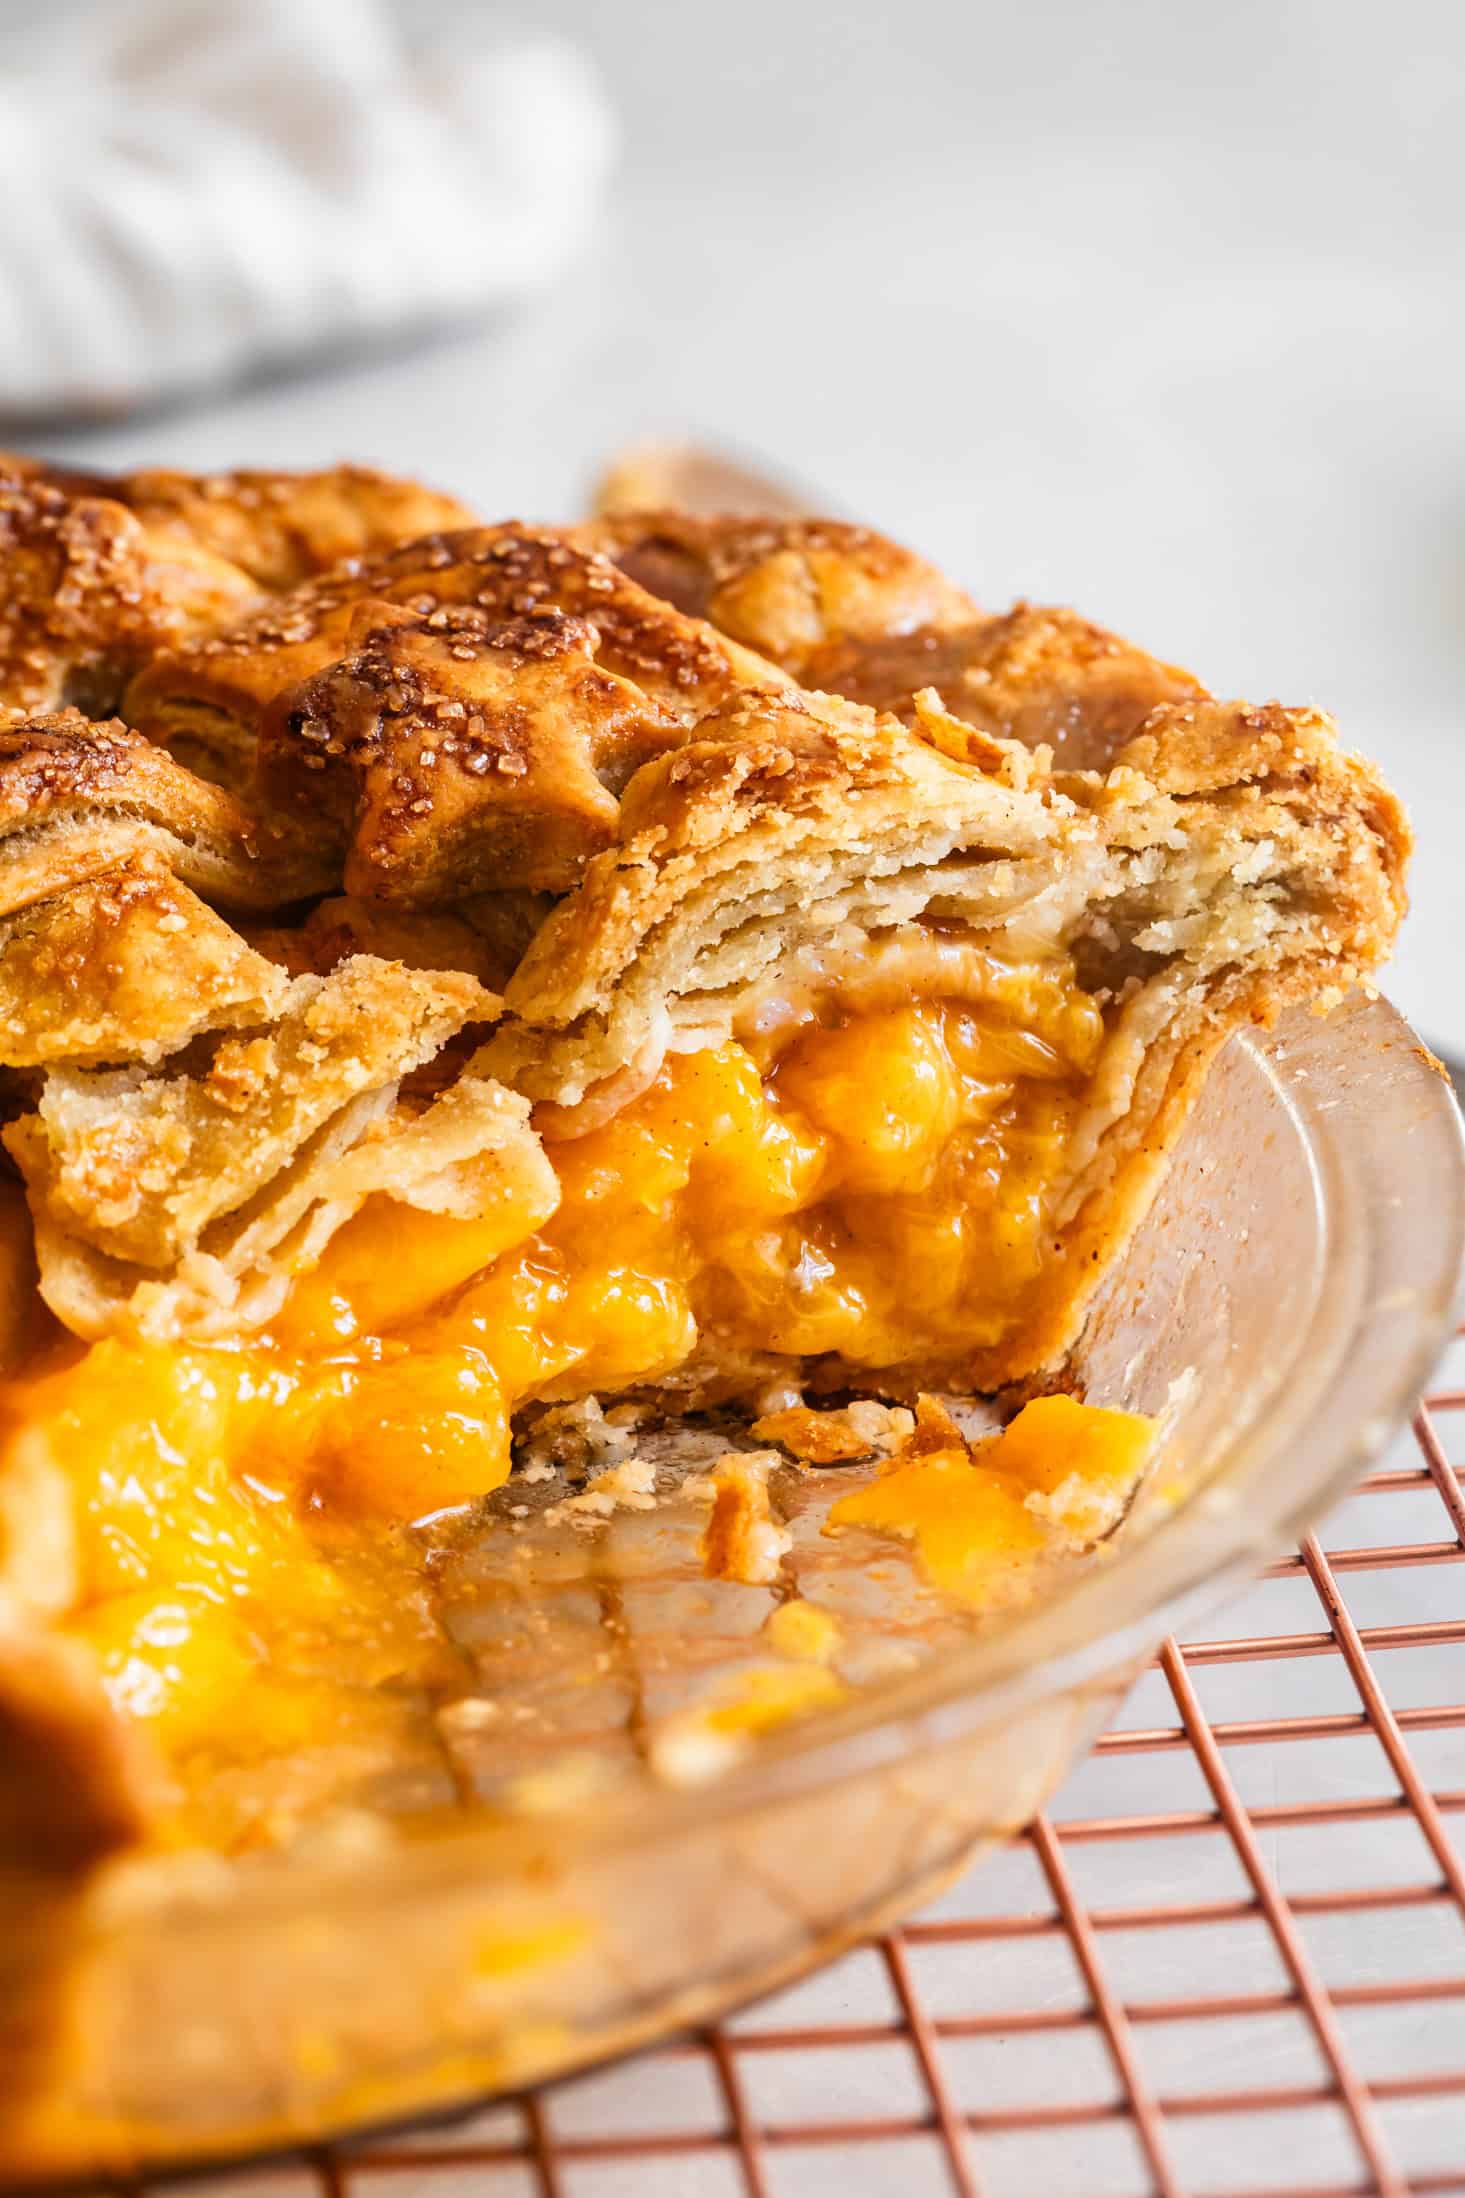
Chill the whole pie for 20 minutes then brush with egg wash and sprinkle with coarse sugar.
Bake the pie on the parchment-lined baking sheet on the lower rack at 425°F for 20 minutes then reduce heat to 385°F and bake for 55-65 minutes, until the filling is bubbly and the crust is golden brown.
Tip: If the edges get too dark or you find patches darkening quicker than others, use a pie shield or foil cut into a donut shape the size of the crust to cover the fluted edges. Use tiny bits of foil to shield any small areas of the crust that are browning too quickly.
How to store gluten-free pie dough or pie crust
You can store the dough before you've rolled it into a pie crust, after it's been rolled into a crust, or after it's been baked.
Pie dough
Store pie dough disks wrapped in plastic wrap in the fridge for up to a week. When ready to use, remove it from the fridge and let it rest for 5 minutes before rolling it out.
To store for longer, place the wrapped disks in a freezer bag and freeze for up to 3 months. To use, let it thaw overnight in the fridge. When ready to use, remove it from the fridge and let it rest for 5-10 minutes before rolling it out.
Unbaked pie crust
Alternatively, store the shaped pie crust dough. After you've rolled the dough out, placed it in the pan, crimped the edges, and docked the bottom with a fork, place it in the freezer for 10-15 minutes to firm up.
For short-term storage, wrap it in plastic wrap and store it in the fridge for up to 24 hours.
For longer storage, place the pie pan directly into a freezer bag if it will fit, or wrap it well in a few layers of plastic wrap and foil and freeze for up to 3 months. Let it thaw overnight in the fridge before using.
Par-baked or fully-baked pie crust
You can store a par-baked or fully-baked pie crust for up to 24 hours before using. Once cool, wrap it in plastic and store at room temperature until you're ready to use.
If you store any longer than 24 hours, the crust will begin to lose its crisp texture.
Recipe
Buttery, Flaky Gluten-Free Pie Crust (step-by-step)
Ingredients
- 72 g (½ cup + 1 tablespoon) Bob's Red Mill sorghum flour
- 46 g (¼ cup + 1 tablespoon) millet flour
- 35 g (¼ cup + 1 tablespoon) Bob's Red Mill tapioca flour
- 49 g (¼ cup + 1 tablespoon) Bob's Red Mill potato starch
- ½ teaspoon xanthan gum
- 1 tablespoon granulated sugar
- ½ teaspoon kosher salt
- 9 tablespoons unsalted butter, frozen
- 6-8 tablespoons ice water
- 1 Egg wash, 1 egg whisked with 1 tablespoon cream, milk, or water
INSTRUCTIONS
- Note: If making a double crust pie, double the recipe. Start by preparing your ice water so it's ready when you need it!
- In a medium bowl, sift together all the dry ingredients.
- Grate ⅓ of the frozen butter into the dry ingredients, and gently toss it with the flour to coat.
- Slice the remaining butter into ¼-inch thick slices and add to the dry ingredients, gently tossing with the flour to coat. Use your hands to quickly massage the butter into the flour, pinching and smashing the butter into thin sheets, until the largest sheets are about the size of a quarter.
- Drizzle the ice water over top, starting with just 6 tablespoons (10 tablespoons for a double crust). Begin mixing the water into the dough with a fork, until it is no longer super sticky. Working quickly, use your hands to pinch and knead the dough until it just holds together into one piece when pinched. There will still be dry areas, but that's okay - the dough will hydrate in the fridge. Take care not to over mix or the butter will melt from the heat of your hands, eliminating those delicious flakes!
- Dump the dough onto your work surface. Use your hands to knead until the dough just forms a disk, about ¾-inch thick and holds together completely. If you doubled the recipe, divide the dough into two pieces and wrap each piece in plastic wrap. Press the dough flat into the plastic wrap and chill for at least 30 minutes or up to overnight.
- Once chilled, you'll laminate the dough using the letter fold method! Working one at a time, place the chilled pie dough on your work surface, lightly floured with sorghum flour. Dust the top with sorghum flour as well, to prevent the rolling pin from sticking.
- Roll the dough into a large rectangle, about ¼-inch thick, lifting and flipping as you roll, and lightly dusting with more flour as need to prevent the dough from sticking. Fold it like a letter: fold ⅓ of the length of the dough over the top, using a bench scraper or a knife help remove the dough from the surface, if needed. Then fold the other ⅓ of the length of dough over top as you would a letter. Repeat the tri-fold one more time in the other direction, this time folding ⅓ of the height of the dough over top, then folding the remaining ⅓ of the dough over top.
- Dust the dough lightly with sorghum flour and roll it out again into another rectangle about ¼-inch thick. Repeat the same 2x letter fold process you just did. Wrap the dough in plastic again and chill for at least another 30 minutes or up to a week in the fridge. If you doubled the recipe, repeat with the second disk of dough.
- When your dough is chilled, you're ready to roll it out into your ultra-flaky pie crust! Lightly dust a sheet of parchment paper with sorghum flour. Remove the dough from the fridge (one disc at a time, if you're doing a double crust) and let it rest for 5 minutes. Carefully roll into a 12-inch round on the floured parchment paper, dusting with sorghum flour and flipping or rotating the dough to keep it from sticking, and repairing any cracks as you roll.
- Lightly dust the top of the dough with sorghum flour, then carefully and lightly fold it in half and then in half again to form a triangle. Transfer the dough to a 9-inch pie pan, placing the point of the triangle in the center of the pan, then carefully unfold it into the pie pan. Alternatively, you can roll the parchment paper to invert the pie dough round into the pie pan, then remove the parchment paper. Gently pressing the dough down into the edges of the pan.
Single Crust Pie with Par-Baking or Blind-Baking
- For a single pie crust, trim the edges so there is just ½-to-¾-inch of overhang all around. Save the scraps in plastic wrap for decorations, if desired. Fold the overhang under and use your thumbs and index finger to crimp the edges of the pie into a fluted pattern. Dock the bottom of the pie with a fork to prevent it from puffing up too much in the oven and chill in the fridge for at least another 30 minutes, or in the freezer for 10 minutes.
- Meanwhile, preheat the oven to 425°F and place the rack on the bottom of the oven. For a single crust pie, you may want to par-bake or blind-bake your pie crust. To do so, crumple up a square of parchment paper and spread it over the pie crust. Fill the cavity with pie weights, rice, or dried beans. Bake for 18-23 minutes, until the edges and sides look fully set and slightly golden brown. Note: If the edges get too dark, you can use a pie shield or foil to cover the fluted edges while the bottom continues baking.
- Carefully use the parchment paper to lift the pie weights from the pan. Reduce the oven temperature to 375°F. For a par-baked crust, return the pie to the oven for another 6-8 minutes. For a fully-baked, or blind-baked, crust, you can optionally brush the pie with an egg wash (1 egg whisked well with 1 tablespoon cream, milk, or water) before returning it to the oven. This gives it that glossy golden-brown sheen. Return the pie to the oven for 12-20 minutes, or until the bottom is golden brown and fully baked. Let cool completely before filling.
Double-Crusted Pie
- For a double-crusted pie, you'll wait to bake until the pie is filled and the second crust is placed on top. Prepare the bottom as instructed above, waiting to trim and crimp the edges. Chill for at least 30 minutes before adding the filling. Prepare the filling, but do not put it in the crust yet.
- Meanwhile, remove the second disk of pie crust from the fridge and let it rest for 5 minutes. Roll it on a sorghum-floured sheet of parchment paper into a 12x14-inch oval about ¼-inch thick. Use a ruler to slice into an even number of long strips.
- Add the filling to the pie crust, leaving behind any juices in the bowl. Place the strips on the pie in a lattice pattern. First, use every other cut strip from your oval to place half the strips evenly spaced lengthwise over the pie. To weave the lattice, lift and lightly fold two alternating strips back halfway. Grab one of your remaining center (longer) strips, place crosswise, then fold the lifted strips back over the top of this new strip. Lift the other two strips ¼ of the way, and place one of remaining shorter strips crosswise, then fold the lifted trips back. Rotate the pie and repeat these steps with the remaining two strips. Trim the crust and strips to a 1-inch overhang, saving the scraps for decoration, if desired.
- Fold the edge overhang of the crust over itself and the lattice edges, using your thumbs and index finger to crimp the crust (alternatively use a fork to add a pattern to the crust edge).
- Chill the whole pie for 20 minutes then brush with egg wash and sprinkle with coarse sugar. Bake the pie on the parchment-lined baking sheet (to catch any juices) on the lower rack at 425°F for 20 minutes then reduce heat to 385°F and bake for 55-65 minutes, until the filling is bubbly and the crust is golden brown. Note: If the edges get too dark or you find patches darkening quicker than others, use a pie shield or foil cut into a donut shape the size of the crust to cover the fluted edges. Use tiny bits of foil to shield any small areas of the crust that are browning too quickly.
Notes
Can I make dairy-free or vegan gluten-free pie crust?
To make this pie crust dairy-free, replace the butter with stick-style plant butter, such as Country Crock Plant Butter or Miyoko's. Plant butter melts much quicker, so ensure it is frozen solid before starting, and chill your dough between each step to prevent the plant butter from melting too quickly from the heat of your hands. For a vegan version, rather than brushing the dough with an egg wash, brush the dough with plant butter or plant cream.Can I skip the xanthan gum?
For this recipe, the xanthan gum is necessary for keeping the crust pliable and not crumbly. If you cannot tolerate xanthan gum, you can replace it with 3 tablespoons of ground white chia seeds or golden flax seeds (ground up in a coffee grinder).Can I use this crust for galettes?
Absolutely! Just roll out the chilled dough into a 12-inch round, place the filling in the center leaving a 2-3 inch edge, the fold the edges over the filling. Brush with egg wash and sprinkle with sugar, and bake at 400°F for 35-45 minutes, until the fruit is bubbling and the crust is fully baked and golden-brown.Can I use this crust recipe for savory crusts?
Yes - use the crust for any savory recipe, such as your favorite quiche, just as you would any traditional crust recipe.Gluten-Free Flour Substitutions
Using multiple gluten-free flours can seem daunting and expensive. While the flours listed by far make the best gluten-free pie crust, here are my recommended substitutions if you can't find or can't have one of the flours in the recipe. That being said, if you buy multiple flours, you can use my recipe index to find other recipes that use the same flours to use up the whole bag! Tip: keep your flours in the freezer for longer storage! They'll last for years in the freezer.- Sorghum Flour: Sorghum flour adds flavor to the crust. Sorghum is wholesome and whole grain that has slightly sweet notes that add flavor depth.
- Substitute by weight with gluten-free oat flour.
- Millet Flour: Millet flour is a neutral flour in texture and flavor that's used almost as the mediator between the sorghum and the starches.
- Substitute by weight with brown rice flour, white rice flour, or gluten-free oat flour.
- Tapioca Flour: Tapioca starch is one of my go-to flours for gluten-free baking, it's a fluffy starch that holds the dough together, while also helps the flaky layers puff up.
- Substitute by weight with arrowroot starch or sweet rice flour (mochiko).
- Potato Starch: Potato starch works in combination with tapioca starch by helping the flaky layers bake up ultra crisp, and adding more flavor to the dough.
- Substitute by weight with arrowroot starch or corn starch.

Rissa -
Finally! I’ve tried so many gluten free pie crusts only to be completely dissatisfied with the ability to shape them, the graininess that comes with gluten free flour blends that contain rice (it never fully hydrates in a pie crust), the lack of flakiness, the absence of butter, etc.
My favorite grains to use to gluten free bread are sorghum and millet, so I looked high and low for a pie crust recipe that used those, and I finally found this one. I made a cherry pie for the 4th and even the most discerning gluten eaters liked it. (Which is always a win, because I like cooking for everyone, not just me and my fellow celiac family members.) It has more depth than a wheat crust, yet it’s still neutral, buttery, and flaky. I used the leftover crust to make some mini savory pies the next day and they were just as fabulous.
Susan -
I just found your site and am excited to start trying your recipes. I can’t have sorghum. Saw your recipe but I can’t have sorghum. Do you have any suggestions what I can replace sorghum with?
Sarah Menanix -
Hi! For most of my recipes, I have substitution options within the post to make it easy for folks with different allergies or access to flours. For this recipe, you can substitute the sorghum flour by weight with gluten-free oat flour.
Eleanor -
Yum