
Soft and flavorful gluten-free cassava tortillas that taste like regular flour tortillas! They're tender, chewy, and flaky. Adapt with your fat of choice to make them paleo or vegan, and make them ahead to keep on hand in the freezer or fridge!
When we got married, Lucas fondly told me stories of his grandma's homemade flour tortillas. When she passed a couple of years ago, he wanted to carry on her legacy, bringing more of his Mexican heritage into our family cooking. So, together, we've been testing batch after batch of gluten-free flour tortillas. Lucas is the resident authentic flour tortilla expert, and I'm the gluten-free flour buff. Honestly, this might be the best outcome of our marriage (kidding, our kids are pretty great too).
This final recipe here is exactly what we've been looking for. Lucas says they live up to the "Grandma Marta" test and we all prefer them to any store-bought tortillas we've had. Dedicated to Grandma Marta for Mother's Day.
Homemade Gluten-Free Tortillas
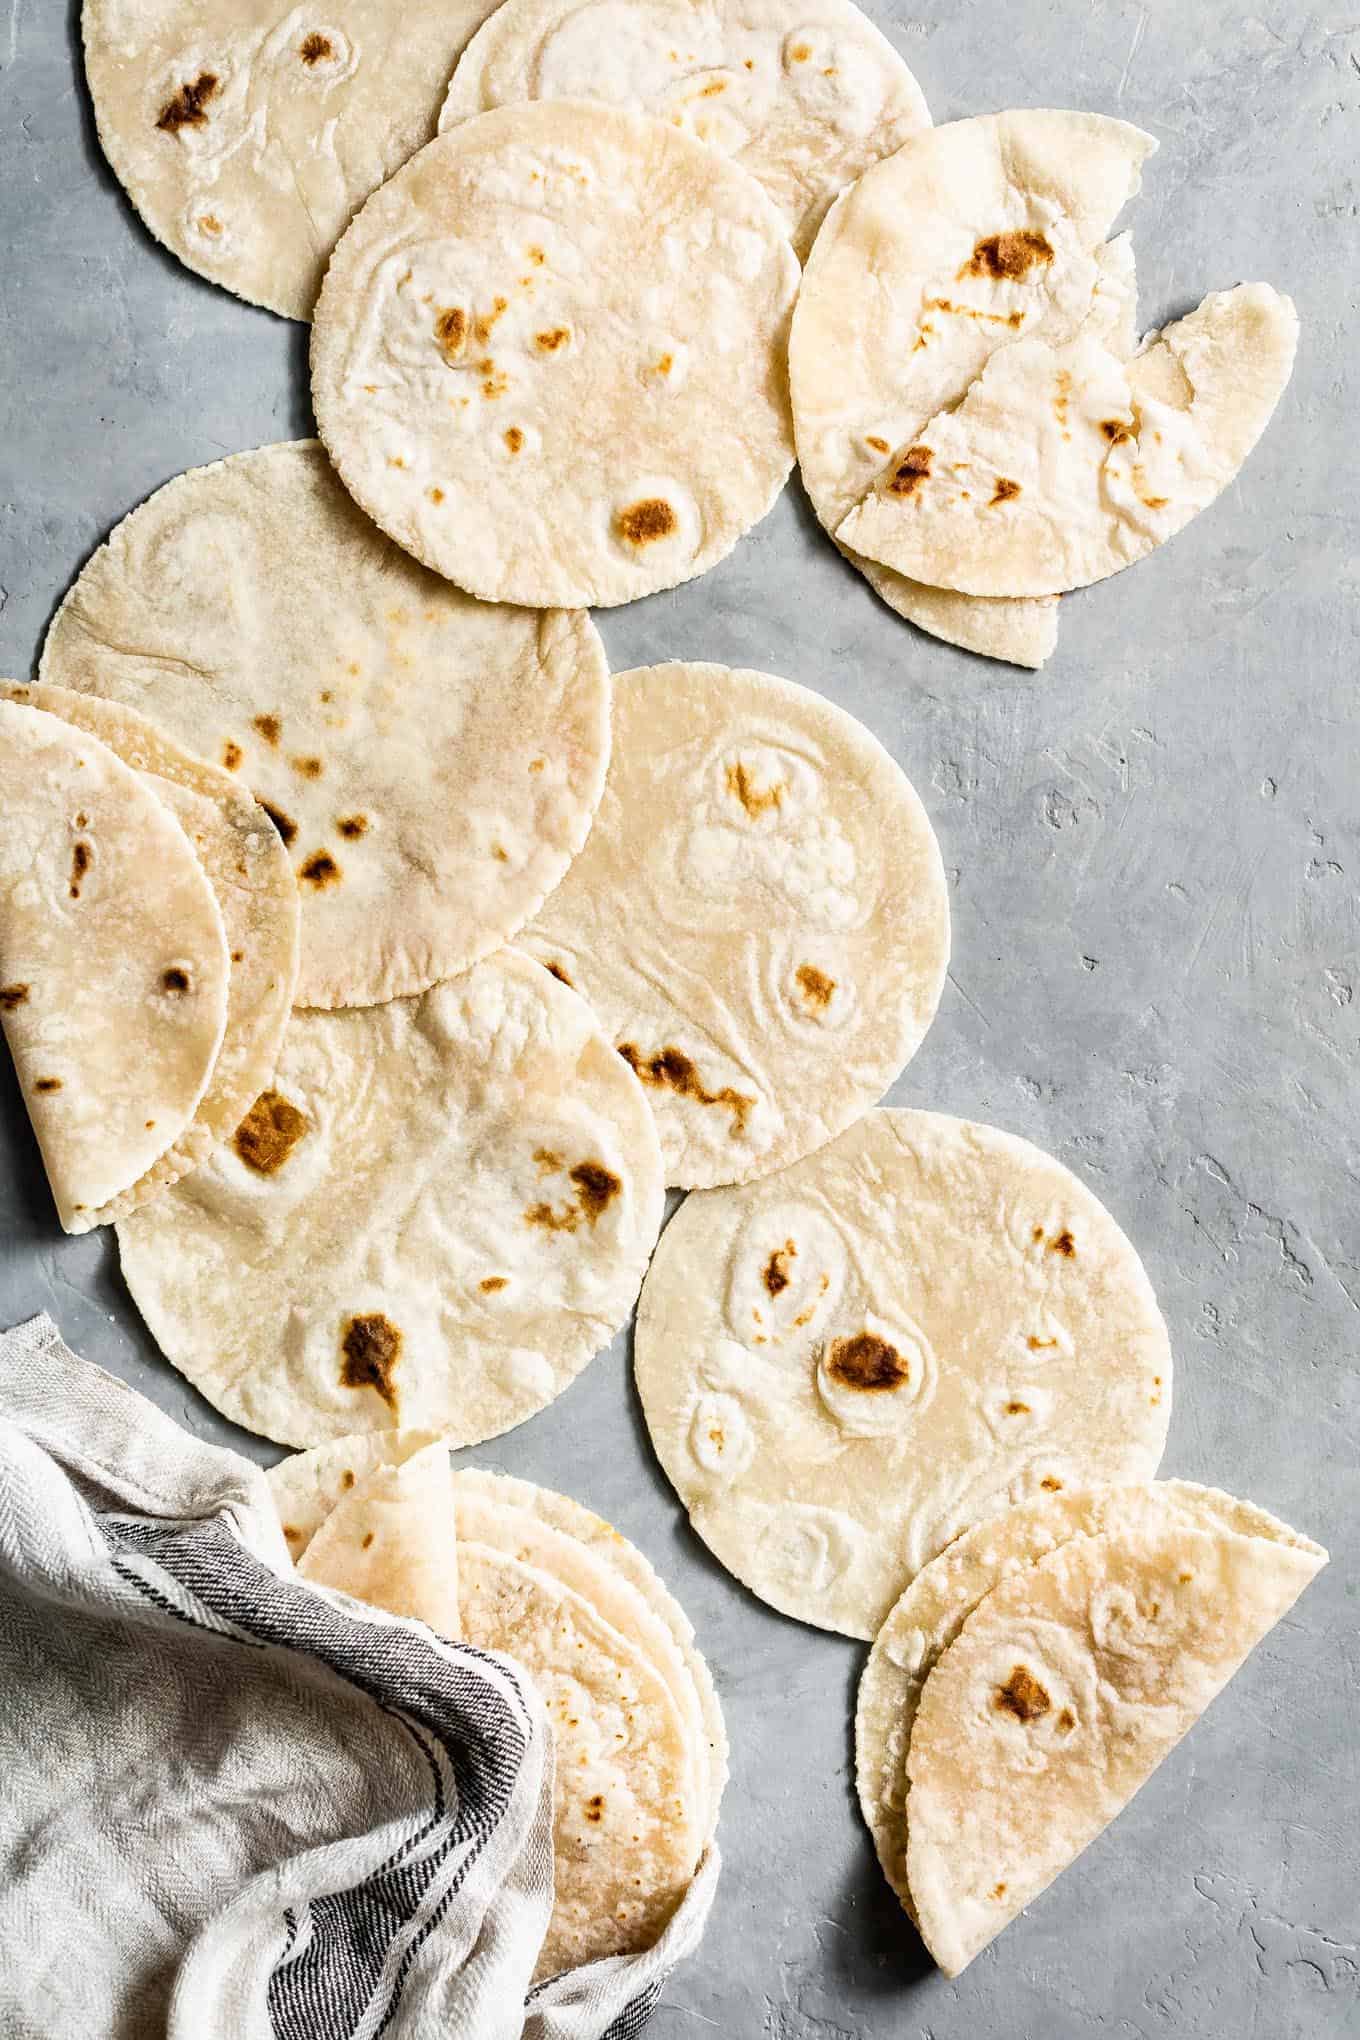
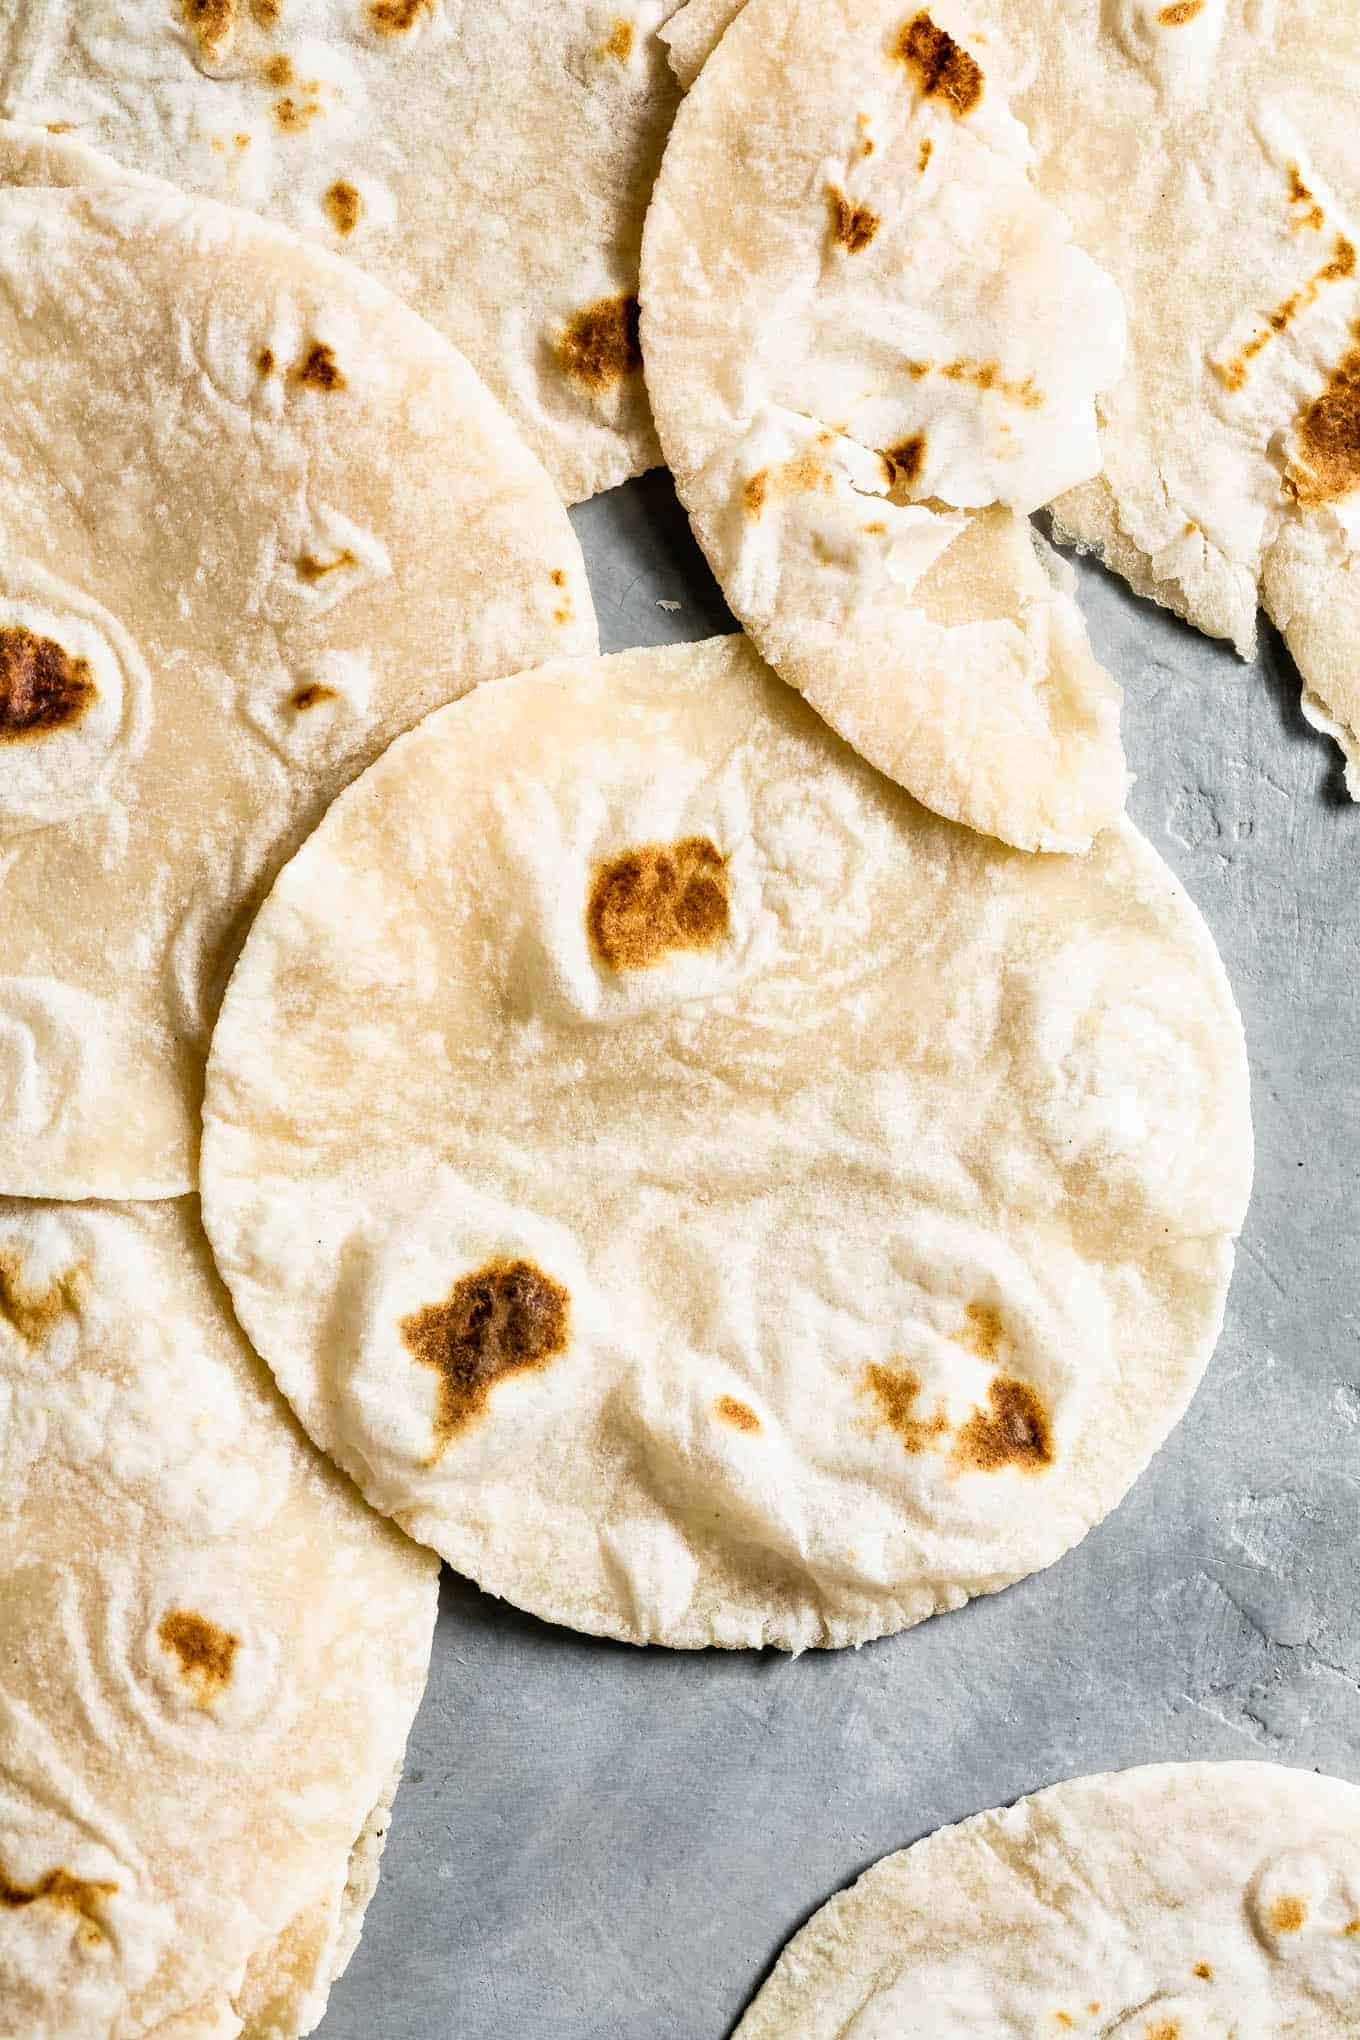
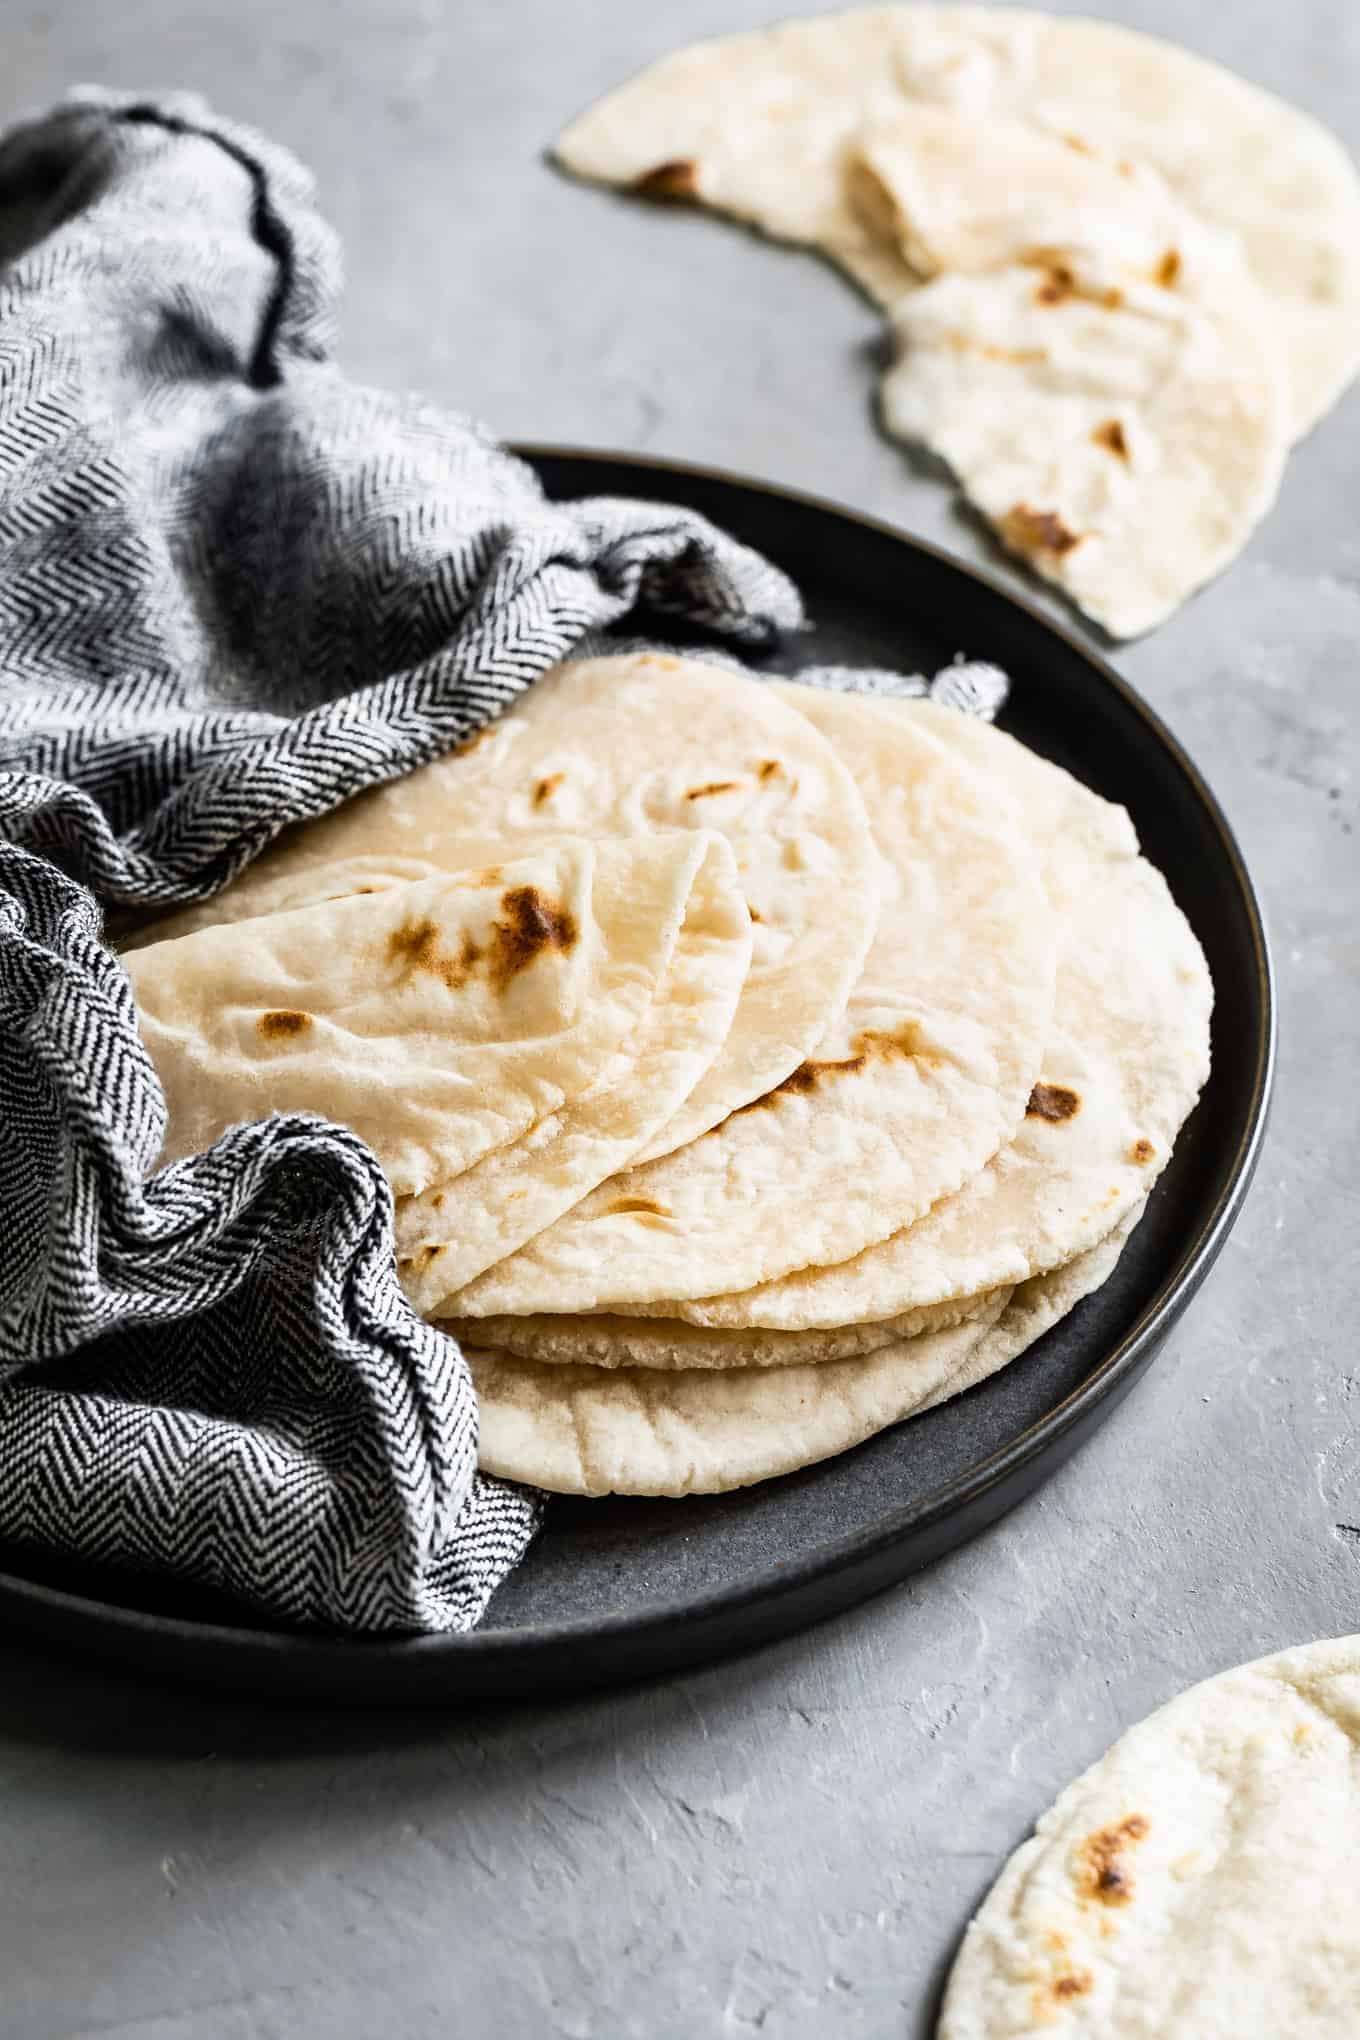
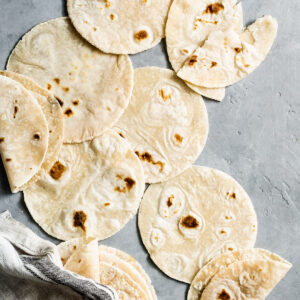
These homemade gluten-free flour tortillas are soft and tender with flaky bubbles that brown up just like traditional flour tortillas. With a chewy texture, they make the best tacos and quesadillas. And they're even delicious enough to eat on their own.
Lucas folds a warm tortilla up with a pat of butter, so we now make a double batch if we want to have enough left for tacos!
Cassava flour tortillas
Pliable soft gluten-free or grain-free flour tortillas can seem elusive, but cassava flour cooks up with a very similar texture as wheat flour in recipes like tortillas that don't rely on gluten for structure.
Cassava flour is a soft and finely ground flour that is neutral in flavor, which makes it a great substitute for gluten-free or paleo flour tortillas. This nutrient-rich flour is created out of the root vegetable cassava, sometimes also called yuca. Native to South America, the production and harvesting of cassava root is an essential aspect of many indigenous populations' livelihoods. With this history, I feel fortunate to have easy access to cassava flour in mainstream supermarkets and online for home cooking and baking.

How to make gluten-free tortillas
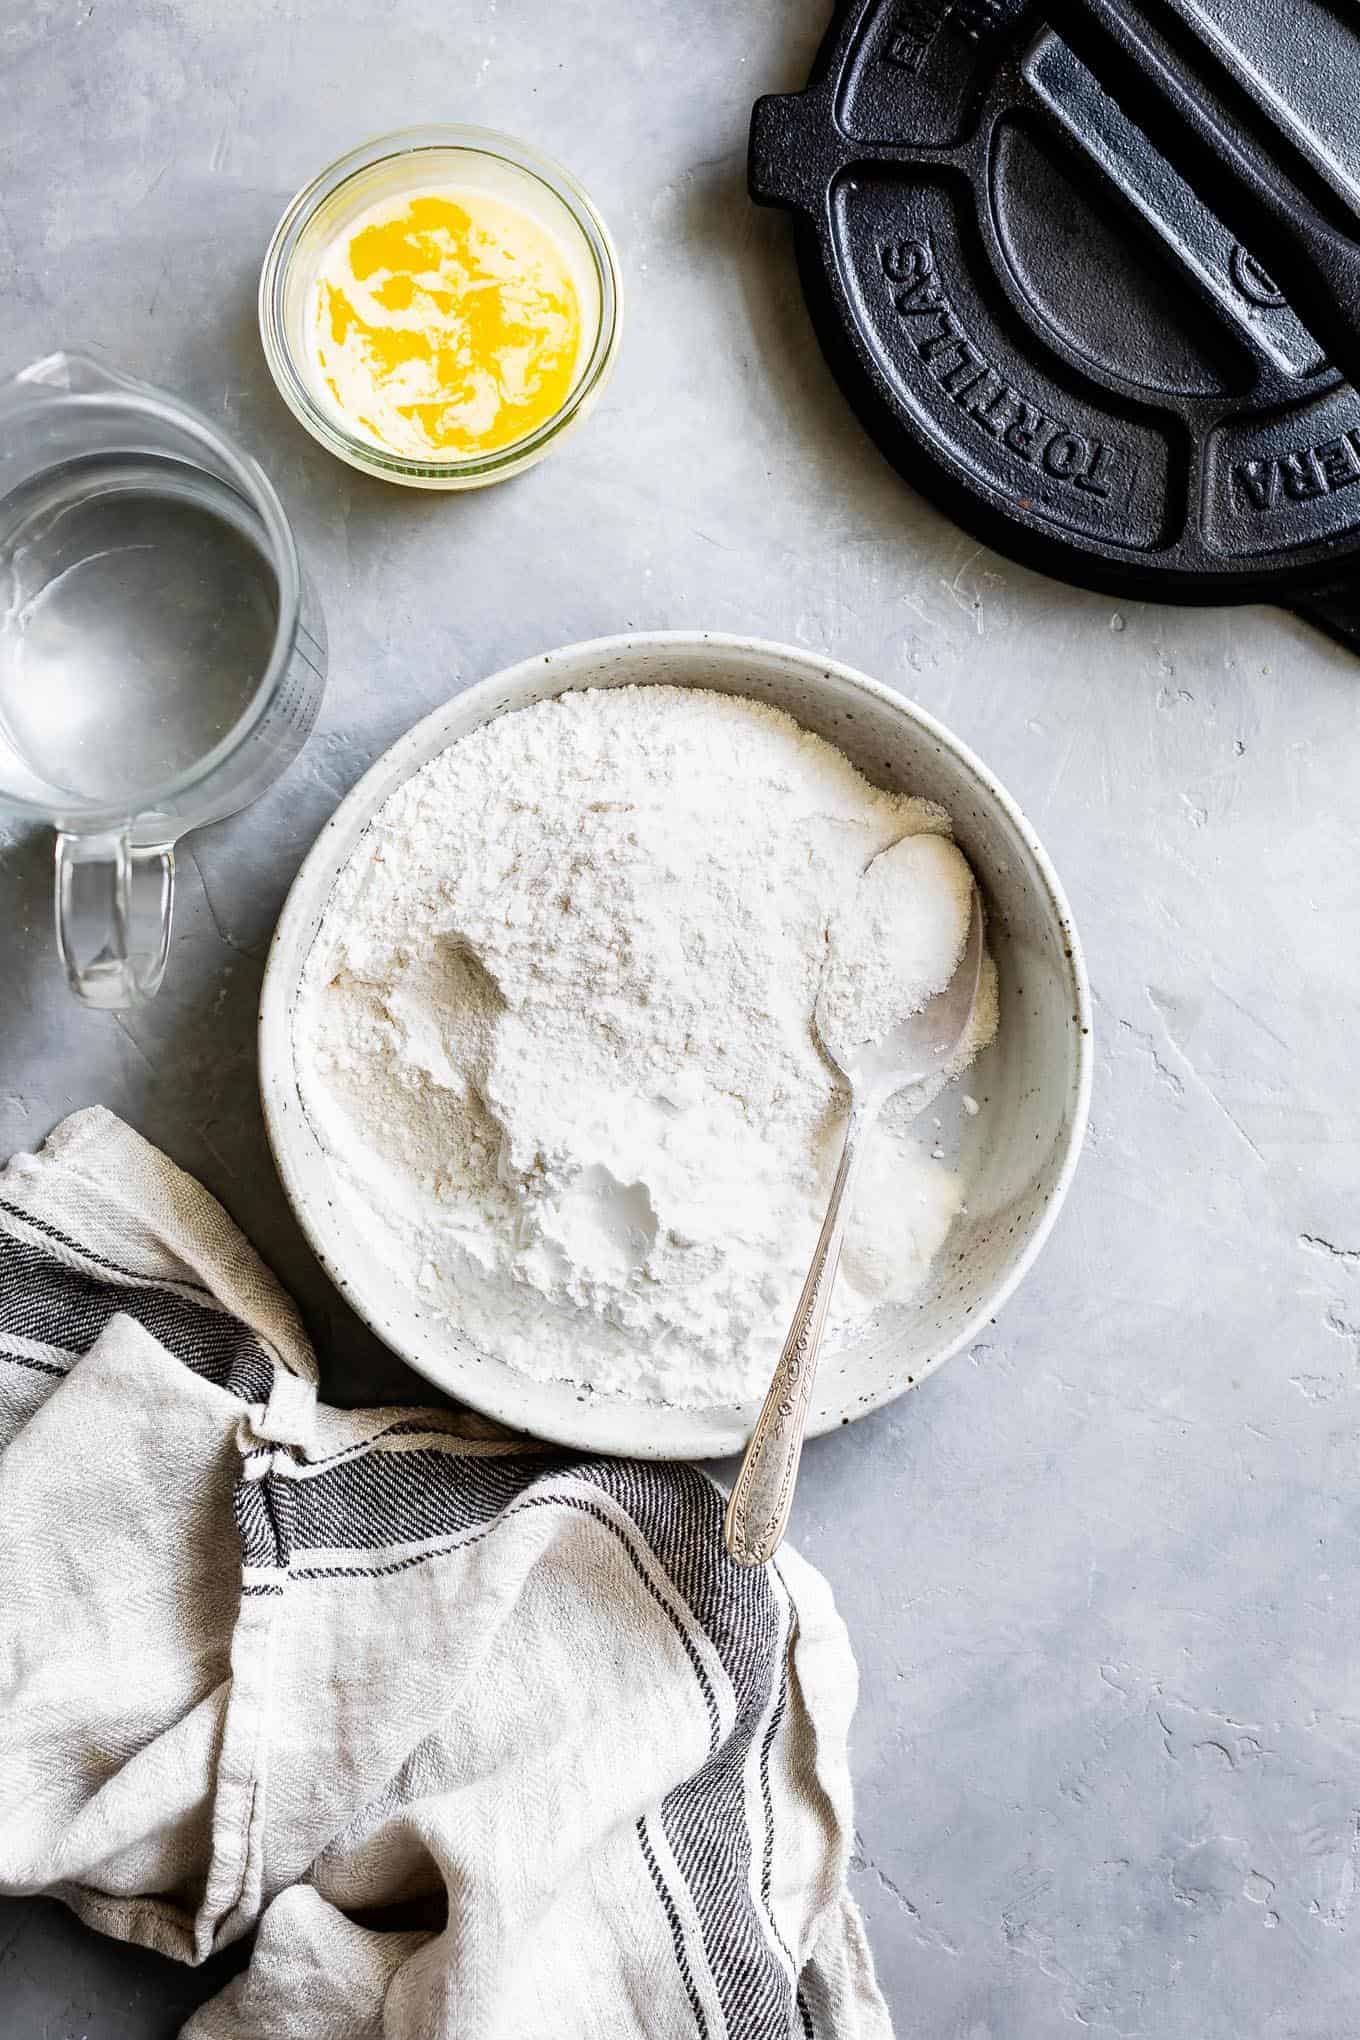
This gluten-free tortilla recipe uses a combination of cassava and tapioca flours as the base. Add hot water, fat, and salt. The dough couldn't be simpler!
For this cassava tortillas recipe, I found that combining the cassava flour with a bit of tapioca starch made the tortillas even softer and fluffier. When first mixed, the dough may seem sticky, but after a minute or two, the cassava flour will soak up moisture, leaving a dough that feels like very soft playdough that isn't at all tacky.
Since the flours are so light and fluffy and just a little mismeasure can affect the moisture content, I strongly recommend a kitchen scale for measuring flour and water. I've included cup measurements in case you don't have a scale, but you'll then need to pay attention to the cues from the dough for the perfect texture.
Best gluten-free tortillas
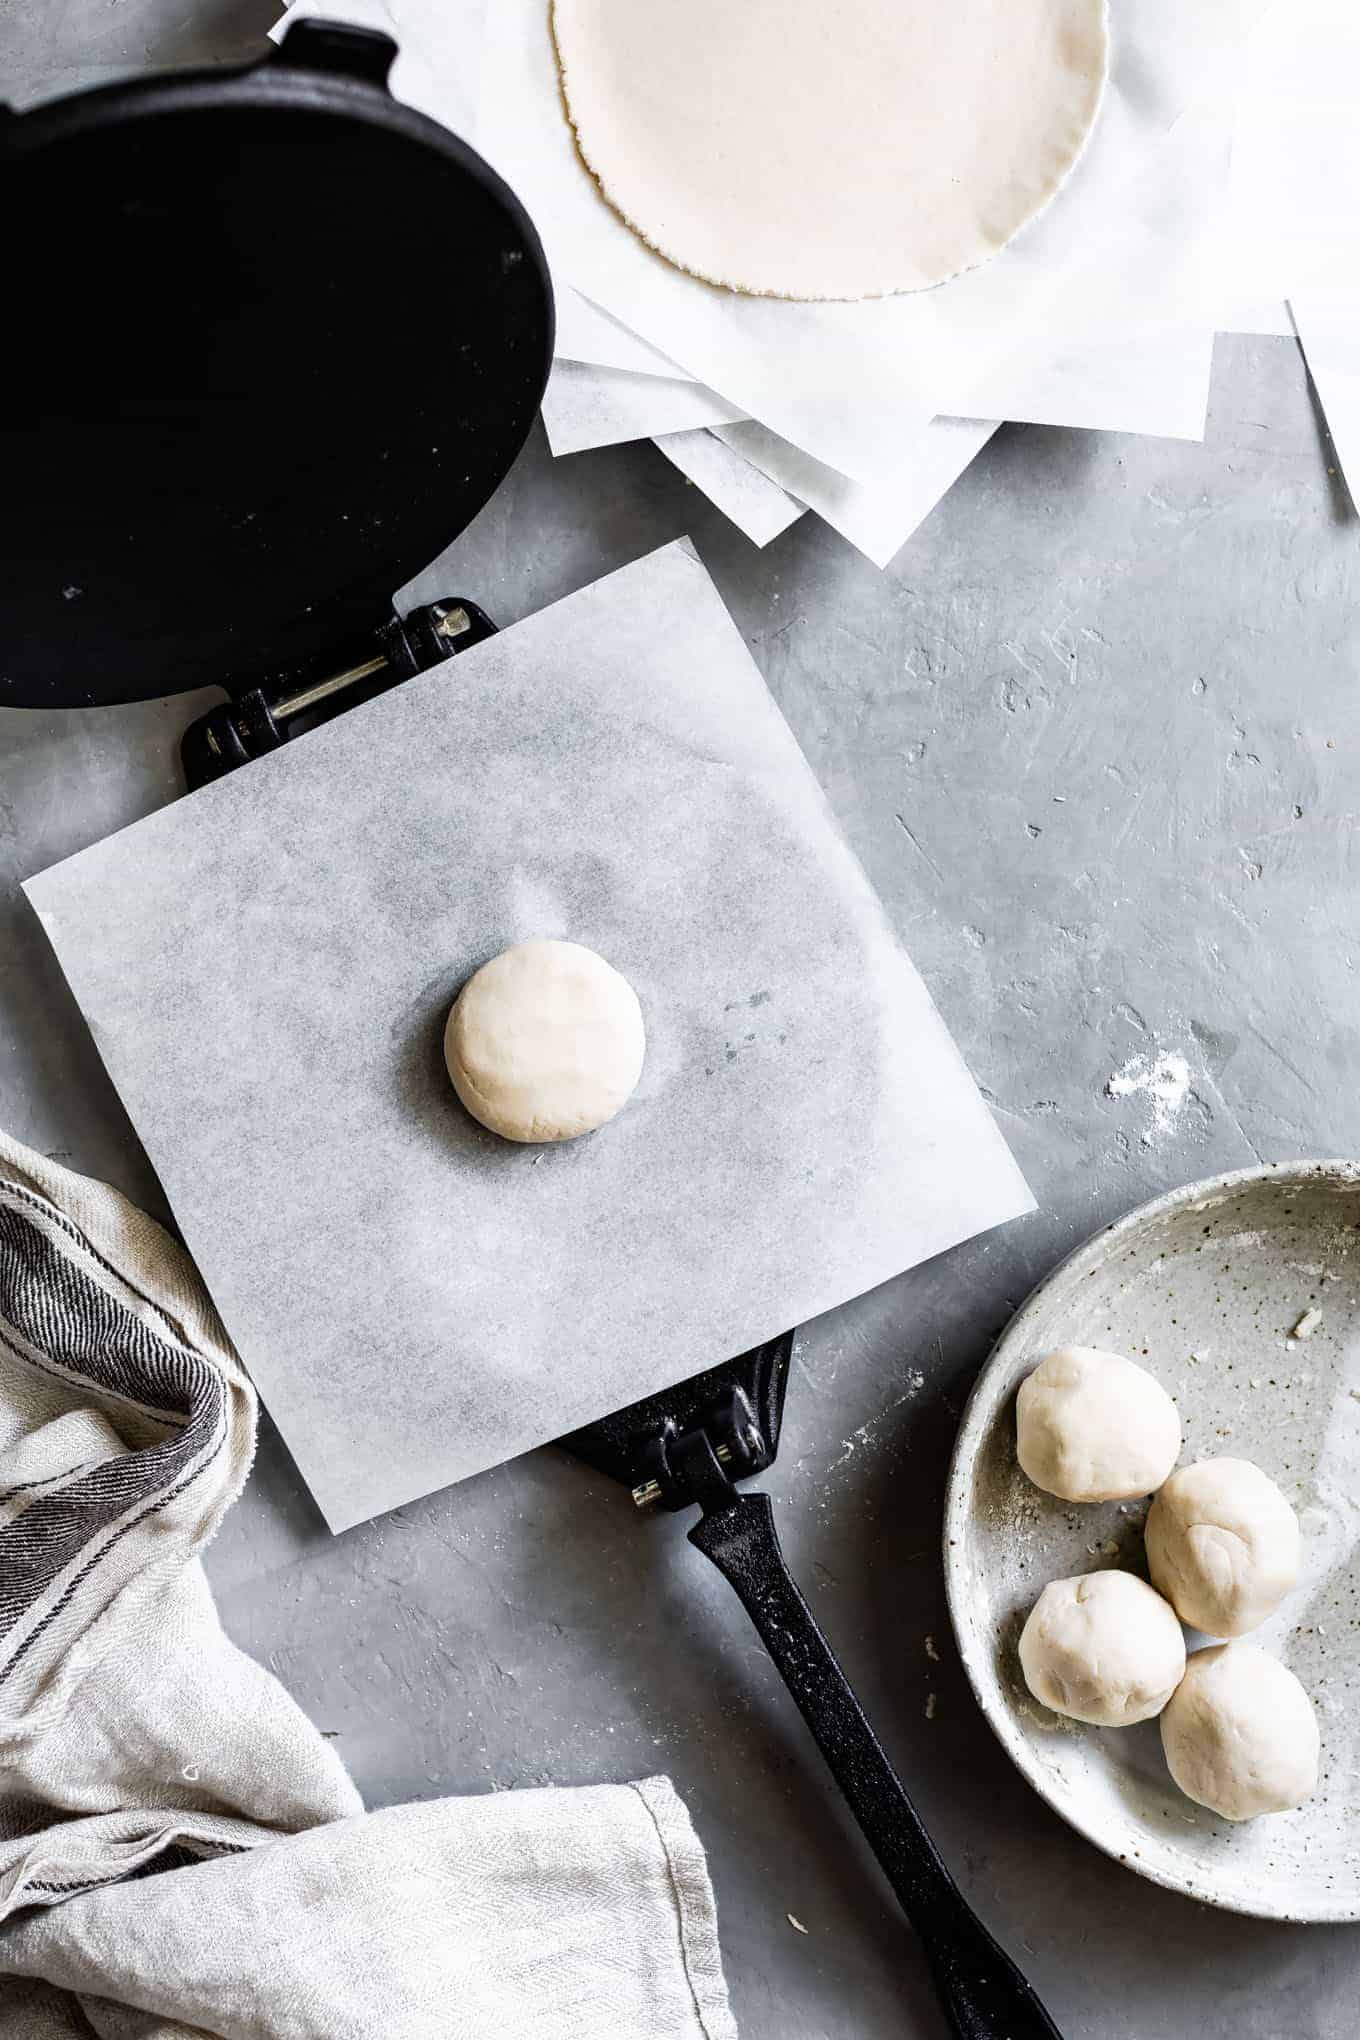
Without the stretchiness from the gluten, gluten-free or grain-free flour tortillas can be a bit trickier to roll out into a perfect circle. I first recommend pressing the dough disk flat using a baking sheet then rolling it thinner with a rolling pin. When hand-rolled, you may end up with rustic shaggy edges or an oblong tortilla. They'll taste exactly the same, don't worry!
However, if you're like me and crave perfectly round flour tortillas for your tacos, use a tortilla press. While a tortilla press is typically used to make homemade corn tortillas, it's the perfect solution for gluten-free flour tortillas. Just press the dough between two sheets of parchment paper and repeat.
This tortilla press method makes the whole process so much faster as well! We can make fresh homemade gluten-free flour tortillas, adding only about 15 minutes to our cooking time than when heating up store-bought tortillas. And the results are so worth those extra 15 minutes.
Gluten-free flour tortillas recipe
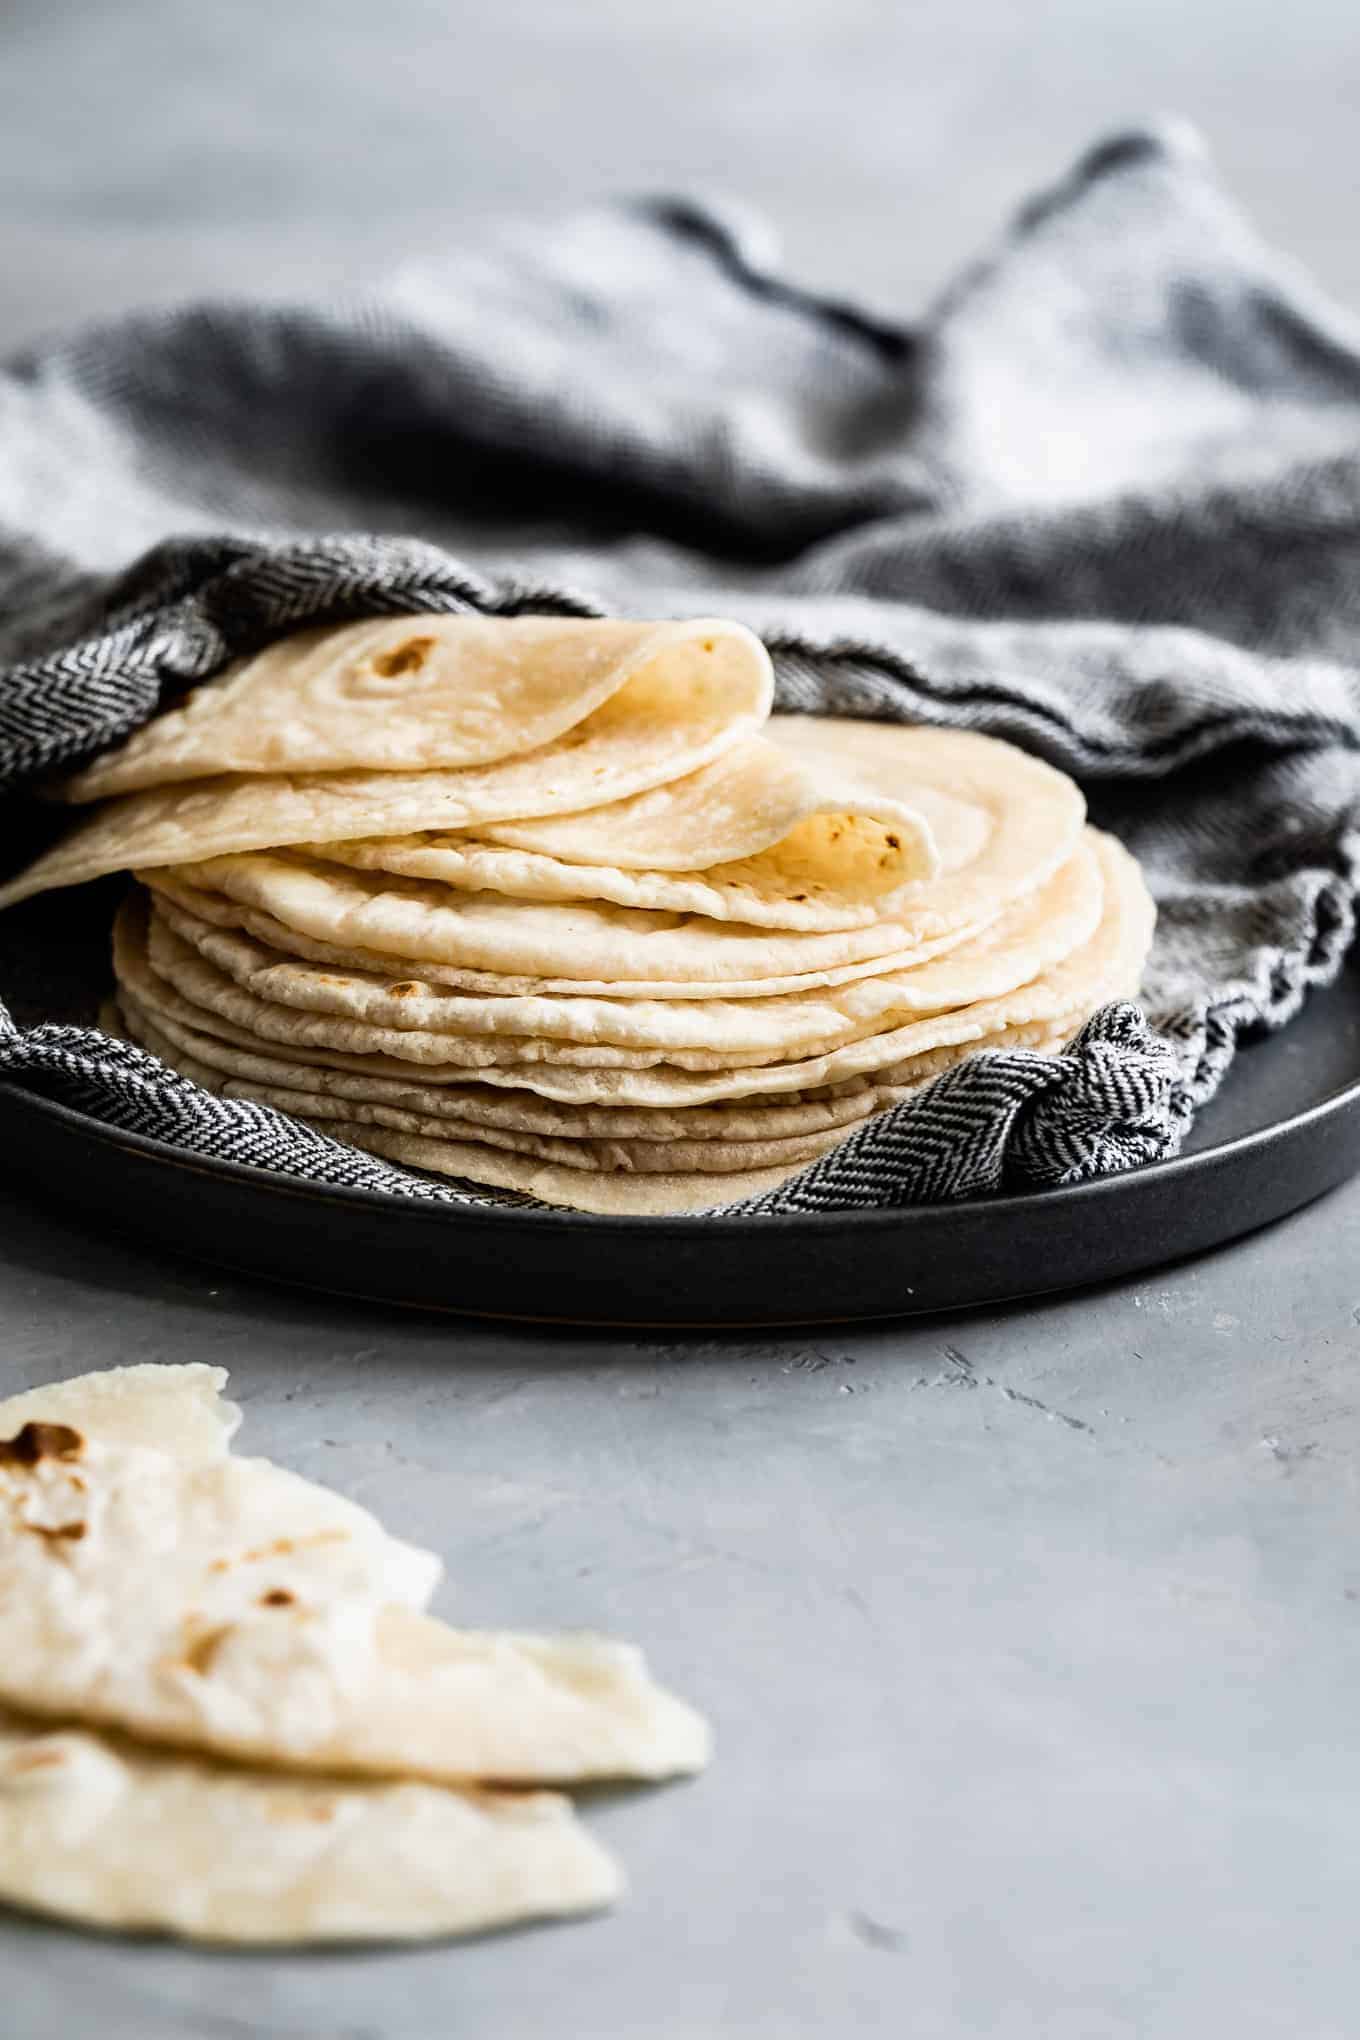
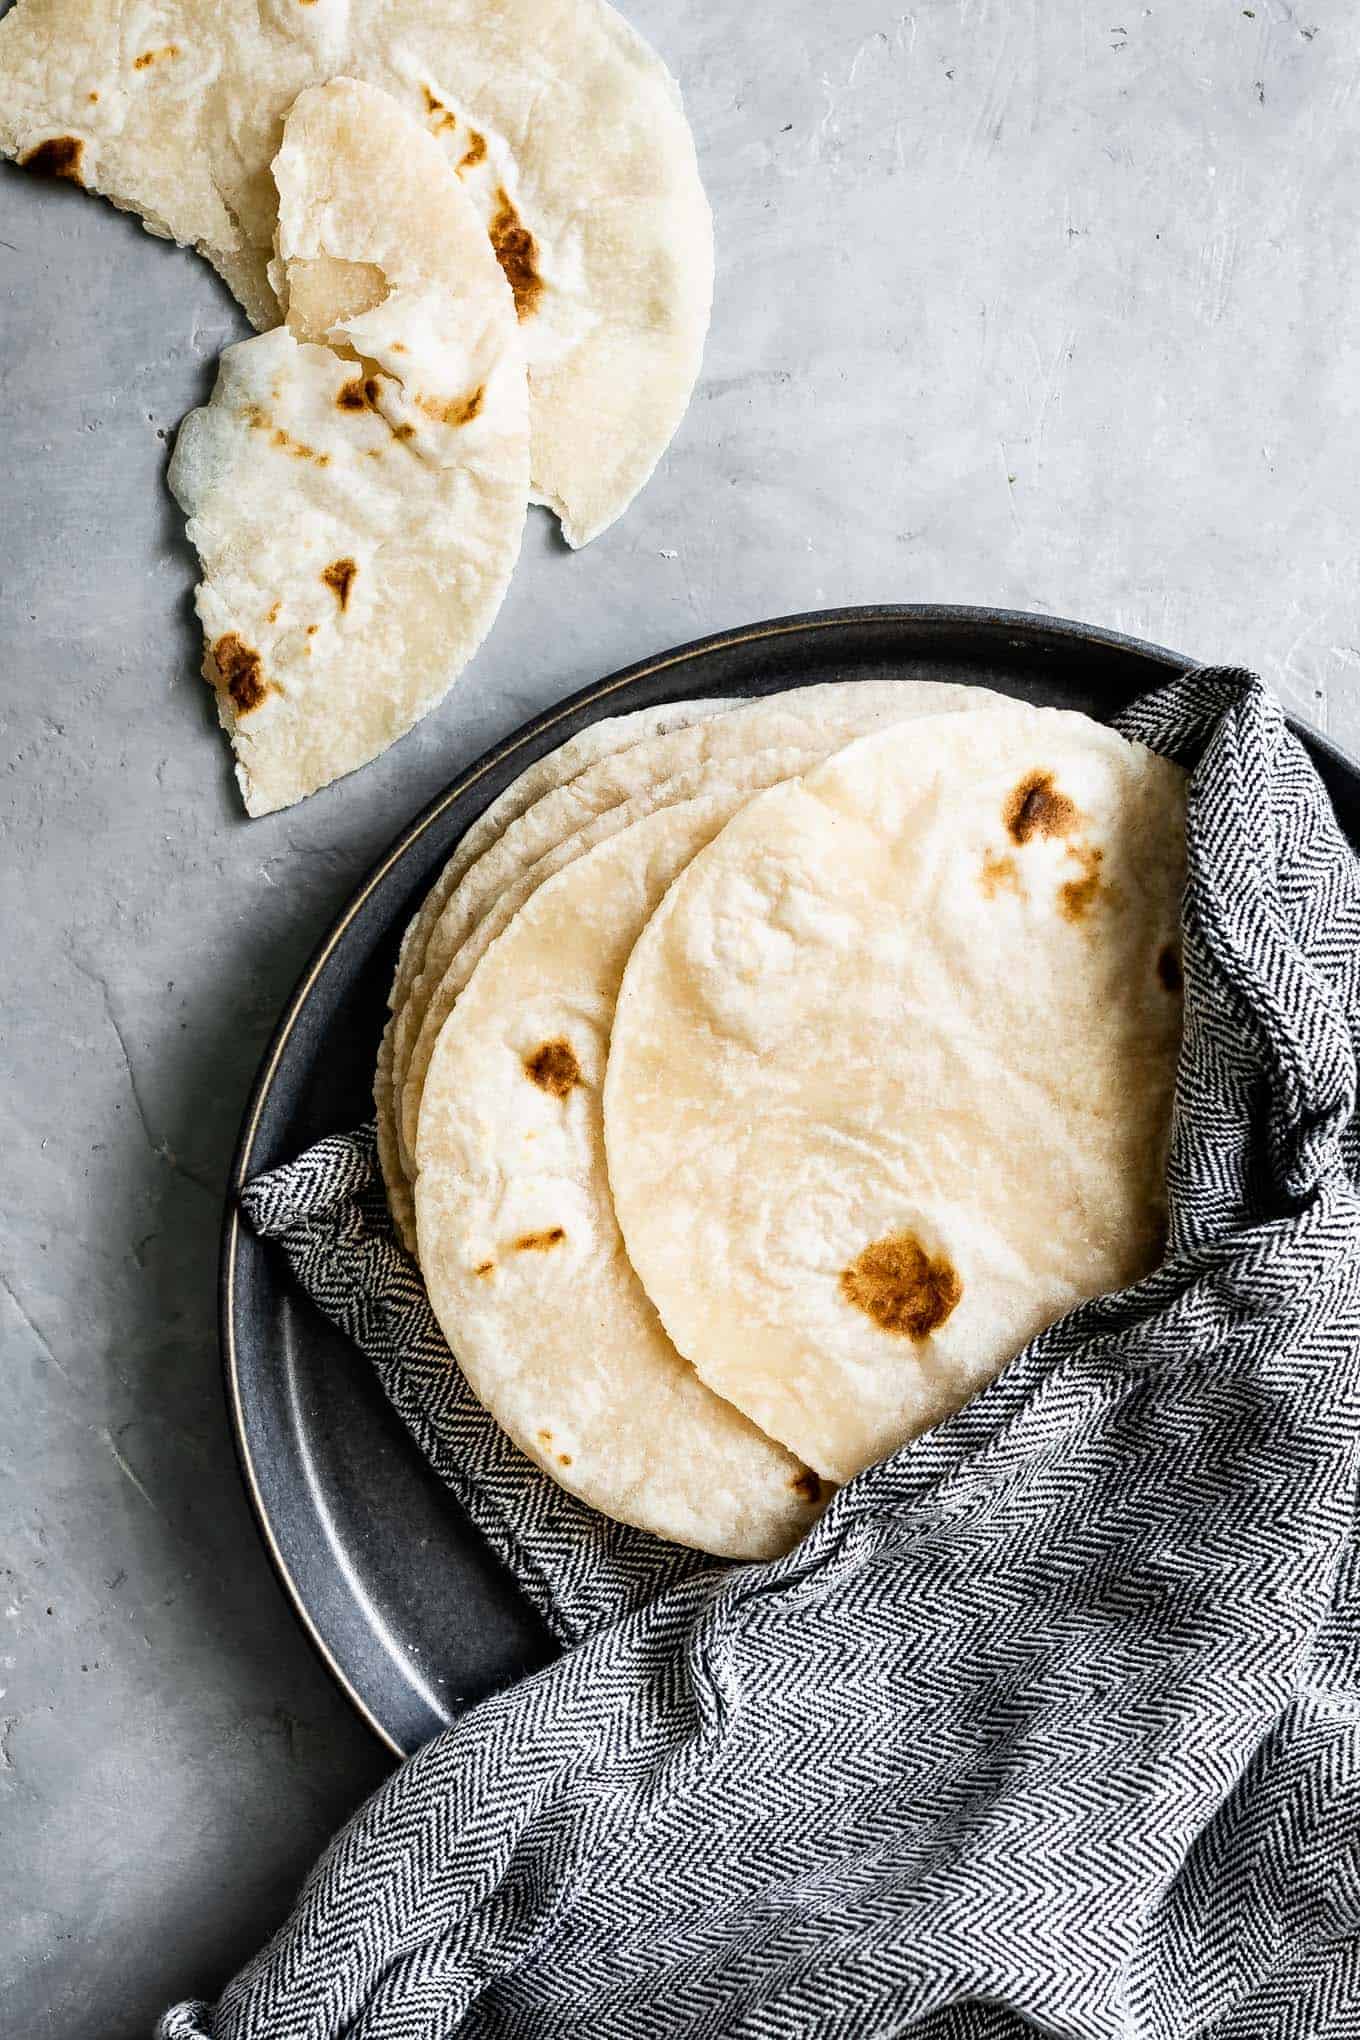
After cooking the tortillas, keep them warm in a tortilla warmer. This is one of the first gifts my mother-in-law gave me and it's now one of the most-used items in my kitchen. It keeps your tortillas piping hot while you prepare the rest of your tacos, and if you happen to cook a tortilla a bit too long and it ends up a bit crispy, it'll soften right up from the steam in the tortilla warmer. Get one, you won't be sorry.
Paleo or Vegan Gluten-Free Tortillas Recipe
This grain-free tortilla recipe calls for fat, and the differences are so subtle that you choose what works best for your diet. To make paleo tortillas, use ghee or coconut oil. To make vegan gluten-free tortillas, use coconut oil or vegetable oil. Note: unrefined coconut oil has a distinct coconut-y flavor. If you'd prefer a more neutral flavor, opt for refined coconut oil.
Storing Cassava Flour Tortillas
You can make a double or triple batch of these grain-free flour tortillas and store them for later use.
Freezer storage: Stack uncooked, par-cooked (20-30 seconds on each side), or fully cooked tortillas between squares of parchment paper and place flat in a freezer bag. Freeze for up to 6 months. The tortillas are a bit more delicate and brittle when frozen uncooked, so just make sure you don't crush or bend the freezer bag while in storage.
- To cook, remove them from the freezer and let sit for 5 minutes to slightly soften. Cook uncooked or par-cooked tortillas as instructed above, adding 30 seconds or so to the time. For fully cooked tortillas, reheat on low so you don't burn the tortillas.
Fridge storage: Stack uncooked, par-cooked (20-30 seconds on each side), or fully cooked tortillas between squares of parchment paper and place flat in a freezer bag. Keep uncooked tortillas for up to 2 days, and par-cooked or cooked tortillas for up to a week in the fridge.
- To cook, remove them from the freezer and let sit for 1-2 minutes to slightly soften. Cook as instructed above, directly from the fridge. For fully cooked tortillas, reheat on low so you don't burn the tortillas.
Gluten-Free Taco Recipes
- Vegetarian Shawarma Tacos with Cauliflower & Chickpeas
- Buttermilk Fried Tofu Tacos with Jalapeno Lime Yogurt Cabbage Slaw
- Mole Spiced Chickpea & Grilled Zucchini Tacos
- Gluten-Free Baja Fish Tacos with Chipotle Cream Sauce
- Salmon Tacos with Green Onion & Asparagus Salsa
Recipe
Soft Homemade Gluten-Free Cassava Flour Tortillas
Ingredients
- 165 g (1 cup + 2½ tablespoons) Bob's Red Mill cassava flour
- 36 g (¼ cup + 1 tablespoon) Bob's Red Mill tapioca flour
- ¾ teaspoon xanthan gum*
- ½ teaspoon kosher salt
- 195 g (¾ cup + 1½ tablespoons) hot water , 110-120°F
- 49 g (3½ tablespons) melted unsalted butter*
INSTRUCTIONS
- In a medium mixing bowl, combine cassava flour, tapioca starch, xanthan gum, and salt. Add hot water and melted butter (or other fat) and stir to combine into a shaggy dough. Use your hands to knead into a smooth dough. The dough may seem sticky at first, but will become smooth and not-tacky after 30 seconds or so of kneading as the cassava soaks up the moisture. The texture of your dough should be similar to very soft playdough. If it's too firm, add a few drops of water and work it into the dough. If it's too sticky, dust just in a bit more cassava flour (I've never had this happen).
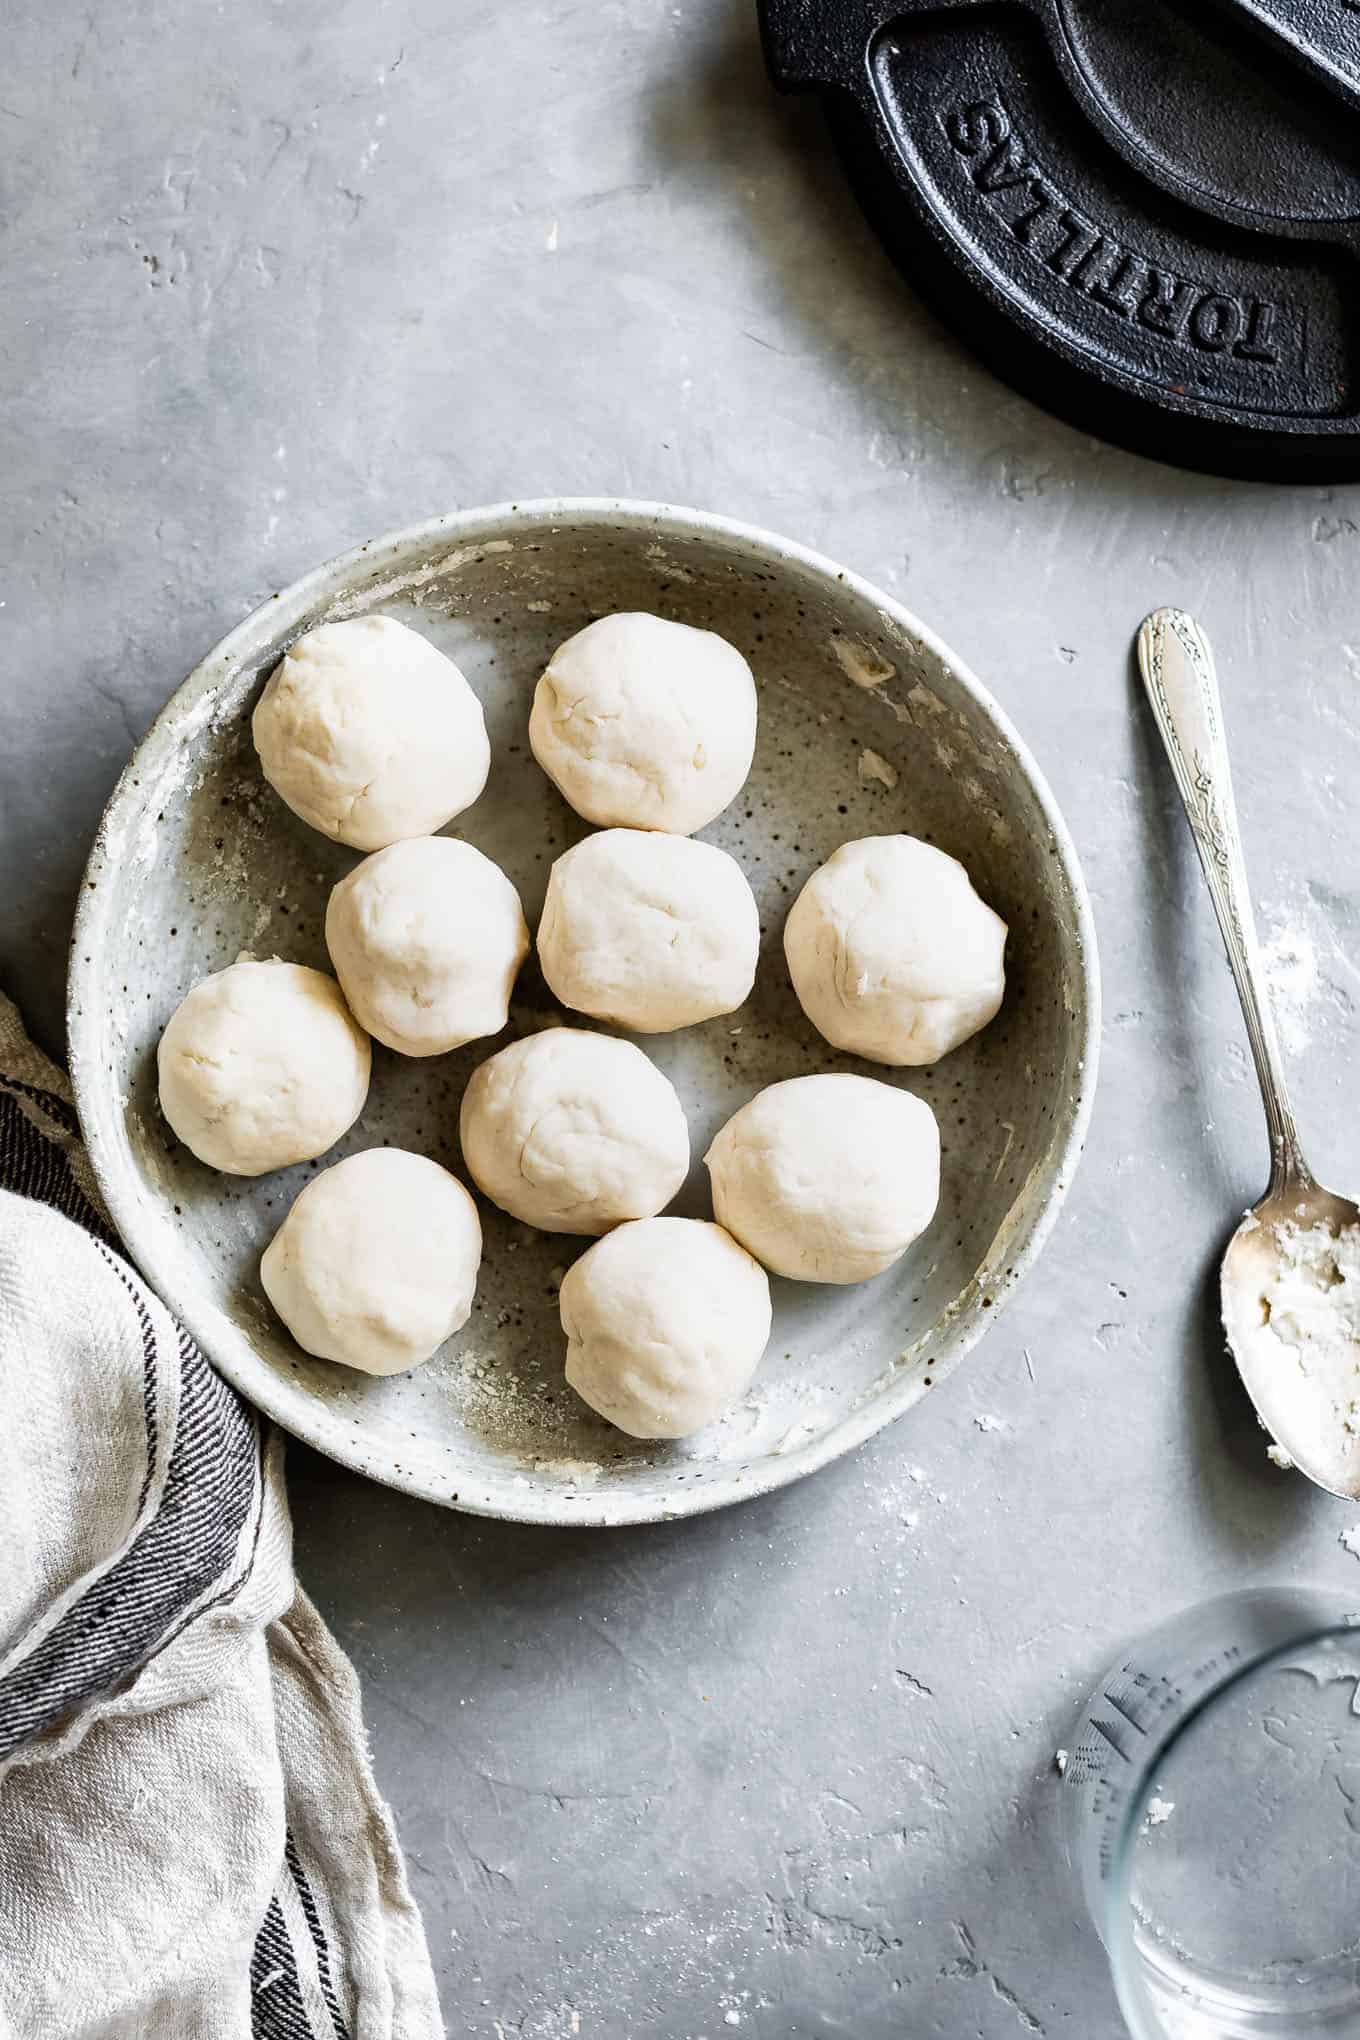
- Divide into 9 balls, about 49g each, and gently flatten each ball into a disk with your hand so it's no more than an inch thick. I recommend placing the dough balls under a damp towel so they don't dry out as you roll each one. If you notice a dough ball seems a bit crackly or dry after sitting, just knead in a couple of drops of water to soften it back up.
- Roll out the tortillas. If using a tortilla press (my recommendation), place a square of parchment paper on the press (no larger than the press itself), then top with a dough disk and another square of parchment paper. Press the dough into a flat round circle. Peel off the top piece of parchment paper and set the tortilla aside on the bottom parchment paper. Repeat, until you have a stack of tortillas with parchment paper between. If rolling the tortillas out by hand, place a dough disk between two pieces of parchment paper. Start by using a flat baking sheet to press the tortilla as flat as possible then use a rolling pin to roll it even thinner (or roll using just a rolling pin to start, but your tortilla may not be perfectly round). It should be very thin, but not translucent (and if you mess one up, just roll it back into a ball and do it again!). You can freeze the tortillas at this point, or cook them for easy fridge storage (see notes about storage).
- Preheat a cast-iron or non-stick skillet over medium-high heat until hot (I like to do two pans side by side to make this go quicker). Carefully peel a tortilla from the parchment paper. To easily peel the tortilla off the bottom parchment, I flip it over so the tortilla is upside down on my left open palm and then carefully peel off the parchment. Place the tortilla in the hot skillet and cook until it starts to bubble up with a few larger bubbles (½-1 inch), about 45 seconds. Carefully flip the tortilla and continue cooking until it puffs up, about 45 seconds (see picture). Flip and cook the tortilla until the bubbles are golden brown on both sides, less than a minute. If you notice the bubbles burning too quickly before the tortilla puffs up, adjust the heat on your burner a little lower. If you notice your tortillas taking a lot longer to cook, increase the heat. Repeat with remaining tortillas. Tip: I usually have two skillets going with tortillas side by side.
- Transfer each tortilla to a tortilla warmer or a plate covered in a couple of layers of clean kitchen towels to keep them soft and warm. Serve warm.
Notes
- Freezer storage: Stack uncooked, par-cooked (20-30 seconds on each side), or fully cooked tortillas between squares of parchment paper and place flat in a freezer bag. Freeze for up to 6 months. To cook, remove them from the freezer and let sit for 5 minutes to slightly soften. Cook as instructed above, adding 30 seconds or so to the time. For fully cooked tortillas, heat on low so you don't burn the tortillas.
- Fridge storage: Stack uncooked, par-cooked (20-30 seconds on each side), or fully cooked tortillas between squares of parchment paper and place flat in a freezer bag. Keep uncooked tortillas for up to 2 days and par-cooked or cooked tortillas for up to a week in the fridge. Cook as instructed above, directly from the fridge. For fully cooked tortillas, heat on low so you don't burn the tortillas.

Amanda -
Thank you so much! I started AIP this week and these are the first bread-type thing I've made that is actually GOOD!
I did substitute the butter for tallow in order to remain strict AIP, it worked really well!
Angela -
These are hands down the best tortillas I’ve ever had. But due to recent consumer reports study on toxic lead levels in cassava flours, I am looking for an alternative to cassava. Any ideas? Would a regular gluten free flour blend still turn out the same? Thank you for your great recipes.
Kellie -
This recipe is AWESOME! I used Azure Standard cassava flour and I needed A LOT more than the recipe calls for. Same with the tapioca flour...BUT...I'm so happy with how they turned out! I flattened them using the bottom of a pie plate and they were probably a little too thick. I don't even care though because they were delicious! I missed tortillas SO much! Thank you for this recipe!
Susie -
oops! may have forgotten to rate my comments
These tortillas are amazingly good! So much better than any store bought flour tortillas. Thank you! for the recipe.
[sigh] Lately my tortillas haven't been puffing well, or not at all. They're pliable, but not soft- instead they're on the chewy (tough-ish) side. The dough consistency is just as you describe. I follow the recipe amounts as written, always use Bob's Red Mill ingredients- Cassava Flour, Tapioca Flour, Xanthan Gum. also unsalted butter, and water at 115 degrees,
Using the Victoria 8" press; perhaps I'm not getting the thickness right, either pressing too hard or not enough? Is there a diameter to aim for when pressing the dough in order to get the right thickness? Would greatly appreciate any pointers you can give me. Thank you.
Susie -
These tortillas are amazingly good! So much better than any store bought flour tortillas. Thank you! for the recipe.
[sigh] Lately my tortillas haven't been puffing well, or not at all. They're pliable, but not soft- instead they're on the chewy (tough-ish) side. The dough consistency is just as you describe. I follow the recipe amounts as written, always use Bob's Red Mill ingredients- Cassava Flour, Tapioca Flour, Xanthan Gum. also unsalted butter, and water at 115 degrees,
Using the Victoria 8" press; perhaps I'm not getting the thickness right, either pressing too hard or not enough? Is there a diameter to aim for when pressing the dough in order to get the right thickness? Would greatly appreciate any pointers you can give me. Thank you.
Bethani -
I was so excited to try these since I'm eating grain-free right now. They did not disappoint! I only had arrowroot starch, so I subbed that for the tapioca, and they turned out great! However, they didn't puff up and they are a bit more chewy than regular tortillas. I will get some tapioca starch since I will definitely be making these regularly!
Agnes -
Make these every taco night my family loves them
Jennifer -
These turned out really yummy for me, but the dough did not resemble play dough at all, it was really really oily and I had to add quite a bit of cassava flour to get it to seem like the right consistency. I made them twice now and weighed everything out. The first time I used clarified butter and the second time I used coconut oil and both came out the same. I've read through all of the comments so realize that it could be partly that I'm using a different brand of cassava flour, but I can't figure out what else it could be! I made sure the water temp was between 110 and 120. I'm in Colorado at a little over 5K feet, but I would think this would make it more dry and I would have the opposite problem?? Maybe I need to get the water hotter here for some reason?
Sarah Menanix -
I'm certain it has to do with the brand of cassava - different grinds of flour will soak up moisture differently so I suspect yours is not as finely ground and thus doesn't soak up the moisture as easily and needs more flour to come together. The warm water should help cook the dough, creating the elasticity, but if yours isn't soaking up the moisture as well, I can see it being oily as a result! I think your instinct to add more flour is the right thing to do here. Next time, try using a bit less water. Also, are you using BRM tapioca flour? I've particularly noticed a vast difference in different brands of tapioca flour.
Valerie -
These are excellent. Used them for some fish tacos. Very yummy, thanks for the recipe
Alisha -
The first time I made this dough I really liked it and this time I am having a lot of trouble. It takes me a lot longer than 45 seconds to cook which is fine I probably have it on a lower heat but when they are cooked they are hard as crackers. Is My new press making them too thin?
Sarah Menanix -
I suspect that's the issue! If they're too thin, they'll definitely cook up crisp rather than puff up and soften. I also wonder if because they were so thin, you kept cooking longer since they didn't resemble how they'd looked last time (or the pictures) and doubly led to the issue. When I'm using my tortilla press to make them, I make sure I don't press TOO hard or they'll become paper thin (I've had to teach my kids that they don't need to use their full body weight on the tortilla press haha).
Anna -
Can you help me figure out what i did wrong? I could not get the rolled dough off the parchment paper. Nothing I tried worked. I ended up just pressing down with a pan and didn’t roll them out. Usually with thicker dough I could get the parchment paper off. The dough wasn’t sticky it just wouldn’t come off the paper. Taste was still great! I have to start laying off gluten for health reasons and really want to find some make at home replacements! I should probably try Bobs Red Mill- I was just wary of paying that much for flour when I wasn’t sure how they would turn out.
Sarah Menanix -
Hi! To clarify, did you use Bob's Red Mill flour or another brand? If another brand, it's possible you'll need to adjust the recipe by adding more flour (I've specifically noticed other brands of tapioca flour behave differently). Was your dough super duper sticky? If so, then you probably either need to add a tiny bit more flour or else use hotter water (this will cook the cassava and tapioca so it becomes gummier and less sticky).
Here's my trick for removing it from the parchment paper: I peel off the top layer, then I flip the tortilla over in my palm so the tortilla is resting on one palm and the parchment is facing up, then peel the parchment off from the top (so in other words: I peel the parchment off the tortilla versus peeling the tortilla off the parchment). I hope this helps!
beckie -
Since my son was diagnosed with Celiac disease, we've missed tortillas. None of the store brand ones we have access too are anywhere near the texture and taste of the flour ones we were used to... until this! We now make this in big batches and freeze them. Thank you soooo much for this amazing recipe. The texture and taste are spot on. We now enjoy tacos and quesadillas regularly again!!
B -
So good! Best I’ve had!
Jill -
Soft. Pliable. Tasty. I followed recipe exactly. I’ll make these over and over!
Jill W -
Thank you!! I followed recipe, including using the weight measurements and Bob’s products. I’ve missed flour tortillas and these are perfect. One minor question: I occasionally got some grit like fine sand as I ate them. Did I not stir/knead enough? Not a big deal. I will make these often!!
Sarah Menanix -
Yes, it sounds to me like it wasn't stirred/kneaded enough. Cassava flour can taste gritty when not mixed thoroughly. Hopefully next time, that fixes that for you!
Nicole -
I am following a lectin free eating plan at the moment and literally have just made these for my dinner. This recipe is outstanding! I couldn’t believe how amazingly delicious they were and beautiful in texture also (a rarity in gf baking). I used grass fed ghee in mine and the buttery crispness was just gorgeous. I made them into souvlakis and wow - I’ll be doing that again! Easy to make too, and love the texture of the dough. I’ve actually wrapped the leftover ball in cling wrap - it was so soft - and put it in the fridge as an experiment to see if it will successfully hold until tomorrow. After making the batch initially (and quickly cooking up a couple to taste test), I left it sitting for a good couple of hours out on the bench before cooking the actual dinner ones up. Still stayed lovely and pliable. Thankyou so much for sharing this - it has made my week!😍
Nancy -
Just made these and ate a delicious chicken wrap for lunch! I used Otto's Cassava flour and ghee and they came out great. Also used a tortilla press but then rolled them out a little extra. Definite learning curve in order to transfer them to the cast iron but it can be done. I loved the flavor and stretch of the wrap. Maybe I won't have to pay the big bucks for the Siete wraps anymore! Thank you!
Browns -
my husband and I are GF and we have been on the struggle bus finding decent tortillas from the store. we found a brand we semi-like but the price tag was just not worth it for us. THANK YOU so much for this recipe. We can finally enjoy tortillas again!
Suzy -
Thanks so much for this recipe. It is a life changer for me for sure since I really dislike corn tortillas. Maybe my tortilla press is on the small side, but after some trial and error, I found that 30 gram balls worked right and I still had to hand roll a little after pressing the dough. This made the edges a little rough looking but that didn’t matter. . Some of them didn’t bubble but that didn’t matter either.
Rayanne -
Do you measure the butter from hard or melted? I measured it from hard and then poured it in. My dough is very soft and sticky in spite of adding more cassava flour. My wraps are not fluffing off at all. Thoughts?
Sarah @ Snixy Kitchen -
The butter should weigh/measure the same, whether hard or melted. It sounds to me that the water was not hot enough - using hot water begins cooking the flours to make them stretchy rather than sticky. Also, What brand of cassava and tapioca flours did you use? I use exclusively Bob’s red mill, and using other friends, may significantly affect the results based on how fine they are ground.
Jen -
Perfect. Finding the right ratio has been a nightmare. This is how I’d do any kind of flour tortilla in ratio and technique; it was great.
That, and this is the first time tapioca starch was a revelation for achieving that “chew/tear” texture. Don’t omit (if you’re like me and haven’t enjoyed the texture of tapioca/gelatin use in so many “bread” type AIP recipes, this one actually makes sense and doesn’t make that bizarre gummy jello nonsense found in other recipes.)
Kelly -
YYUUMM!!!!! I made these yesterday, using coconut oil and a cast iron skillet. Filled two with scrambled eggs, nutritional yeast, and hemp seeds. Swiped a little Smart Balance olive oil spread inside before adding the eggs, etc. Great breakfast burrito! Today, I filled with leftover roast chicken, nutritional yeast, hemp seeds, and avocado. I heated the tortillas in the microwave for 15 seconds between damp paper towels, then filled and heated in the air fryer. Pure bliss! I can't decide what type of enchiladas will be made, but definitely will be done soon. Thank you so very much for sharing this!
Kelly -
These wraps are light, flexible, have a gluten feel when eaten and are easy to make. This will be our go to recipe now.
Kelly -
These are incredible. I haven't had a decent (and flexible) grain free wrap until we made these today. I see many in our future! Thank you!!
Kelly Dennis -
Is there a nutritional value chart for these? Would love to know the carb and fat grams. 😊
Terri Damato -
I have been gf for @ 9 years.. I missed flour tortillas so much and cheated a few times, ended up so sick ☹️ So, I decided to give it a go with this recipe and I am shocked! Tastes JUST like a regular flour tortilla!! What?! I even bought a tortilla press and a ceramic warmer for my new found love of cassava tortillas!! Thank you!! 🙏🤗❤️
Jessica -
I don't normally comment on recipes, but these tortillas are INCREDIBLE! I've been gluten, dairy, and grain free for a long time, and flour tortillas are something I've missed terribly. These TOTALLY hit the spot! Many thanks!!!
Pam -
My dough was very sticky and I ended up adding quite a bit more cassava flour. I used the cassava flour I had on hand (not Bob's Red Mill). I also had trouble getting the pressed dough from my hand into the skillet without it wrinkling. The flavor and texture was great! Will try again with good ol' Bob's Red Mill cassava flour!
Kelli -
Amazing recipe! These hold up soo well! I can attest that arrowroot works perfectly as a sub for tapioca.
Merethe -
Hi :)
Just making these now, and the crack at the edges when rolling them out.. I could only find grainy cassava (gari), but I ground it fine. Could that be the reason? Also don’t have xantham. Used rapeseed oil.
The first tortilla I made really thin and it’s basically a cracker now after five minutes out of the pan.. Did I leave it in too long? It was a few minutes as I kept waiting for it to bubble and brown..
Sarah Menanix -
I suspect it has to do with the flour and lack of xanthan gum. While I tested them without xanthan gum, the results are similar but less soft, chewy, and flaky. Also, the grain of the flour will greatly impact how the moisture gets absorbed. It sounds like yours may have been a little dry with the different flour. They should also only be cooked for about a minute or less on each side, so that would explain the crisp you made. Likely due to the flour, thinness, and lack of xanthan gum, you did not get the brown bubbles. Try cooking them for less time (and maybe even adding a bit more water) and see if that helps!
Merethe -
Thanks! I managed to find some extra fine cassava flour, but it looked almost like the other one. This time I cooked them for about a minute on each side. And… they aren’t done at all. They’re still mushy in places!.. :/ But I left one a little longer and it’s a bit stiff.. So I don’t know… Maybe the flour just isn’t fine enough where I live. It’s like.. don’t know the word… but the opposite of fine wheat flour. A lot more.. grainy..
Merethe -
Hi! :)
Just making these now, and the crack at the edges when rolling them out.. I could only find grainy cassava (gari), but I ground it fine. Could that be the reason? Also don’t have xantham. Used rapeseed oil.
The first tortilla I made really thin and it’s basically a cracker now after five minutes out of the pan.. Did I leave it in too long? It was a few minutes as I kept waiting for it to bubble and brown..
Faye -
Do you have to put oil in the cast iron skillet. My cast iron skillet is new and pretreated. Do I have to do anything else to it before I cook the tortillas in it? Actually pretreated is not the word I'm looking for.
Sarah Menanix -
No oil in the cast iron skillet. Your new cast iron skillet should be pre-seasoned, so it arrives non-stick already :)
Christina Owen -
These looks amazing, I just found your site and made your donuts… just perfect (and I’m a chef and really finicky, lol) Have you ever tried making a middle eastern flatbread or pitta? I bet this flour mix could make beautiful pita if you added a leavening agent like yeast to it! I might give it a try.
Jen -
Turned out so so good! I used cornstarch as it was the only thing I had, and did not use the gum ingredient. Bought a tortilla press for this recipe and it's prob my new fav kitchen gadget =)
Susan -
Have you ever tried them with olive oil or avocado oil? Just curious as those are my usual go to oils. Also have you ever made things using them like breakfast burritos and frozen them?
Sarah Menanix -
I haven't tried them with avocado oil, but I think it would work similarly to vegetable oil. What I noticed about the olive oil is that the tortillas got crispier. In my personal notes where I tested the olive oil, I wrote "this would be GREAT as a flatbread."
I have not frozen them as burritos, for example, but I have frozen the tortillas themselves and they defrost and reheat great! I think it would work great for frozen breakfast burritos!
Sarah Menanix -
Oh no! I'm so sorry you experienced this - that's so frustrating. It sounds like the water you added wasn't hot enough. When you add the hot water, it should start to cook the tapioca flour just a bit, which as you work it, turns it into a dough that's no longer super sticky. Did you check the temperature of the water you added to the dough?
Beth -
My dough was a sticky mess and nothing helped to get them to roll out. I set my scale to grams, used Bob's Red Mill and coconut oil. Kept adding more and more cassava flour to make it possible to roll out and they stuck to the parchment paper something awful. Any help would be appreciated.
Blake -
Can I sub corn starch for the tapioca? Thank you! I’m excited to try this recipe out!
Sarah Menanix -
I wouldn't recommend subbing corn starch. It cooks up crisp and brittle, whereas tapioca starch is chewy and soft.
Amie -
These were delicious and so easy to make. So much cheaper than the $5 cassava tortillas at Whole Foods, which were the only gluten free tortillas I had tried and liked. Thank you so much for this recipe!
MaryLiz -
Thank you for your tortilla recipe. I've made cassava tortillas several times, but today I decided to search for a recipe with xanthan gum for a better texture. You sound like a GF tortilla expert. Thanks for working out the details for the rest of us! Muchas gracias señora.
Jordan -
Best cassava tortillas I have ever made! I used grass fed butterfat my fat and Anthony's flour. You can definitely get away with 10 tortillas as they are bigger than most I've made.
Kath -
I weighed everything to the gram and mine never puffed up. They were off shaped as I don’t have a press. They tasted delicious though. Do you have any ideas as to why they didn’t puff up? Thanks!
Sarah Menanix -
Hi! I'd love to help you brainstorm! Did you use Bob's Red Mill brand flours? I've noticed differences in brand of flours in terms of grind that can make a difference in how baked goods behave. I've only tested these with Bob's Red Mill flours.
My other guess is that perhaps something about a shaggy edge from hand-rolling might make it a little less prone to puffing up.
Also, now that I've made them well over 50x (in fact, we are making them tonight!) and letting my 5-year-old and preschooler press them out (they're favorite kitchen job!), I have noticed that when they press them too thin, they don't puff up. However, after I put them in the tortilla warmer, they all taste the exact same by the time we eat them! So, that being said, I wouldn't stress too much if they aren't puffing up, as long as they taste delicious.
Jen -
These were excellent. Thank you so much! I made them exactly as written.
Kirsten Haahr -
Hi there i just tried to make these, and they taste amazing. They turn out very crisp for me though and the crack along the edges when I roll them. The also don’t puff up.
I did not have xanthan gum, so I tried a little guar gum. Only 1/2 a tsp. I live in Denmark so the brand of flour you use are not available to be here. I used a pancake nonstick pan, and rolled them by hand.
Any idea how I can make them soft and flaky like yours?
Sarah Menanix -
I've not tried them with guar gum, but in my experience with trying them without xanthan gum, they definitely got a bit crispier. That being said, it also sounds like you may be rolling them a bit too thin. My daughter is now our official tortilla presser and I've noticed that when she presses them too thin, they don't puff up and the edges get crispier.
Two other thoughts: I found that when I used the tortilla press, I got less shaggy edges that didn't crack, but if my dough is too dry (or dries out a bit while I'm pressing the other balls), the edges will be more prone to cracking. So before you roll out each ball, I recommend dipping your finger in water and massaging the ball a bit like playdough, then rolling out. This will make sure the edges aren't dry and crackly before rolling/pressing.
Finally, when I do make thinner crispier tortillas because my 5 year old pressed them too thin (ha), I just put them in a tortilla warmer while I cook the remainder of the tortillas and that steam softens them right up. If you don't have a tortilla warmer, just wrap them in a couple of kitchen towels after you cook each one and continue adding to the bundled up stack.
Kirsten Haahr -
Thank you so much for you fast reply. I have ordered some xanthan gum and a tortilla press and I can’t wait to try again when it arrives! I also ordered some cassava flour that is not quite so finely milled, it’s the same brand (the only one I can easily get here) but it might still make a difference.
In short I’m gonna have fun trying to get it right! Thank you for sharing the recipe!
Barbara -
This recipe was greatl! My dough mixture needed a little more water but once rolled & flattened, the tortillas cooked beautifully in the cast iron skillet. I omitted the xantham gum & was still impressed at how pliable & tasty the tortillas came out. Definitely a recipe I will be repeating
Sarah Menanix -
I'm so glad you loved them! Yes, this can happen depending on the humidity of your room and how hot your water was - a bunch of factors, so that's why I just mentioned kneading in a bit more water to get the right texture if you notice your balls start seeming dry. You did the right thing:) Thanks for coming back and letting me know they turned out great!
HappyTortillaLover -
Thank you so much for this utterly perfect tortilla recipe. I have been down a long road of trail and error with paleo tortillas. It's been especially difficult, now that I realize I have a sensitivity to almond and coconut flours. Nothing I tried, until your recipe, was remotely delicious or anywhere near the right consistency. I knew I needed something other than just straight cassava flour to get the right harmony, so when I found your recipe with tapioca and xanthum gum I thought this might actually work. And boy, was I pleasantly surprised! Delighted, really. The bend, the chew, and the gorgeous puffy blistered bubbles when cooking??? It's pure magic. I really didn't think it was possible. This will be in my weekly rotation. You have made my day!
Question: what diameter are we going for when fully pressed/rolled? You don't mention it in the recipe, but the link is to an 8" tortilla press, which I'm excited to buy! I'm presuming the target is therefore below 8"? Like 7" or so?? Thanks in advance for your help and for brightening my culinary world!!
Remi -
Are you daft, tapioca is just Cassava flour lol
Sarah Menanix -
You are correct that they come from the same plant, but they are different flours and have different culinary purposes and structures. While they're both made from the cassava (or yucca) root, tapioca flour (also called tapioca starch here in the US) is made from just starchy part extracted from the plant, whereas cassava flour is made from the whole root and also contains the fiber.
Jill -
Some people are jerks… 🙄
Jo -
Lol. You got put in your place. Try not to be rude next time mkay😂
Know it all
Nathaly Saucier Livano -
Hi ! thank you for this recepy … I'm going to try it for sure, but I have an small question, which size tortilla press are you using for this recepy to make 9 tortillas?
Sarah Menanix -
I've got an 8-inch tortilla press. This is the exact one I use!
NDLT -
Best gluten and grain free tortillas ever!!! New staple in my household and even the family members without restricted diets prefer these over any other options. Thank you for this recipe!!
Tammy -
Great recipe! The tortillas taste so good! Skipped the xanthem gum and still turned out great.
Michelle -
I love flour tortillas much more than corn tortillas. Thank you! Thank you for creating a great recipe that uses Cassava flour - the only flour I can eat anymore! Thanks for sharing!
AMPARO E SQUAGLIA -
I am curious what you would substitute in if you did not have the tapioca starch. I looked online and arrowroot was an option. Thanks so much - I am going to attempt this with that substitution anyway and report back.
Sarah Menanix -
I've not tried it with arrowroot, but that might work. Or potato starch too (both of which I haven't tried). I have tried it with all cassava flour and no tapioca and I found it a bit less soft and pliable, but that's also an option! Please let me know how arrowroot works!
Katy -
I can't get them to puff up. I weighted everything perfectly. This is my second time making them. Any tips? They still taste great, I'm just not getting the browning I want. I'm using medium high heat.
Sarah Menanix -
Hi! I'd love to help you! Since I'm not in your kitchen, it's a bit hard to guess what the differences might be, but let me try - I'll ask a few questions first. Are you using Bob's Red Mill brand flours and are you trying them with or without xanthan gum? Are you pressing in a tortilla press or rolling out by hand? When you first put them into the hot pan, do they bubble up after a minute or so before you flip them? Are you using a non-stick or a cast-iron? Mine always brown in both the non-stick and cast-iron (I have them running side by side to make it quicker), so I suspect for the browning part the pan might need to be a bit hotter. Sorry for all the questions - I just want to understand the variables to make a guess for what to try next time!
Katy -
Hello! I guess that I should have provided more information. The flours are not Bob's. I did use xantham gum. I used a tortilla press. They do not bubble at all. I am using a cast iron pan. They brown just find, they just don't puff up like yours. They still taste great.
Sarah Menanix -
Ah - Given all the other information you've given me, I would bet that it's the flour brand that's causing the differences. Different brands can vary quite a bit in their grind which will affect moisture absorption and texture. I was actually just speaking to my friend who owns a gluten-free bakery about different cassava flours and she told me that of the ones she's tried, they vary quite a bit in the grind. I've only tried Bob's Red Mill cassava flour. I know this also to be true of tapioca starch brands. I've only tested these tortillas using Bob's Red Mill brands, so my recommendation would be to grab their cassava and tapioca starch when you run out of the current brand(s)! The only other tip besides flour brand would be to possibly try with a hotter pan to see if that helps them bubble up.
Katy -
Thanks for letting me know! I haven't used cassava flour before and this was good to know.
:)
Andrea -
I used a different brand of cassava flour and tapioca starch. I also used Greek yogurt instead of oil. Tortillas turned out fantastic. Browned in the right spots and puffed up as they were cooking. Very soft and pliable!
Dora Gomez -
Don't roll them too thin or they will not bubble.
Brandy Salazar -
I’ve been waiting for a GF recipe!!! So easy and so good!!!
Julia Trigo -
Thank you so much for the recipe Sarah! These gluten-free tortillas are a godsend! Taste so much better than any store bought or wheat flour tortillas! Super flaky, soft and delicious! My husband wants me to make them all the time now! :p
Julia Trigo -
Sarah’s gluten-free Tortillas are absolutely amazing. Super easy to make and taste delicious!!
AngelaH -
These are my go to tortillas. I use olive oil and they turn out great. Thank you for the recipe. A hundred times better than store bought.
Surati -
I am so happy I found this recipe! I almost gave up on cassava flour tortillas because the last two times I tried to make them using other recipes they came out dry ,
hard and inedible. I saw snixykitchen make these on her stories on instagram and I decided to give it one last shot with cassava. They came out amazing just like a flour tortillas, they were so easy to whip up . I didn’t have a tortillas press and they were really quite easy to roll out. Thank you for this amazing recipe! It’s going to be my go to.
Alesha -
Can you give the carb content on these? They sound so good!
Ellie -
Can I use arrowroot starch/flour instead of tapioca
Sarah Menanix -
I've not tested it with arrowroot starch, but the amount is little so I suspect it may work. I don't have much experience with arrowroot thought so I can't say for certain!
Jenny -
Tapioca gives it a chewy softness, almost gelatinous