
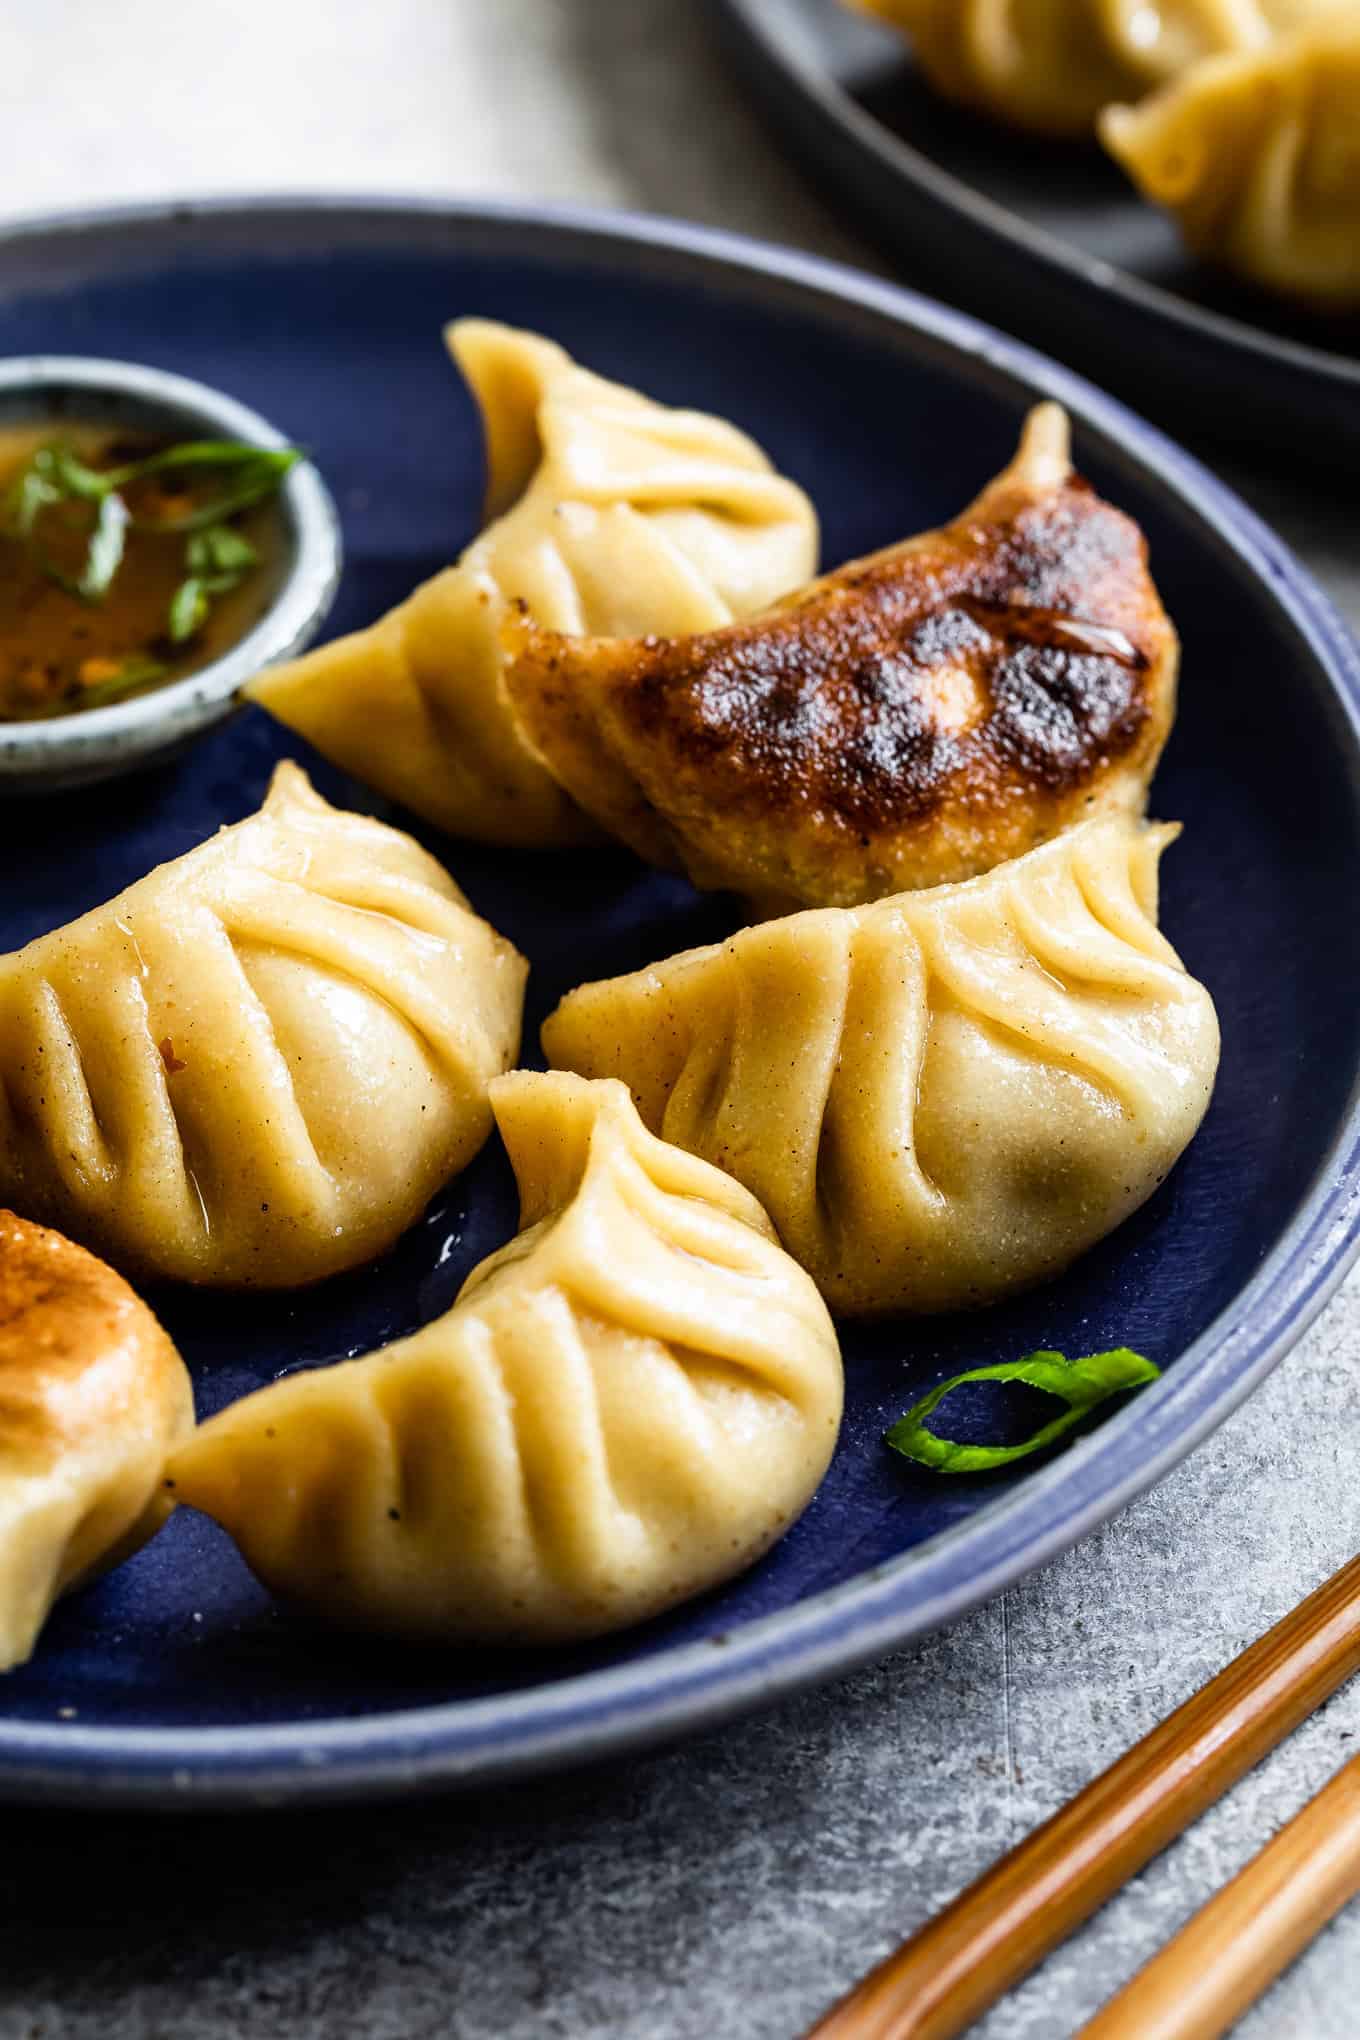
Making gluten-free dumpling wrappers is easy with this tutorial on rolling, filling, and pleating gluten-free dumplings! With just gluten-free flours and water, these pliable gluten-free dumpling wrappers can be used to make gluten-free potstickers or gyoza. This post has all our tips on working with gluten-free dumpling dough to pleat, store, and cook potstickers! This versatile gluten-free dumpling wrapper recipe is vegan and can optionally be made without xanthan gum!

I've been craving dumplings since our honeymoon to Taipei almost 6 years ago. My hunger has only intensified thanks to my friend Lisa from Healthy Nibbles. Lisa knows a thing or two about dumplings. You can't follow her Instagram feed and NOT want to make dumplings. Sadly for me, dumplings aren't very gluten-free friendly. Until now, that is! For those of you similarly longing for gluten-free dumplings, I've got your back with pliable, easy to make, gluten-free dumpling wrappers.
Gluten-Free Dumpling Skins
Lisa and I have been plotting a gluten-free dumpling-making adventure for awhile and it only took about a year to finally happen. She'd show me how to pleat and cook dumplings just like Mama Lin and, in exchange, I'd bake her some chewy gooey gluten-free oatmeal chocolate chip cookies.
Oh, I also had to develop a gluten-free dumpling wrapper recipe. Minor details. I've never made any kind of dumpling but I've made lots gluten-free pasta, so I figured if all else failed, I could throw an egg in the recipe and charge ahead (which Lisa assured me would have been a totally legit thing to do).
I worked on a few iterations of gluten-free dumpling skins before her first dumpling tasting visit. I started with an egg-free version of my chickpea pasta recipe as a base, using Lisa's post on how to make gluten-filled dumpling wrappers as a guide. And now, with Lisa's help, we've made over 150 gluten-free potstickers using her pork and cabbage filling recipe and this gluten-free dumpling wrapper recipe. I can say with certainty this is the perfect the gluten-free dumpling wrapper recipe!
(Actual live review from the dumpling expert herself upon taking her first bite, "ooo, the skin is really nice! It's nice and soft.")
This post has all our tips on working with gluten-free dumpling dough to pleat, store, and cook potstickers! This versatile gluten-free dumpling wrapper recipe is vegan and can optionally be made without xanthan gum!
Can I Make Gluten-Free Dumpling Wrappers without Xanthan Gum?
If you need to avoid xanthan gum, rest assured, you can still make gluten-free dumpling wrappers! Instead use ground up chia seeds.
To do so, grind up chia seeds into a powder using a coffee grinder and sub in 6 tablespoons ground chia seeds in place of the xanthan gum. Since chia absorbs more water, add 2-3 tablespoons more warm water to the dough. Either white chia seeds or black chia seeds will work, but ground black chia seeds will produce a light greyish dumpling, while white chia seeds will only minimally change the appearance of the dumpling to look a little more whole grain.
While the chia seed wrappers are easier to roll out into rounds, they're a bit more delicate when it comes to pleating, so handle them more gently. Work quickly because once you wet the edge, the dough gets softer much quicker. After they're pleated into potstickers, they cook up and taste exactly the same as the xanthan gum version!
How to Make Gluten-Free Dumpling Wrappers
Measuring
I highly recommend using the weight measurements for dumpling wrappers as a little bit of flour can make a big difference in texture, especially when working with gluten-free flours. If your dough is too firm, it'll dry out quicker and be more difficult to roll. That being said, humidity can make a difference and you may find you need another tablespoon of water to make your dough more pliable or a tablespoon for tapioca starch if it feels too sticky. Your dough should be firm but pliable, almost like playdough.
Lisa's tutorial on making dumpling wrappers recommended working with warm water (110-115°F), and I kept her same method here, which worked great!
Keep all your dough under damp kitchen or paper towels every step of the way to keep it from drying out. Dried out dough is difficult to roll, and dried out wrappers or potstickers can crack more easily.
Rolling
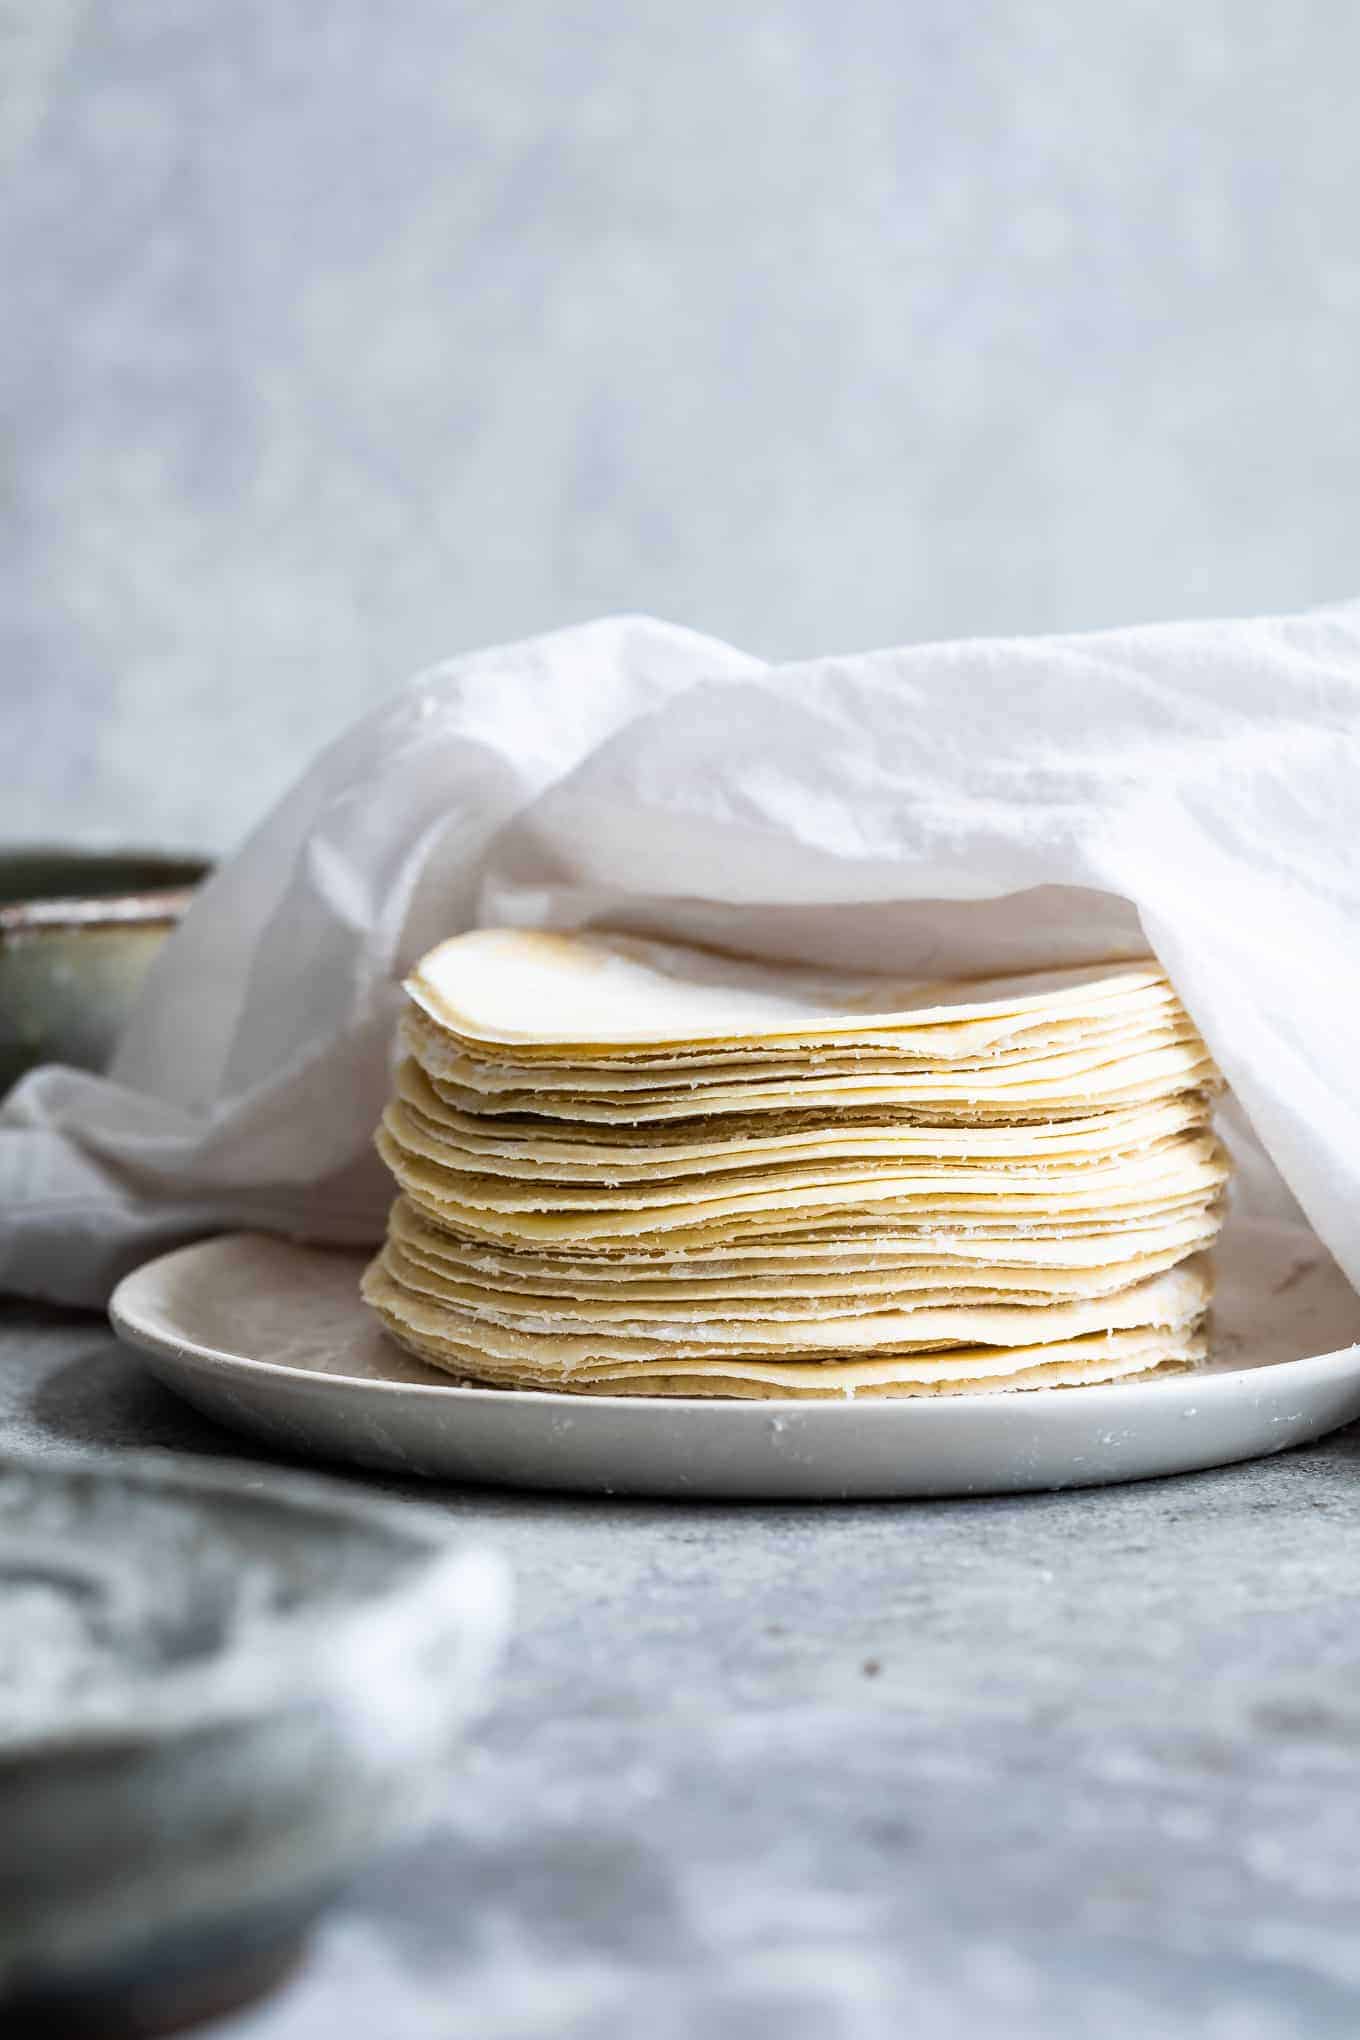
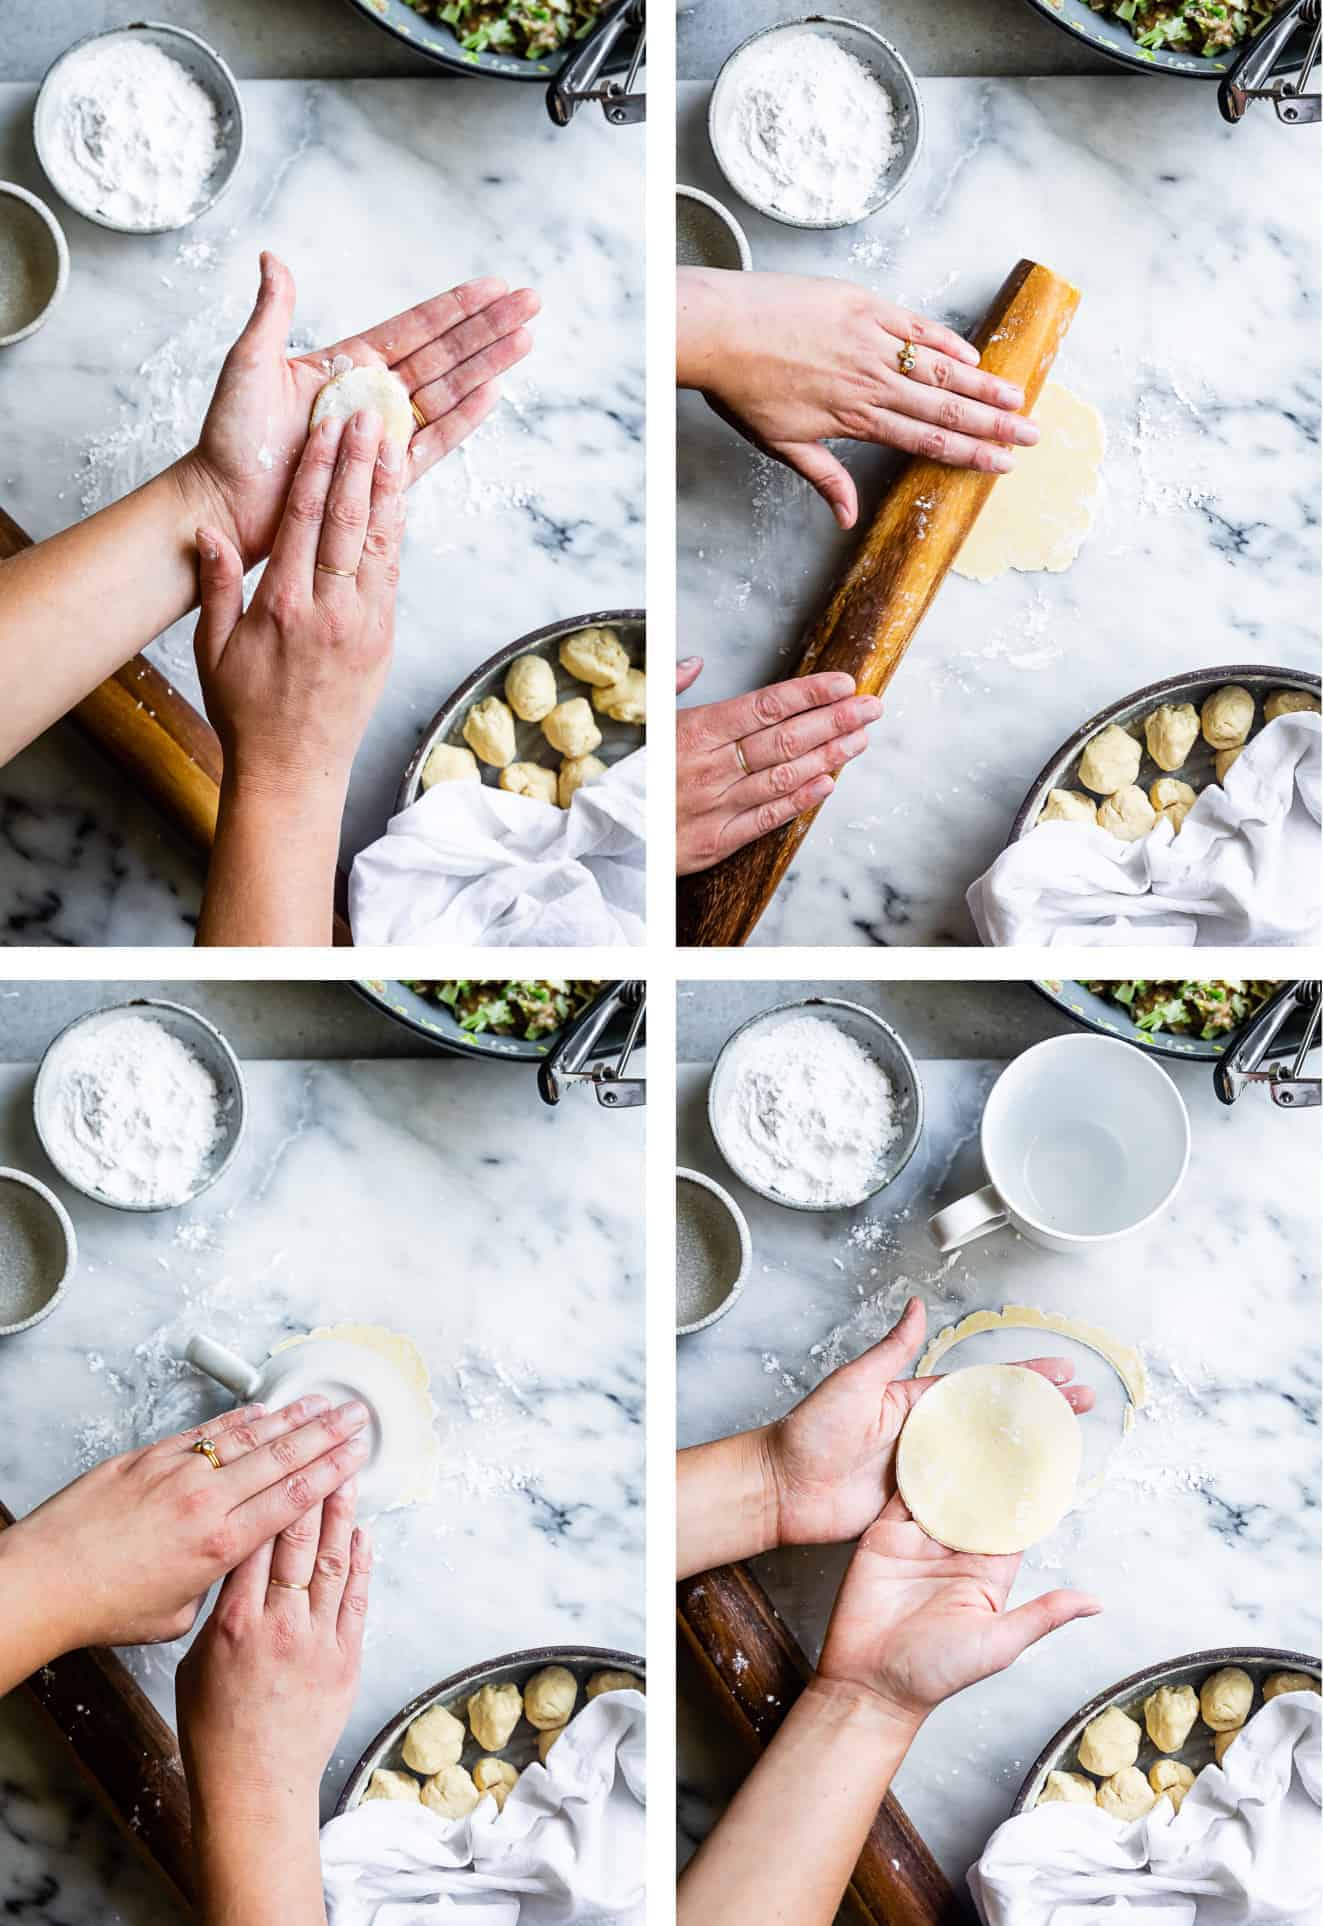
I start by weighing a few 15-16g balls of dough, which I've found is the perfect weight for a 3¼-3½-inch wrapper. If you find dough balls a little dry a little as you work, don't worry! You can freshen them up with a dab of water on your finger and some gentle kneading. Make sure your surface is dusted well with tapioca flour and rotate your wrapper as you roll to keep it from sticking.
Unlike traditional gluten dumpling wrappers, gluten-free dumpling wrappers don't easily roll into perfect circles with neat and tidy edges. Without the stretchiness of gluten, the dough rolls out with slightly shaggy rough edges, which is normal and okay! Just prep yourself with a 3¼-3-inch round cutter - a biscuit cutter or an upside down coffee mug work great to press and cut perfect rounds.
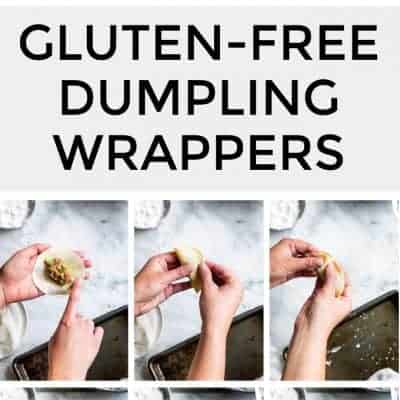
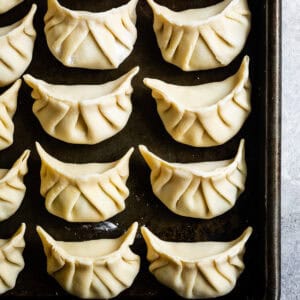
How to Pleat Gluten-Free Potstickers
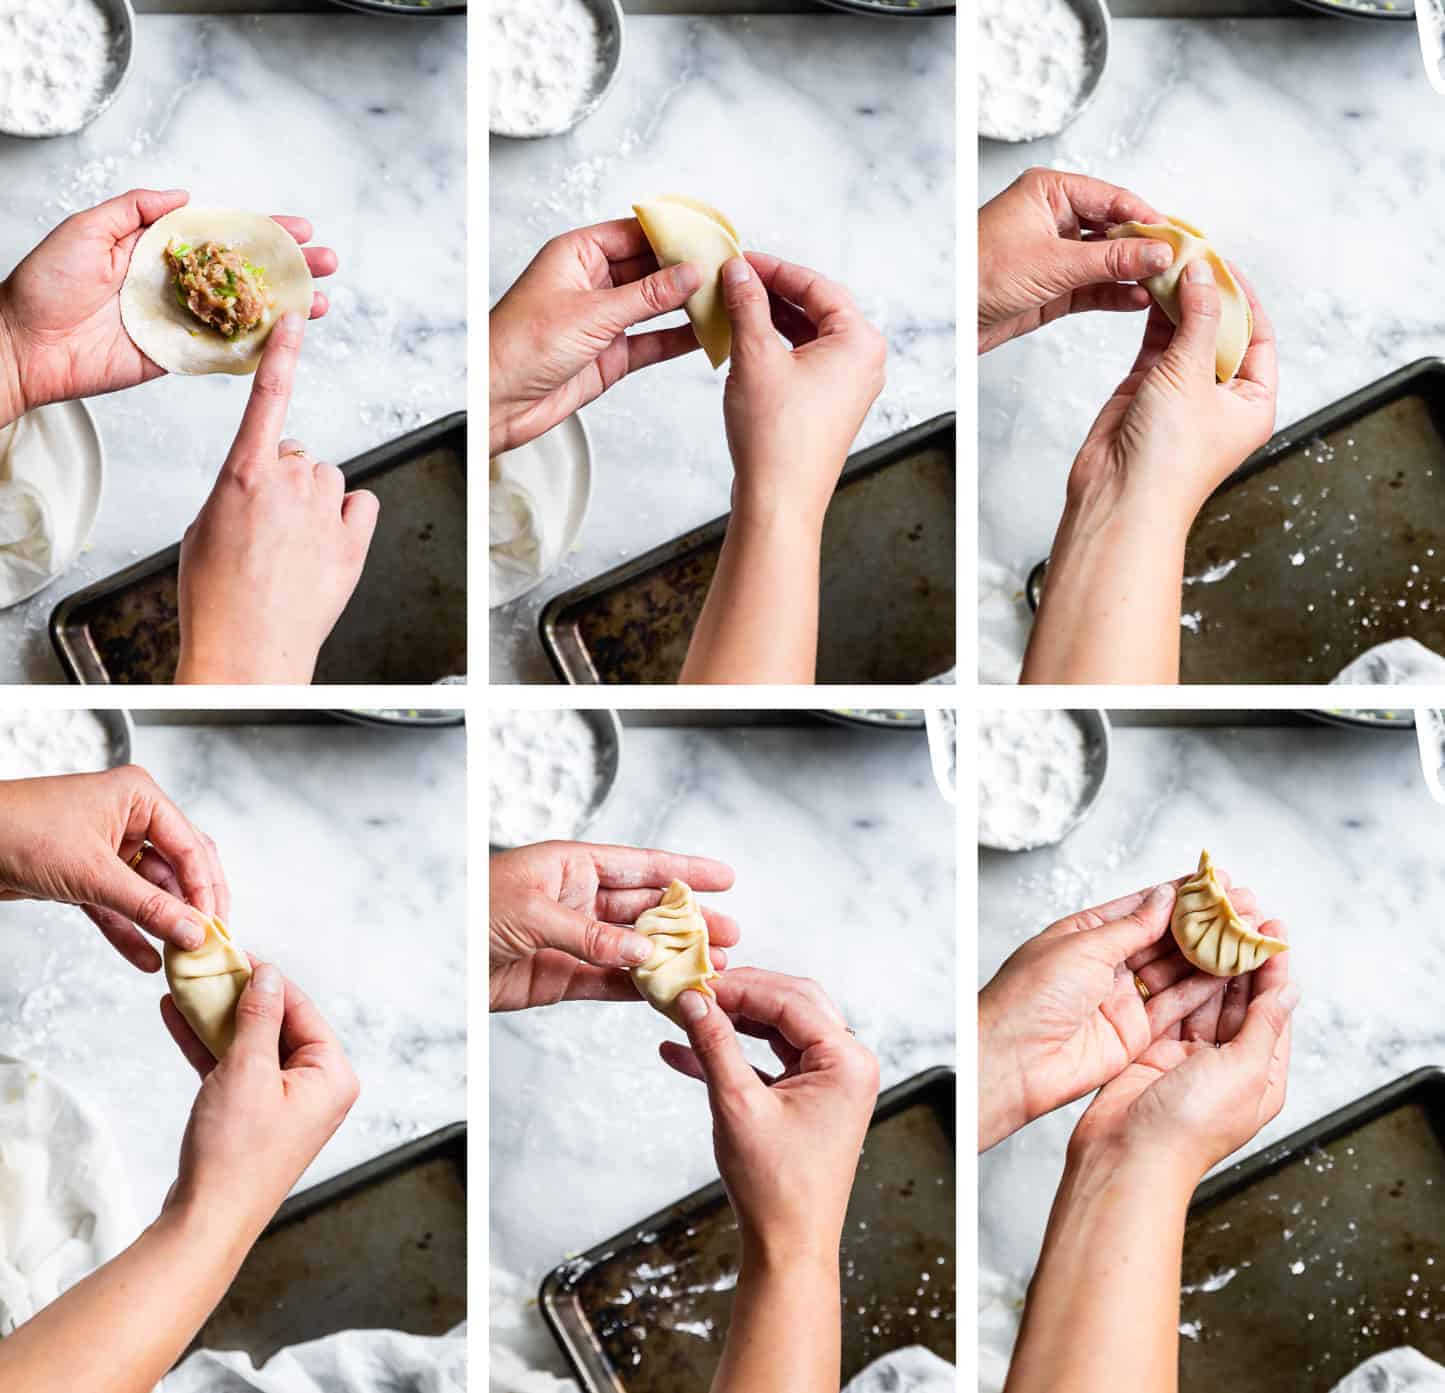
If you're new to pleating potstickers, first read Lisa's tutorial on pleating potstickers using the v-method and watch her instagram video.
The main difference for gluten-free potstickers comes in handling the dough. Treat the gluten-free dough very carefully and refrain from attempting to stretch the dough for each pleat. Instead, simply fold and press the dough for each pleat.
Before filling, you can wet the edge of the wrapper in one of two ways. You can dip the ¼-inch edge of the wrapper in the water about ⅔ of the way around. Alternatively, wet your index finger in the water and run it along the edge of the upper half. If using the dipping method, your pleats and dumplings will seal easier, but you'll need to work faster as the dough will soften and get more difficult to work with. If using the finger method, your dumplings may not seal as easily, but they're easier to work with.
I found it was easiest to learn to pleat with the finger method first before doing the dip method. Once I got the process of pleating down, I exclusively switched to the dip method. Experiment and see what works best for you!
If you develop any very small cracks in your dumpling while pleating or freezing, don't fret! Once you cook the dumplings , the steam will seal the cracks up. For larger tears while pleating, you may want to remove the filling and start over with a new wrapper.
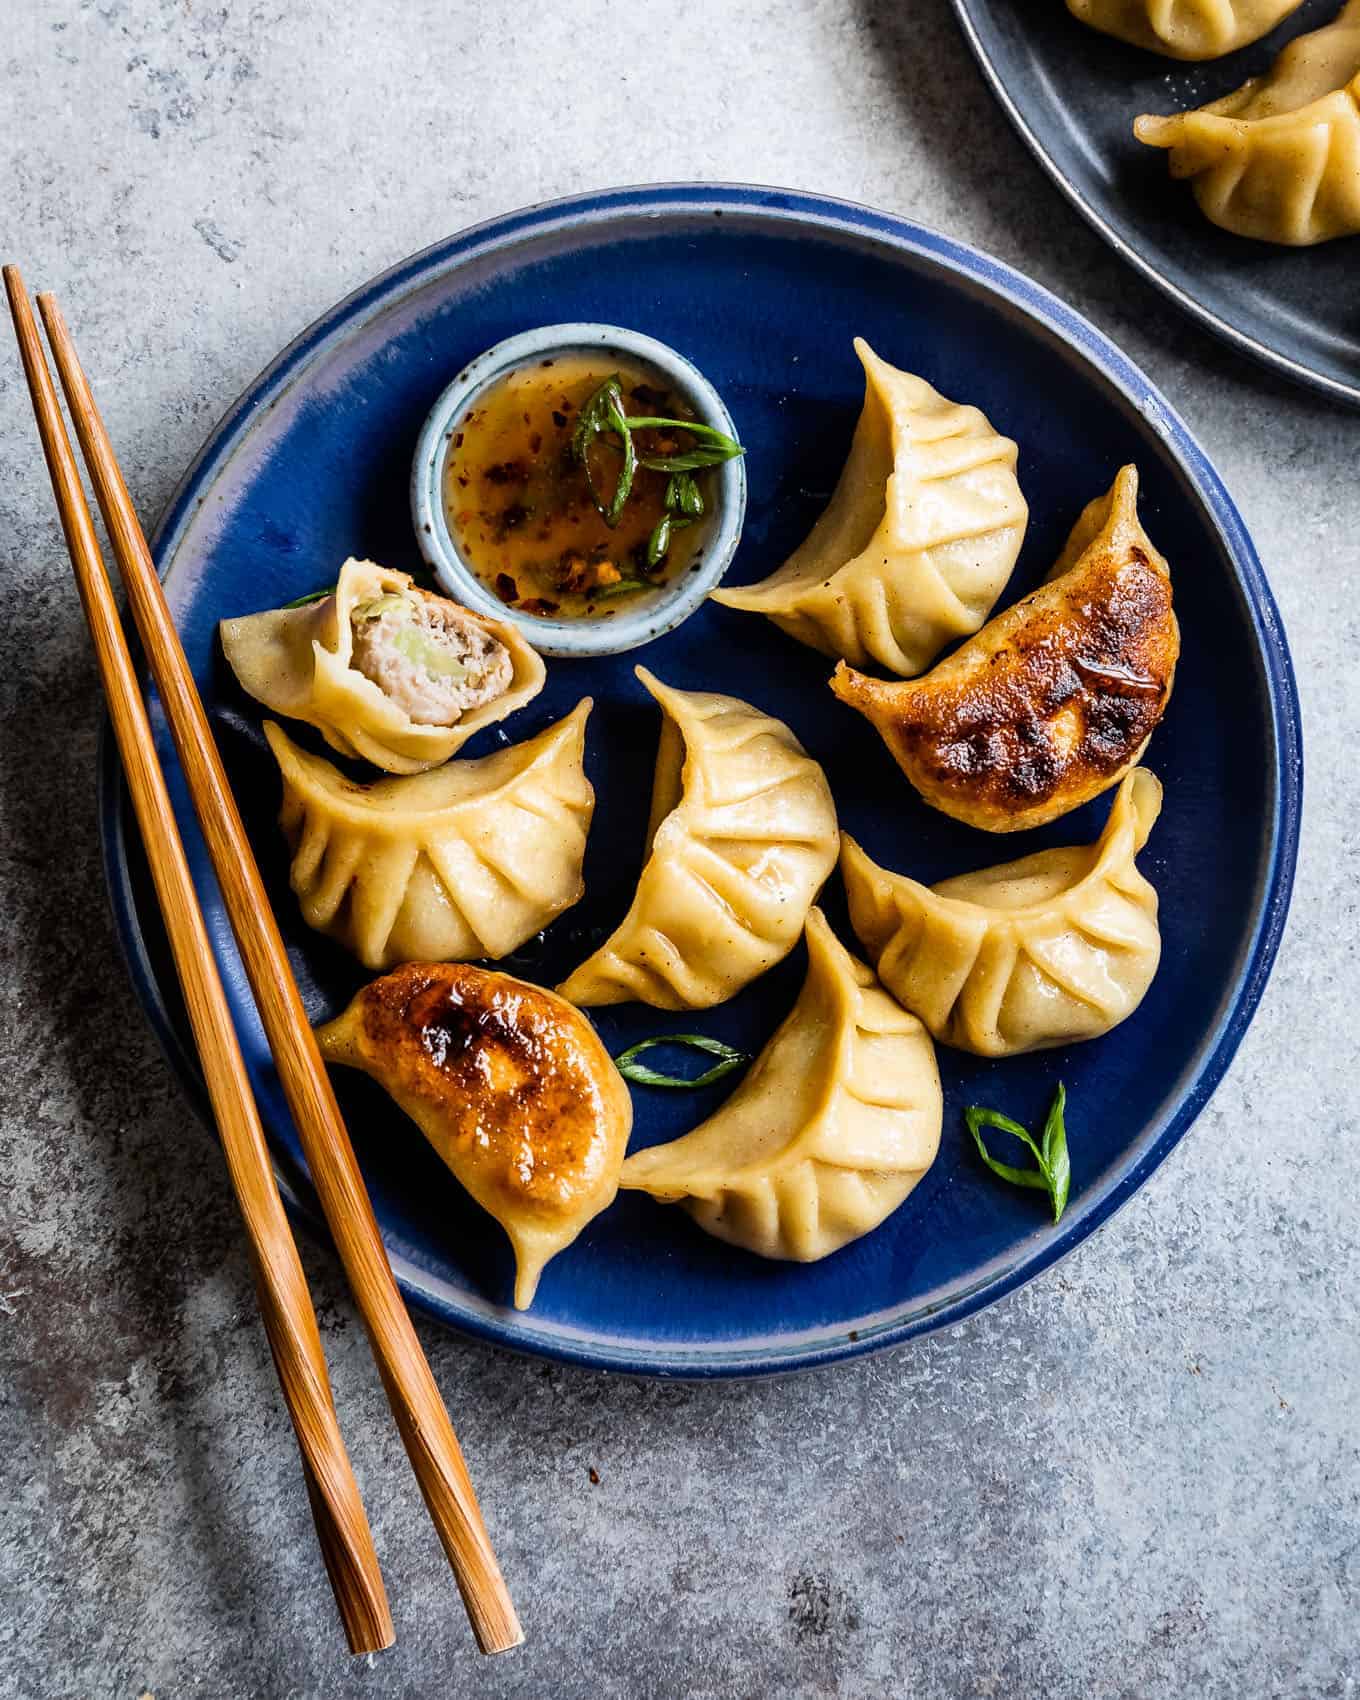
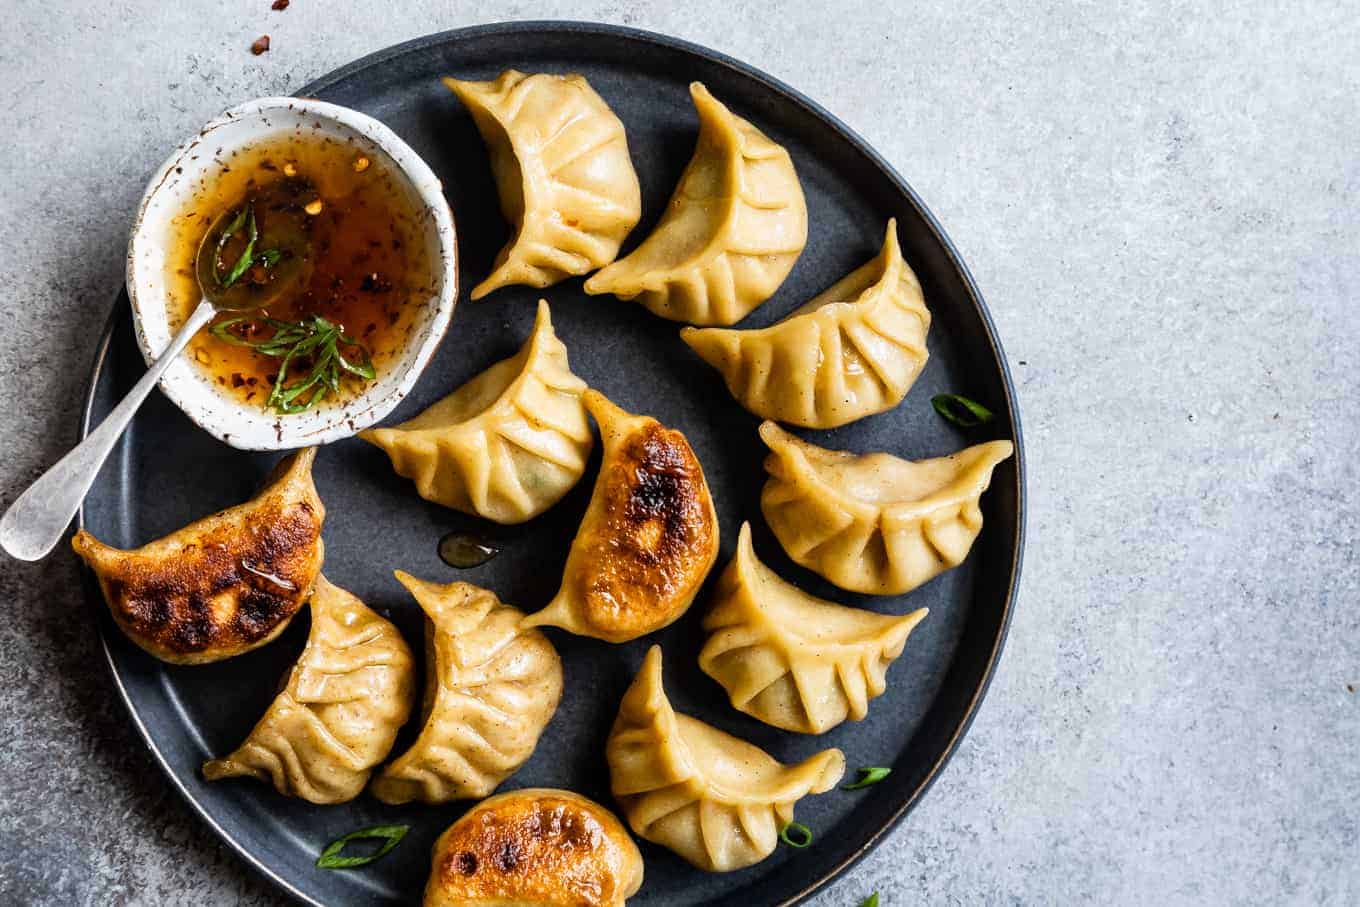
In the photo below, the lefthand row is made with ground white chia seeds, while the rest are made with xanthan gum.

How to Freeze or Refrigerate Gluten-Free Dumpling Wrappers
You can store your gluten-free dumpling wrappers in the fridge or freezer to pleat into potstickers or gyoza later. To store them for later, lightly dust each wrapper with tapioca starch before stacking them up.
Wrap the stack tightly in plastic wrap and store in a freezer-safe bag or airtight container. Lisa warns that you must wrap the stack in plastic wrap before putting in a bag or container or condensation will form and your wrappers will stick. Trust her.
Refrigerate for up to 2 days or freeze for up to a month. When you're ready to use the dumpling wrappers, you must defrost and bring them to room temperature before folding or pleating them or they'll crack. To speed up this process, I placed 4 to 6 wrappers on the surface to warm up for a couple minutes, replacing one each time I used one.
How to Freeze Homemade Gluten-Free Potstickers
You can also freeze the finished potstickers too cook them later - here are all of Lisa's tips on freezing potstickers. If you don't plan on cooking your gluten-free potstickers immediately, freeze them, even if just for a couple of hours!
When I go through the effort of making homemade dumplings, I always double the recipe and store more than half in the freezer. To freeze the pleated uncooked potstickers, make sure none of the dumplings are touching one another on a baking sheet and place the baking sheet uncovered in the freezer for at least an hour. Once the dumplings feel firm, you can transfer the dumplings to a freezer-safe storage bag, using a metal spatula to lift them from the pan if needed.
Cook frozen dumplings straight out of the freezer without defrosting, adding 1-2 minutes to the fry and cook time.
I mentioned this above, but if they crack a tiny bit while freezing, don't worry! The steam from cooking will seal the cracks back up.
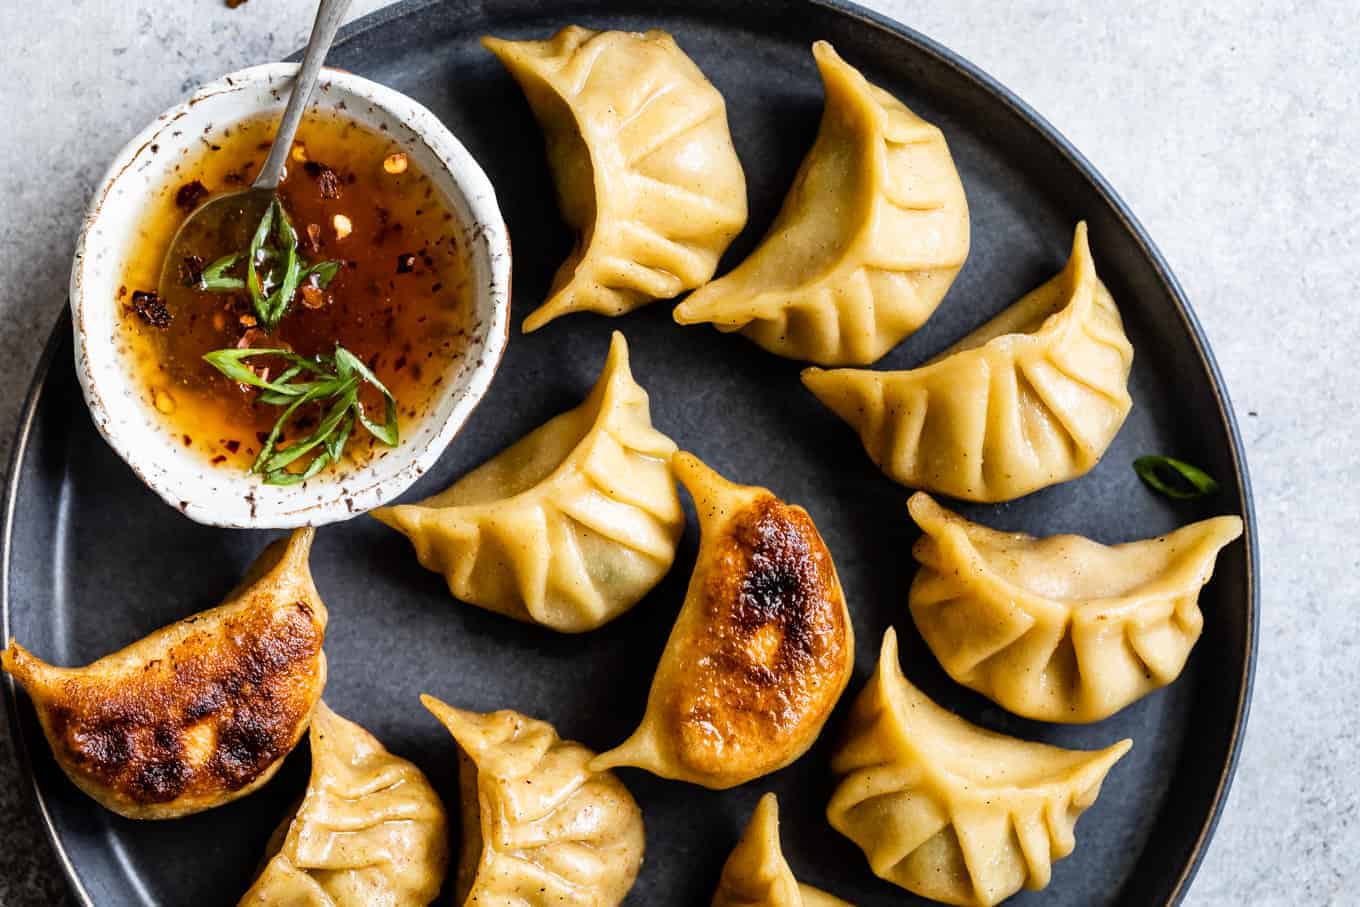
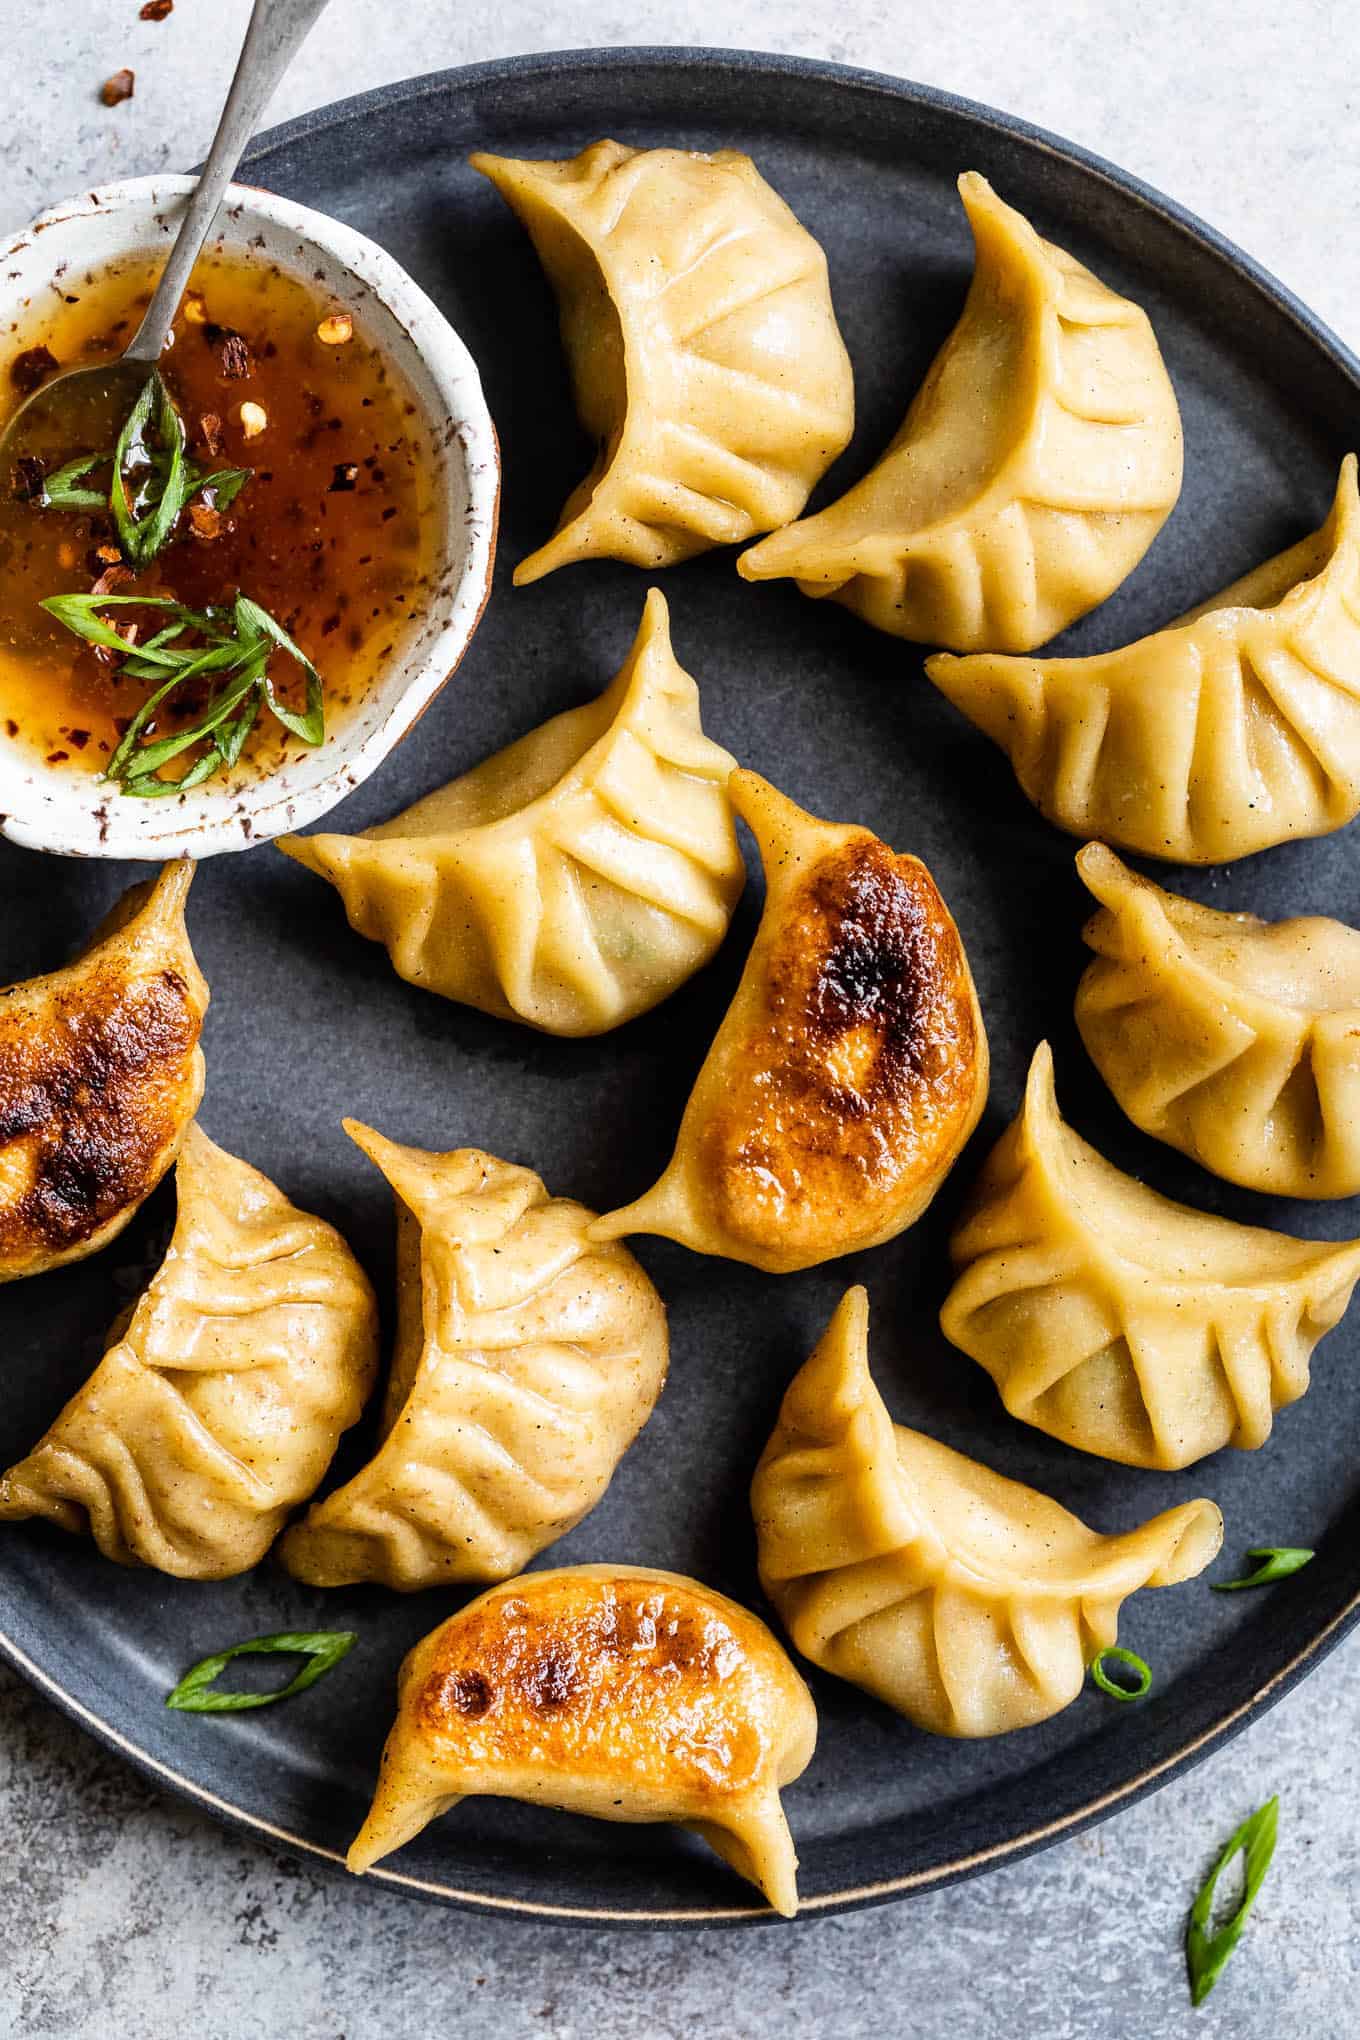
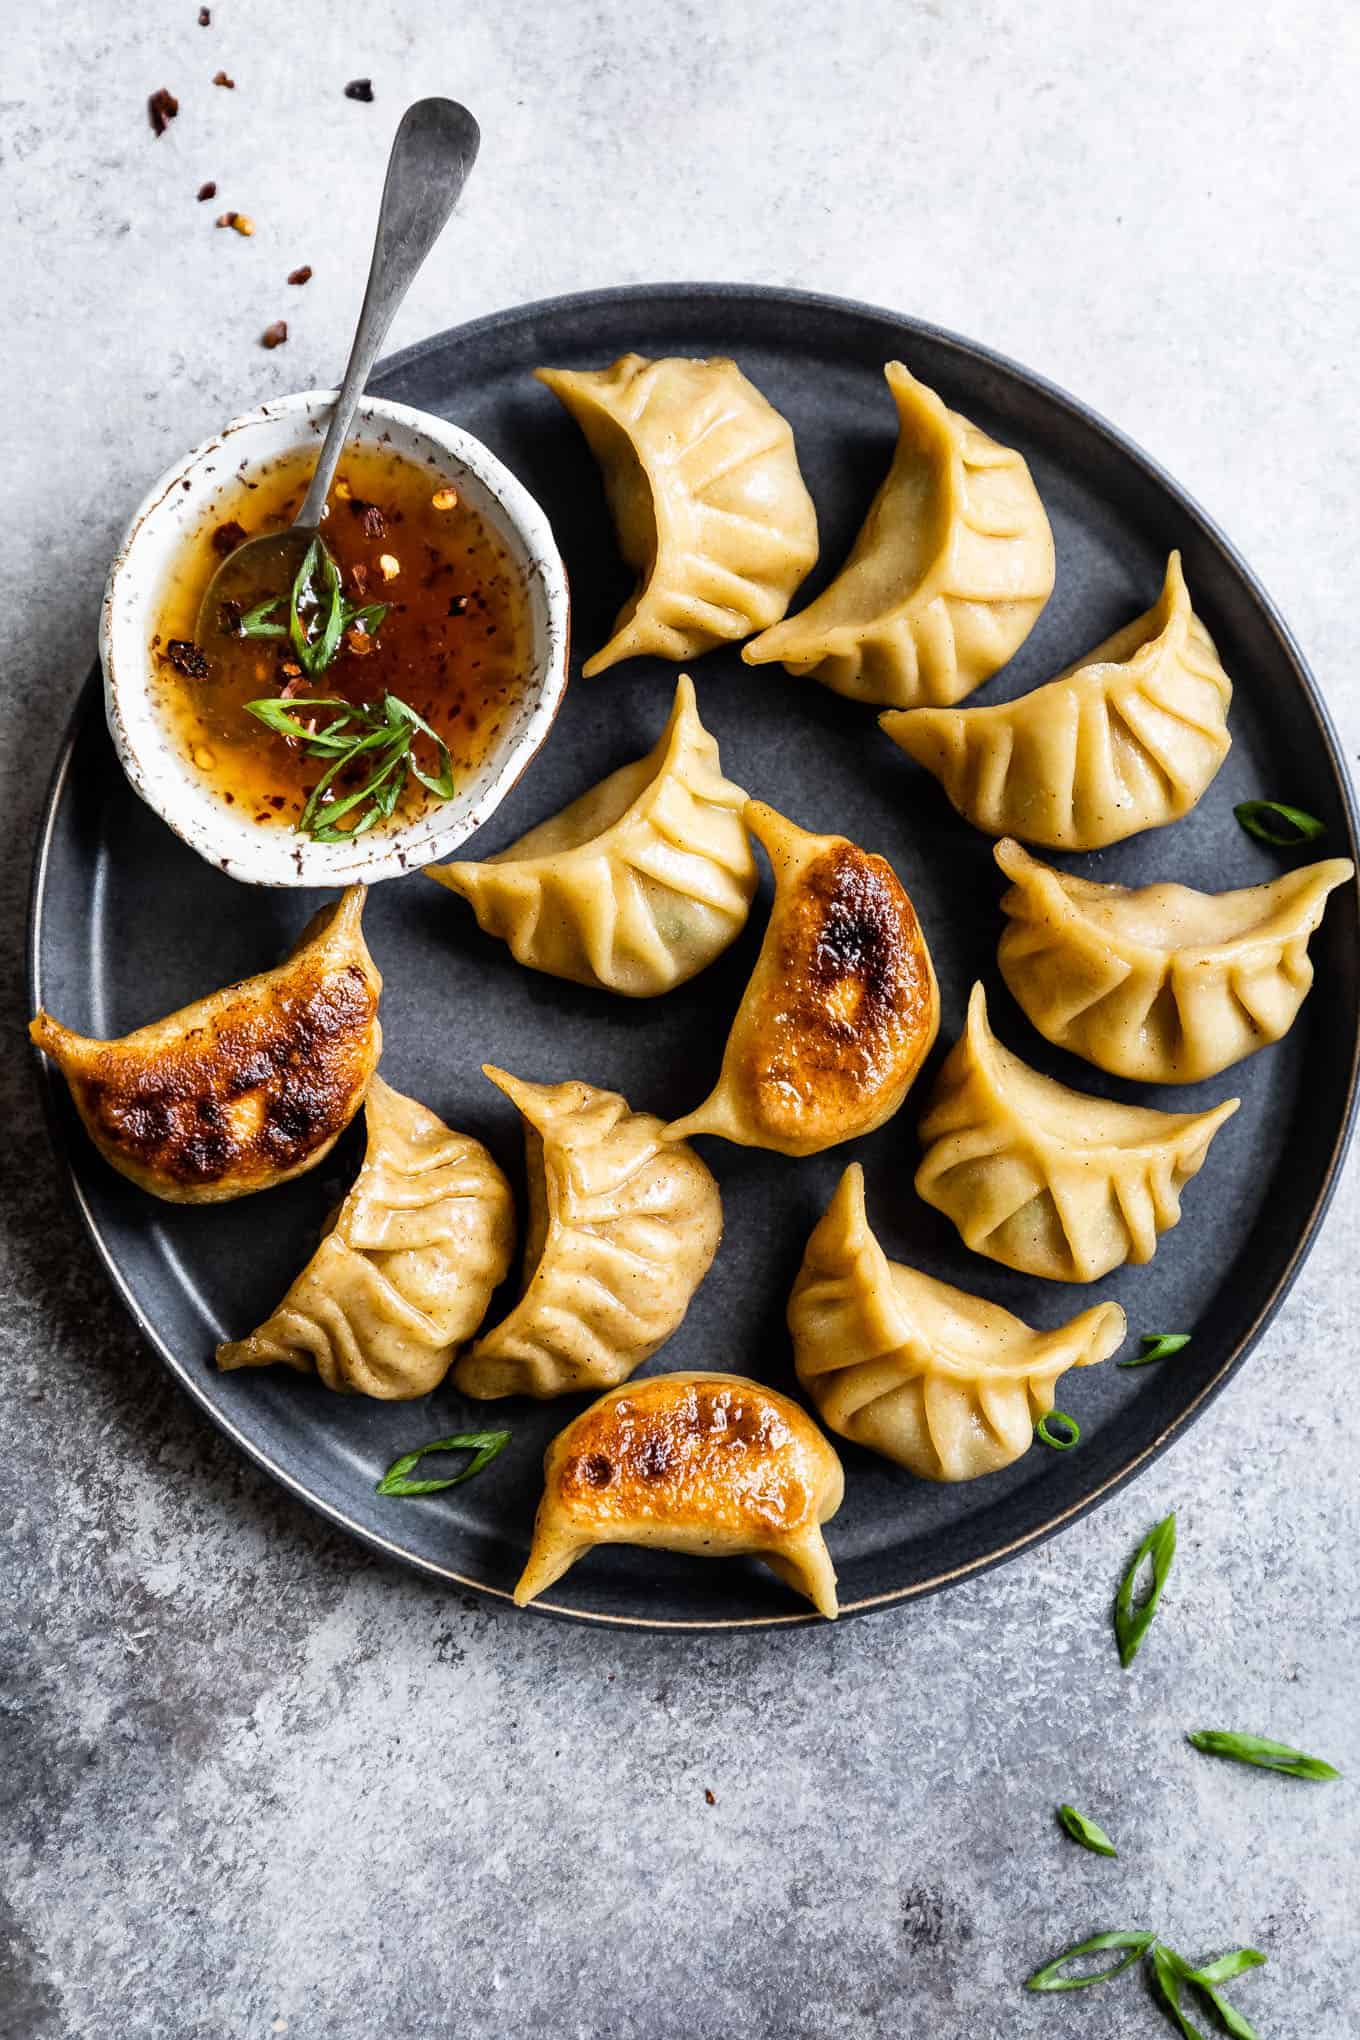
Gluten-Free Potstickers Recipe
Once the potstickers are made, they cook up just as you would normal potstickers. You could fill these gluten-free potstickers with any filling of your choice, but here we've used Lisa's recipe for pork and cabbage filling, subbing in tamari sauce for the soy sauce. I also served them up with Lisa's sweet chili sauce for dipping.
If you're new to making and pleating potstickers, Lisa recommends starting with a ground meat filling. The meat holds all the ingredients together into a neat ball, making it easier to practice pleating.
The gluten-free dumpling wrapper is completely vegan though, so feel free to try your favorite vegan filling (maybe mushroom, or try Lisa's tofu & kimchi filling). Get more inspiration for filling on Lisa's dumpling archive page.
If you make these wrappers, please let me know what you used them for! I'd love to get inspiration from you for filling, shape, and pleating variations.
Recipe
Homemade Gluten-Free Dumpling Wrappers
Ingredients
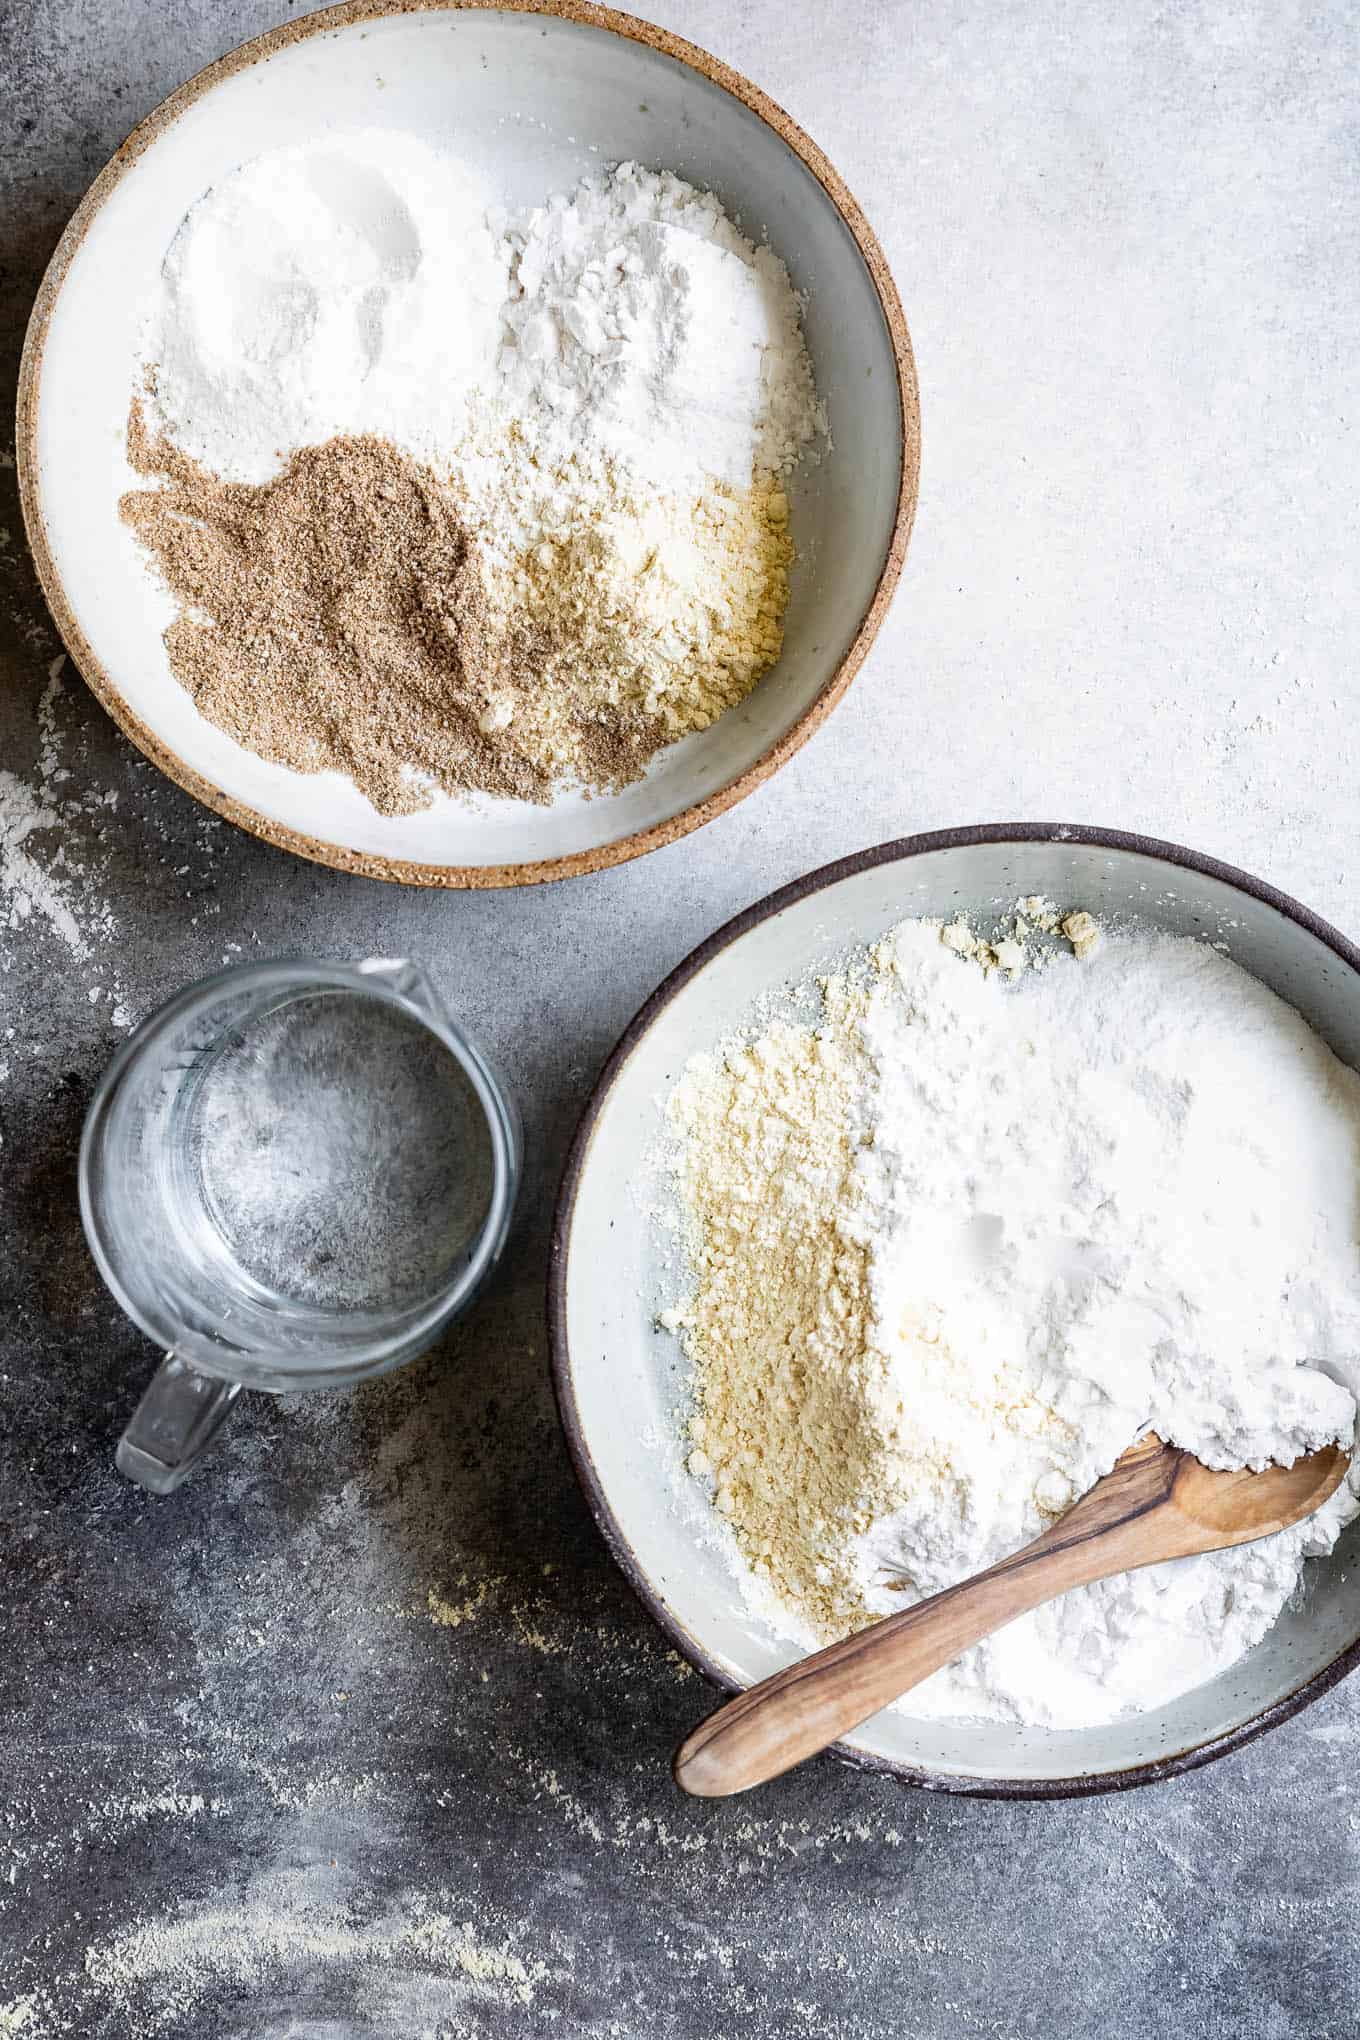
- 150 g (1¼ cups) chickpea flour, see note
- 125 g (¾ cup + 3½ tablespoons) Bob's Red Mill tapioca flour
- 125 g (½ cup + 3½ tablespoons) sweet rice flour, also called mochiko; do not substitute white or brown rice flour
- 1¼ teaspoon xanthan gum, or sub 6 tablespoons ground white or black chia seeds, and add 2-3 tablespoons more water
- 1 cup + 1 tablespoon warm water, 110-115°F
INSTRUCTIONS
- Prepare your dumpling filling: If you're planning to fill and pleat your dumplings immediately, begin by preparing your dumpling filling and set it aside while you make your wrappers. I recommend this pork and cabbage filling recipe. Lisa recommends cooking the veggies in the filling to soften any sharp edges that may tear the wrappers.
- Make Gluten-Free Dumpling Wrappers: When your water temperature is 120°F, whisk together all the dry ingredients in a medium bowl. Pour in the warm water and mix together with a fork until it forms a shaggy dough.
- Using your hands, gather the dough together and knead until it forms a ball. Remove the dough from the bowl and knead it for 2-3 minutes until it forms a smooth ball. If you find the dough too sticky, dust the surface with a bit of tapioca starch while kneading. Humidity can make a difference and you may find you need another tablespoon of water to make your dough more pliable or a tablespoon for tapioca starch if it feels too sticky. Your dough should be firm but pliable, almost like playdough.
- Place the dough in the mixing bowl and cover with a damp kitchen or paper towel while you prepare your dumpling station. The towel keeps the dough from drying out.
- Fill a small bowl with water and another with tapioca starch. Have a damp paper towel ready to cover the wrappers so they don't dry out. Keep a rolling pin and bench scraper nearby for making the wrappers. Have a spoon or small cookie scoop ready for putting the filling into the wrappers. Place a baking sheet nearby for the finished dumplings, with another damp paper towel to keep them from drying out. Have a kitchen scale ready for diving the dough.
- Pull off 15-16g balls of dough (about 1.25 tablespoons of dough), keeping the rest of the dough covered in the bowl with the damp paper towel to keep them from drying out. I pull weigh out six balls of dough at a time, keeping them covered in the bowl while I work with one.
- Lightly dust your work surface with tapioca starch (a marble slab or your countertop work great for this). Take out a ball of dough and using the palm of your hand, flatten the dough into a disc, about 2 inches in diameter. If you notice the outside of your ball of dough feels a bit dry (maybe the phone rang and you got distracted for a few minutes?), begin by massaging it with your fingers to mix and soften a bit, adding a dot of water if needed. It should be smooth and pliable and not at all crumbly. If you find it crumbly, dot it with water and massage again.
- Dust the dough disc lightly with tapioca starch on both sides and place it onto the dusted surface.
- Use your rolling pin to roll the disc into a very thin circle about 3.75-4 inches in diameter, turning and flipping as you go to keep it from sticking to the surface, dusting with more tapioca starch, if needed. The edges of your circle will be a bit rough and shaggy. Use a round cutter, mug, or glass to cut the thin dough into perfect 3¼-3½ -inch rounds (I use an upside down mug as a cutter!). Save the scraps, set the wrapper aside under another damp towel, and repeat with 2 more balls of dough. After rolling out three wrappers, I gather up the scraps and dab them with a drop of water to roll them into another ball. I then repeat the process above to roll it into another dumpling wrapper round, discarding the scraps from this cut. Note: If you plan to store your dumpling wrappers in the fridge or freezer for later use, even just for a few hours, very lightly dust the wrappers with tapioca starch before stacking to keep them from sticking. See note about storing wrappers for later use below!
- Repeat until you've made all your dumpling wrappers, ensure you keep the rolled wrappers under a damp paper towel while you work. You can also opt to roll 6-8 wrappers at a time, fill and fold them, then roll out more wrappers. Lisa gives this tip to help keep your wrappers from drying out while they wait. For these gluten-free dumpling wrappers, I've found that as long as you ensure the towel covering the finished wrappers stays damp, they shouldn't dry out if you make them all at once.
- Fill the Dumpling Wrappers to Make Potstickers: Dip the ¼-inch edge of the wrapper in the water about ⅔ of the way around the wrapper. Alternatively, dip your right index finger in the water and run it along the edge of the upper half. If using the dipping method, your pleats and dumplings will seal easier, but you'll need to work faster. If using the finger method, your dumplings may not seal as easily, but they're easier to work with. I found it was easiest to learn to pleat with the finger method first before doing the dip method.
- Lay the wrapper in the palm of your left hand. Scoop about 1 tablespoon of filling to the center of the dumpling wrapper (I use a small cookie scoop to make it easier! For your first try, err on too little filling). Use the "V" shape pleating method from Healthy Nibbles (how to pleat potstickers blog post and Instagram video here), pinching the dough together tightly as you go. See pictures above. Note: Follow this method above on pleating the dumplings, but treat the gluten-free dough very carefully. Refrain from attempting to stretch the dough for each pleat, instead, simply fold and press the dough for each pleat.
- Place the finished dumpling upright on the baking sheet and cover with the damp towel. Repeat with remaining wrappers/filling. See note below about small cracks.
- At this point you can cook the dumplings immediately or else freeze them for later (even if you'll be cooking them later that day, freeze them to keep the moisture from the filling from soaking through the wrapper). See notes below on freezing dumplings.
- To cook the dumplings: Heat a large well-seasoned cast iron skillet or nonstick pan with 1½ tablespoons high heat oil, such as peanut oil, over medium-high heat. Working in batches, place the dumplings into the oil, making sure they don't touch, until you've filled the pan. Pan-fry the dumplings for 2-3 minutes, rotating the pan as needed, until the bottoms are golden brown.
- With a lid in one hand to protect from splatter, pour about ¼ cup of water over the dumplings (or just enough to cover the bottom of the pan) and quickly cover the pan with the lid. Reduce heat to medium and cook for 5-6 minutes more (or 7-8 minutes for frozen dumplings). I like to use a meat thermometer to check for doneness; The filling should be at least 165°F inside.
- Remove the lid and cook the dumplings for another 30 seconds to a minute to absorb some of the water. Transfer dumplings to a plate. Cook off any remaining water and repeat.
- Serve warm with soy sauce, ponzu sauce, or Healthy Nibbles and Bits' soy & vinegar dumpling sauce or sweet chili sauce.

Natasha -
Does anyone have the weight of the ingredients in a unit of volume instead? I saw it was there earlier this week but I looked today and the cups and tsp conversions are gone from this page.
Sarah Menanix -
Thank you for your comment! It seems my recipe card plugin was having a glitch and needed to be updated - It would have taken me awhile to notice without your comment! It should be all fixed now!
Natasha -
Glad I could point it out, thank you for updating it so fast!
Pamela Powers -
Just a question...can you put you dough through a pasta machine and then use the round 3" disc for cutting the dough?
Sarah Menanix -
While I haven't tried it - I think it could work! It's possible dough would be a little bit delicate for the pasta roller, in a way it isn't for a rolling pin. If you try it, please let me know!
Kim -
Do you have a suggestion for chickpea flour substitute? My
Sarah Menanix -
While I haven't tried it, I would try cassava flour as a substitute! You may have to adjust the liquid, but it should work - this is what I use for my gluten-free tortillas.
Briana -
Can I use regular white rice flour instead of sweet ? I don’t have it. Or is there another option?
Sarah Menanix -
Regular white rice flour will not work in this recipe. Sweet rice flour is the same flour used to make mochi, so it's sticky and is what holds the dough together, giving it the elasticity. White rice flour, on the other hand, is much more grainy and brittle and does not have that sticky quality. If you can, I would look for Koda Farms Mochiko sweet rice flour - I use it in nearly every gluten-free recipe as it's gluten-free baking's secret weapon.
Though I haven't tried it myself, one reader below said they had success substituting potato starch for the sweet rice flour. Hope one of these works for you!
Kim -
Has anyone tried using a cast iron tortilla press instead of rolling?
Sarah Menanix -
I think that would work great! I would just put the dough between two pieces of parchment paper in the tortilla press so it doesn't stick.
Melanie -
I would like to know if anyone ever used a tortilla press instead of rolling them?
Thank you
Luna -
Hi,
Thank you for this wonderful recipe. I have tried before and they turned our great, definitely my pleats weren’t as beautiful as yours 😅
I was wondering if I can replace the chickpea flour for white rice flour or brown rice flour ? I like chickpeas so I didn’t mind the chickpea flavor of the wrappers that I could taste once I cooked the dumplings but I would like to try a different more neutral tasting flour
Sarah Menanix -
For a more neutral-tasting flour, I'd probably recommend something like Sorghum flour, millet, or brown rice flour. All of these have similar protein amounts to the chickpea flour! I haven't tried any of them, so you might find you need to add a bit more flour or water to bring the dough to the proper consistency, but it should work!
Sheila Yao -
The sweet rice flour measurement in the recipe isn’t right. I weighed 1/2 cup plus 3.5 tablespoons, it’s only close to 90g . I weighed 3/4 cup plus 2 tablespoons sweet rice flour, it’s close to 125g.
So the dough came out very dry when I used weight to measure. I had to add almost extra 100ml warm water to make dough work.
On my second attempt, I was able to make dumpling wrappers.
Anyway, thanks for the recipe so I can still have dumplings without wheat flour. Next time I’m going to try to make green onion pancakes with this recipe. Will let you know how it comes out.
Thank you again.
Sheila
Sarah @ Snixy Kitchen -
I have found that more than any other flour, the weight of sweet rice flour can vary DRASTICALLY with the brand because some are ground much more finely than others. I exclusively use koda farms mochiko which isn’t as finely ground as the brands you get at the Asian supermarket but is more finely ground than Bob’s red mill. Mochiko weighs about 10ish g per tablespoon. I’m glad you were able to rescue it with more water and had success!
Sheila Yao -
I’m reporting back about the green onion pancake I made with recipe of dumpling wrappers. After I accidentally add coconut oil to the dough, it actually works out batter. I was able to knead dough to very thin, about 6”*7” , add coconut oil and chopped green onions, fold it up to make into 2”*2” pancakes. It turns out very delicious.
Thank you again for the dumpling wrapper recipe.
Sheila
Judy Cohn -
I’m in the process of rolling out and filling these wrappers with great, yummy success! I used a scant two teaspoons of Terrasoul psyllium husk powder, a brand recommended by Aran Goyoaga, in place of the xanthum gum. I didn’t need to use extra water.
Margaret -
Hi everyone! These look delicious. Has anyone tried using a pasta extruder with this dough rather than rolling them out by hand?
Sarah Menanix -
Hi! I did try this when I first tested the recipe and because the wrapper does not have egg, it's a bit too delicate to effectively go through the pasta roller without breaking apart!
kat -
Did these take FOREVER to make? yes. But was it worth it? 100000% yes!!! Omg!!! these gf dumpling wrappers are MAGIC! I can't believe I was able to roll them out SO thinly with out tearing. I haven't been able to have an authentic dumpling in years. I was about to cry of joy lol. The wrappers held together really well and were quite easy to wrap, with a bit of gentle care. Just as good as the real deal. THANK YOU!
Jodi Cummings -
This was my first time making gf dumpling wrappers and they came out really great! I used cassava flour (it was the closest to chickpea flour I had available). The dumplings came out really great. Use tapioca starch when rolling out to prevent sticking too much. Use light pressure on the rolling pin, and practice until you can roll it out pretty thin.
Haley Brumfield -
Has anyone tried to make crab rangoons with this dough!?
Stuart -
Absolutely brilliant! Thank you for this recipe and the time you’ve spent developing it. I made a huge batch and got to take part in a shared dumpling meal. Everyone loved them and asked me to make more!
Cheers!
Dorothée -
Absolutely amazing recipe!
I was doubting about the dough when I started to make it.
We had to add quite a lot of water but it worked absolutely perfectly.
We made them for New Year's Eve yesterday with a pork and cabbage filling and it was so good! Thank you so so much for sharing this amazing recipe, the new year started deliciously! :)
Samantha -
Wow…these dumplings are amazing! I don’t care how much time it takes, these are worth it! Get a crew together and have a dumpling day! I used millet flour instead of rice and the ground chia seeds the dough was perfect! It made so many wrappers, I’ve got a heap in the freezer now for future use :) Thank you so much for sharing this recipe, it’s a winner xx
HHB -
Takes some time and patience but the results are worth it. I did not have luck freezing the wrappers but I do freeze the dumplings and they defrost well.
Linda -
I am thrilled to know there is a viable GF dumpling recipe available for Asian foods. I thank you and Lisa with all my heart for the many hours of work and tears you put in to get to this final recipe. My best friend needs to eats GF and according to FODMOP restrictions, and your recipe seems to accommodate both. Xanthan Gum is another ingredient she cannot consume. I recently read that Lecithin Granules can be used in place of Xantham Gum in recipes. Do you know if that is true? If so, I'm wondering if the same measure of the XG is used in measuring the lecithin granules. Thank you so much for any feedback you can give me.
Sarah Menanix -
I've not tried using Lecithin Granules, so I'm sorry I can't help you there! Can she have chia seeds? There is a variation above using ground chia seeds instead of xanthan gum.
Lydia -
Wow-- I had hoped and dreamed for a gluten free option that would work and this is it. Thank you for the detailed instructions. Just in case it throws anyone off tapioca flour = tapioca starch :). And mochiko is a sweet rice brand that is easy to find.
Susan -
Just made Gyozas with this Pastry recipe for my Ceoliac son who hasn'tbeen able to eat a gyoza for 3 years!! Sooo good!!!
A++ will be making again and again!
Thank you!!
Melissa -
I nearly cried when I came across this! I am Taiwanese and have not had these (we call them "sway-jows") since before I discovered I had Celiac Disease in 2016 (I went undiagnosed, miserably, for four years). I will be 41 in June and these were one of my childhood staples, they taste like home. They remind me of cooking with my grandma (who passed in 2003, when I was 22, from ALS), standing on a chair because I was very young, learning about our culture and bonding. I love that they are vegan, but I am going to have to cheat because my grandma filled the inside with ground pork, the incredible Chinese chive and soy sauce (GF soy sauce is soooo inferior). I was reading about your incredible story and as someone who has had a 24/7 migraine (and migraine associate vertigo) for the last 15, going on 16 years, I am glad that eliminating gluten from your diet has helped you greatly!! =)
I cannot thank you enough, Sarah (and Lisa!) for working sooooooo hard on this recipe that I cannot wait to try!!!! You are amazing beyond words.
Gillian -
I was wondering if you can use ground turkey or chicken instead of pork?
Sarah Menanix -
I don't see why not! I just texted Lisa and she said that because ground turkey is so lean, you'll need to add some oil to the filling or it will be very dry when cooked up in the potstickers.
gina -
Excellent recipe! It was time consuming, and getting the dough texture to be right is tricky, but the wrappers were yummy and that's all I can ask for.
I used glutinous rice flour from an Asian market and Bob's Red Mill GF flour since those were available to me. Used more water than the recipe called for, and shaped the dough disk in my hand rather rolling it out. Worked well for both pan frying and steaming - steamed texture was very similar to mochi.
Thank you for the recipe!
lacey bulmer -
Hi!
Does this dough rise? I used a few substitutes because i couldn’t find the right ingredients and I want to make sure it still works!
Sarah Menanix -
This acts like a pasta dough and does not rise.
Alex -
Since it acts like a pasta dough can the pasta roller attachment be used and then just cut out circles, or is it a necessary step to create balls of dough and then use a rolling pin?
Thanks for your time.
Sylvana -
Unfortunately they didn't turn up great for me:( I mean the dough in particular. I used ground chia instead of gum and potato starch instead of tapioca one. Don't know if that was beacuse of starch but my dough was too sticky to roll and too "sandy" to shape. So at the end I fried them with a thicker layer of batter and it didn't fry well:( Finally - i threw everything out...
Sarah Menanix -
Oh no! I'm so sorry it didn't work out for you! I would love to help brainstorm what may have gone wrong for you. Though, I don't have experience substituting potato starch in this recipe. You mention it being sticky and sandy which makes me wonder two things: 1. Can you confirm whether you used sweet rice flour (aka mochiko) and not white rice flour? Which brand of sweet rice flour did you use? 2. I suspect your water may not have been warm enough, which did not allow the starches to cook a bit, which gives it the stretchy smooth texture. Did you check the temperature of your water?
Carmen -
These worked SO WELL and are SOOOO DELICIOUS. I was a bit worried at first because I felt like my seam wasn't properly squished together, but in the end the water just ended up acting like glue and they didn't fall apart at all.
For anyone looking to make this recipe though, DUST THE TRAYS WHERE YOU PUT YOUR FINISHED DUMPLINGS. I ended up teating a couple of them! :'(
Juliet -
This recipe is amazing! I was so skeptical at first when mixing into a shaggy dough but it came together perfectly. Was so easy to roll out and pleat - not 1 single tear!!!!! I was also skeptical of the taste but holy moly they were so so good! My partner who is newly GF was ecstatic! Thank you thank you
Lu -
So I’ve been making gf dumplings for a while and by far this is the worst recipe. I had to add an egg because your dough was too brittle, that is why your dough cracks and the filling keeps falling off. And with the addition of an egg you won’t need to use the tapioca and water mix when folding them, the water mix only made the dough sticky and melting.
I find that people post all kind of unprofessional recipes online and really your just wasting people’s time. Your recipe uses way too much ingredients and it’s totally unnecessary. I am of Chinese origin and have been eating and making dumplings since my childhood and this is just an insult to my culture. When you don’t know how to do something don’t go and post a recipe like you know what your doing.
E -
Instead of being angry, maybe you can share your recipe?
T -
How did you make yours ? I’d prefer mine with an egg as well . Thank you!!
Francisca -
Really good recipe! Found glutinous rice flour in a chinese supermarket. At first I thought the dough was really stiff and hard to kneed, but I was pleasantly surprised at how easy it was to roll out the small dough balls! Next to no tearing! Really held together perfectly. I kept adding sprinkles of water because I was worried that it was stiff from lack of water, although this didn't alter the texture much, it was very forgiving to the extra hydration. Thanks so much for the recipe! Definitely a very time consuming process but sometimes that's perfect to clear your mind :) Thank you!
Lisa -
Owner
Mary -
This is truly an amazing recipe!! The whole family loved it. The texture of the dough was just amazing and so easy to work. Made all the pastry and half the filling so at daughters request doing shrimp and pork next week :)
Mari -
This was a big project, it took me about 6hrs including making the filling of my choice (low fodmap pork/shrimp/cabbage/chinese leek). I had to make the dough twice - I tried subbing sorghum as suggested but the dough was impossible to work with so I remade it with Trader Joe's GF flour and it was much better but still very, very delicate. I had to rehydrate each little dough ball before rolling and there was no way I could do any pleats - I have pierogi-looking dumplings: delicious but ugly. I am happy and plan to do this again with real tools - dumpling rolling pin instead of a soy sauce bottle and a biscuit cutter instead of a mug. There are many dumplings freezing at the moment and I'm exhausted.
Nicole -
Hi Sarah, have you tried freezing half the dough in a ball and rolling the wrappers once you de frost at a later date?
Sarah Menanix -
I have not tried freezing the dough before rolling it out - only once I've rolled them out - sorry! I don't see why it wouldn't work - you find the dough a bit dry when you defrost it, you could just add a bit more water. If you try it, please do let me know!
Paul -
WOW, WOW, WOW! Haven't had dumplings in years, but stumbled across this recipe and tried it tonight for dinner. Thank you SO much. I didn't intend to make any substitutions, but I ran shy of tapioca starch by 58g, so I used corn flour gram for gram. The recipe worked like an absolute charm. The texture, the flavor, the experience ... all were just great. I don't know how we managed to, but we even had a few leftover to freeze for another time. Thanks again!
Alison -
I made these with a group and had a great time. The dough was a bit dry so I had to add more water than called for and we definitely needed more as we floured the table and hands, but they were AWESOME.
I love the texture. I can have gluten but my sister and mom can’t. These are VERY comparable wheat versions.
Garbonzo bean flour was also much less expensive than I thought it would be in the Indian section of my grocery store called Gram flour.
Thanks for the recipe! I feel more empowered to try and make some gf pastas now too!
Sarah Menanix -
Yay! I'm so glad you loved them! I exclusively use Bob's Red Mill chickpea flour, and I've noticed different brands of flour are more/less finely ground so they soak up water differently. Makes sense that it may need more water - glad you thought on your toes to make it work!
Buxx -
Hi! I'm so pumped to try this recipe. I don't have xantham gum or chia seeds on hand but I do have arrow root powder. Have you tried that swap? Thanks so much!
Sarah Menanix -
Hmm - I haven't tried that so I can't say for certain, but it's my understanding that arrowroot powder can be used interchangeably with tapioca starch, but doesn't really have the gum/stickiness needed to hold these wrappers together. While I also haven't tried it, my third recommendation would be to try subbing it in for 1 tablespoon psyllium husk flakes (but you might also have to add a bit more water too).
Lia -
I used a tsp of pslyum husk and added more water to get the play dough consistency.
They turned out great and the dough was easy to work with.
Rather than weighing the balls if dough, I just took a fondant rolling pin with smallest guides on and rolled the dough thin then cut out with biscuit cutter so they are consistent in size. Some of the scrap pieces needed a little extra water befire rerolling to return it to a very pliable state.
Extra little scrps if the dough tasted great fried up too!
Stephanie -
Incredible! My dad and I have celiac and haven’t had dumplings in years. This recipe made phenomenal dumplings. The dough is so forgiving to work with and the finished product is delicious. My only note is that the time estimate on this recipe vastly underestimated the amount of time prepping/cooking. I was in the kitchen for just under 4 hours.
Leah H. -
These potstickers are amazing! I’ve moved to a gluten free diet recently and I am so happy I found these. They were so easy to make. I had my family try them and left out the fact that they were gluten free...they LOVED them. When I told them, they were so surprised! I will definitely be making these again. Thank you so much for this amazing recipe!
Karan Bastian -
WOW. Haven't had dumplings for 10 years due to coeliac disease. Family loves dumplings, thought we would have a go at gluten free version. Every one agreed these are just as good as wheat dumplings. Coming from a family which would have 50 dumplings a week this is high praise. Very easy to make wrap, I was really impressed how well the wrap came together. 5 stars.
Michelle Keller -
Made these and filled them with a cabbage, pork, and mushroom filling and they were delicious! The recipe is really good, well developed.
Tyler -
These came out fantastic with a modified version of the pork filling (used ground turkey). I recommend using a wide-mouth Mason jar lid for the shaping of the wrappers.
Tina -
Easy to follow steps and delicious end result!
Due to laziness I ended up rolling larger chunks of dough and cutting & sealing several dumplings at a time with the help of a ravioli mould. My son could not get enough of the tasty goodness. There's a lovely bag full of dumplings in my freezer now, waiting for the next occasion to be enjoyed.
Thanks a lot for creating and sharing this recipe!
Judi -
Thank you for sharing this recipe. I am the only coeliac in our house and had never had dumplings before. I was feeling really left out as hubby and my teenagers love dumplings and I desperately wanted to know what the fuss was about lol
Happy to say this was a hit with everyone and there will be no more store purchased wrappers in our house again ????
Can not believe how silky smooth the dough is!!
Jen -
We love dumplings, but we gave up wheat, egg, and dairy for our one-year old who has food allergies. This recipe is great, and we're excited to be making dumplings soon - they've always been one of my favorite foods and I miss them! I was curious if you've tried to make dumpling wrappers with Namaste Flour Blend and/or almond flour (since that's what we have alongside the rice and tapioca flour)? Do you have any advice/suggestions about either? Thanks! :)
Sarah Menanix -
I haven't actually tried with either, though I have made almond flour pasta and it does tend to be a bit more delicate than the chickpea flour. Another reader above said, "I replaced the chickpea component with namaste GF flour from Costco. Worked great. Used sweet rice flour and tapioca as instructed." so I think you should be good there! I would just replace it by weight and then adjust the water a few drops at a time until it's the right texture! Please let me know if you end up making them!!
Leslie -
We can’t get Mochiko in Australia (where I am) and amazon won’t ship it here.
Is there a substitute for that?
Sarah Menanix -
Are you able to get Bob's Red Mill sweet rice flour? If not, I've tested them with extra tapioca starch in place of the sweet rice flour and they work, but they're much more delicate so just be careful while folding them!
Maki -
I'm in Australia and you can definitely get Chinese versions of mochiko. I've found it at Asian supermarkets - it's generally called 'glutinous flour' or 'sweet glutinous flour'. If you're not near an Asian supermarket I've seen it on myasiangrocer.com.au. Good luck! Nothing should get in the way of dumpling consumption.
Kirsten -
I just made these and they are amazing. What a great recipe. I did everything you said to do, and they worked perfectly. I ended up making 53. Absolutely delicious, thanks so much for your hard work on this recipe!
Anna -
We used a GF flour blend instead of the sweet rice flour and they turned out great. Would probably make the wrappers the day before next time as they are time consuming but awesome to have dumplings while GF! Thank you!
Melanie -
Hi! I was wondering which gf all purpose flour you used, and if you used tapioca starch and sweet rice flour too (or did you sub all flour for the all purpose)? Thank you!
Sarah Menanix -
In case they don't reply - I wanted to let you know another reader told me on IG they used Bob's Red Mill GF flour in place of the chickpea flour (and still used sweet rice + tapioca starch) and it works! It looks like the above person maybe replaced just the sweet rice flour with GF AP flour (though I don't know which one!). Hope this is helpful!
Kyra -
I made these today and used other commenters suggestions of sorghum flour instead of chickpea, and potato starch instead of sweet rice flour because it’s what I had! They turned out great - I used a traditionally korean filling of ginger, garlic, ground pork, shiitake mushrooms, scallion, onion, soy sauce, sesame oil, and a dash of fish sauce. The wrappers are delicate but it was a fun challenge. Thanks so much!
Sarah Menanix -
I'm so glad to know these substitutions work! This is super helpful for other folks right now, especially since it's so hard to get an array of gf flours! Thank you!
Jacqueline Trotzuk -
Just wondering if you used the same weight or measurements when substituting the sorghum for chickpea flour and potato starch for sweet rice flour?
Claudia -
I am intolerant of Rice (so much joy) what can I substitute it with. More tapioca or more chickpea. Or even numbers? I also am intolerant of all nuts. (Yea my life is that special)
Sarah Menanix -
I just tested a version with cassava and tapioca starch and it worked, but definitely more delicate. I would add in more tapioca and then a smidge more xanthan or ground chia seeds!
Jasmine -
Thank-you so much for this recipe!
I made a batch following your guide step by step.
Had 8 for dinner and froze the rest.
Delicious!
Amanda -
Hi Sarah - will this dumpling wrapper recipe work for steamed dumplings? I generally prefer them to pan fried dumplings.
Sarah Menanix -
That's a question I've been wanting to try too! I don't actually know because I haven't tried it yet, but it's on my list of things to work on soon! If you do try it, please let me know what you discover. As soon as I've got a steamed dumpling wrapper recipe I'll be sure to post it!
Nicolette -
I followed the recipe ingredients and fried them for a gyoza style. They turned out great! I might add a little salt to the wrapper mixture next time, but otherwise the texture and versatility in cooking it was amazing! Thank you for sharing your recipe! This is a keeper! 💚
Helen -
I did try steaming them and it does work. Oil the inside of the steamer and just steam till done. They are quite sticky when hot so try not to have them touch each other. As they cool though, they stop being sticky. I found the dough a bit chewy/firm for my liking though (more so than wheat dumplings), so going to try the cooking method listed here next and see if the addition of water softens the dough when cooking.
Gabrielle -
I'm so excited to try this!! Those photos look so good! Is it okay to use sweet white rice flour (Bob's Red Mill)?
Jack Lipton -
These came out great. I used tapioca and sweet rice flour and xanthan gum as instructed. Also used the water, but weighed it to get it precise (240g). However I didn't have chickpea flour so I used namaste gf flour (g for g replacement) I got from costco for that part. It came out great. Easy to use, not very cracky. Made mine 4.5" because I like a larger potsticker. Thumbs way up.
Haley -
Hi Sarah! I was so excited to find this recipe, as I haven't been able to eat dumplings in YEARS! It was definitely time-consuming to make, but SO SO worth it!! These were perfectly chewy, and crispy and held together so well. I used a shredded veggie + mushroom filling. I wasn't able to do the beautiful pleats you did but will give it a shot next time. Thanks so much for the great recipe!
Ali Miner -
I am wondering if this recipe will work to be used for soup dumplings... That are steamed, & not pan fried?
Laura -
Can this recipe be used to make won ton wrappers that are deep fried?
Sarah Menanix -
I haven't tried it, but I think they'd work! Please let me know if you try it! I'll add it to my to-do list too:)
Magdalena -
Thank you so much for this recipe it’s the best gf dumpling wrapper recipe! Very nice and playable pastry. Now we can enjoy eating dumplings again ???? Thank you heaps
Magdalena
Jessie Daniels -
Hi! I can't get sweet rice flour! Could I use normal rice flour? I can't wait to try these!
Sarah Menanix -
Normal rice flour will not work here. Sweet rice flour has a special sticky texture that allows you to make the dumplings without gluten to hold it all together. Sweet rice flour is available on amazon prime, but if you cannot get it, I might try replacing it with more tapioca starch - though I've not tested this so not sure how well it will work!
Kelli -
I used potato starch instead of the sweet rice flour, and these still turned out amazing. It takes a while, but I was so excited about having potstickers for the first time in over 7 years. This recipe is fantastic!
Ana -
Try your local Asian market. It's also called glutinous rice flour.
I made these today and OMG I AM IN LOVE!! It's so hard for me to not eat them ALL! The recipe made 35 dumplings for me and they were amazing! I limited myself to 5 so they will last a bit. THANK YOU THANK YOU YOU!!
Dana -
Think I’m the only person allergic to Chickpeas! So could you recommend a substitute flour for the potstickers?
Sarah Menanix -
While I haven't tried it, I think if I couldn't use chickpeas, I'd try either millet or sorghum flour! Chestnut flour would definitely work, but it does have a little sweeter flavor, but that might pair really nicely with the pork filling!
Erica -
You may be the only person allergic to chickpeas (probably not) ... BUT you wouldn’t be alone in needing to avoid chickpeas/legumes in general for other reasons. One day legumes will be back in my life (besides GF soy sauce) but it could be a long time! To top it off, gluten free is new in my life too, so I have zero experience with GF flours. I found some ramen noodles that are pre-made using rice and millet that are wonderful ... so millet will likely be what I try. I really, really want dumplings. Not something easy to start with ... but oh well! I seem to have beginner’s luck so wish me some.
Carla -
Where did you find ramen noodles made with rice & millet? Please reply.
Thank you!
Sarah Menanix -
I get the Lotus Foods Rice & Millet Ramen noodles from Costco and Whole Foods!
Jack -
I replaced the chickpea component with namaste GF flour from Costco. Worked great. Used sweet rice flour and tapioca as instructed.
Mari -
Do you think that any GF flour would work like the Namaste flour did? I too cannot eat chickpeas and my stomach wasn't very happy with millet either. I also don't have a Costco membership!
Sarah Menanix -
While I haven't tried it, I think you could probably sub in Bob's Red Mill 1-to-1 baking flour for the chickpea flour! Or else sorghum flour would be another choice I would try.
Sheri -
Amazing!
Tammy Palmer -
Thanks for sharing your recipe! I made these tonight and, although very time consuming, they turned out great. I made the filling with mushrooms, corn, cabbage and tofu. Being gluten free these are something I had missed.
Oh also instead of the separate flours I used the King Arthur gf ap blend (the one with garbanzo flour). Ok thanks again!
Karen @ The Food Charlatan -
This is amazing!! I'm so impressed that you made these gluten free! Also jealous that I didn't get to eat a hundred dumplings with you and Lisa ;) so fun and now I'm craving a dumpling like nobody's business. Gorgeous photos Sarah, as always!