
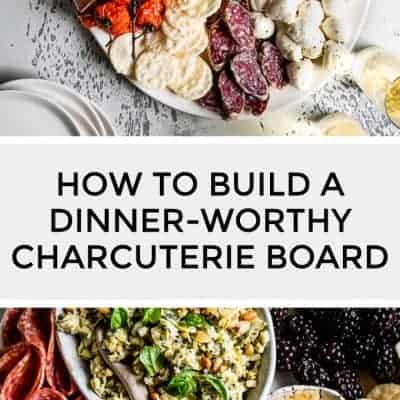
How to build a dinner-worthy charcuterie board with what makes a good board, ideas on how to choose a variety of options for the board, and tips and tricks for arranging a showpiece platter!


This post is sponsored by Safeway, a year-long partner of Snixy Kitchen
Dating all the way back to when we first moved in together, Lucas and I have been making cheese and charcuterie platters as part of our regular dinner rotation. Snacking Dinner, we call it. The modern term is Girl Dinner. Back when it was just the two of us, we lived in a tiny in-law apartment. With a pint-sized kitchen, easy dinners that didn't require tons of cooking or dishes were welcome and necessary.
Today, snacking dinner is still on our short list of dinner ideas and our 3 year old even asks for snacking lunch for school. She also calls it picnic lunch/dinner and insists we all eat on a blanket on the living room floor.
We're about to move back into that same tiny in-law unit - 6½ years later - for a month and a half while we rip off the back of our house to add on another bedroom and bathroom. Now with two kids and two cats in a pint-sized kitchen, I anticipate a lot of snacking dinner-worthy charcuterie boards in our future.
I'm partnering with Safeway again this year, joining them on a Northern California blogger tour aimed at inspiring recipes that show off some of their California-based products and initiatives that you might not already know about. We recently toured J Vineyards & Winery, co-hosted by Columbus Craft Meats, and Good Thins.
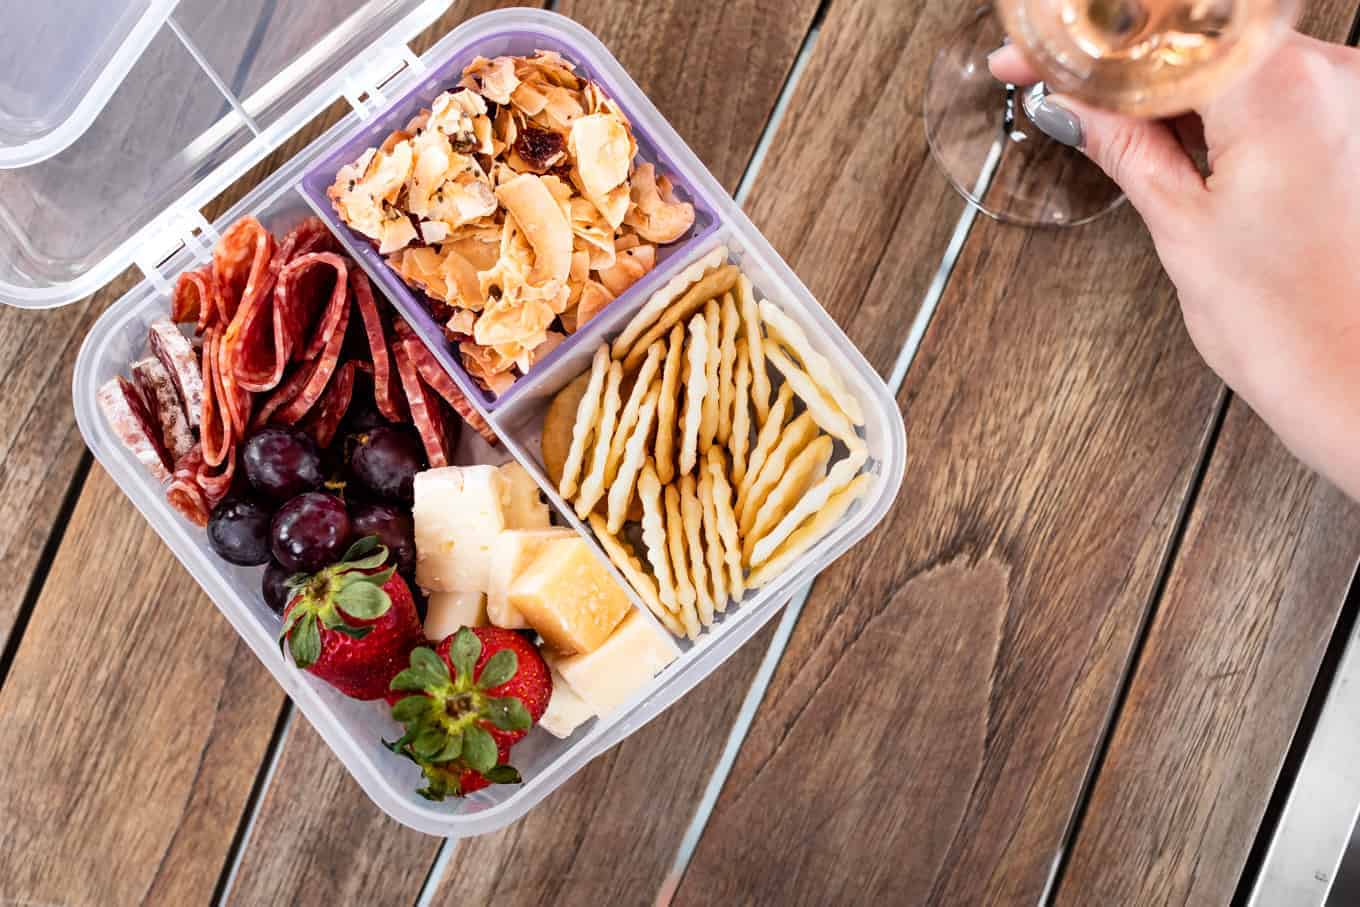
After touring the winery, we got to build our own picnic lunch boxes, mixing and matching meats, crackers, and other snacks - complete with wine pairing. This bento box served as inspiration for this dinner-worthy charcuterie board.

What makes a dinner-worthy charcuterie board?
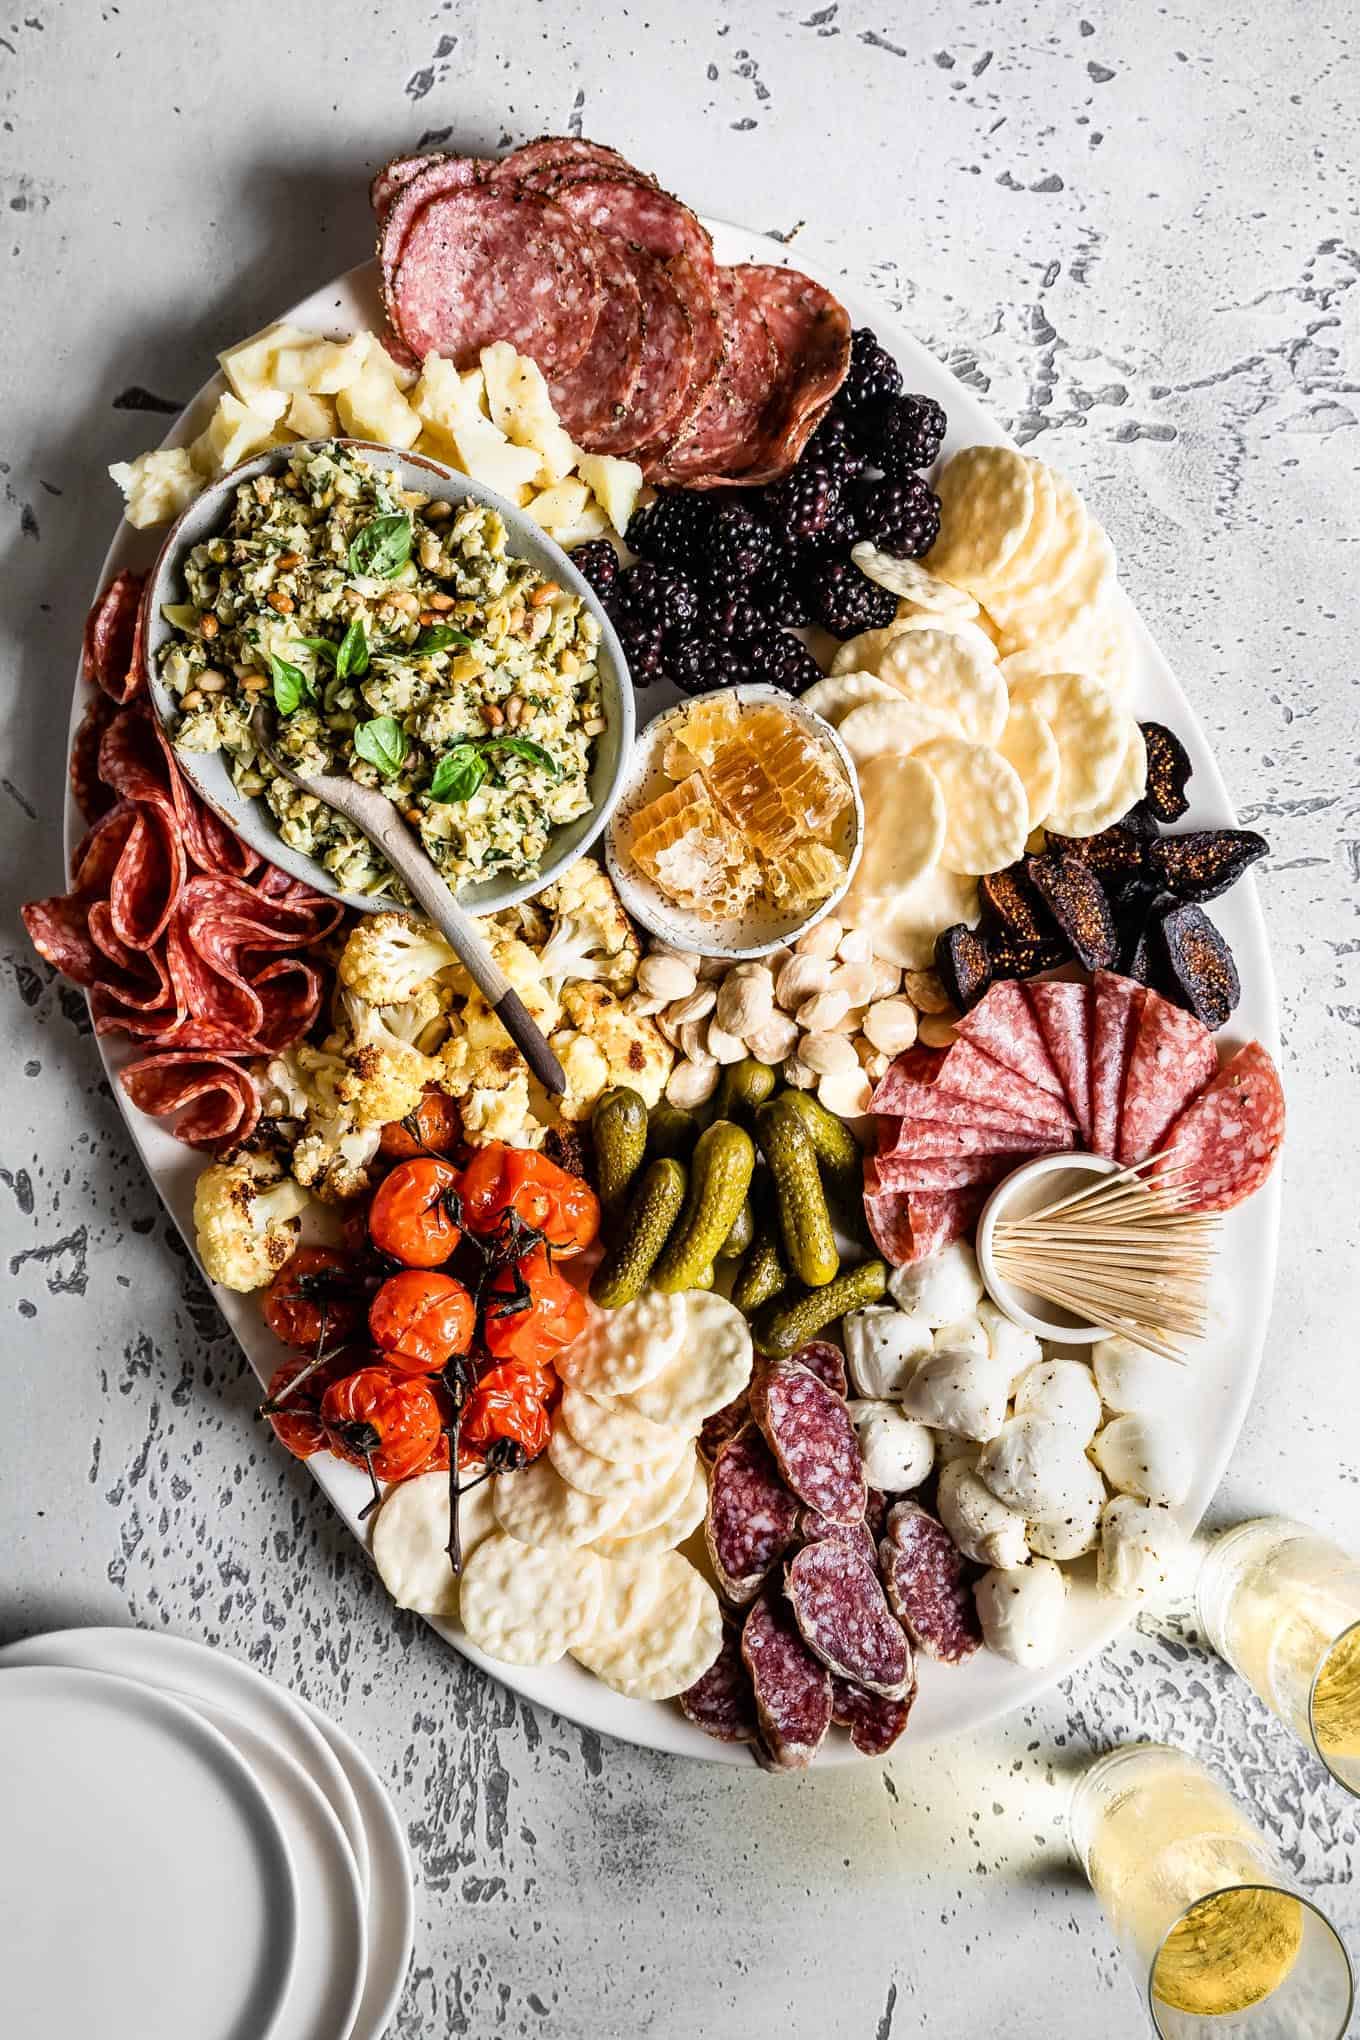
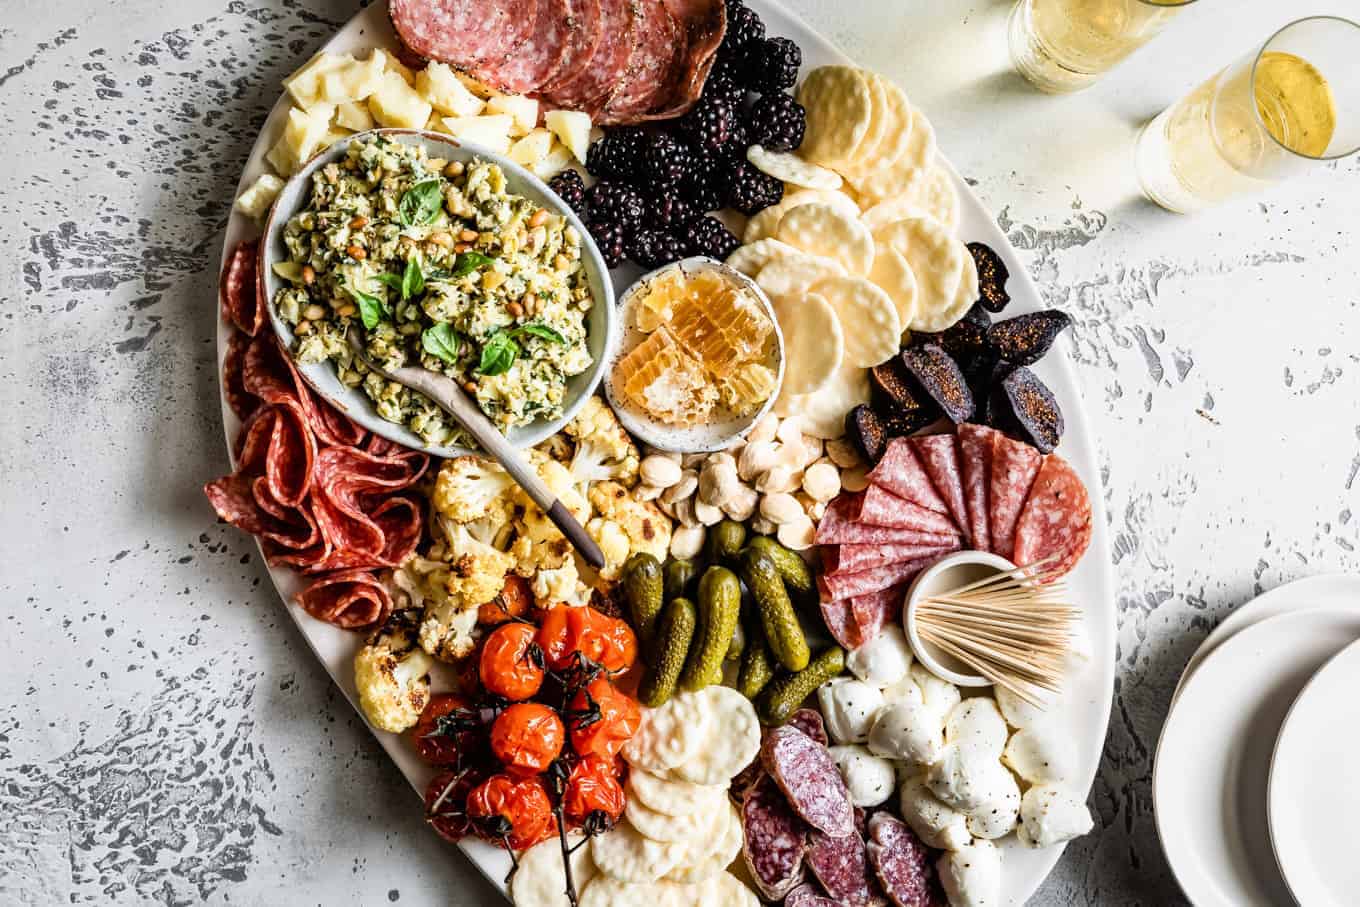
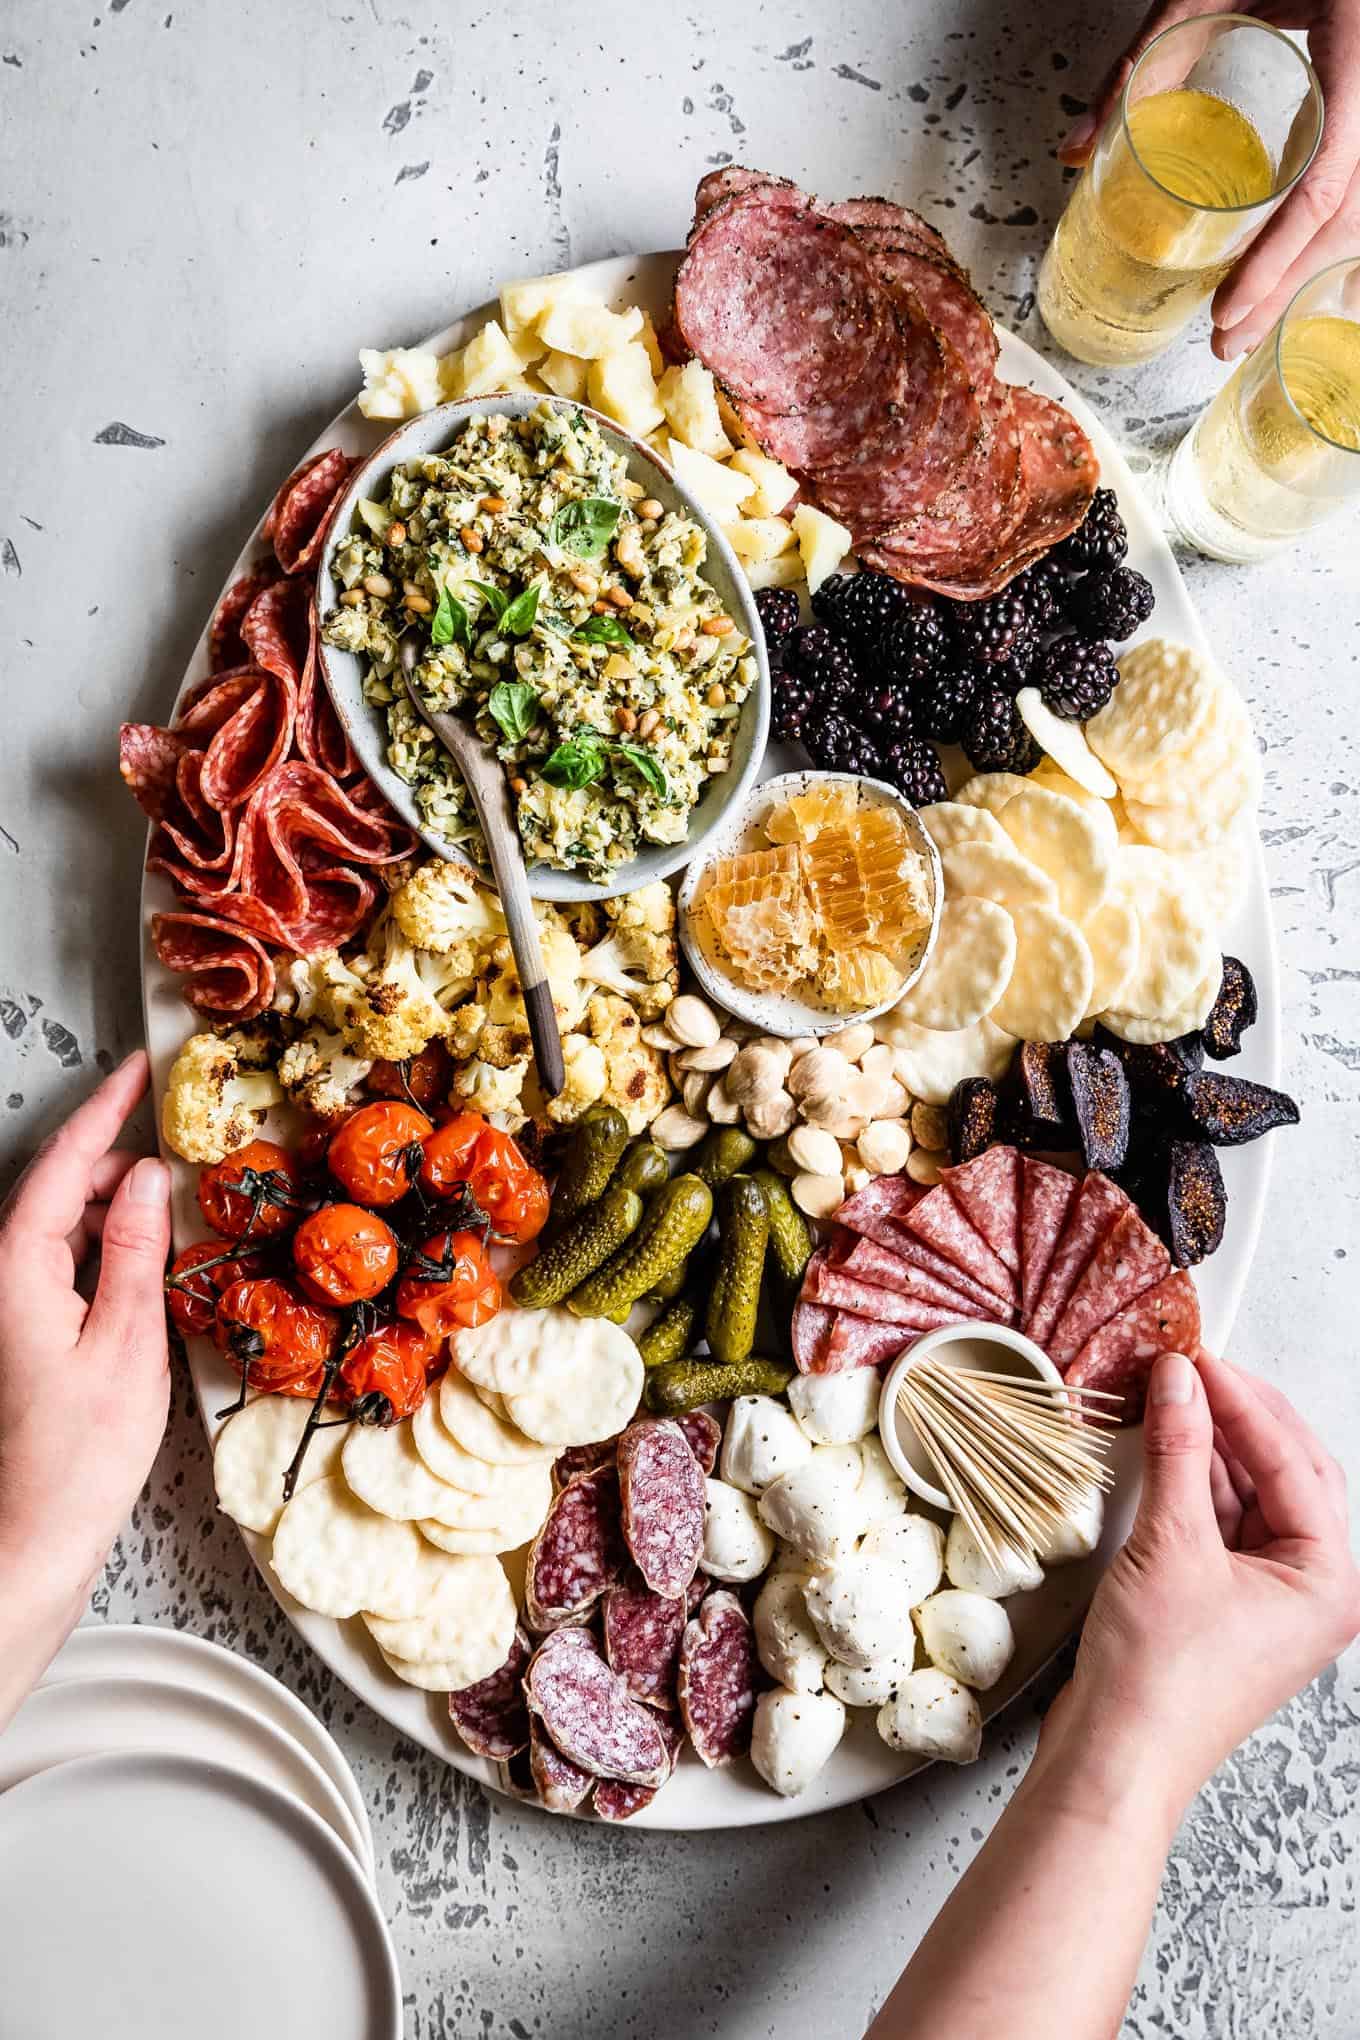
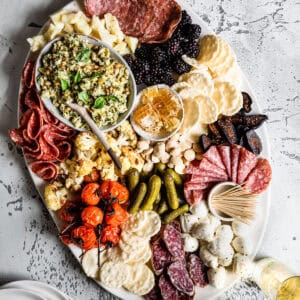
Whether I'm making a cheese and charcuterie platter for a weeknight dinner or summer entertaining, the board must hit all the marks for menu and presentation. No matter the reason, it should offer enough sustenance to be filling and balanced as a meal. That's this dinner-worthy charcuterie board.
You can serve it as a meal for 2-4 people or make a few large platters to put out for party grazing.
What is charcuterie?
Charcuterie is a French word used to describe any of a variety of cold cooked or cured meats. When served on a board for entertaining, it's often served along side cheese, crackers and/or bread.
With meat as the hero of a charcuterie platter, it's the perfect starting point for creating a dinner-worthy board.
Theme & Planning
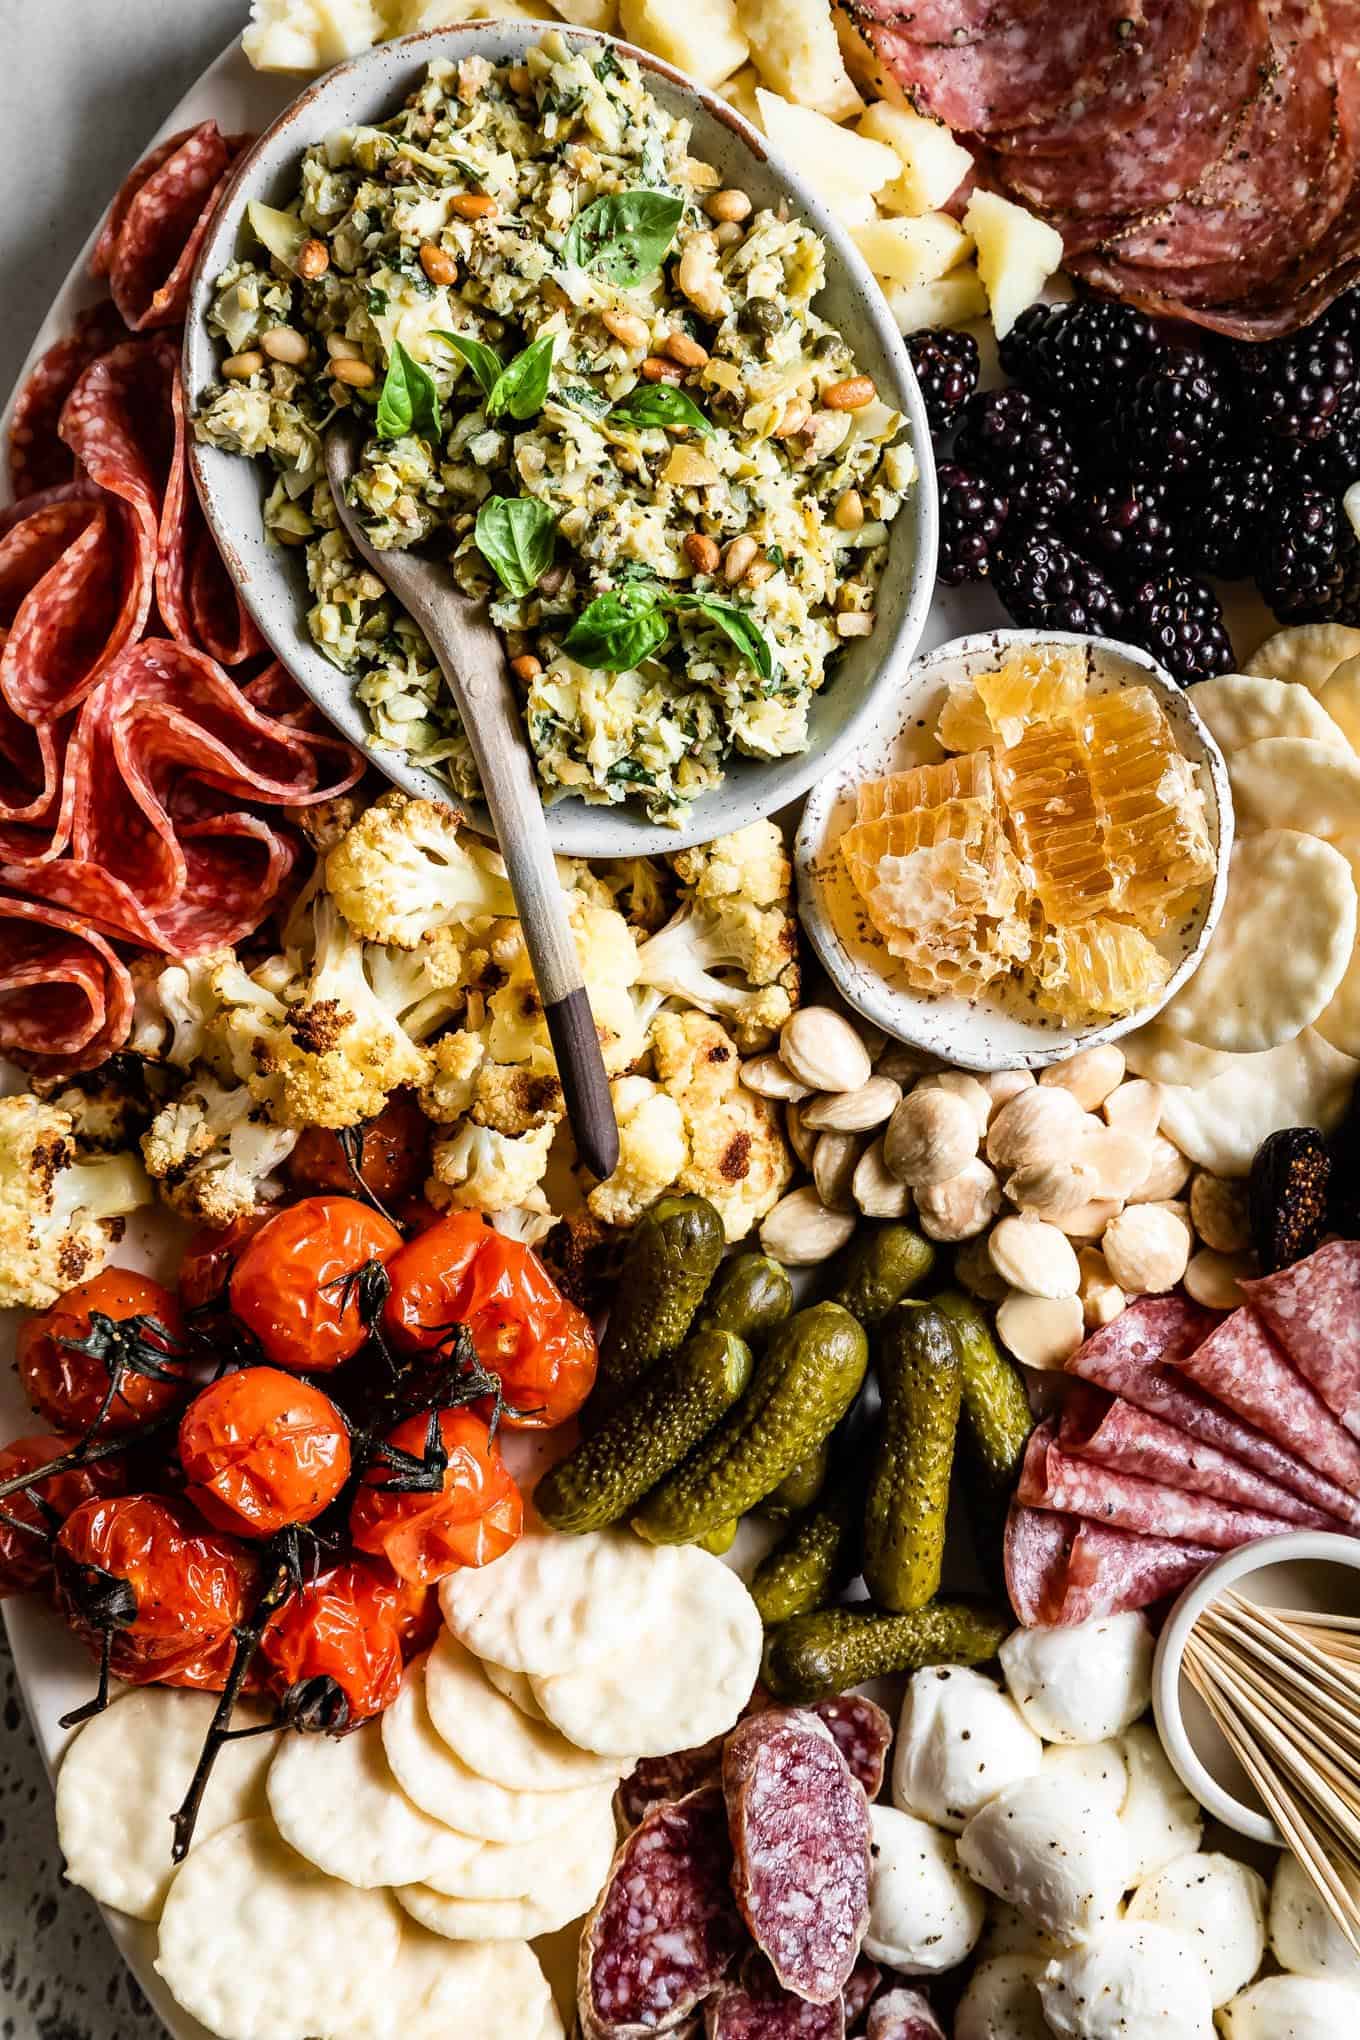
Start with a theme to help you choose what should go on your board! For my dinner-worthy board, I've chosen an Italian salumi board theme and built out my flavors for things that will pair well together. A salumi board typically contains Italian pork cold cuts like salami, where a charcuterie board more generally is a French term for a board that may contain other meats like patés.
What goes on a charcuterie board?
Typically, a charcuterie board has a variety of cooked or cured cold meats, cheeses, and crackers and/or bread. The rest of the elements are all bonus - let your creativity shine!
Choose a selection from each of the categories below. Make a list of the bigger components you want, then leave room for inspiration once you're at the grocery store.
Meat
The meat is the most important part of the spread. It is a charcuterie board, after all. Include a variety of quality cooked or cured meats.
On my board, I've used a combination of salumi: spicy peppered salami, thick cut cacciatore, Italian dry salami, and calabrese salami - all from Columbus Craft Meats. They use only high-quality whole muscle pork in their salame and carefully source all the ingredients and spices for flavor quality.
Cheese
Choose a variety of hard and soft cheeses. For any hard cheese, pre-slice or cut the cheese into bite-sized pieces to make grabbing and eating quicker for your guests. For soft cheese, make sure you have a cheese knife for spreading. Think about what goes well with the meats you've chosen.
Some of my favorites for a charcuterie board: parmesan, pecorino romano, mozzarella balls, a bowl of fresh ricotta, brie, gouda, or smoked cheddar.
Crackers and/or bread
Crackers and/or bread serves as the tiny plate to deliver the meat and cheese to your mouth. For a large charcuterie platter with lots of different elements, choose a neutral cracker that will add texture, but let the flavor of the fixings do the talking.
Here I've used a neutral rice-based gluten-free cracker from Good Thins. You could also add slices of lightly toasted baguette.
Vegetables
For a meal-worthy board, include vegetables, either roasted or raw.
For my board, I've chosen cold roasted vegetables that will pair with the salumi - roasted cauliflower and blistered tomatoes. You could use asparagus or roasted peppers.
Depending on your theme, you could opt for fresh raw veggies like carrots, snap peas, sliced radishes, cherry tomatoes, or cucumbers.
Fruit
Add a combination of fresh and dried fruit that pairs well with your meats and cheese. Fresh fruits like berries, grapes, apples, pears, or cantaloupe and dried fruit like figs, dates, or apricots all work well.
Tip: keep apples and pears from browning by squeezing a bit of lemon juice on top!
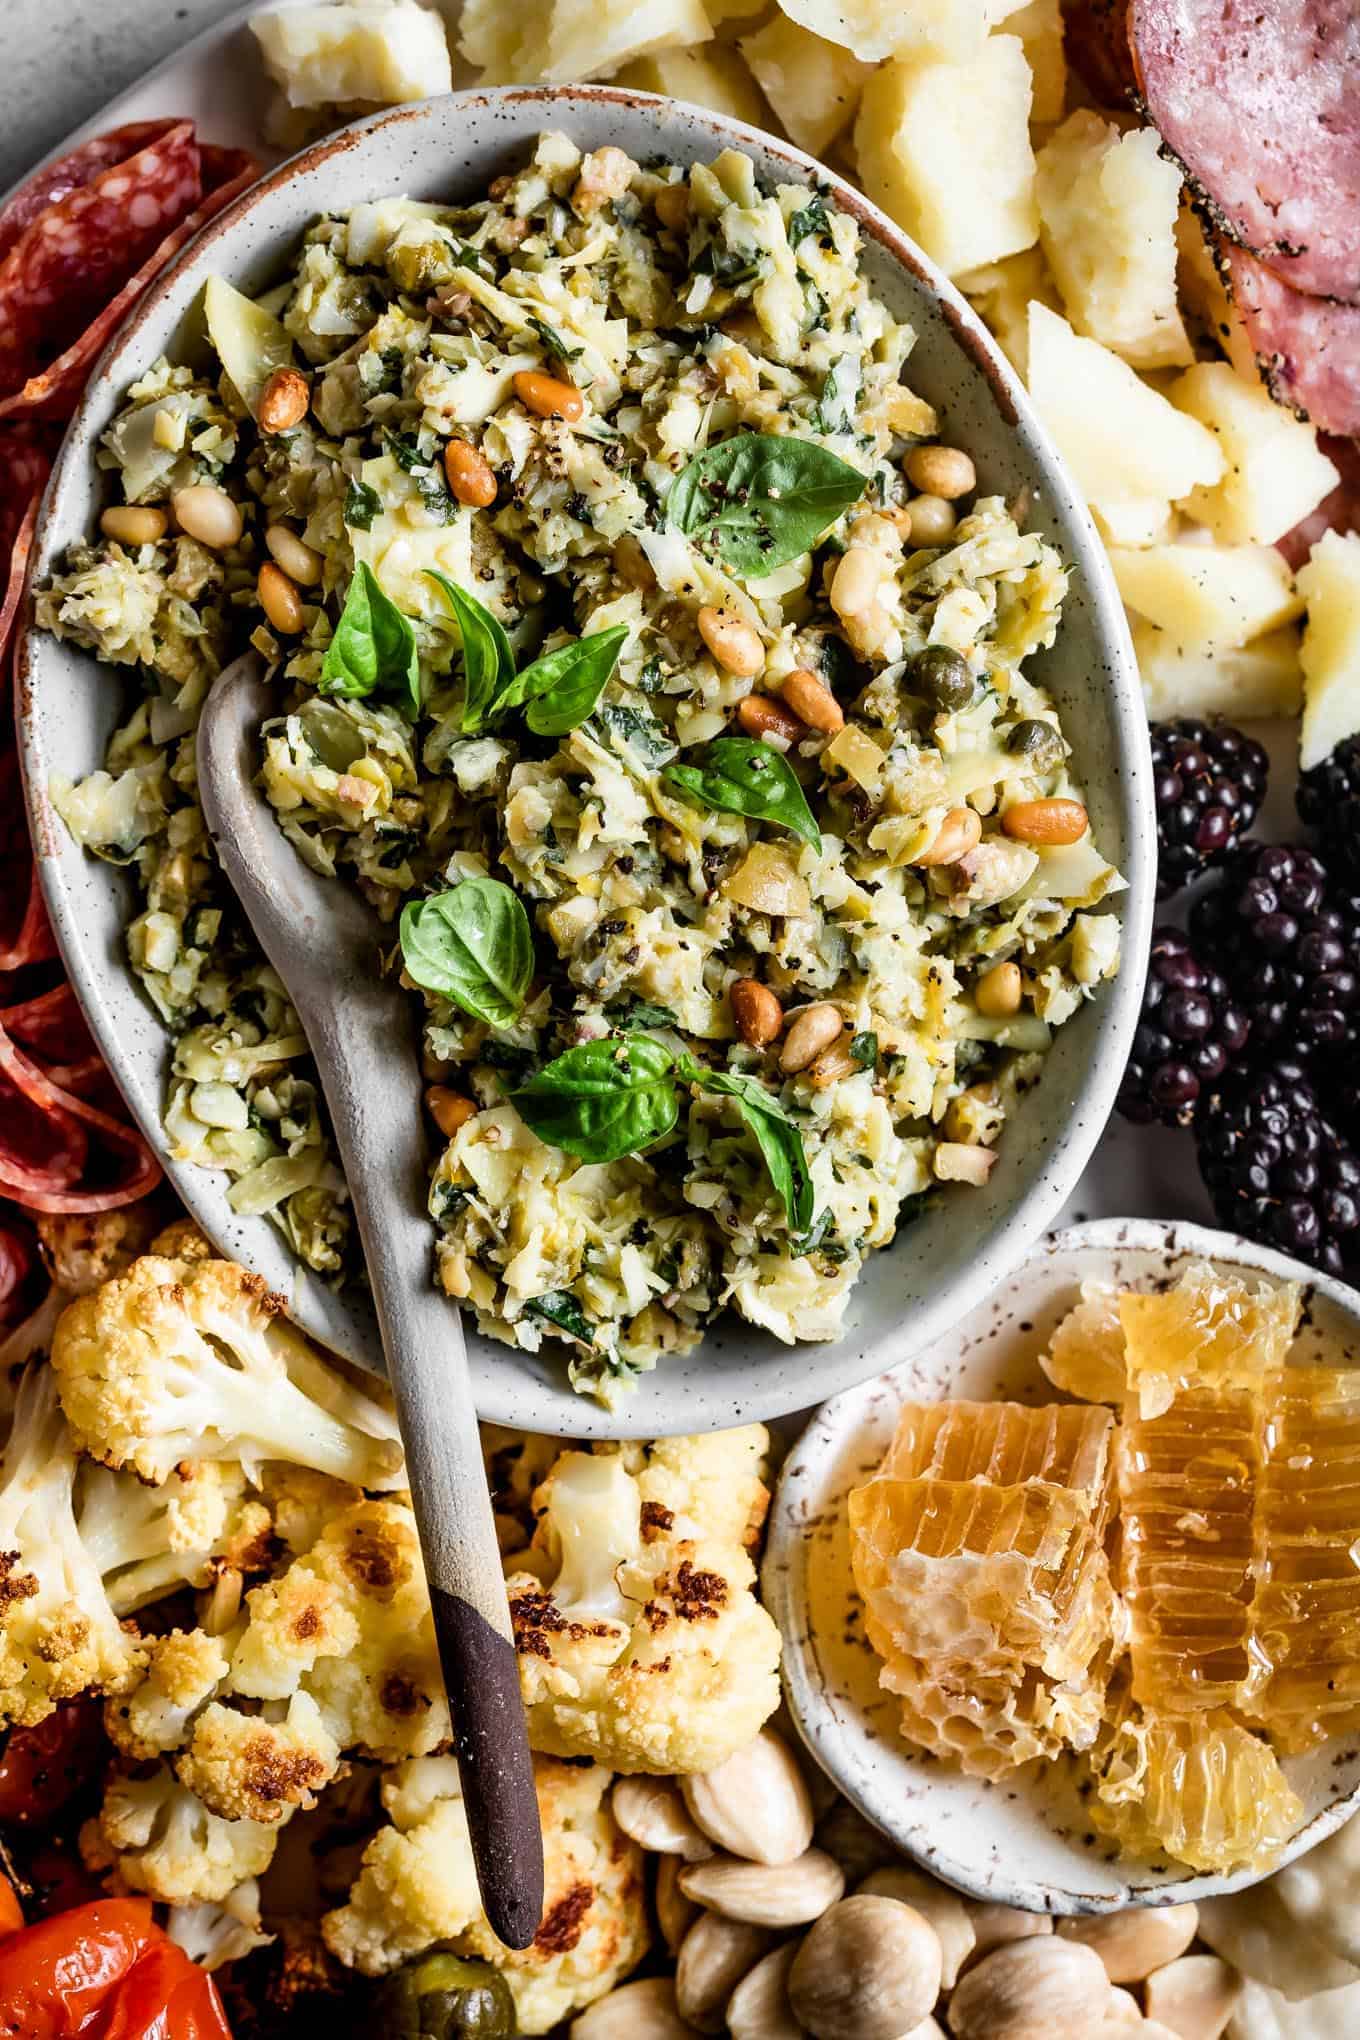
Dips, Tapenades, or Spreads
Dips or tapenades are the musical breaks of a charcuterie board. It's your chance to add something unique and interesting.
It also lets you add a bowl to the platter to visually break up and physically support all the components!
Here I've made a quick basil artichoke tapenade that goes with the flavor profile of my Italian salumi.
These dips and spreads would all go well as a dip or spread for your charcuterie board.
- Baked white bean and artichoke dip
- Pistachio basil ricotta spread
- Beet cashew hummus
- Everything bagel whipped goat cheese
Extras
Once you've chosen all the other elements of the board, grabs some extras help fill in the gaps - both in flavor and visually. Maybe you need something pickled, spicy, crunchy, or sweet. These extras are also great for filling in the visual spaces on your board. Here's where you can really get creative.
Ideas for extras: A bowl of honey or honeycomb, cornichons, nuts (marcona almonds, dry roasted almonds, walnuts, etc), jam, spicy mustard, or warm olives with citrus, rosemary, and gin. Don't forget the toothpicks!
Serve with
Pairing your platter with a special wine can make your board feel more festive, especially if you're serving it at a dinner party.
I've paired my board with J Vineyard's Cuvee 20 Brut sparkling wine that offers subtle notes of almonds. This brut is soft and creamy without being astringent. It's fermented in the same bottle it's sold in, a traditional method that creates smaller more delicate bubbles.
How do you arrange a beautiful charcuterie board?
Just as important as the food to a charcuterie board, so is the appearance. Arranging a charcuterie board can seem daunting. How do you decide what to put in each place? What goes where? How do you make it look balanced? While a complete charcuterie board certainly looks like a piece of art, I'll give you some tips to make it easy for you to arrange.
Step 1: Platter and bowls
Choose a platter according to how big of a charcuterie board you want to make - large plates, ceramic platters, or wood serving boards all work great. Use one large platter or, if you plan to spread out the platters on different tables, use multiple smaller platters. Here I've used an oval ceramic platter that's about 19-inches x 14-inches.
Add visual variation by using different sizes of bowls for things like dips, honey, jams, spreads, or tapenades. Or use bowls for smaller components like nuts or berries.
Start by placing these bowls on your platter, then use them to prop up your meats, crackers, or other components.
Step 2: Texture, Shape, Color, Flavor
Next, start placing the larger components on the board, using the bowls as your starting point. Think about texture, shape, and color when deciding what goes where. As you start placing things, don't worry about filling in all the space just yet. Reserve some of each component to fill in space later, if needed.
For texture, display each of the meats and cheeses in different ways. Roll up, fold, or fan out the meat, and crumble, cube, or slice the cheeses.
For shape, think about placing contrasting different shapes near each other and putting similarly shaped items further away from each other. Round roasted cherries next to long skinny cornichons instead of next to mozzarella balls.
Similarly, think about adding contrast to your board by mixing up the colors. For example, don't put two light-colored cheeses right next to each other or near similarly colored crackers. Distribute the meats on different parts of the board.
Also consider flavor. Keep things that go nicely together near each other, and away from clashing components. For example, I purposefully kept the blackberries and roasted tomatoes away from one another, but the blackberries near the hard cheese and honey.
Step 3: Fill the space
Reserve smaller or more neutral items for last to fill in the empty space. Nuts and crackers work great for this. Once you've placed all your main components, sprinkle nuts or scoot in some crackers to fill in all the empty spaces on your board.
My Dinner-Worthy Charcuterie Board Menu
Here's an overview recipe summary of all the components for my dinner-worthy charcuterie board featured here.
Get the recipe for the basil artichoke tapenade here!
Recipe
How to Build a Dinner-Worthy Charcuterie Board
Ingredients
- Featured: spicy peppered salami, thick cut cacciatore, Italian dry salami, and calabrese salami
- Featured: pecorino romano and mozarella balls
- Other options: parmesan, fresh ricotta, brie, gouda, or smoked cheddar
- Featured: ½ head roasted cauliflower & 1lb whole roasted tomatoes, roast up to 2 days in advance and chill until ready to serve
- Other options: roasted asparagus, roasted peppers, carrots, snap peas, sliced radishes, cherry tomatoes, or cucumbers
- Featured: blackberries and dried figs
- Other options: Berries, grapes, apples, pears, or cantaloupe. Dried dates or apricots.
- Featured: homemade basil artichoke tapenade
- Other options: hummus, white bean dip, pistachio ricotta spread, whipped goat cheese
- Featured: cornichons, honeycomb, salted marcona almonds, and toothpicks
- Other options: walnuts, dry roasted almonds, candied nuts, jam, spicy mustard, olives
INSTRUCTIONS
- Roast any veggies and prepare your dips or tapenades in advance.
- Prepare your platter for arranging and pull out all of your ingredients. Start by arranging any components you're serving in bowls around the platter.
- Next, start placing the larger components on the board, using the bowls as your starting point. Think about texture, shape, and color when deciding what goes where. As you start placing things, don't worry about filling in all the space just yet. Reserve some of each component to fill in space later, if needed. For texture, roll up, fold, or fan out the meat, crumble or slice the cheese. For shape, think about placing contrasting different shapes near each other and putting similarly shaped items further away from each other. Similarly, think about adding contrast to your board by mixing up the colors. Keep flavors that go nicely together near each other, and away from clashing components.
- Reserve smaller or more neutral items for last to fill in the empty space. Nuts and crackers work great for this. Once you've placed all your main components, sprinkle nuts or scoot in some crackers to fill in all the empty spaces on your board.
Disclosure: Special thanks to Safeway for providing the ingredients for this recipe and sponsoring this post! And thanks to you for supporting the companies that keep Snixy Kitchen cooking!


Christina Lane -
This is such a perfect board! Everything was so easy to pull together, and she made it seem easy!
Lori -
Not really enough like this but for only me, I tried it already! So yummy your pics.
Amy -
It would be amazing if you’d include the list of items bought at Aldi, especially since it’s a sponsored post!
Sarah Menanix -
Hi! This post was actually sponsored by Safeway and I purchased every ingredient featured on the board from Safeway, but you can use my guide breakdown to purchase whatever ingredients are available at your Safeway!
Erika -
Beautiful board. Looks delicious! Also love the tip about preassembling and popping in the fridge!! Will be doing that for Friendsgiving tonight
Karen @ The Food Charlatan -
I LOVE all the ideas on this charcuterie board! As a generally uncreative person ???? sometimes I have a hard time coming up with what to put on “snacking plates.” I love all your ideas, especially the meat selections, sooo helpful! I want to eat this in the living room on a blanket now :)