
A classic gluten-free cream puff recipe made with an easy gluten-free choux pastry baked into crisp and airy puffs and filled with vanilla cream. An impressive, but easy dessert for entertaining! Use the choux pastry to make gluten-free cream puffs, eclairs, or profiteroles!

What are you celebrating right now? Are there big transitions in your world? Whatever they are, you probably need gluten-free cream puffs to mark the occasion. For us, our life is changing in so many ways right now and they're all cause for celebration.
Zoella started preschool this week, which means we're all shifting to an earlier wake-up schedule (yet somehow us grown-ups haven't figured out how to also shift to an early BEDTIME schedule). Though, apparently Zo fell asleep at school in the middle of story time this afternoon, so she's also figuring it all out. After school dessert surprises help.
We're also just over a week away from breaking ground on our major home addition (first talked about here). To start, they'll be framing out the addition, but once they break into the house, we have to move out for 2 months. We'll be going full circle. We're moving back into the in-law unit that Lucas and I lived in when I first started Snixy Kitchen 7 years ago. This time with two kids in tow. Sounds like a reality TV show: A married couple with two cats and two kids under 3 in approximately 400 square feet for 60 days. Will they survive?
Perhaps more importantly, will Snixy Kitchen survive? (KIDDING, mostly). My blog tagline back then was "culinary stunts in a pint-sized kitchen." A 26-square-foot pint-sized kitchen. I'll spend this next month grappling with what must come with us. What essentials do I need to keep baking cream puffs, cookies, and cakes? I'll pay you good money to do this list-making and packing for me. Actually, scratch that, I'll bake you gluten-free cream puffs!
With this gluten-free cream puff recipe, you can now enjoy this classic French treat filled with clouds of sweetened vanilla whipped cream - except without the gluten. The result is an impressive, yet easy dessert perfect for entertaining or celebrations.
Cream puffs (or profiteroles) start with a choux pastry dough that's cooked on the stove and finished by baking in the oven where it puffs up.
How to Make Gluten-Free Choux Pastry
To get the classic cream puff crisp shell with an airy dough inside, this gluten-free choux pastry (pate a choux) recipe uses a combination of tapioca flour, almond flour, and cornstarch. Pulling inspiration from Brazilian cheese bread recipes, this choux pastry similarly relies on tapioca flour for the chewy stretchy structure. Almond flour adds flavor and cornstarch ensures a crisp shell.
Making a gluten-free choux pastry is very easy. The important part is to focus on the texture during the egg addition step. First, make sure that the dough isn't too hot before adding the egg, or your eggs will start to cook, leaving a slightly eggy flavor. You also won't need all the whisked egg, instead, just add a little at a time just until the dough smooth and pipe-able, but not runny. When you drizzle some dough back onto itself with a spatula, it should mostly hold its shape for 10-15 seconds.
Don't open the oven while they're baking!
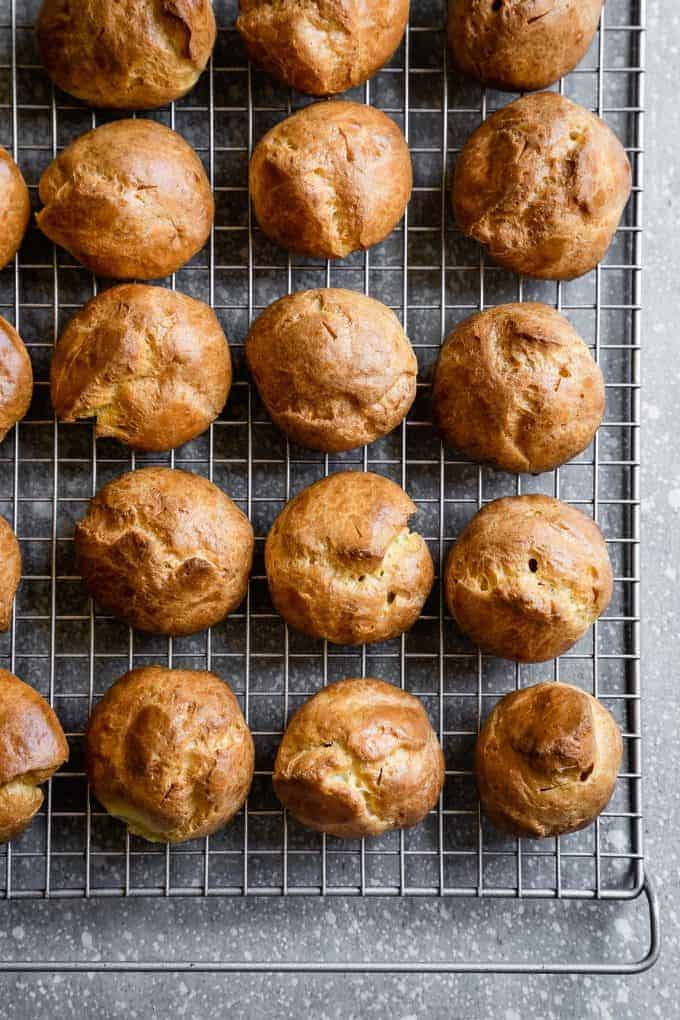
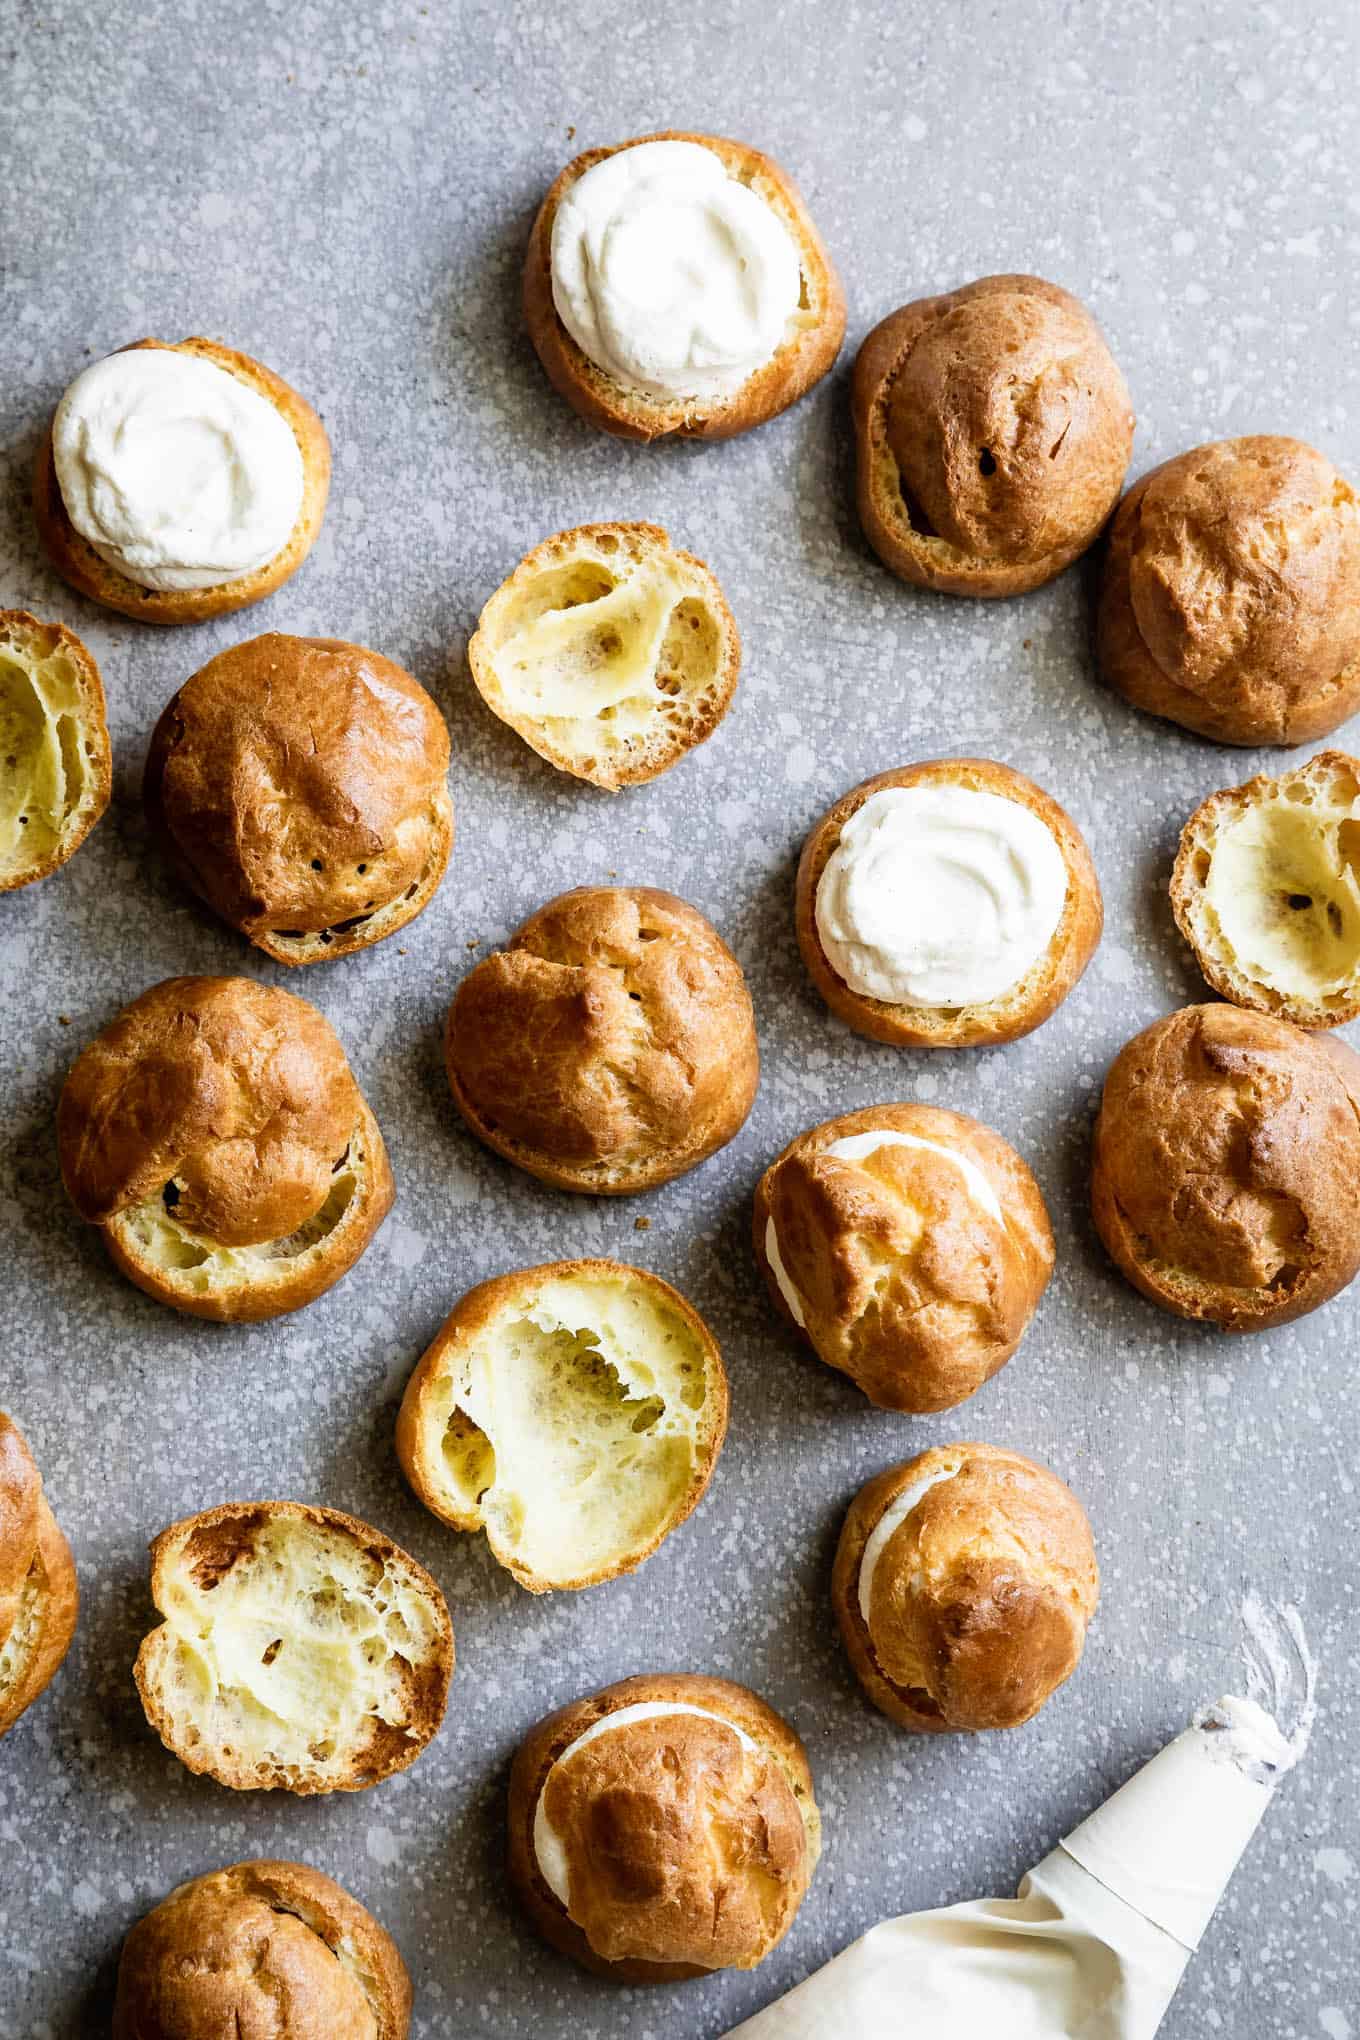
As the cream puffs bake, they'll puff up and turn golden. Resist the urge to open the oven while they bake. To check if the cream puffs are finished baking, pull one cream puff out of the oven and slice it in half. If the dough inside seems very moist and eggy, continue baking it for another 3-5 minutes. Repeat. The inside should be mostly hallow, with some thin cooked dough around the edges.
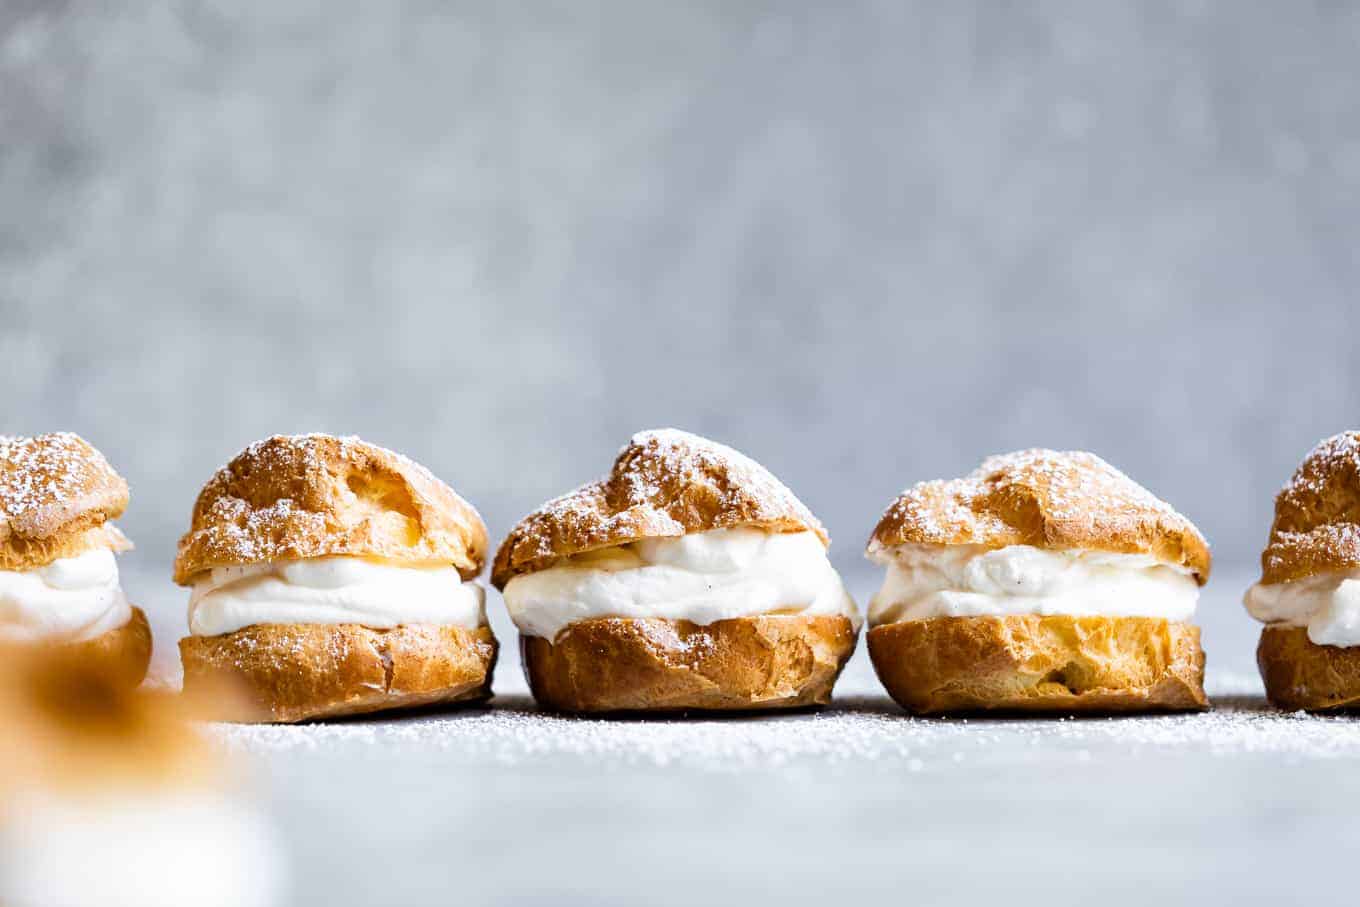
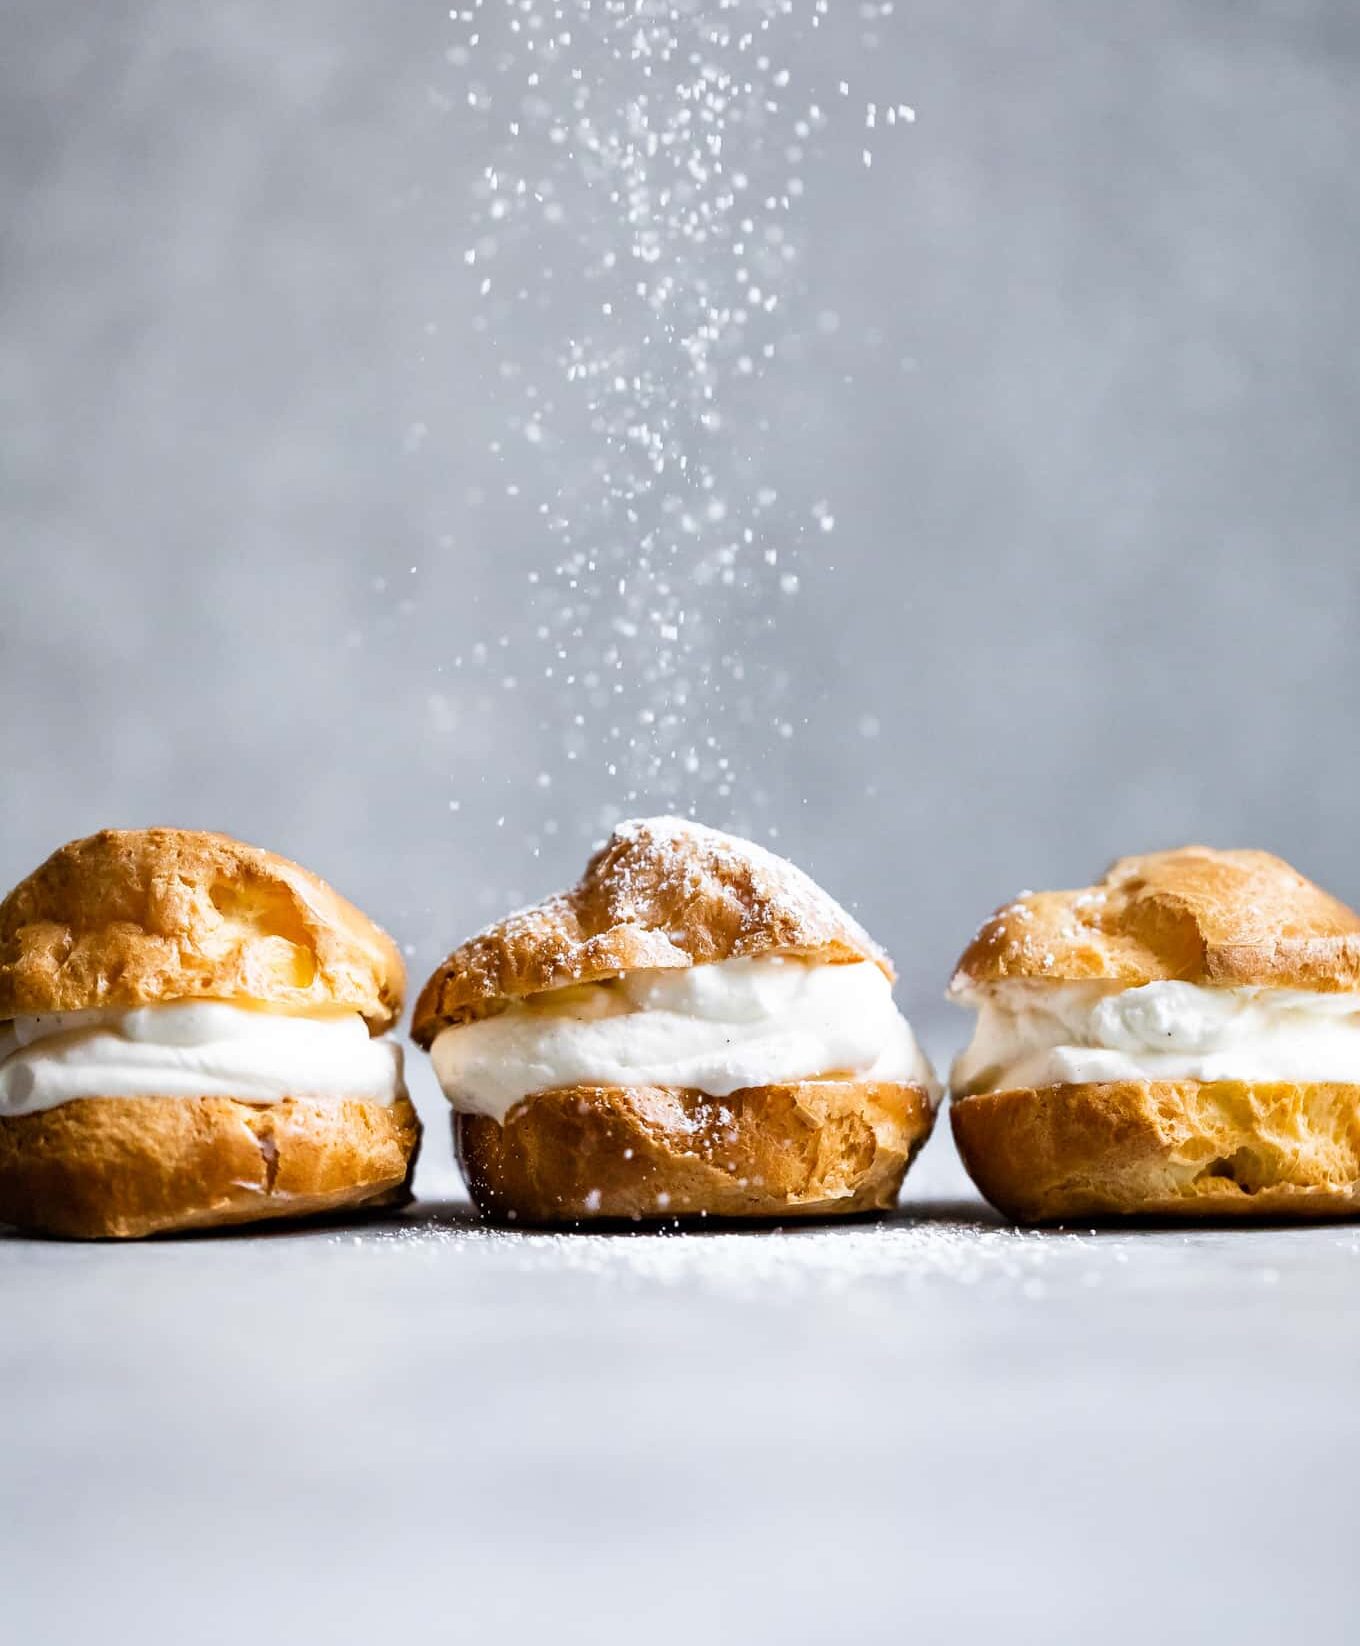
When you pull the gluten-free profiterole out of the oven, slice a very small thin slit in the top to release any steam so they stay crispy. Once cool, slice them in half then pipe them full of sweetened vanilla whipped cream and dust with powdered sugar!
Use Choux Pastry to make gluten-free eclairs
To use the choux pastry recipe to make gluten-free eclairs - pipe 3 to 4-inch long strips onto your baking sheet instead and bake just the same, adding a bit more time on the end to dry out the centers.
Here's what I like to fill them with:
The classic cream puff filling is simply sweetened whipped cream. That's what you see here. You could also use other fillings such as pastry cream, lemon curd, or even ice cream!
While I've left this cream puff with a classic vanilla, feel free to flavor your filling - get creative! You could add ground-up freeze-dried strawberries or matcha powder to the whipped cream to mix it up!
Recipe

Light & Airy Gluten-Free Cream Puffs
Ingredients
- 8 tablespoons unsalted butter, cut into 8 pieces
- ½ cup (120 ml) water
- ½ cup (120 ml) whole milk
- 2 teaspoons granulated sugar
- ¼ teaspoon kosher salt
- ½ cup + 2 tablespoons (72 g) Bob's Red Mill tapioca flour
- ¼ cup + 2 tablespoons (44 g) Bob's Red Mill super-fine blanched almond flour
- 3 tablespoons (24 g) cornstarch
- 3 large eggs, room temperature, lightly beaten (Note: you will only need 142g-150g of the eggs)
- 2 cups heavy cream
- ¼ cup granulated sugar
- 2 teaspoons vanilla bean paste or vanilla extract
- 2 tablespoons powdered sugar, for dusting
INSTRUCTIONS
- Preheat oven to 400°F. Line two large baking sheets with parchment paper and brush the paper lightly with water. Whisk together tapioca flour, almond flour, and corn starch in a small bowl and set aside.
- Combine butter, water, milk, sugar, and salt in a medium saucepan and bring to simmer over medium heat, whisking occasionally.
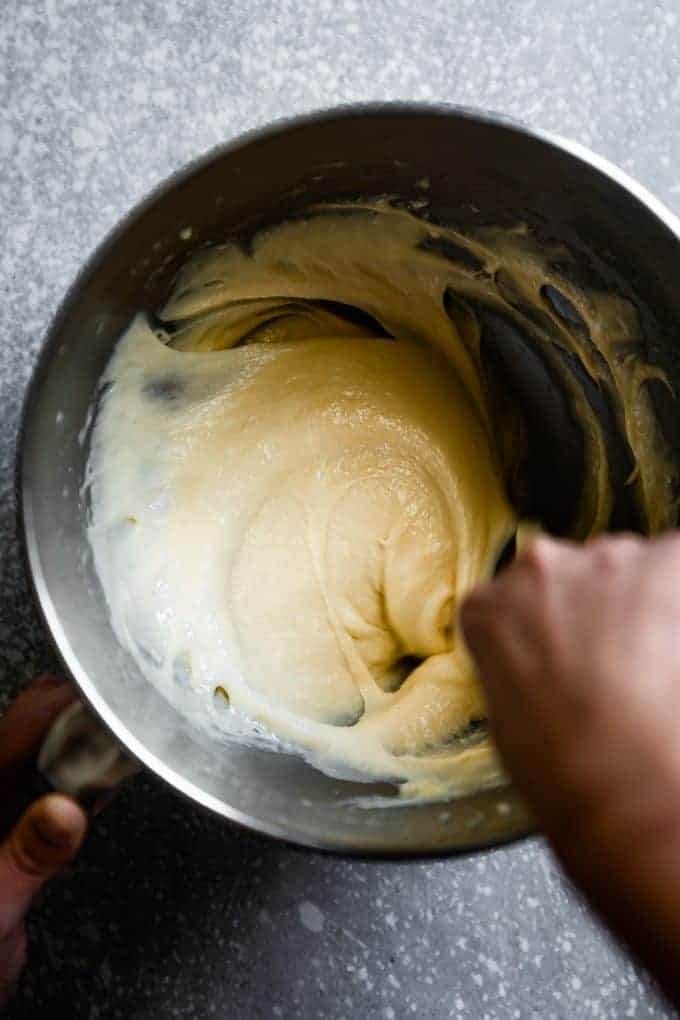
- Once simmering, reduce heat to low and add flours, mixing well with a heat-proof rubber spatula. Cook, stirring and pressing the dough to combine for 3-4 minutes until it is very thick and a toothpick would stand upright in the dough. The dough will be very gummy almost like the texture of cooked mochi and a little oily. It's important to cook this long enough to thicken to cook off some of the moisture. The dough should also leave a thin film on the bottom of the pan. Transfer to a stand mixer fitted with a paddle attachment or medium bowl with a hand mixer and let sit to cool until it reaches 160°F. If some of the butter separates, this is okay!
- In 4 additions, slowly add SOME of the whisked eggs, mixing well on medium-high speed between additions. You will need about 142g-150g of whisked egg, depending on how long you cooked the dough. At first, it will seem like it won't incorporate, but rest assured if you keep mixing it on medium-high speed, it will. When it's done, your dough should be shiny, thick, and smooth. When you pull your spatula or paddle from the bowl, the dough should stretch and form a V shape without being runny. When you drizzle some dough back onto itself, it should mostly hold its shape for 10-15 seconds.
- Place a pastry bag (or large disposable plastic storage bag) fitted with a ⅜-inch round tip inside a glass and transfer the batter to the bag.
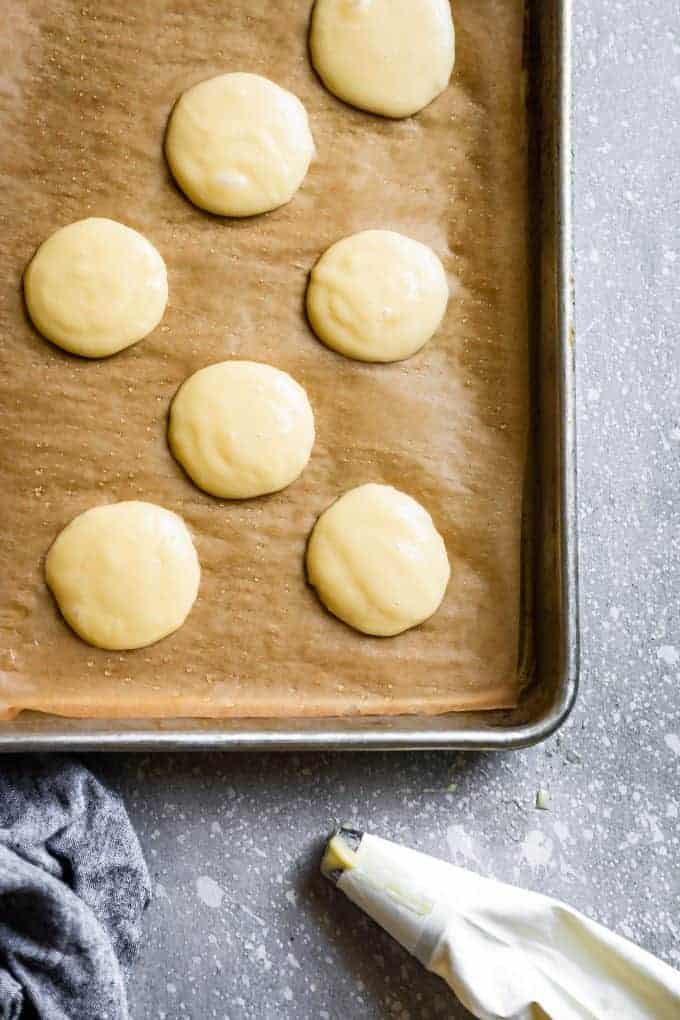
- Pipe heaping tablespoon rounds onto the prepared parchment paper about 1.5 inches apart, using your finger to cut off the stream of batter between dollops. Use a wet finger to help form the edges of the dollops into perfect rounds if any have gotten lopsided. The gluten-free choux batter mounds will be much smoother and glossier than the non gluten-free ones - this is OKAY. They will puff up.
- Unless your oven fits your baking sheets side by side, bake one sheet at a time on the middle rack for 20 minutes (See note below about cooking in an air fryer). Reduce to 350°F and bake for 6-10 additional minutes until the shell is browned and crisp and the inside is hollow and dry. Check if one is finished baking, pull one cream puff out of the oven, use a sharp knife to poke a thin hole in the top and let it cool for a couple of minutes. Slice it in half, if the dough inside seems very moist and eggy, continue baking it for another 3-5 minutes. Repeat. The inside should be mostly hallow, with some thin cooked dough around the edges.
- Remove from oven and use a sharp knife to poke a hole in the top of the cream puff shell to release the steam. Let cool for a few minutes on the pan before transferring to a wire rack to cool completely. Once cool, use a sharp or serrated knife to cut the cream puff shells in half lengthwise - they will be mostly hollow, with a film of cooked dough.
- Meanwhile prepare the vanilla whipped cream. In the bowl of a stand mixer with the whisk attachment or a mixing bowl with a hand mixer, whisk the cream until it begins to thicken, but peaks have not formed yet. With the mixer running on medium low, add the sugar in a slow stream. Add the vanilla and continue whisking until pillowy soft peaks form. The cream should be thick enough to pipe, but not so thick that it looks lumpy (then it's over-whipped!).
- Pipe or dollop cream onto the bottom half of each cream puff shell, then place the top back on. Use a fine mesh sieve to dust them with powdered sugar and serve the same day.

Rosemary Mark -
I really like your detailed instructions and weight measurements. All,was going well till I added the three beaten eggs which I should have weighed. The dough never got as thick as you described and the puffs baked up flat. Do you think anything other than possibly too much egg was the problem?
Sarah Menanix -
Sounds like definitely too much egg was the problem - if you put too much egg, the dough will be too soft and runny, so they won't puff up in the oven. Thanks for your comment - I've called out in the ingredients list up top that you won't need the full weight of the 3 eggs! They're so good that you should definitely try again, measuring the eggs!
Sarah Menanix -
While I haven't tried it, I would recommend subbing out the cornstarch for additional tapioca flour by weight to make them grain free.
HELEN -
I tried to follow all the many directions in the recipe, but haven't analyzed what I did wrong yet. The batter in the end was very liquid, so to rescue it I put it into muffin tins! That helped a lot, and though they didn't fit the usual cream puff description they were still very delicious! I used some instant chocolate pudding I had on hand to fill them, with the powdered sugar sprinkled on top. Nobody complained! Thanks for the recipe, and I plan to redo them with the information from previous relies.
Jami -
Try watching a YouTube tutorial then the process will make much more sense. Once you get the hang of it, you’ll be shocked how easy it is. I had to watch the process because trying to read it and understand it was not working for me lol. You probably did everything right other than accidentally added too much egg. Once you SEE what the piping consistency should look like, you’ll be good to go.
Also, if you mix any pudding with a bit of whipped cream, it makes them even lighter and a bit more elevated. Get that consistency down and you’ll be whippin them and some eclairs up 😁🙌🏼
Elizabeth -
I just made these and they are absolutely amazing! I measured the eggs as you mentioned and it all worked out perfectly.
Megz -
Thanks a lot for giving us hope once again! I just tried this recipe thrice back to back. The cases taste absolutely amazing but just won’t hold shape. Reduced the eggs to approx 2 eggs on the second round, yet it kept melting away. The cases come out a tad bit on the oily side. Might it be the butter? We don’t have tablespoons marked out on our packaging.. so I used 113-114g butter. Is this the same as what you are using? If so, should I try again by reducing butter?
Sarah Menanix -
Hmm - that's curious! Yes, this is the correct butter weight. I'd love to help you brainstorm what may have gone wrong! Do you weigh the eggs when you add them? Another question is what brand of tapioca flour you're using? I've noticed vast differences in brands in terms of how finely ground they are and correspondingly, how they soak up moisture. For this recipe, I've only tested with Bob's Red Mill tapioca flour and it's what I recommend.
Megz -
Hi Snix! Thanks for replying!!
I used BRM Tapioca starch and did weigh the eggs.
I used approx 147g the first time, a tad less the second time and I didn't weigh the third time but a lot less..
On another note, I also experienced the oil sweating out of the dough while on the stove similar to another comment. I did time it as per your recommendation.. so didn't think it would be a problem.
Sarah Menanix -
Hi - sorry about the delay. I wanted to test the recipe again just to make sure I hadn't unintentionally typed something wrong! Just made a batch today with success - phew! It's very normal for the dough to sweat on the stove and be a little oily. Also when it sits in the bowl to cool a bit, it's also normal for some of the butter to separate out. It will incorporate when you mix it up.
I've got one idea and also a question. I inherently always use room-temperature eggs when baking, which is what I did today. I realized that I did not specify that, so I've updated that for specificity. I'm not actually sure if it would make a difference in this case since the heat from the dough would warm up the eggs anyway, but possibly.
Also, when you say they won't hold their shape, can you describe what happens? Do they spread and lose their shape when you pipe them onto the baking pan before they hit the oven or do they spread out flat when they're baking? Or do they deflate as they cool? This will help me figure out what may be happening for you!
Diana Holcombe -
I'm looking for a recipe for a friend who can't have gluten but is also diabetic. Does the choux recipe has to have the sugar or can I use a sugar substitute and if so what?
Sarah Menanix -
I haven't tried the choux without the sugar, but it's such a small amount that I think it would work just fine subbing in coconut sugar or another sugar substitute!
Maya -
I've made these twice now and they are great! I made them pretty close to the recipe the first time and made some changes the second time, and both were fantastic!
A few notes in case it's helpful to others:
-I used oat milk the second time I made them, seemed almost exactly the same as normal milk (Oatly Low Fat in case that matters)
-I tried to make a piping bag out of a plastic bag but it exploded, using a spoon to dollop them on the tray was fine. The second time I only ended up with 16 and would recommend making the scoops smaller to end up with more but seems like this dough is pretty flexible. Wet hands to shape is nice to make them smooth, but if they are rough when they go in they baked up fine and tasted good still.
-I used 1-1.5 cups cream both times and ended up with more than I needed (definitely not a problem!)
-My 3 large eggs weighted closer to 150-155g on my scale so I used almost all of them.
-I'm lazy and put both trays in the oven together (a rack at 1/3 and 2/3s of the way up) and it was fine.
Hope this is helpful! If you want them to be perfect, definitely follow the recipe, but just wanted to let people know that if you don't do everything exactly as it says they will probably still be fantastic!
Kelly -
Could I just use the almond flour and not the tapioca? Or is there a substitute for the tapioca?
Sarah Menanix -
Unfortunately, I don't think these would work without the tapioca flour. It adds the starch that helps them puff up in the oven. While I haven't tried it, you could try subbing out for arrowroot starch or potato starch, which is what I recommend in other recipes, such as cakes/breads. However, since I haven't tried it here and cream puffs require precision, I can't say for certain if it would work the same!
Amanda Shultz -
Is it possible to sun coconut sugar and arrowroot starch (for the corn starch)? I can't have cane sugar or grains :(
Sarah Menanix -
I've not tested with either, so unfortunately I can't say for certain if it would work - Sorry!
MichelleK -
Hi,
I’m looking for a gf choux recipe to mix with minced meat to create a sausage filling and am wondering if I can make this lactose free by using almond milk instead of regular milk?
Andreea -
They look great!!! The butter can be substituted with coconut oil? Or what can I use instead of butter?
Sarah Menanix -
Hi! I've only tested the recipe with butter, so I can't say whether coconut oil would work - sorry! If you do try it, please let me know how it turns out. Ghee might also work in place of butter...
Jocelyn -
Made these yesterday and they were AMAZING! Everyone kept asking if I was sure they were gluten free. 10/10 :)
Sindy -
Also do you have any videos of you making the recipe? If you do would be great to see what the difference stages are meant to look like. At the cooking dough stage wasn’t sure what to expect and I got some butter oozing as well so was a bit worried but Mine worked out and was very pleased with them :) so thank you for the recipe !!
Sindy -
Thanks! I decided to just cook it all and then plan to make a new batch. Didn’t want to experiment for the day of the party. I’ve read on non gluten free recipes and they say you can keep it up to three days but On the day of cooking they sometimes won’t rise as well. Have you ever cooked them and then stored the baked choux for next day use?
Sarah Menanix -
I have stored them to use the next day! They get a little softer the longer they sit - I would recommend not covering them - or loosely covering them with a cloth to store them. I posted some IG stories of me making them - I've just saved them to a highlight so you can go watch!
Kay -
Hi thank you for sharing this recipe! I was super excited to make these, but they didn't quite turn out and I was hoping to get your advice on what I could do differently next time! They rose, but not enough so they ended up quite flat. Also, they were super brown but still pretty wet inside, even though I kept them in much longer (kept checking them one at a time). There was a decent air pocket inside, but not massive due to the flatness.
I noticed that after I took the dough off the stove and transferred it to mixing bowl, a lot of butter came out into the bowl. Would that indicate that I cooked it for too long?
And then it took a while to come together with the kitchenaid, and I ended up using all 3 extra large eggs (which seems like a lot?). The piping consistency seemed okay.
Would love some tips on what I could try differently when I make it again - trying to troubleshoot where I went wrong :)
Sarah Menanix -
Absolutely! My guess by all the indicators (not rising enough and too wet inside) is that you used too much egg. I use 3 large eggs (versus extra-large) and I don't use all of them. For reference, 3 extra-large eggs weigh about 192g (3 large weigh about 170g), but I recommend only using 142-150g. I suspect that's the reason they were too flat and moist.
The dough cooked on the stove should be a little oily, and it is important to cook it long enough to cook off some of the moisture. So It's also possible you didn't cook it quite long enough - I would err on the side of cooking longer than not enough, otherwise, your dough will have too much moisture.
Finally, I'm curious what brand of tapioca starch you used? I always use Bob's Red Mill, which is very finely milled. Only recently have I tried another brand in baking (because I ran out and it's all the store had) and it wasn't nearly as finely ground. I didn't use the other brand in this recipe specifically, but I found it didn't soak up moisture nearly as well and produced a more gritty texture.
Kay -
Thanks so much for the quick response! A few things to experiment with for sure.
The reason I used so much egg was because it took forever to come together. I was actually worried it wouldn't, so I kept adding egg. But it sounds like I should be more patient next time. Approximately how many minutes should this step take?
Good to know that I should err on the side of cooking it longer. I feel like that's what I did - probably around 6-7 minutes? But afterwards when reading different sites to see where I might have gone wrong, I came across this: "Heating the dough for too long can cause the butter to split from the dough as well. So make sure you don’t do this" which made me wonder if that's why I was seeing all the butter in the bowl after.
It's hard knowing which advice applies to this recipe though, since gf may work differently.
As for tapioca flour, I used a brand called "cuisine Soleil" - I'll switch over to Bob's and give it a shot.
Lastly, I'm curious what your thoughts are on pricking the puffs with a toothpick at the end? I tried that when I noticed they were wet inside.
Sarah Menanix -
I can't remember exactly how long it takes for the eggs to incorporate, but next time I make them I'll time it! Offhand, I think it could take a few minutes for the egg to mix in on medium-high speed.
Ohhh - I hadn't heard that, but that also makes sense about cooking the dough - such a science! I haven't cooked it long enough to have the butter completely separate so perhaps that is what happened there. It's so hard to know without being in your kitchen but 6-7 minutes is def long enough (I do 3-4 min here) so this could be why it took longer for the eggs to incorporate because you also had butter sliding around in the bowl.
For the toothpick do you mean in place of this step? "Remove from oven and use a sharp knife to poke a hole in the top of the cream puff shell to release the steam" Or do you mean before you pull them out of the oven? I haven't tried pricking them before they're done baking, but my guess is that wouldn't help since you'd be releasing the steam which should be helping to cook the inside.
Also definitely getting some Bob's Red Mill would be my #1 tip. Given this info, here's what I'd try: 1. Use BRM, 2. cook it less (about 3-4 min) until it's thick and there's a thin film of sticky dough on the pan (but butter has not separated, 3. weigh the eggs you add (142-150g) and be patient for it to mix in (this is a similar step to making Brazilian Cheese Bread and requires some patience!) - once you've completely mixed in 142g, check the visual cues of the batter.
Hope this helps!!
Kay -
Thanks so much Sarah, super helpful advice! I'll give it all a shot and see how it goes. Fingers crossed! :)
Amy -
Just letting you know 4 years later I appreciate the heck out of both the recipe and this thread in particular. My celiac mom is going to be so unbelievably excited to try these!
Sindy -
Hi!! Thanks for this. Am I able to make the dough in advance and use it later ? How long will it keep- Im making it today and hoping to use it again on Saturday if possible. How should I store it ? Would it be better to put cling film on it before stored etc. Thank you- will let you know how it turns out
Sarah Menanix -
Hm - I'm sorry I'm late to reply. What did you end up doing? That I'm not sure! I've never tried freezing the batter. It's much more like a batter than a dough, so I would imagine you'd want to put it in a freezer-safe container before freezing, then thaw to room temperature when you want to pipe again, but I'm not sure how freezing it would affect the final bake.
Brent -
I've been wondering if I could make choux pastry gluten-free. Can't wait to try this. Maybe even try to make some gougeres :)
Angela -
Couldn't be happier with how these wonderful puffs of happiness turned out. I made a test batch for a Christmas cream puff wreath, and my children happily made short work of them. So thrilled to have a GOOD gluten free option for such an easy impressive dessert. Thank you!!