
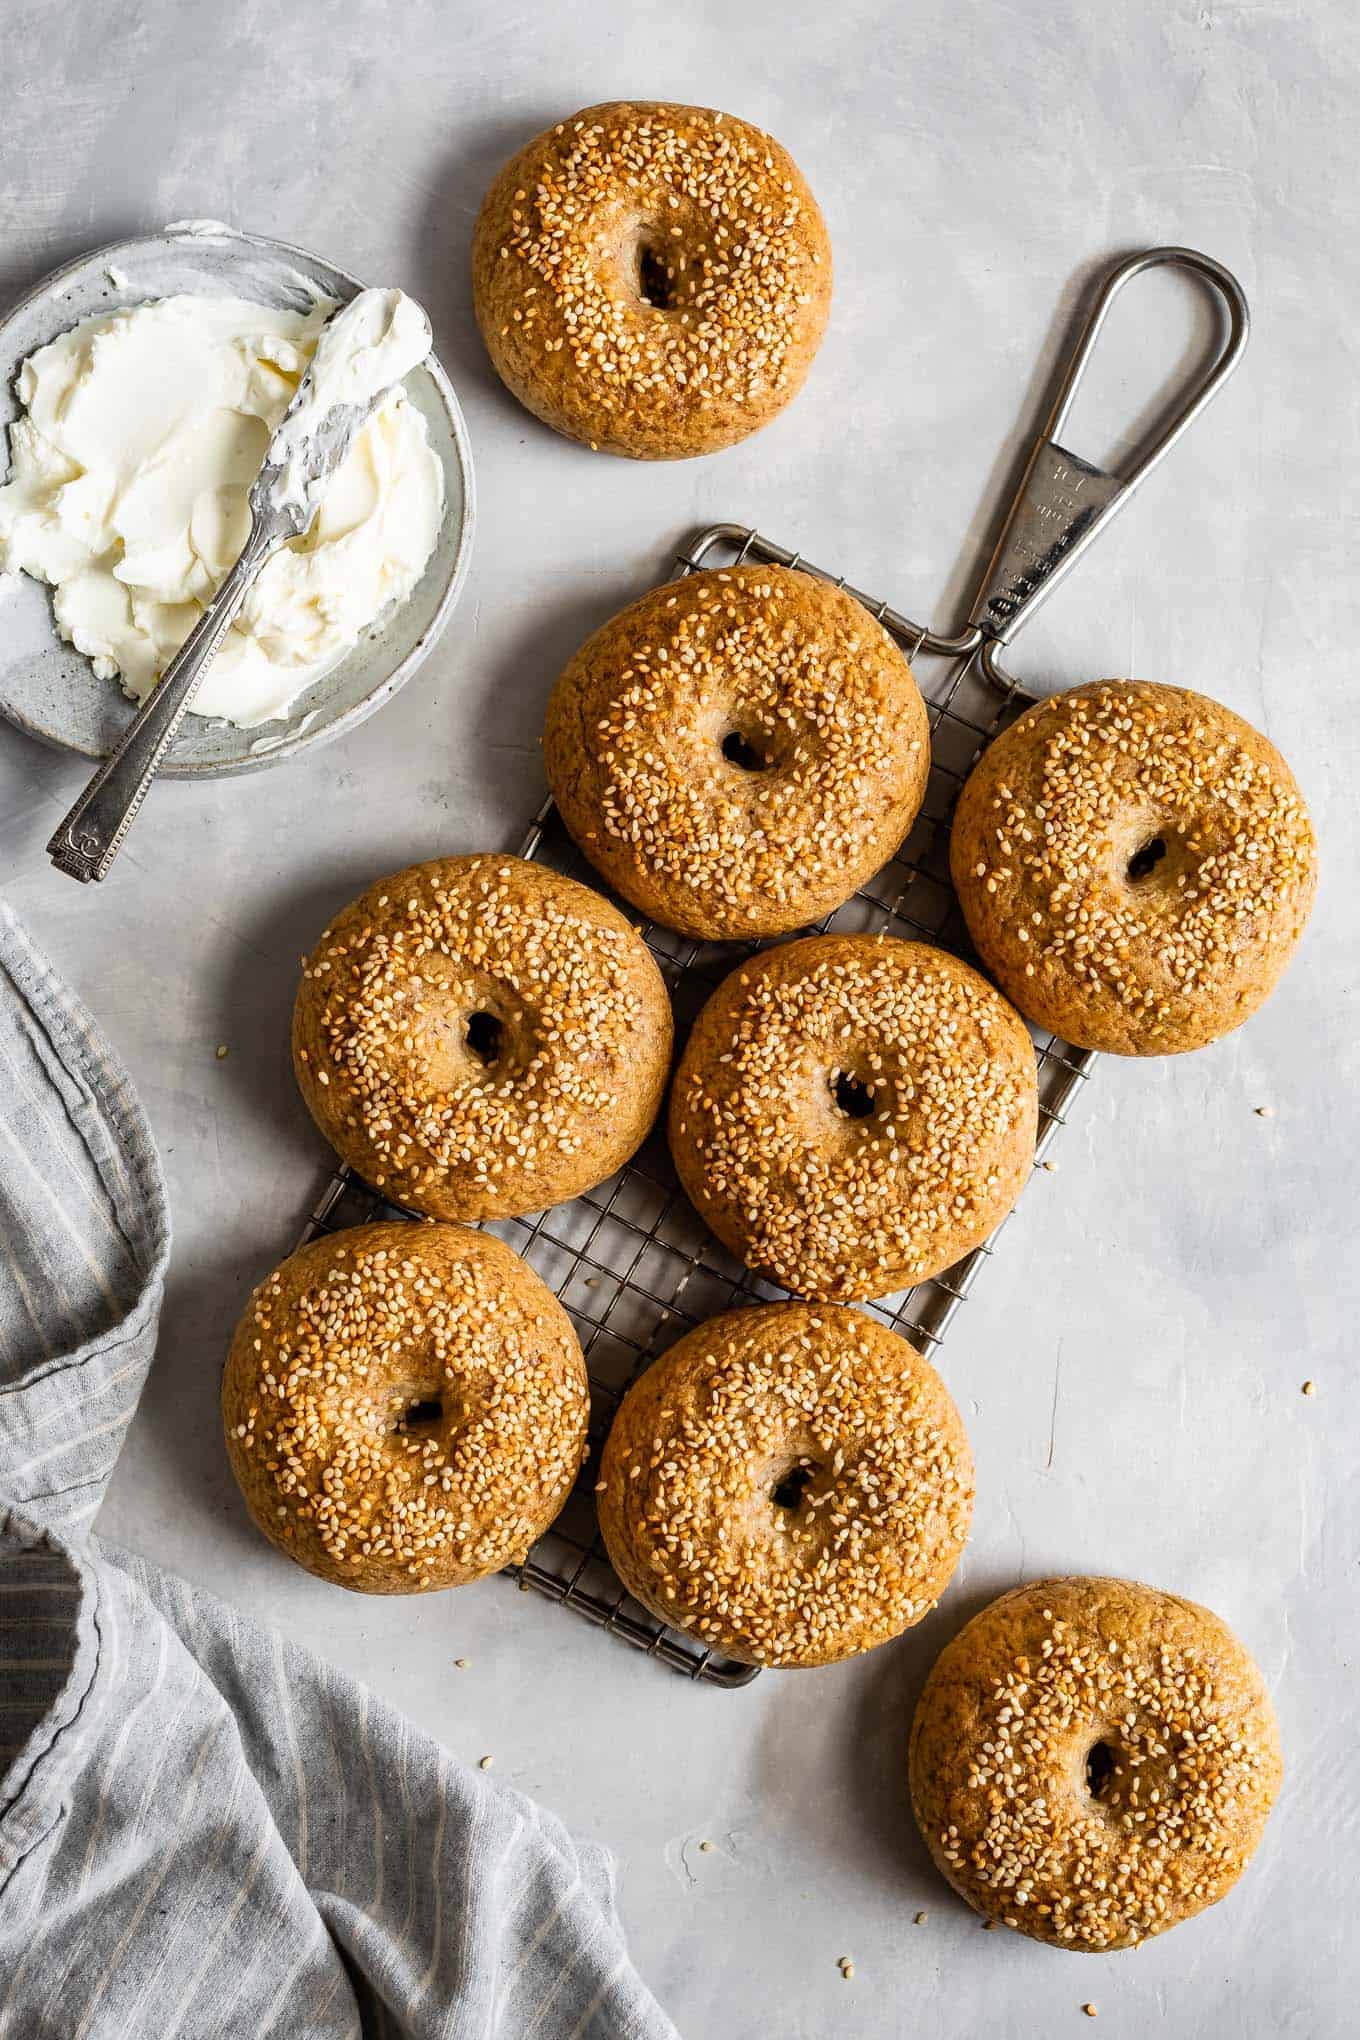
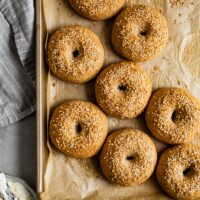
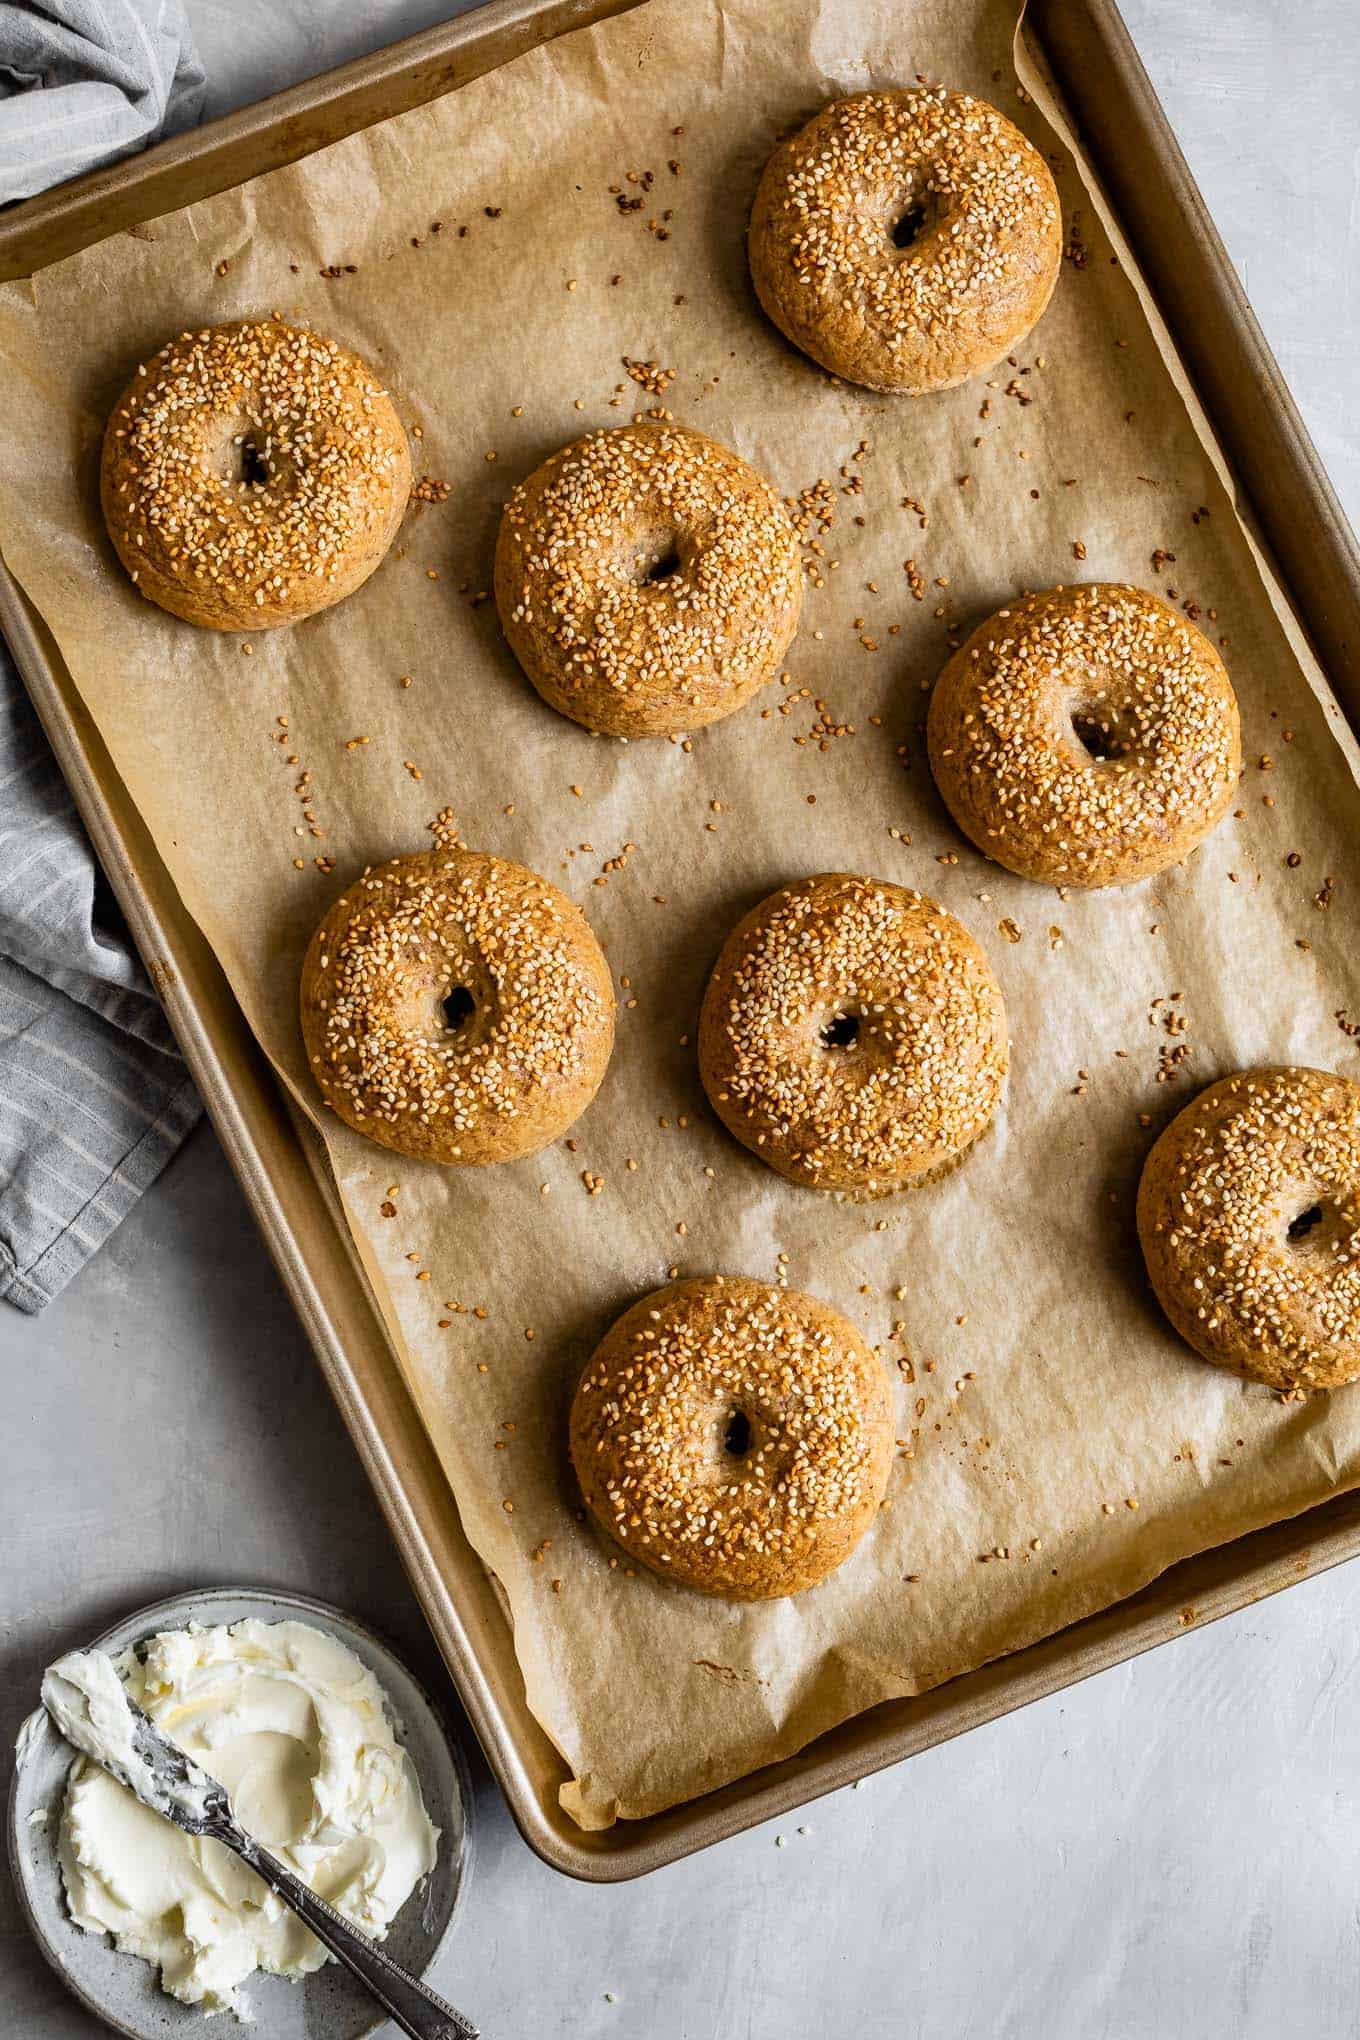
These homemade yeasted, gluten-free bagels are so chewy and delicious, you'd never know they were gluten-free! The flour blend makes the dough soft and supple, which only needs one signle rise. They're boiled and baked until golden brown! Top with sesame seeds, everything seasoning, or your other favorite toppings.
Over the years, gluten-free doughs are something I've worked on a lot, to bring you some of your favorites that you might be missing, like better-than-the-mall gluten-free soft pretzels and soft, buttery gluten-free hamburger buns. When I was mistakenly received a pound of whipped cream cheese in my Instacart order recently, I was sure I could whip up gluten-free bagels, too.
They turned out so incredible though that I made them 4x in a week and went to bed each night giddy about waking up to fresh homemade gluten free bagels the next morning.
When making gluten-free yeasted dough, I've learned to encourage trapping as much air into the rise as possible so they bake up soft and not dense. For that reason, I shape the bagels before the rise so we don't disturb that beautiful rise later.
Just before the bagels are done rising, a boiling water bath with honey is prepared. The short dip in the boiling water gives them a beautiful shine and thickens the crust, giving it the classic bagel chewiness.
Why you'll love these gluten-free bagels
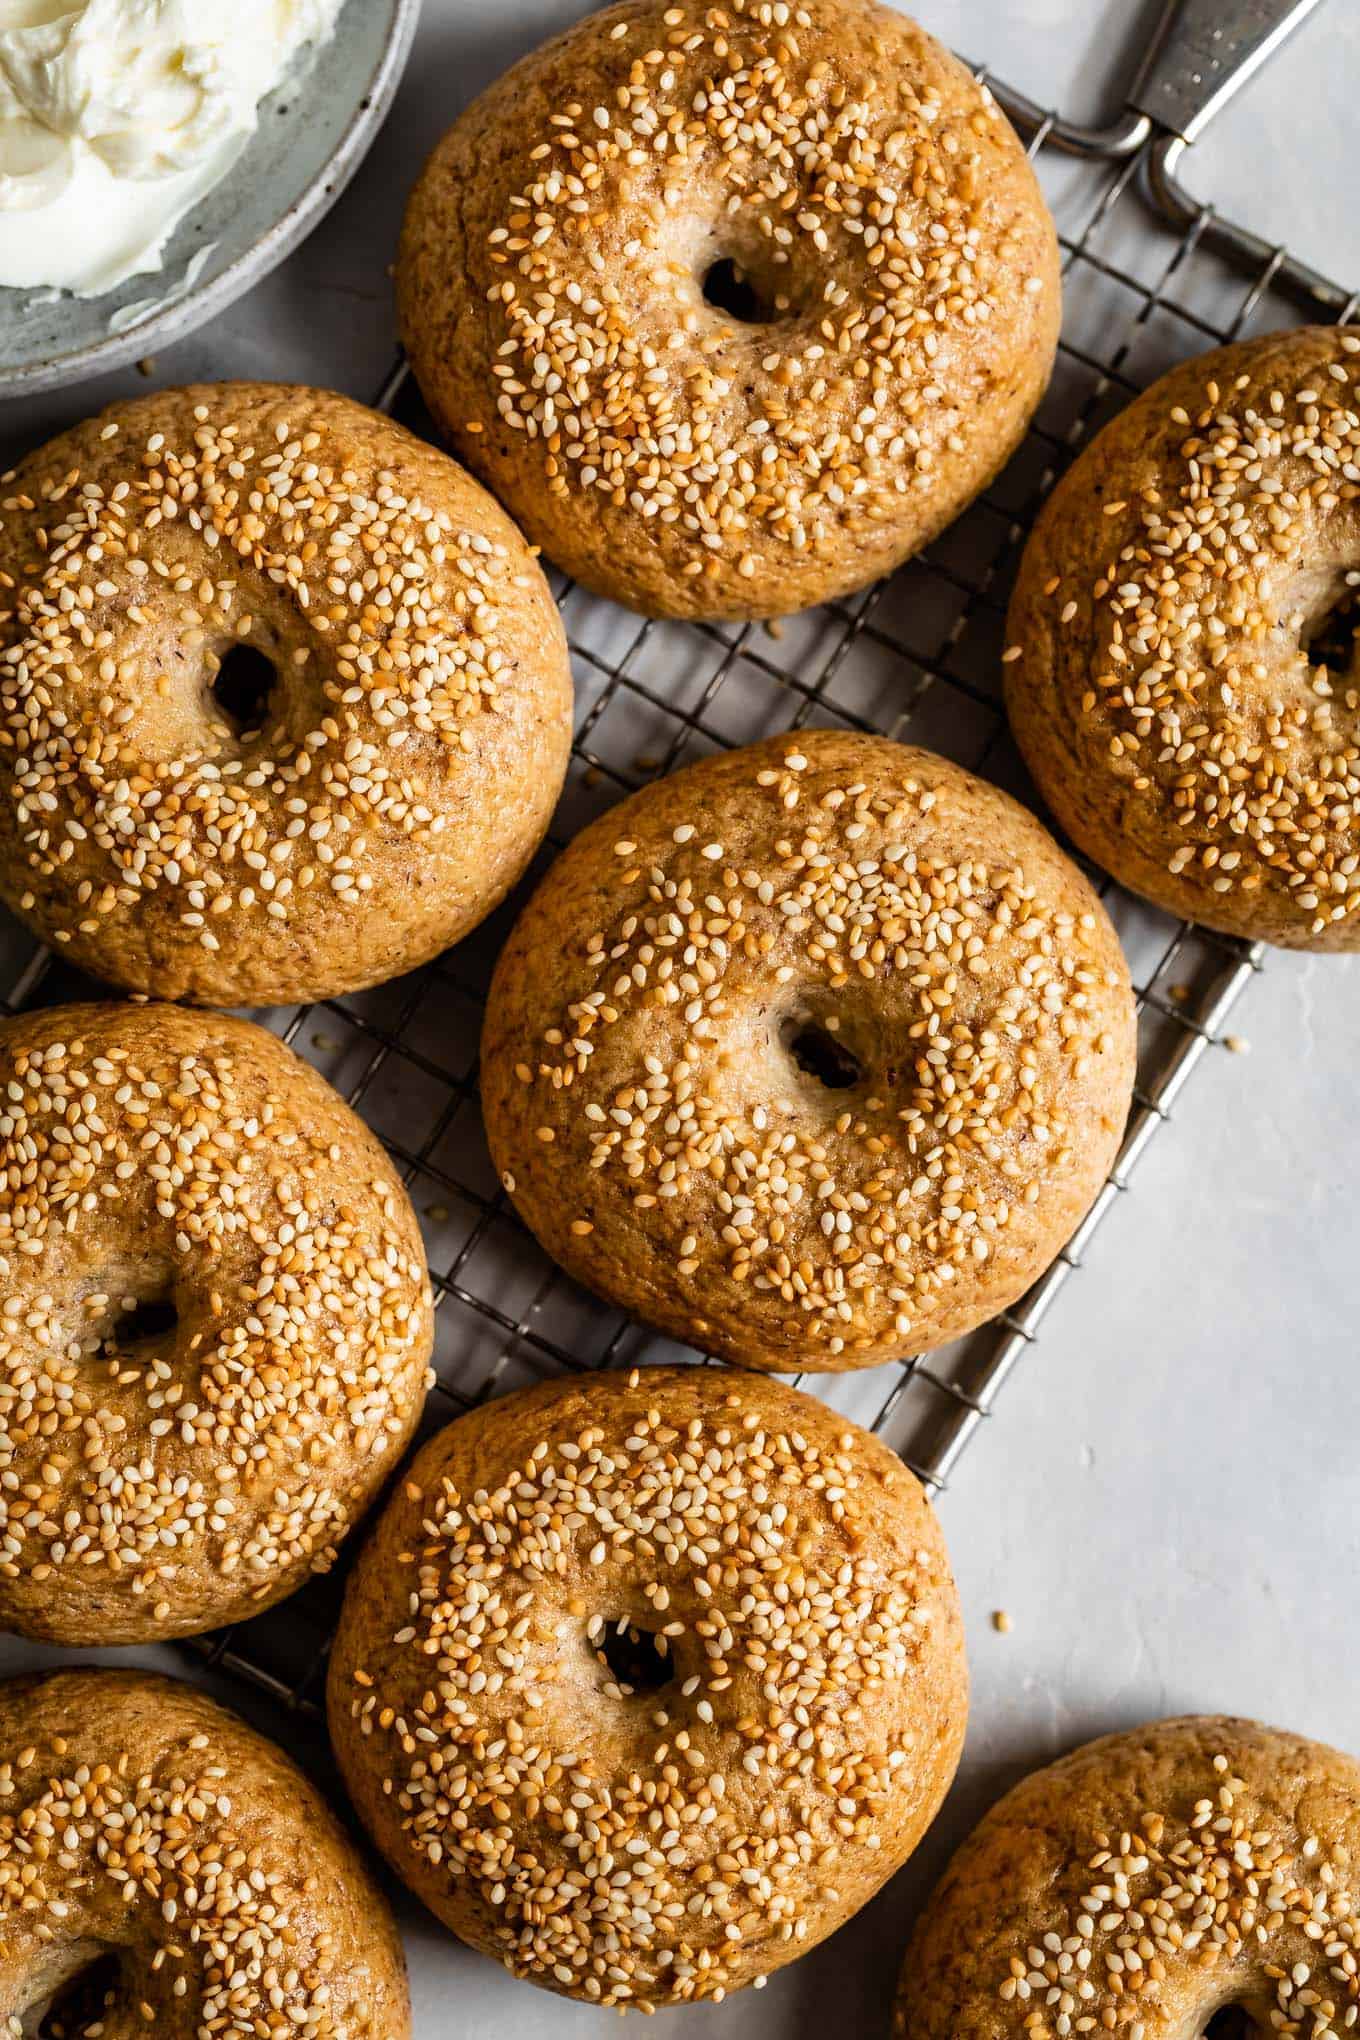
- Thick crust with a super chewy interior. When toasted, it crunches just a bit before giving way to a dense chewy center, the way a good bagel should.
- Like an authentic New York-style bagel, they're boiled before baking to give them a flavor and texture that mimics a classic bakery bagel.
- Naturally dairy-free with easy vegan substitution options.
- Freeze well for easy weekday breakfast.
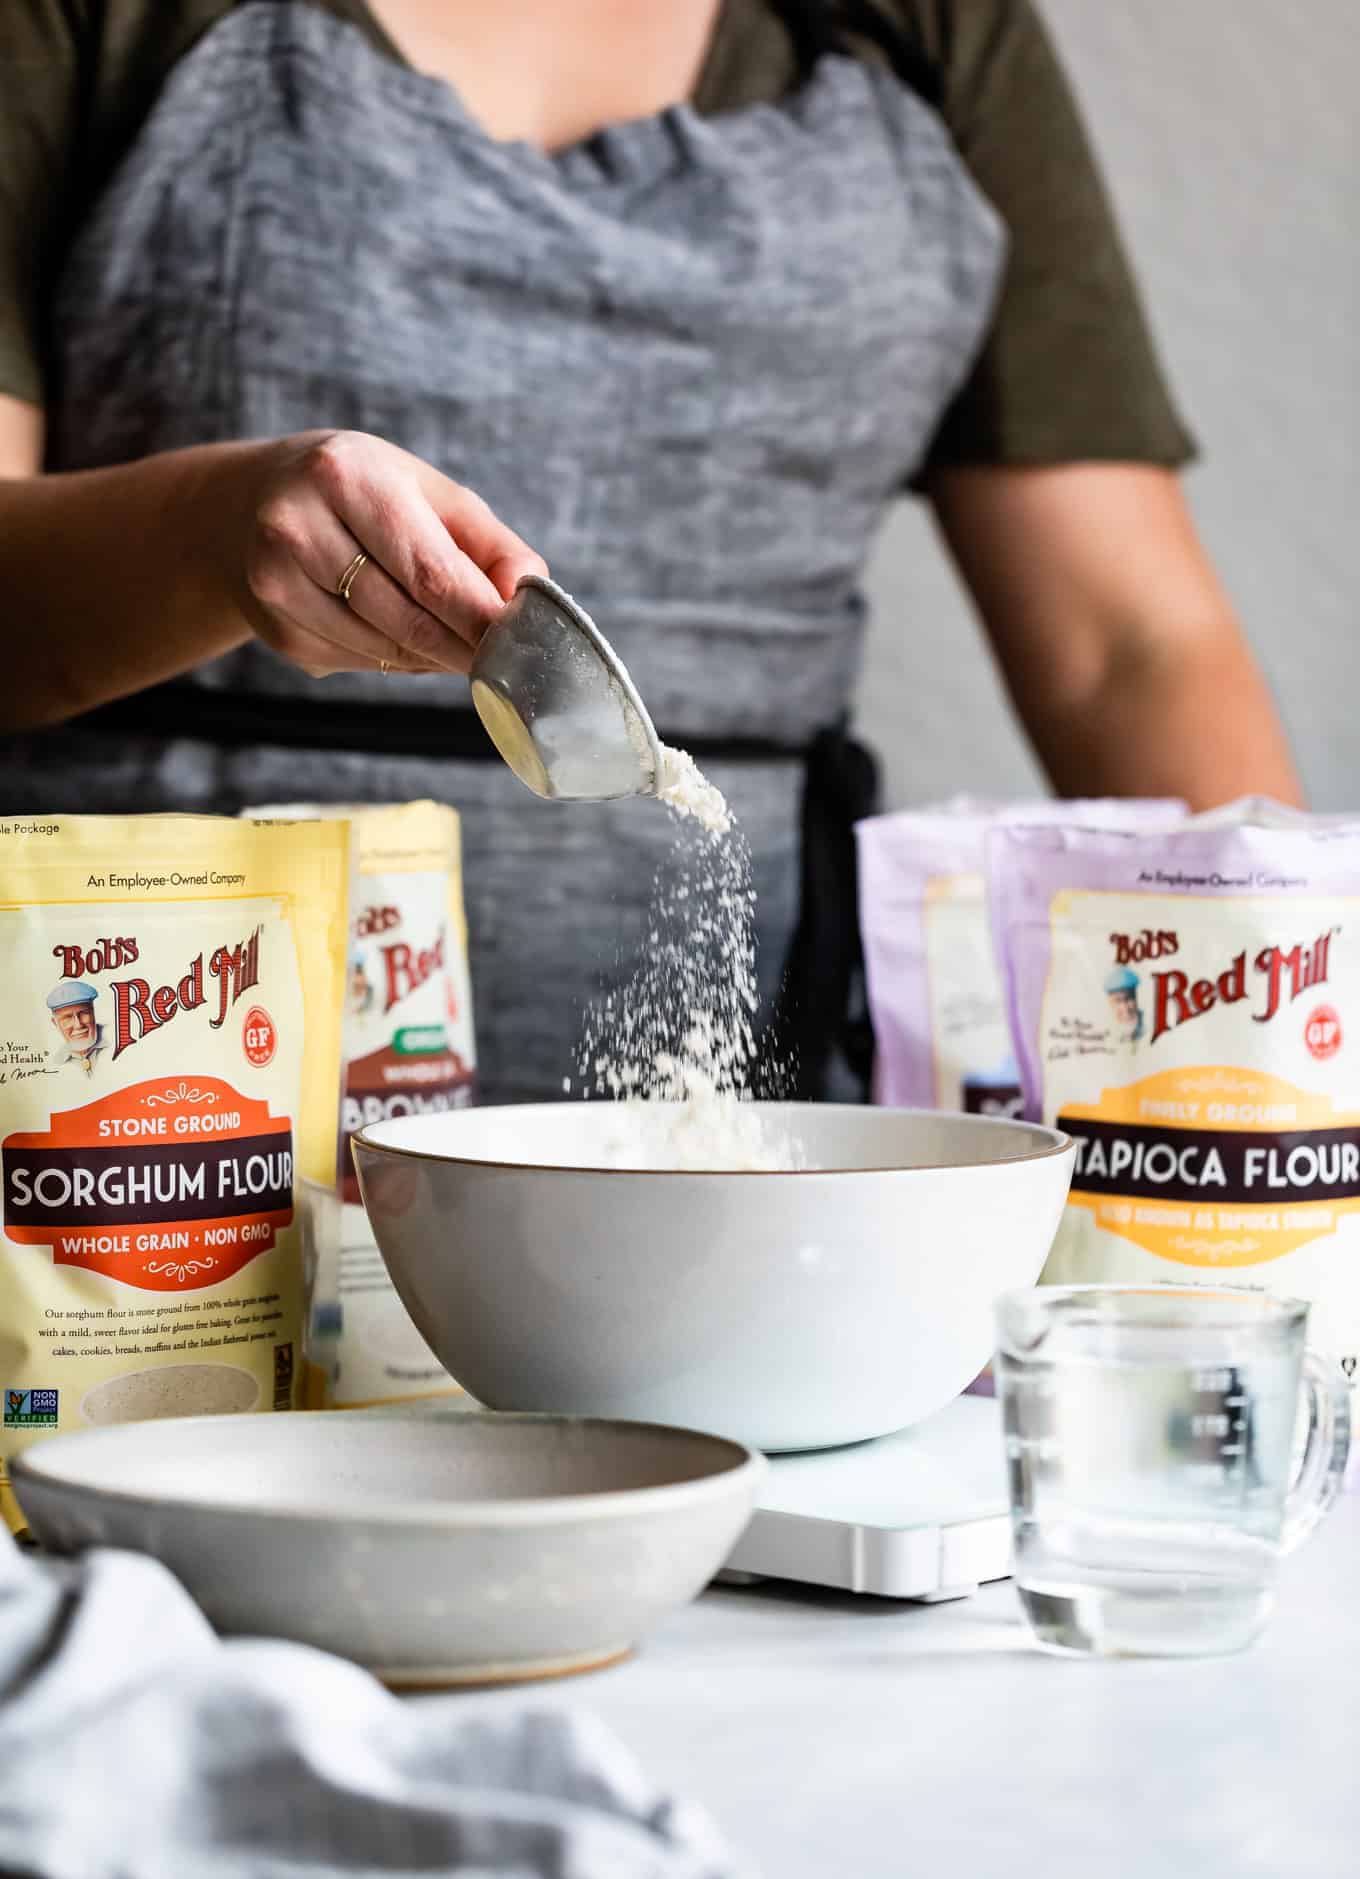
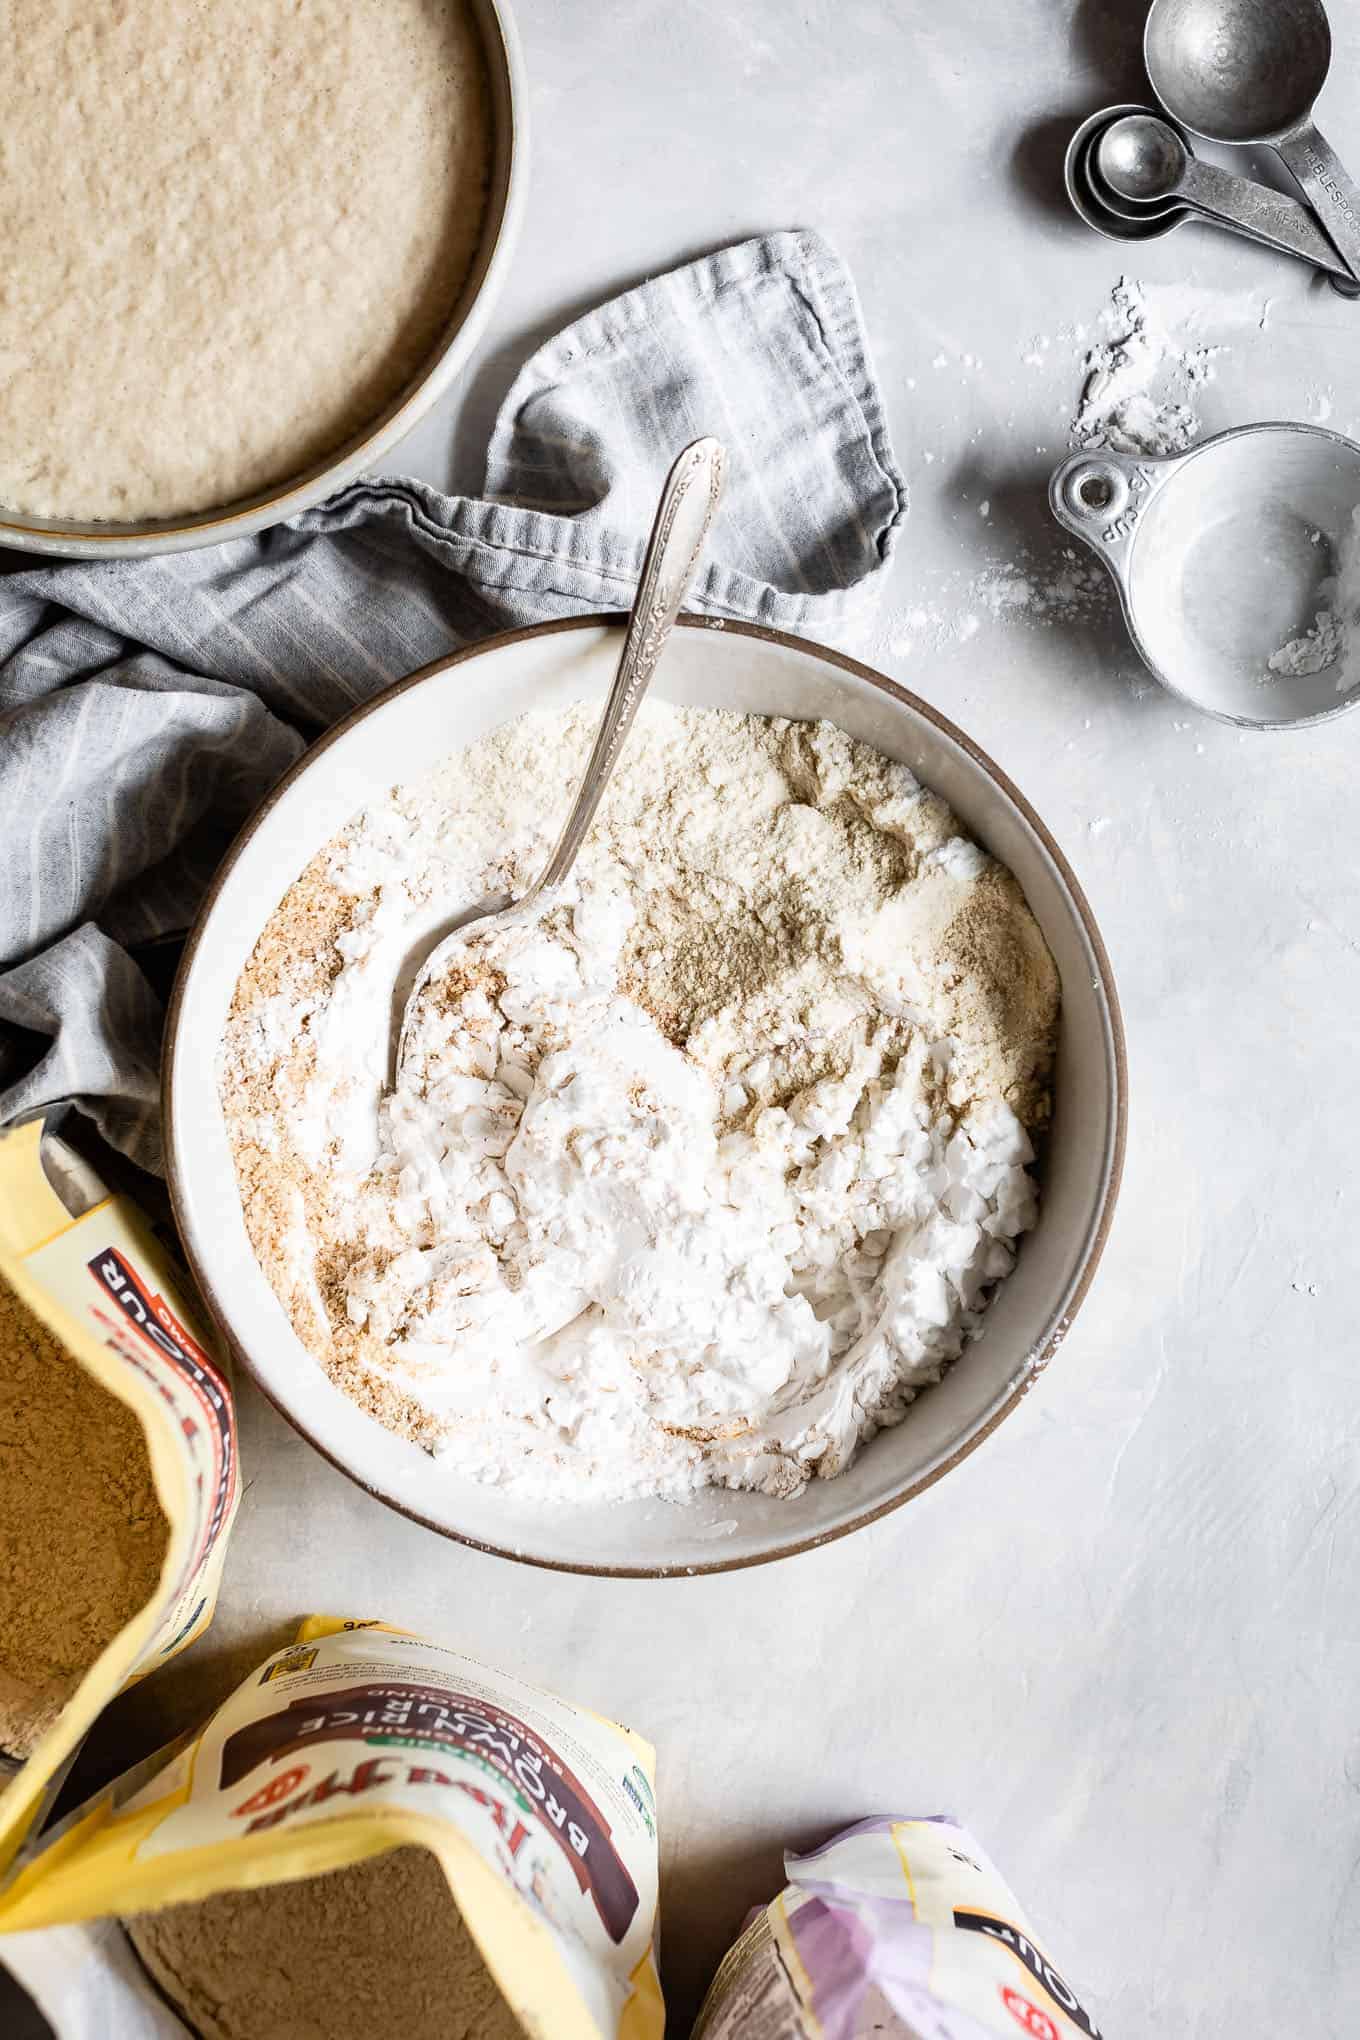
The Gluten-Free Flour Blend That Creates Incredible Bagels
Brown Rice Flour
The base flour I use is brown rice flour, coupled with sorghum flour for the whole grain component. I really like brown rice flour is it is neutral in flavor, bakes up neither gummy nor gritty, and soaks up the moisture nicely. I've tried baking sourdough loaves without brown rice flour and none of them get the texture quite right, so when I turned to bagel-making, I pulled on that sourdough experience and started with brown rice flour.
Sorghum Flour
I've paired the brown rice flour with sorghum flour to add more flavor. Sorghum is wholesome and whole grain that has slightly sweet notes that add flavor depth. I tested a version with oat flour in place of sorghum and the results were too fluffy. The bagels didn't have quite as nice a texture.
Tapioca Flour and Potato Starch
For starches, I've used a combination of tapioca flour and potato starch. Tapioca flour is one of my most-used flours. It's a fluffy starch that adds chewiness to baked goods. Just as when baking sourdough, combining the tapioca flour with potato starch produces a more flavorful bagel.
However, if you don't have potato starch, you can substitute additional tapioca flour by weight in its place. The results will still have nearly the same texture, but won't be quite as flavorful.
Psyllium Seed Husks
These bagels use psyllium seed husks instead of xanthan gum as the binder. The psyllium seed husks soak up moisture and, in doing so, bind the flours together, adding chewiness that mimics gluten. It's also the secret ingredient that binds this cinnamon raisin seed and nut bread together.
Apple Cider Vinegar
Just like in gluten-free pizza dough recipe, apple cider vinegar helps to strengthen the dough and slightly increases the acidity. This allows the yeast to grow easier, causing the bagels to rise a bit better.
How to Make Gluten-Free Bagels
Mixing the dough
Mix all the flours together well in a stand mixer before adding the wet ingredients. Add the wet ingredients, kneading using a dough hook. Alternatively, you can mix by hand with a rubber spatula, then knead it together by hand. At first, the dough will seem as though it's too moist, but as it sits for a few minutes, the psyllium seed husks will soak up the moisture, turning it into a thick dense dough. Knead this dough by hand for a few minutes before dividing it into 8 pieces.
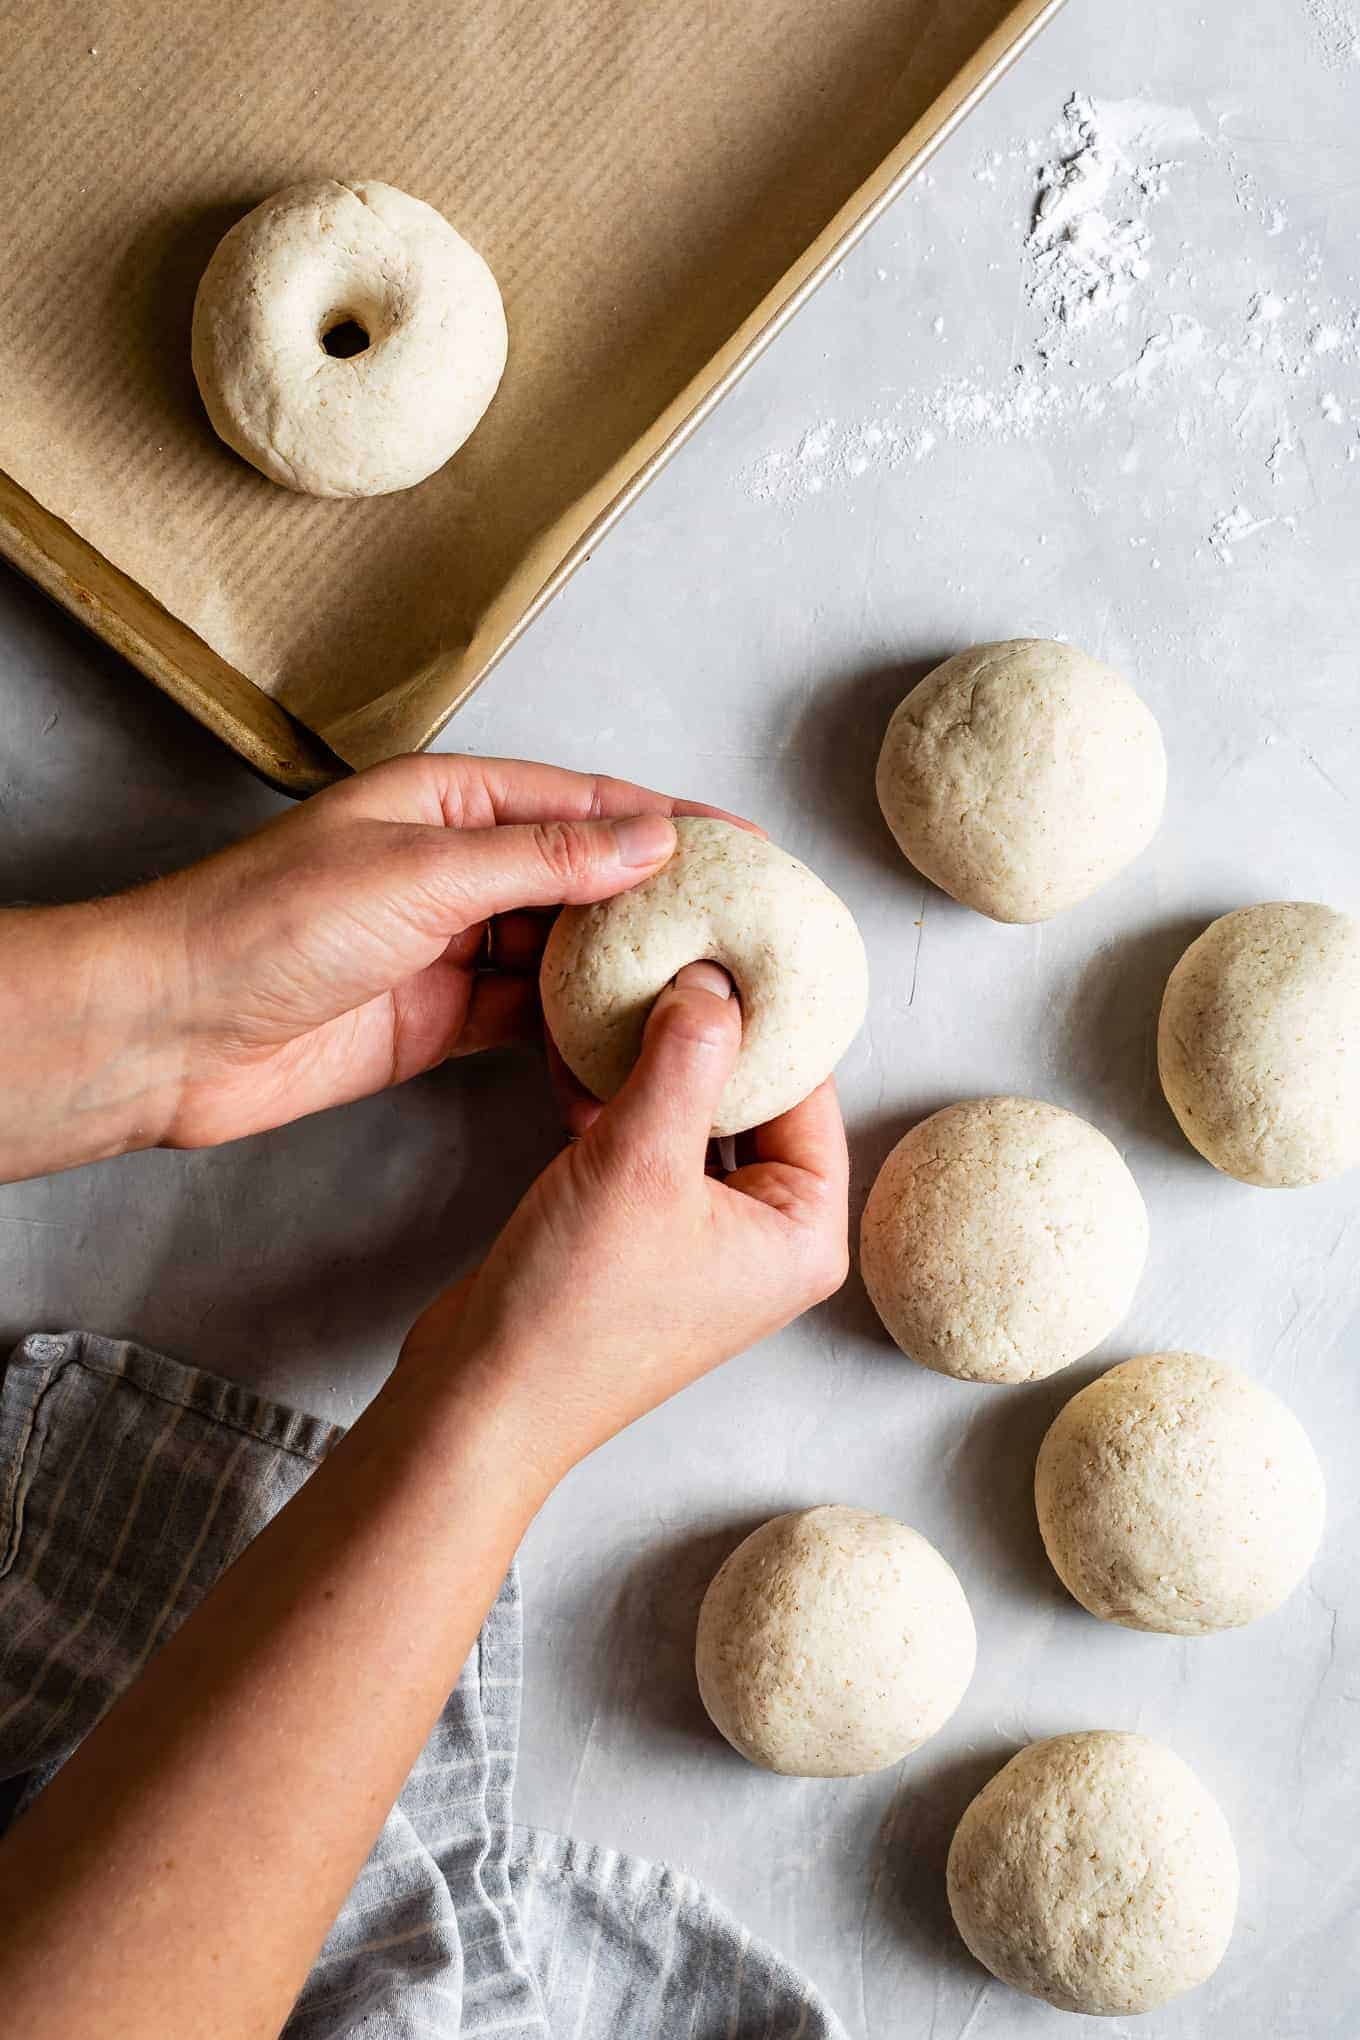
How to Shape Gluten-Free Bagels
To shape the bagels, roll each piece into a smooth ball with the palm of your hand. If you notice the dough feels very dense or even a bit dry on the outside, wet your hands just a bit and knead the water into the dough ball with your hands. Once in a smooth ball, use your thumb and index finger to pinch a hole in the middle of the ball, expanding it to about ¾ to 1-inch large using your fingers.
I make my bagels on the smaller side because these hearty gluten-free bagels are very filling. If you prefer a bigger bagel, make just 6 and increase the baking time by a few minutes.
Single Rise
We shape the bagels before the rise so we don't disturb that beautiful rise later. Let them rise, covered, for 60-90 minutes in a warm place (I use the proof setting on my oven).
Water Bath
Don't skip this step. Just before the bagels are done rising, prepare a boiling water bath with honey. This gives them that brown shine and thickens the crust, giving it the classic bagel chewiness. While the oven preheats, boil the bagels in batches for just 1 minute per side. Transfer the boiled bagels back to a parchment-lined baking sheet.
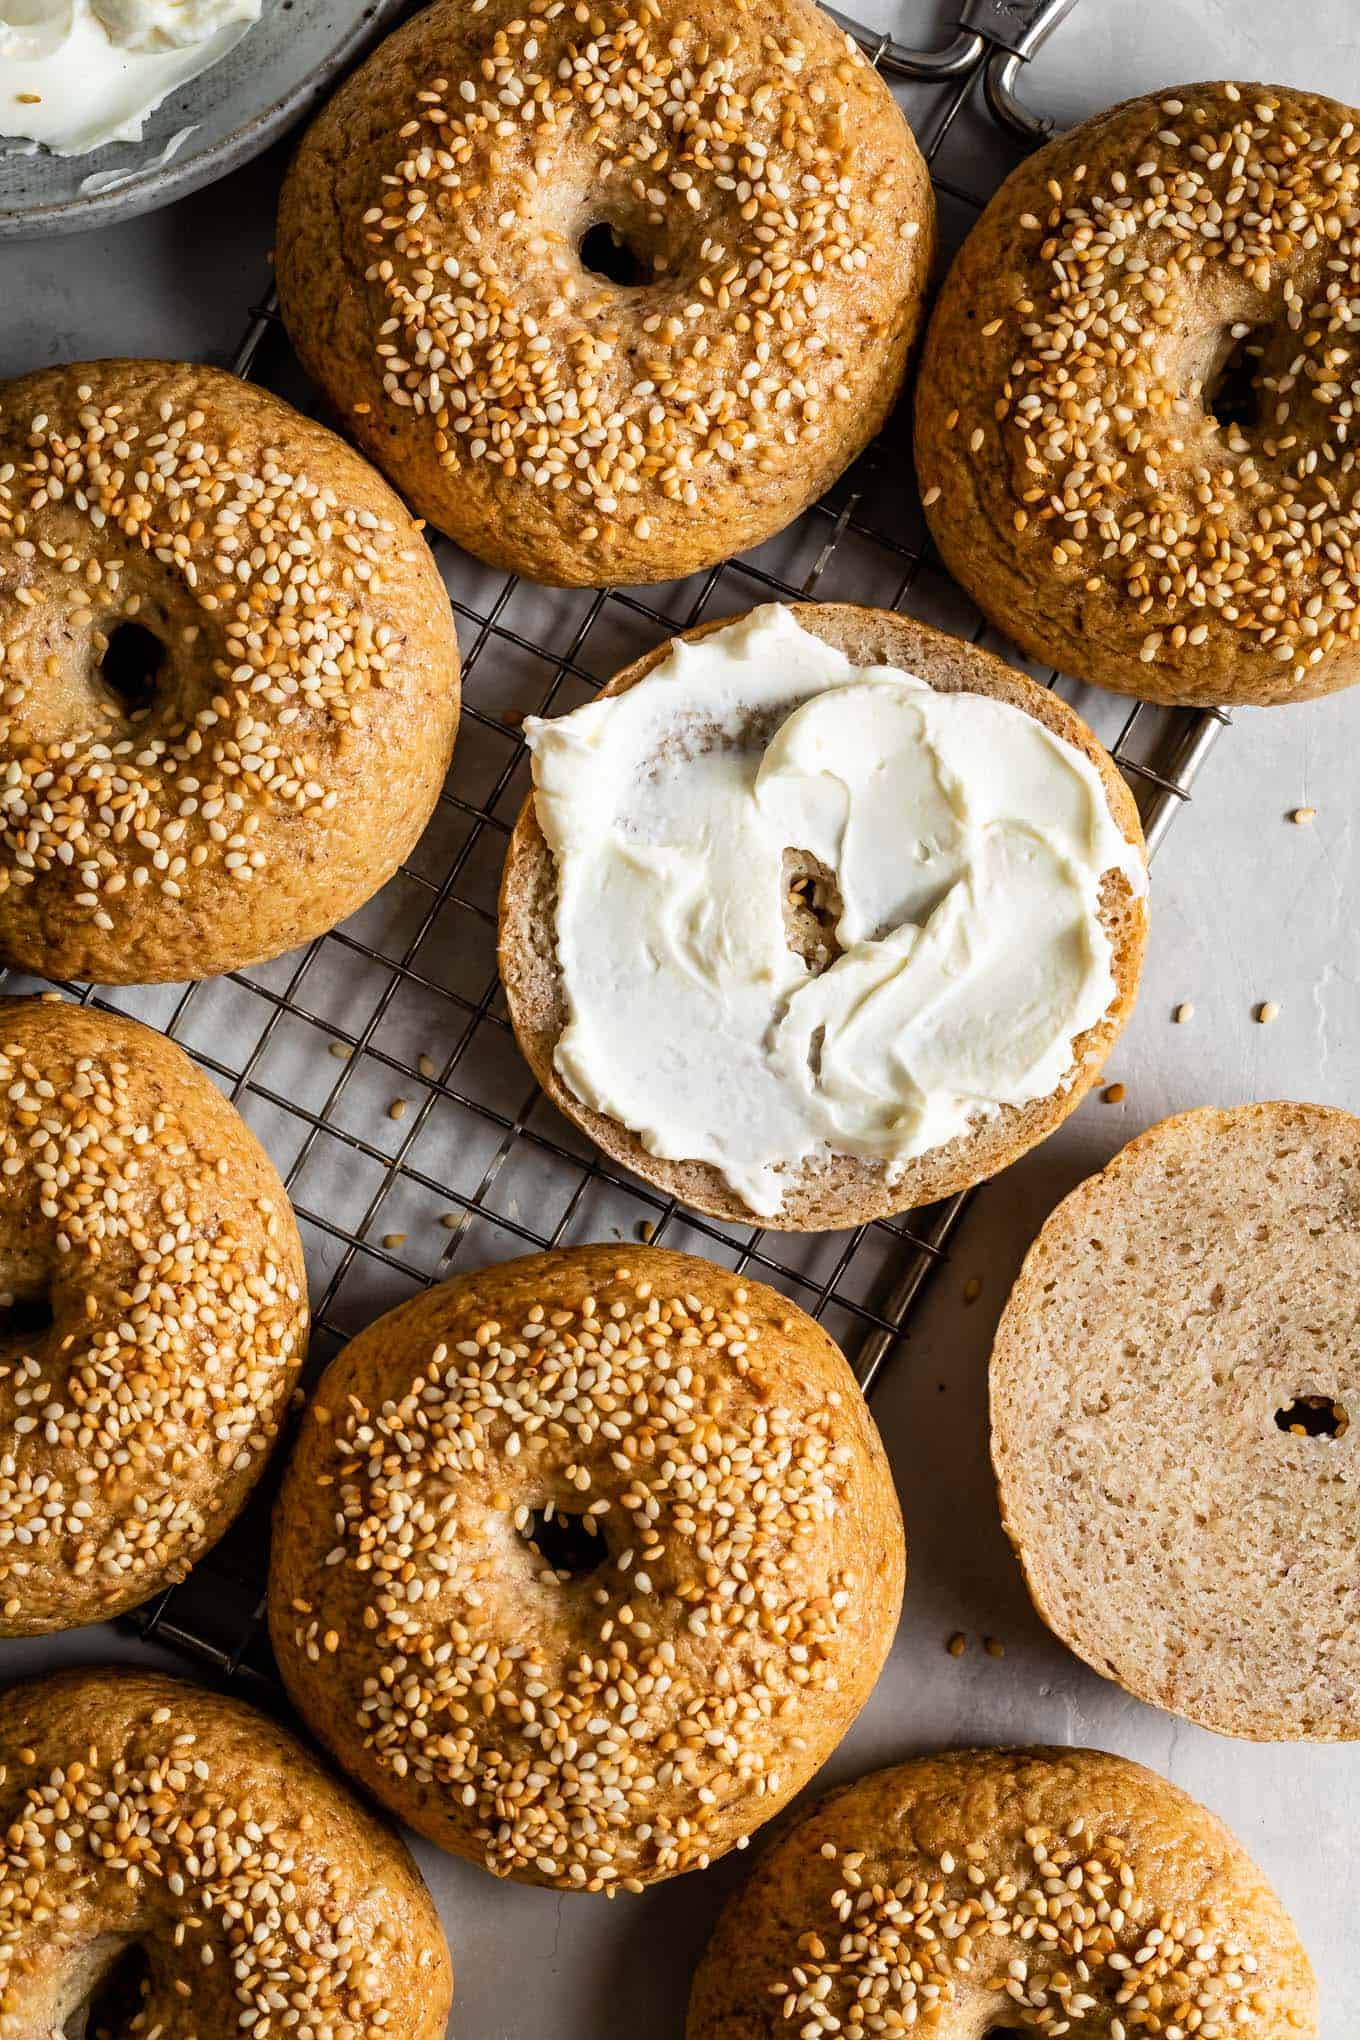
Egg White Brush & Toppings
Brushing the boiled bagels with egg whites does two things. First, it enhances the browning of the crust even further. It also helps the toppings stick to the bagels. Sesame bagels are my favorite, but you could do poppy seed, everything seasoning, onion granules, or whatever else your heart desires!
For a vegan version, you can skip the egg white brush and brush with melted plant butter instead.
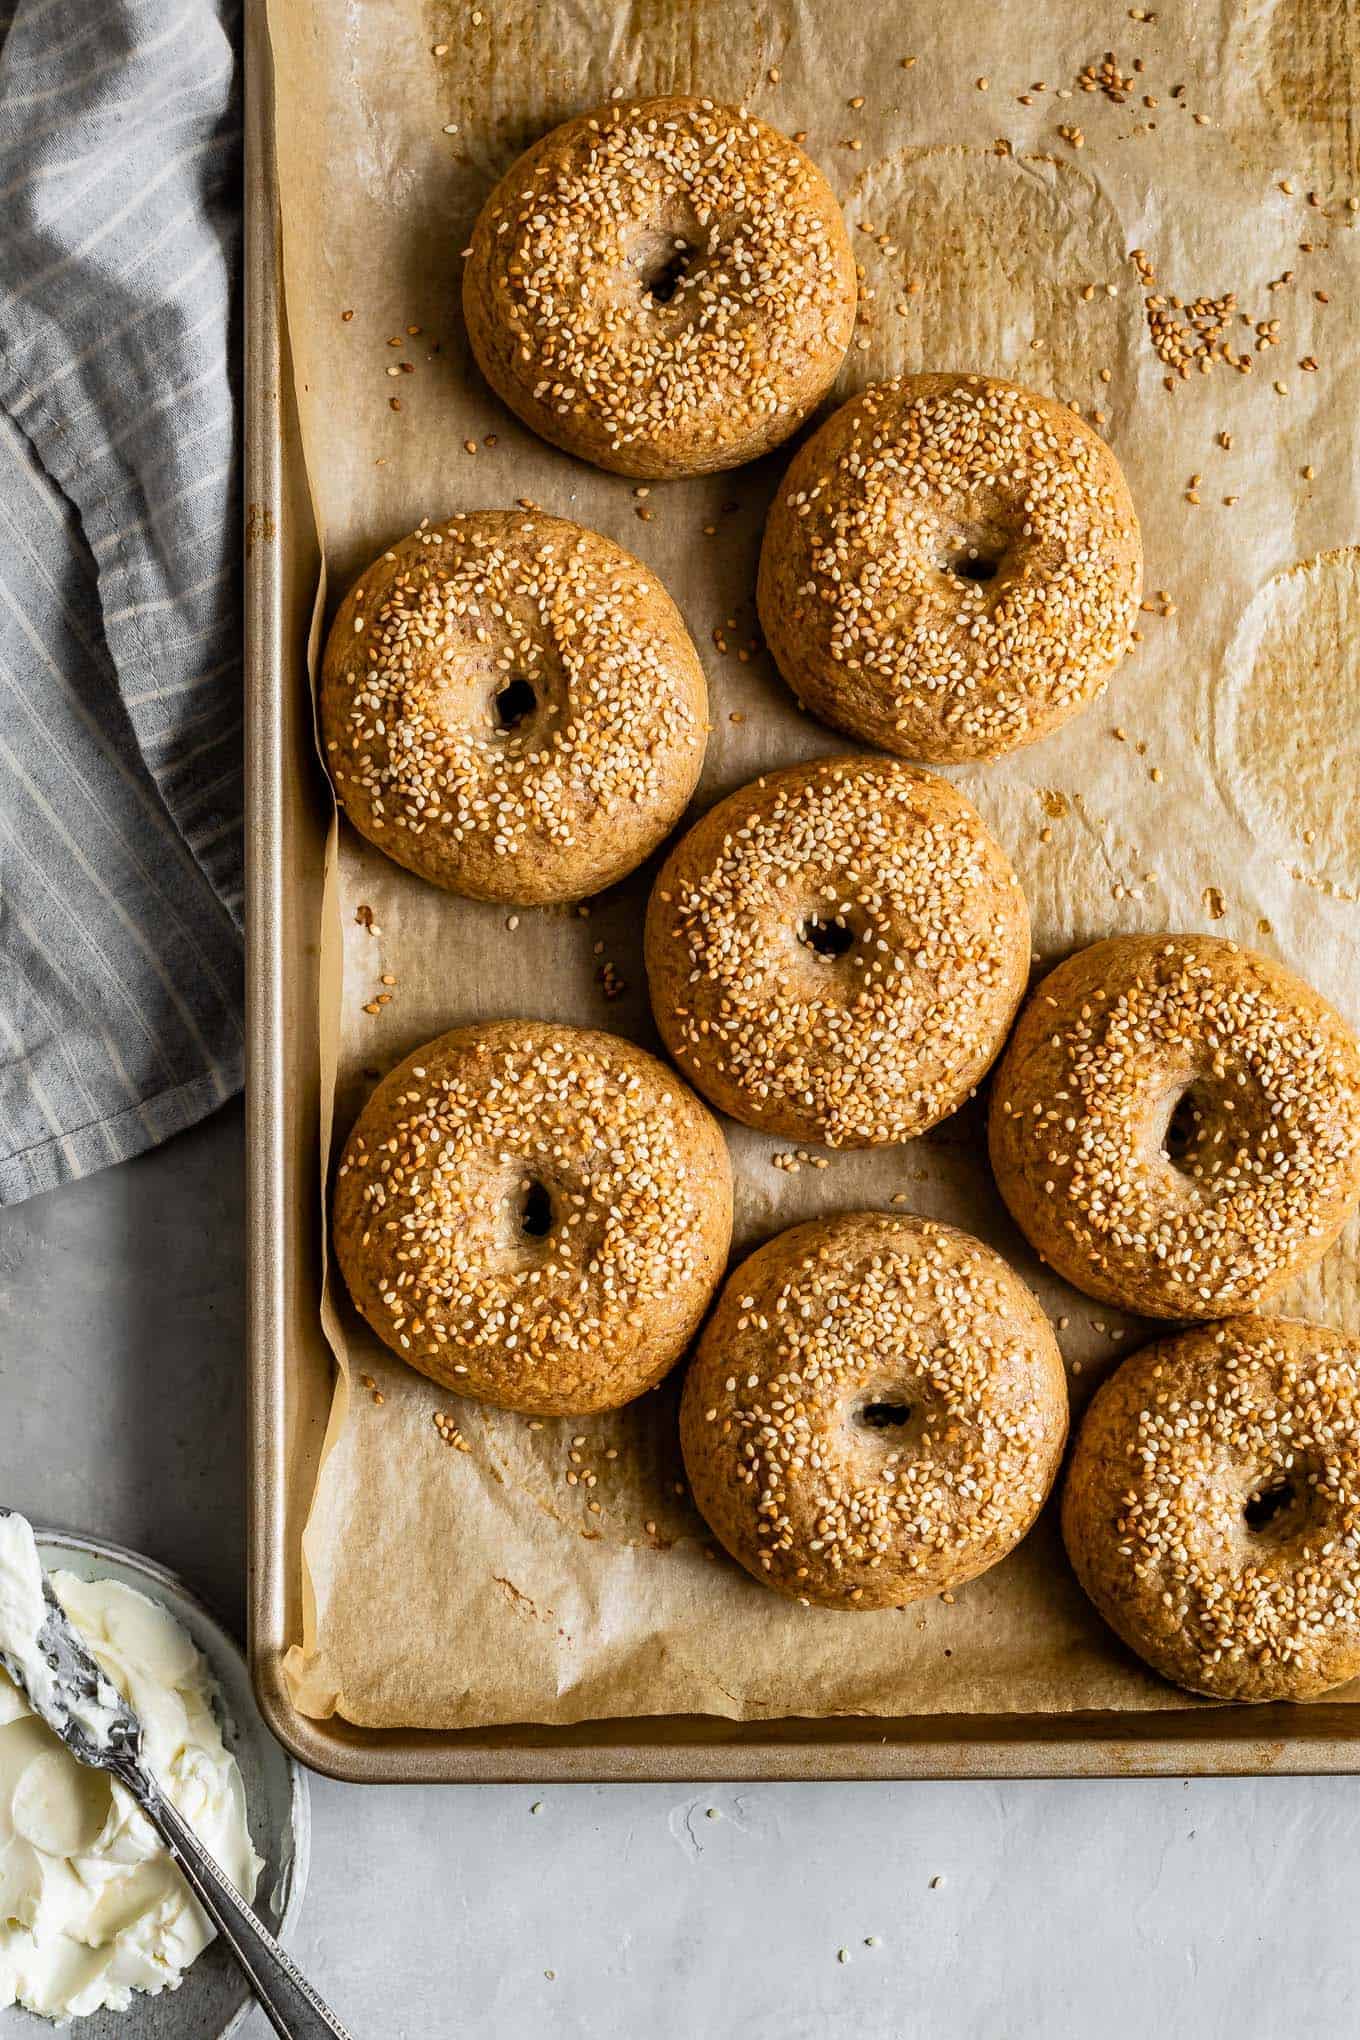
Bake
Now they bake. They'll brown up, and if you tap on them they'll seem very hard, but the crust will soften almost immediately as they cool.
Recipe
Soft & Chewy Gluten-Free Bagels
Ingredients
- 325 g (1¼ cup + 2 tablespoons) (1¼ cup + 2 tablespoons) warm water, (105-110°F)
- 2¼ teaspoons Bob's Red Mill active dry yeast
- 1 tablespoon granulated sugar
- 160 g (1 cup) Bob's Red Mill brown rice flour
- 100 g (¾ cup + 2 tablespoons) Bob's Red Mill tapioca flour
- 100 g (½ cup + 2 tablespoons) Bob's Red Mill potato starch, different than potato flour - see note
- 100 g (¾ cup + ½ tablespoons) Bob's Red Mill sorghum flour
- 20 g (¼ cup) psyllium seed husks, I use whole flakes
- 2 teaspoons kosher salt
- 1 teaspoon baking powder
- 1 tablespoon apple cider vinegar
- ½ tablespoon extra virgin olive oil
- For egg wash: 1 egg white beaten with 1 tablespoon water
- Optional toppings: sesame seeds, dried minced onion, everything seasoning, poppy seeds, etc.
- 2 quarts water
- 2 tablespoons honey or maple syrup
INSTRUCTIONS
- Warm the water on the stove or microwave between 105-115°F (if you go over, just let it cool until the temperature is in that range so you don't kill the yeast). Transfer to a wide medium bowl and mix in the sugar. Slowly sprinkle the yeast over the warm water. Let sit for 10 minutes while the yeast activates and foams. If the yeast hasn't gotten foamy by 10 minutes, the yeast may not be fresh, so try again with a new package.
- Meanwhile, combine the brown rice flour, tapioca starch, potato starch, sorghum flour, psyllium seed husk, salt, and baking powder in the bowl of a stand mixer with the dough hook attachment or a large mixing bowl. When the yeast/water mixture is ready, add it to the flour along with the olive oil and vinegar and mix on low to combine. Increase speed to medium and knead for 4-5 minutes until the dough is super smooth and pulls away from the edges a bit. (If using a mixing bowl, mix with a wooden spoon until it's thick, then knead with your hands until it forms a smooth ball). At first, it will seem very moist, but the psyllium will soak up the water after a few minutes.
- Divide the dough into 8 equal pieces. Knead and roll each piece into a ball and use your thumb and index finger to pinch a whole in the center. Place on a parchment-lined baking sheet and repeat with remaining dough, placing them at least 2 inches apart. If the dough feels too firm or starts to dry/crack as you roll, either knead in a tiny bit more water or dampen your hands as you knead and roll out a new bagel. When finished with all 8 bagels, cover the baking sheet with plastic wrap and let rise in a warm spot for 90 minutes.
- When they're done rising, bring a large pot of 2 quarts of water plus honey to boil and preheat the oven to 425°F. Whisk together the egg white and water and set aside with a pastry brush and have your desired toppings in a separate bowl.
- Working in batches of 2-3 bagels, use a slotted spoon or spatula to drop a bagel into the boiling water. Boil for 1 minute, flip each bagel and boil for another minute. Transfer bagels back to the parchment-lined baking sheet, tapping lightly on the edge of the pot to get rid of extra water. repeat until you've boiled all the bagels.
- Brush each bagel with egg wash all over the exposed surfaces and sprinkle with your desired toppings. Bake on the middle rack for 30-35 minutes until the bagels are golden brown and firm to the touch (if they seem very hard, don't worry, they'll soften up almost instantly as they cool). Let cool completely before slicing and serving.
- Store bagels in an airtight container for two days. Slice and freeze any bagels you won't eat within 2 days. Fresh bagels are great untoasted, but if eating them the next day or out of the freezer, they're best lightly toasted.
Video
Notes
Bagel Topping Variations
I am partial to sesame bagels, but with this base recipe, you can create your favorite type of bagel. Here are just a few classic options for inspiration:
- Everything bagel seasoning
- Sesame seed
- Onion: use dried minced onion
- Poppyseed
- Cinnamon raisin: Add 1 teaspoon cinnamon to the dough and mix in ½ cup raisins before shaping.
- Blueberry: Add ½ cup freeze-dried blueberries to the dough before shaping.
Storing Homemade Bagels
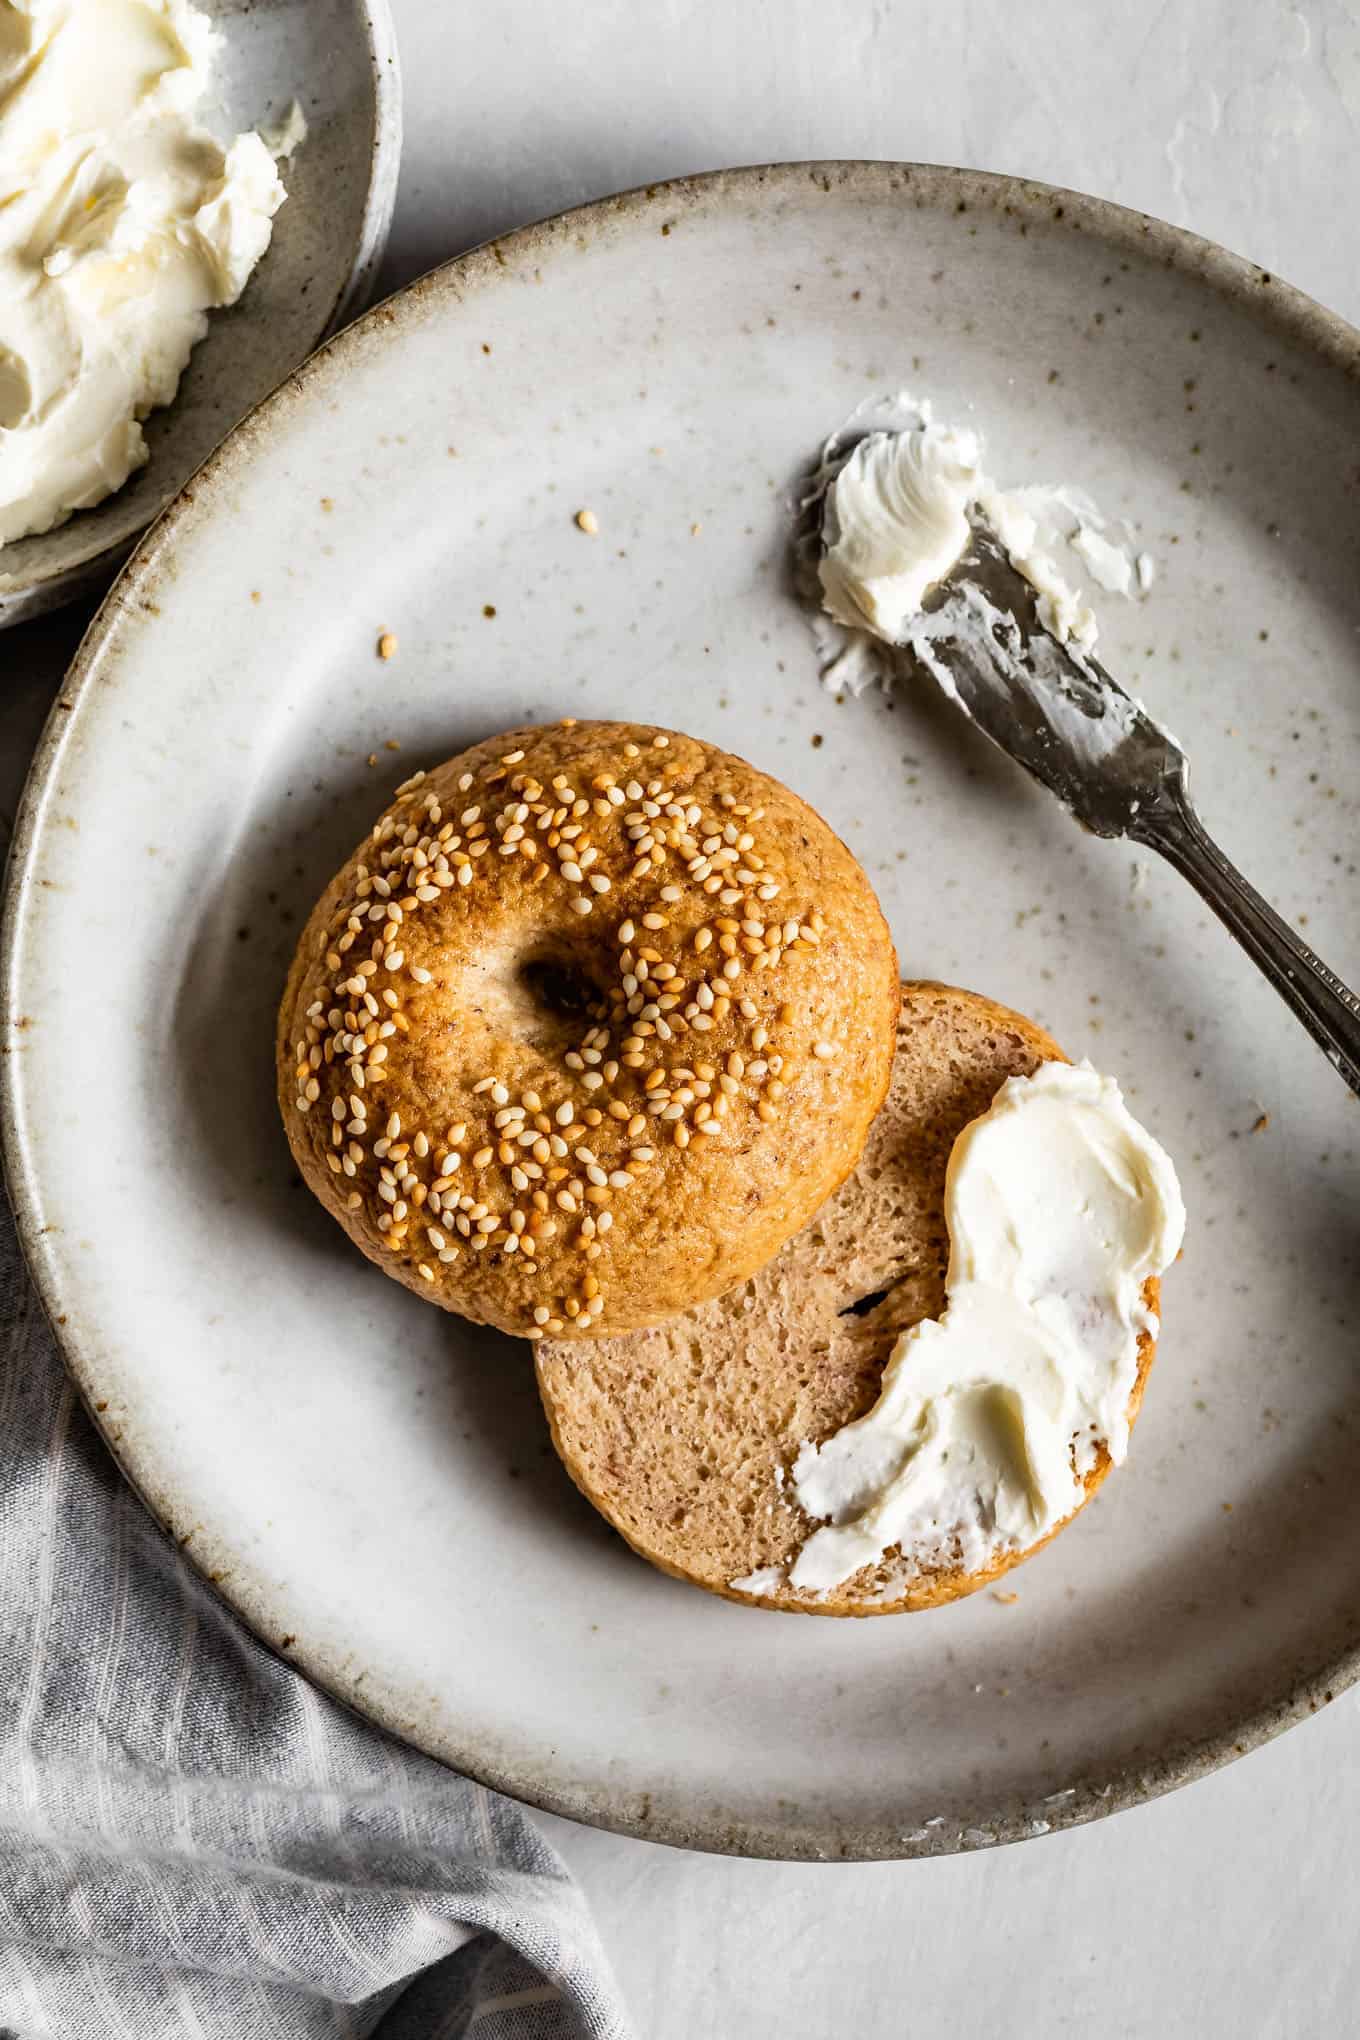
Just like bagels you'd get at a bakery, these gluten-free bagels are best eaten the day they're baked. Fresh bagels are great warm and untoasted after resting for about 20 minutes fresh from the oven.
If eating the gf bagels after they've cooled completely or the next day, they're best toasted before topping with your favorite spread.
Store bagels in an airtight container for up to two days. For any bagels that you won't eat within 2 days, slice and freeze them in an airtight freezer bag as soon as they cool. Pop frozen bagels in the toaster to defrost and refresh the texture.

Pat -
If I wanted to batch up the different dry ingredients (the different flours) in larger quantities, basically so when I want bagels, I just grab and start making, how much would I need of the mix to make a batch?
Sarah Menanix -
I would just do it by weight. For example, batch up like 6x the dry ingredients in the recipe (except the salt and baking powder) and then each time, scoop out 480g of flour.
Grace Sawyer -
I can’t say how awesome these turned out. I didn’t have high hopes because I didn’t read all the way down and see they needed to rise for 90 minutes until after half of them got boiled. Anyways, they still turned out. Not sure how they are after they cool because we ate them all warm with breakfast but I was pleasantly surprised. Such a treat for our GF family to have some much missed bagels with our breakfast. Thank you for this recipe.
Karen -
I love these bagels and make them a couple of times a month. I was wondering if it would work to double the recipe.
Sarah Menanix -
Although I haven't tried it, I think it would totally work to double the recipe! I *have* halved the recipe with success, so doubling should also work just fine.
Iram -
Delicious bagels. We recently had very good gluten free bagels in a bakery in Manhattan, NY where we had travelled from Canada. My daughter who has Celiac rated these very close to those professional ones.
I always weigh all ingredients and adhered to the recipe completely but had the same issue as another person has commented. The weighed water just was not enough by a long shot. I carefully added one tablespoon at a time but in the end ended up adding 6 more tablespoons and even then the dough was very dry and rather hard to work with. Next time I will add more water. But otherwise excellent taste. I added gluten free everything bagel seasoning and it was a hit! Thanks for your recipes. I make several in rotation.
Sarah Menanix -
Thank you for your comment! I'm glad you charged ahead and added more water. I suspect the issues has to do with one or two culprits: Flour brand or psyllium husks. what brand of flours did you use? I notice, for example, that the specific brands make a huge difference in how they soak up moisture because some are more finely ground than others. Did you use psyllium seed husk whole flakes or psyllium seed husk powder? If the latter, you'll need only about 85% of the amount listed, as it binds more of the moisture due to being more finely ground (and thus more surface area). Hope this is helpful!
Iram -
I used Bob’s Red Mill flours. I use psyllium husk flakes by weight. I actually routinely use the same 20 gm psyllium husk flakes for two other recipes (burger buns and another) and never had to deviate from those recipes for water content. But nevertheless, it doesn’t matter in the end as these turned out perfect. The only reason I even mentioned was for others not to be hung up on water quantity. Like, I said, many thanks for your recipes.
Marvissa -
Do you have recipe adjustments recommendations for both an Asiago cheese and egg version? Those aren't favorite and I miss eating them.
Sarah Menanix -
What a great question! I had to google Asiago cheese and egg bagels because I'd never had one. I'm not sure about making it like the yellow egg bagels, but you could definitely add asiago to the top when baking!
Connie -
Can you make the dough and then let it sit overnight?
Sarah @ Snixy Kitchen -
I have not made these overnight, but it should work great! Similar to my donuts, you could shape the bagels and let them rise, covered, overnight in the fridge. Pull the tray out to sit covered at room temperature for an hour, then continue as written.
Laura -
Ive been on the hunt for a soft GF/Vegan bagel and FINIALLY found a good recipe! This is the one I will make again and again. I highly recommend it!
Maggie -
Is it possible to make it without psyllium and yeast?
Gigi -
These were so PERFECT. Sandwiched chèvre as a cream cheese sub in between mine and delicious! I ADORE your blog!!
Gigi -
I’d love to enjoy these every way possible, including making bagel chips out of them. Any clues for doing so without fail? I adore your blog!
Sarah Menanix -
I've turned leftovers into croutons before, so I think they'd make great bagel chips! Slice them into ⅛" thin slices, brush them lightly with olive oil and sprinkle with salt and/or seasonings, then bake in a single layer on a baking sheet at 350°F for 15-20 minutes, stirring every few minutes.
Sarah Menanix -
Hmm - while I've not tried it you could try subbing the tapioca starch for a combination of potato starch and arrowroot starch or additional potato starch.
Theresa -
I'd like to try this recipe but I can't have tapioca anything, including starch. What do you suggest as a substitute?
Nicole -
I made these yesterday! Everyone in my household loved them. My only issue was they look like I added blue food coloring to the dough. I am not sure why they look like this. Any ideas?
Sarah Menanix -
This has to do with the brand of psyllium seed husks you used - it's no issue in flavor, but if you don't like the tint, then look for blonde psyllium husk - I like the whole foods 365 or Anthony's brand psyllium husks flakes!
Rose -
This recipe is fantastic, wow!
Extra info, in case anyone finds it useful: I used Authentic Foods brand brown rice flour, sorghum flour, and tapioca starch, which worked beautifully. AF flours are much more finely ground than Bob’s Red Mill, but I didn’t need adjust the amount of water.
I was a bit short on potato starch and had to sub in 40g corn starch, which didn’t make the dough brittle or gummy (often an issue I have with corn starch).
Used 20g powdered psyllium husk instead of whole flakes, also fine, no issues rising.
Added 1 teaspoon of Authentic Foods dough enhancer, and used white sorghum syrup instead of honey while boiling.
Thank you so much for this recipe! I’m going to make a second batch in a few minutes.
Monica -
I replace 30g sorghum for buckwheat and had to add 75g more water.
I also didnt have kosher salt so added 1.5tsp pink salt, unfortunately still too salty. So I would reduce to 1tsp for any regular salt.
Otherwise texture of the raw dough was good and easy to work with.
Toby -
I made these today because of all of the wonderful comments. They were great. How do you think they would behave if we substituted sweet rice flour for all or part of the brown rice flour?
Wanda -
Delicious, healthy, and super easy to make. I've been baking gluten free for many years and this is by FAR the best ever gf recipe! I use it for hamburger rolls, sandwiches, bagels, etc. Its my go to for everything bread! Don't waste your time on other recipes. The only change is I usually have to add a few tablespoons of water. That's it!
Inna -
I haven't had bagels in probably around 5 years after going gluten free. This changed today. Oh my, these bagels are soooo good! Just like I remember them. I did use a gluten free sourdough starter instead of the yeadt and let them rise for 3 hours, and they turned out pure perfection. Thank you so much for this wonderful recipe!
giulianna -
Is it possible to make these with a sourdough starter? If so, what do you recommend?
Inna -
Yes!!! I just made them today with a sourdough starter and they turned our pure perfection! I used around 100 grams of sourdough discard, I added it into water and then added it to the flour mix. I let them rise for 2.5-3 hours and oh my, they so were good! Highly recommend.
Linda -
Howdy I made these twice yesterday and sadly I made bagel thins. I love bagel thins but I am going to love these when I get them looking llike yours. I was wondering if I over proofed them ? First batch 60 minutes and the 2cd for 90 minutes. They flatten out while rising. Any suggestions. Thank you linda
Sarah Menanix -
I'm so sorry you had this issue. It sounds to me like your bagels possibly have too much moisture in them. I'm happy to help you troubleshoot. I'm wondering - what brand of flour do you use? Also, what brand of psyllium seed husks do you use? Did you measure everything by weight? When you add activate the yeast in the water, does it foam and bubble up?
Linda -
Hi thanks for your time ! I used bob's flours. Weighed everything except the water. I used 2 1/4 teas. Instant yeast mixed with flours. I did use yerba prima psyllium husk powder .( maybe different from husks ? ) Are measurements for rapid rise yeast and instant yeast different ? Thanks again. Ps the bagel thins are still delicious !
Sarah Menanix -
Hm - I'm not sure about the yerba prima psyllium husk powder because I've not used that brand before - I tend to use the 365 whole foods brand, but I just looked it up and I don't *think* that would cause the issue. It's possible that it's the yeast that was the issue - part of the reason I tend to gravitate to active dry yeast is that you proof them before adding them to the dough so you know if the yeast is good. I would recommend trying again with active dry yeast to make sure that outdated or not fresh yeast isn't the issue.
Sarah Menanix -
These bagels use psyllium seed husks instead of xanthan gum as the binder. I hope you love them!
Lilen -
Thank you for the recipe! I'm going to try it next weekend. I just have a question, do not use xanthan gum?
Monika -
Hi! I have made the recipe 3 times and my husband and I LOVE it! Thank you for sharing! I have an observation though. I have used my kitchen scale for everything except the water the first time and the 1 1/4+2 tbsp was not enough. I had to add more when I was mixing. The other two times I decided to weigh the 325 g and it was closer to 2 cups.
Sarah Menanix -
Interesting! I wonder if it's possible your liquid measuring cup is a bit off - I mention this because I have had two that I had to throw out because they were incorrect and it took me a couple of years before I realized it! A cup of water should weigh 236g, so 326g should be 1.3777 cups.
In any case, I'm glad you loved them!
Monika -
Good to know!!!! Let me try another set I have! Thanks!
Wednesday N Sorokin -
Thank you so much! These are the best gf bagels I've made so far and I've tried a lot of recipes. The only changes I made were that I used honey instead of sugar and in the poaching liquid I used 1 tsp. of molasses instead of the honey.
Jasmine -
I'm interested in making these as mini bagels, how long would you suggest I boil/bake them?
Thank you for including the weights of the ingredients
Sarah Menanix -
I haven't tried mini ones, but I would boil them the same amount of time, but bake them for less. You'll want them to be golden brown, so maybe start at 22 minutes?
Mel -
Excited to make these! Can I make them the night before and pop them in the fridge overnight either before or after the rise?
Shirley L Martin -
Would love to make these for my husband who has celiac disease...but he is highly allergic to psyllium. Is there a way to substitute xanthan gum, and if so, how much?
Sarah Menanix -
Oh no! I've not tested without the psyllium (especially because it adds the chewiness classic to bagels). You could try subbing in 1.5 teaspoons xanthan gum and reducing the water. I would probably start with just 1 cup of water if going that route.
Ayah -
I tried this with oat flour instead of rice and tapioca flour instead of potato flour and it turned out great. I absolutely love this recipe. My family can't get enough of the bagels. Thank you!!
Nomi -
Thank you so much! I could not find psyllium husk or powder. Can I use milled flaxseed instead? Or something else?
Sarah Menanix -
Hmm - I'm not sure if that would offer the desired stickiness/chewiness. I've not tested that so I am not sure. You could try subbing in 1.5 teaspoons xanthan gum and reducing the water. I would probably start with just 1 cup of water if going that route.
If looking in the grocery store, often the psyllium can be found with the supplements, if not in the baking/gluten-free section. Depending on where you're located, I get the 365 brand from Whole Foods.
Julie Feldkamp -
Love this recipe but they came out very dry and I added another 1/2 cup of water to make the dough the proper consistency. Otherwise they were AMAZING So glad I found this recipe, Gluten free baking can be so hit or miss and I am glad to find a tried and true recipe that worked exactly as it should!! Thank you for this I look forward to trying other recipes of yours!!!!!!
Bruria -
Hi! I’m so excited to make these, the recipe looks just right! I managed to find all the ingredients in high quality, but we don’t have active dry yeast in my country, only instant dry yeast. Is there a way to safely substitute? This will be my first time baking gluten-free with yeast, so I’m pretty anxious.
Sarah Menanix -
While I haven't tried it, I saw online that 2 1/4 teaspoons active dry yeast = 1 2/3 teaspoons instant yeast. You also don't need to proof the yeast in advance in the water, just add it directly to the dry ingredients, but still warm the water as instructed!
Bruria -
Thanks! I hope it works well!
Dave M -
My wife and I are so happy right now!! Haven't had bagels in years and these are phenomenal. I added green chiles to part of the batch and spread goat cheese on them. So good... Thank you for the great recipe!
Janet -
Hi there. Can’t wait to try. Any thoughts on adding a brown rice sourdough starter to the mix?
Megan H -
Thanks for the videos! My bagels aren't beautiful like yours, but they are super delicious! They have a soft chewy interior and the slightest tang of sourdough. I'm almost afraid to make them correctly, ha ha!
I used a home-made non-dairy cultured cream cheese with them, and it was fantastic. Thank you for this recipe!
Megan H -
I would love a video! I am making these now, and the flour was super dry from the first mix; I added about 1/4 cup more water and used a mister bottle with water while I kneaded and shaped them. My dough did not want to hold together at all! I fought them into bagel shapes, but they are not smooth and pretty. I almost wanted to add more oil. Will see what happens when they come out of the rise. I used Bob's brown rice flour, and swapped corn starch for the potato starch. Next time I will weigh instead of cup measure. I'm hoping if they look ugly I can hide it with poppy seeds.
Sarah Menanix -
Hm - I've never tested it with corn starch in place of the potato starch, but given how you described it, it sounds like the corn starch soaked up much more liquid. As far as flour, corn starch tends to be more brittle than chewy, whereas tapioca and potato starch are much chewier/fluffier (this is why corn starch makes a good flour for dredging fried foods, whereas tapioca/potato starch would be gummier when fried). Tapioca and potato starch, here, act as the binders, adding chewiness. This seems in line with how you're describing the texture when you subbed in corn starch. I have a feeling you'll find that the corn starch version won't be very chewy/fluffy when baked.
In the notes, I recommend replacing the potato starch with more tapioca starch if you need to substitute the potato starch, as they behave similarly in baked goods.
Megan H -
Ah, good to know. I used tapioca, and almost subbed arrowroot for the potato, but your comment about less flavorful led me to the corn starch. Will do more tapioca next time, then. Thank you
Sarah Menanix -
Also, here's a behind-the-scenes video of making them on my instagram reels!
Making the dough
Boiling and Baking
Tee F -
Awesomeness!!! Can't wait to try cinnamon apple and other flavors. Bagels are back in my life woo hoo!
Tee F. -
I just made these bagels today and I prepared myself for another let down BUT these bagels were fantastic!!! Chewy and moist not gummy. I made everything bagels and they were tasty 😁. Sarah, any suggestions on how to get more of the everything seasoning inside the bagel? Thanks!
Sarah Menanix -
Yay! That makes me so happy - thank you for coming back to share! Ooo - that's a good question. Do you mean like in the dough? I bet you could just add some of the everything seasoning to the flour and mix it right into the dough - it shouldn't change how it bakes up at all!
Jane S. -
Oops thought I had sorghum powder but don’t and I’m already in the middle 😬 what can I sub?
Sarah Menanix -
I tested a version with 80g oat flour in place of the sorghum flour (it needed less) - they were yummy, but a bit fluffier so not my preferred texture. In a pinch, it'll still make yummy bagels! I also tried a version with half sorghum and half buckwheat, so I think you could prob try subbing in the same weight in buckwheat (100g).
Sarah Menanix -
Also, this comes with the caveat that I only tested the oat version once and I haven't tested a full buckwheat version :) This is just what I would do if I found myself out of sorghum flour in the middle of baking!
Julie Feldkamp -
There is no milk in this recipe. Not sure what you are talking about but I used dry active yeast and they came out fine. Still did it in the water for ten minutes till it got foamy like the recipe
Sarah Menanix -
Whoops - I got confused because I'd just made my pizza crust and I dissolve the yeast in milk for that. You're correct :)
Janette -
Hi Jane! Just curious if you tried this recipe with the full buckwheat substitution?
Megan -
I made these with millet replacing the sorghum flour. They turned out a bit flat (more like bagel thins than fluffy NY style bagels) but taste great!
Chelsea -
Not sure what happened here because I needed to add almost two cups additional water to make this work... Did I add too much tapioca flour? It says 3/4 plus 2 tbsp.. I had to assume that meant 3/4 c + 2 tbsp like the others in the list, or you would have put 2 3/4 tbsp. Not sure what else could have gone wrong??
Sarah Menanix -
Oh no! You're correct, it was supposed to say 3/4 cup + 2 tablespoons - thanks for catching that typo! I'd love to troubleshoot what went wrong. My inkling is that it has to do with the brands of flour you use. Did you use all Bob's Red Mill brand flours? Did you measure by weight? I have noticed, for example, that different brands of brown rice flour soak up water significantly more/less (to the tune of cups even!). I make these weekly now and had this recipe tested by another baker, who tested with whole psyllium flakes and psyllium powder, so both of those should work. I'm trying to think of other variables that could have caused them to be more dry for you...
Chelsea -
Thanks so much for a quick response! I used different brands, and now that I look closer I used tapioca starch and potato flour LOL. I used the measurements by cup as I don’t have a scale, and Psyllium husk powder :) they’re about to go in the water bath- trying it anyway! :) Sounds like others are having great results though so I’ll definitely give it another shot!
Sarah Menanix -
Ah-ha! Tapioca starch is the same as tapioca flour, but - and this is just confusing - potato starch and potato flour are very different. I'll include a note to make sure people look for potato starch!
Sarah Menanix -
One more guess: Another friend said she almost accidentally used potato flour instead of potato starch - just in case you may have also done the same!
sarah Lewkowicz -
I made the recipe today. Wow! They are perfect. Easy to work with this dough and all the steps were fun and well explained. You might want to clarify that Potato flour ( made from whole potatoes) is not the same as potato starch, which is what your recipe calls for. We had them with cream cheese, lox and sliced shallots. Wonderful
Sarah Menanix -
Yay! I'm so glad you loved them! That sounds like the perfect Saturday morning breakfast! Good idea - I'll add that note above! So many gluten-free flours, I can totally understand why someone might get mixed up!
Abbey -
Such an incredible gluten free bagel recipe! Turned out wonderful and truly so easy to make. Were a huge hit with everyone 💗
Krista -
So nice to be able to make my own gf bagels! This recipe was so easy and the bagels came out perfectly.
Sarah Menanix -
Thank you for catching that! I've updated the recipe card.
Sara shah -
I’m excited to try these! Can I used a superfine psyllium husk powder instead of whole flake? Thank you!
Barb -
What can be substituted for the sorghum?
Sarah Menanix -
I tested a version with 80g oat flour in place of the sorghum flour (it needed less than the sorghum) – they were yummy, but a bit fluffier so not my preferred texture. In a pinch, it’ll still make yummy bagels! I also tried a version with half sorghum and half buckwheat, so I think you could prob try subbing in the same weight in buckwheat (100g). Also, this comes with the caveat that I only tested the oat version once and I haven’t tested a full buckwheat version :) This is just what I would do if I couldn't use sorghum!
Sarah Menanix -
I know we e-mailed about this, but just wanted to put the answer here in case someone else had the question: A friend of mine made the bagels and, for my research, she split the dough and used superfine psyllium powder in half and whole psyllium husk flakes for the other half (subbing by weight). She said the dough was almost the same and the results were very very similar, but the superfine psyllium powder ones seemed ever so slightly denser. That being said, if you've only got superfine psyllium powder, then it will work!
Nicole -
I made mine with the powder because I cannot find the flakes. Where can I get the flakes at?