
We're married! And no one fainted from heat! This post is the second half of our wedding tale - our bride & groom portraits and the DIY reception. To see pictures and read about our first look, bridal party, and ceremony details (including our vows), find part 1 here. With that, here's the second peak into our DIY backyard BBQ wedding. The story of how a craft-obsessed California girl married a design-savvy woodworking Texas boy. On the hottest day of the year.
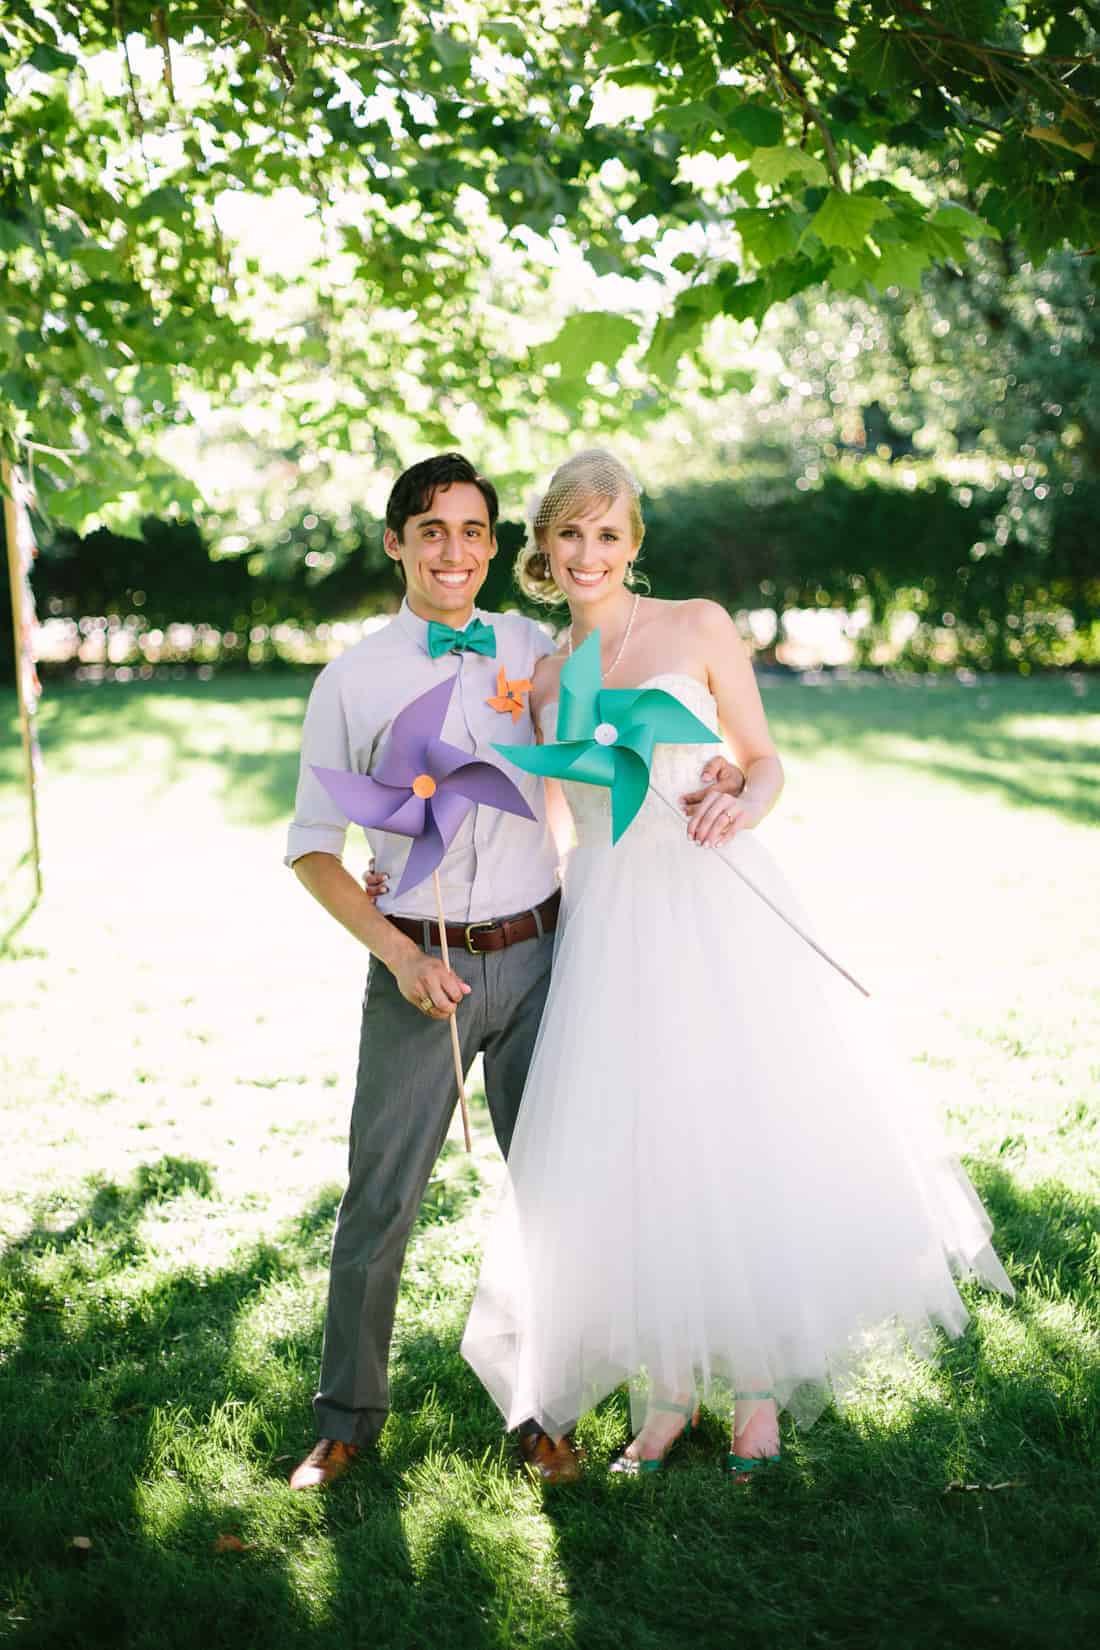
We love pinwheels - obviously. They make fun colorful decor for way less cost than flowers. These pinwheels basically tell the story of the mood of our wedding - "let's all just have fun - yay!" After the ceremony, the guests followed my best friend and usher Tyler, who held an upcycled fence board sign that read "RECEPTION" all the way across the street from our neighbor's garden where we got married to the celebration in my childhood backyard (read about the fence boards in part 1). During cocktail hour, Lucas and I snuck in a few photos before joining the fun.
As before, while we go through the pictures, I'll share specific details, alternating between day-of anecdotes and our DIY touches, including links to where we bought certain things. We did lots of research to find the best prices, and, in general, we tried to buy as much as possible using our Amazon points. All images are copyright of Brent Van Auken Photography, except where noted with the "© SK" mark. Click any picture to enlarge.
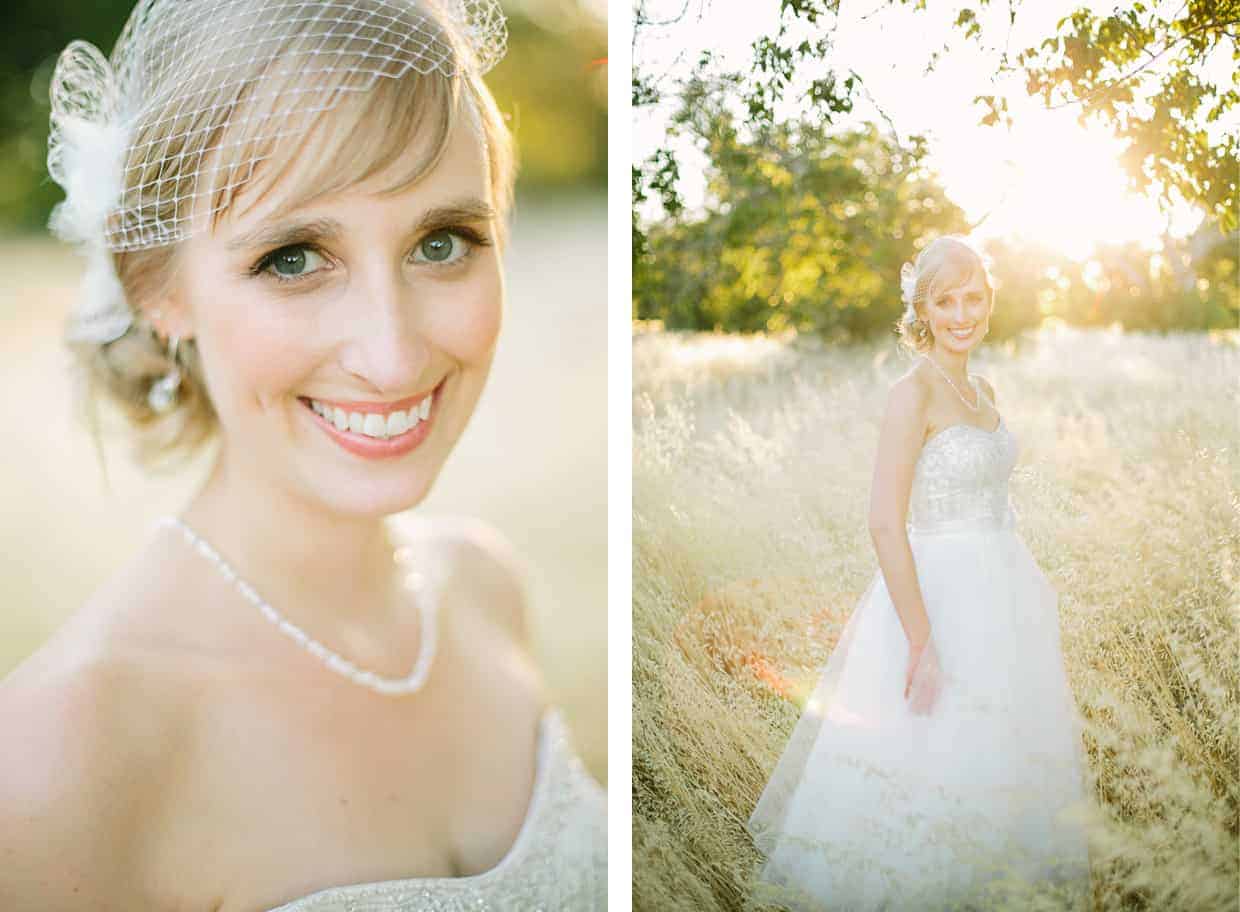
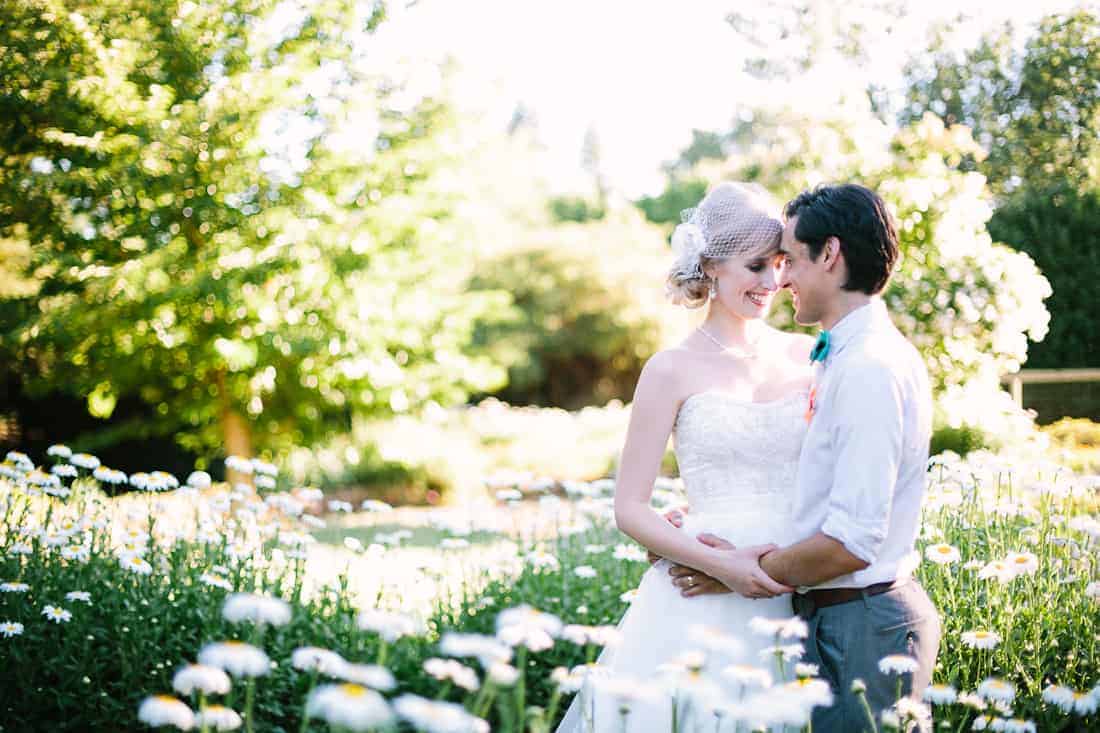
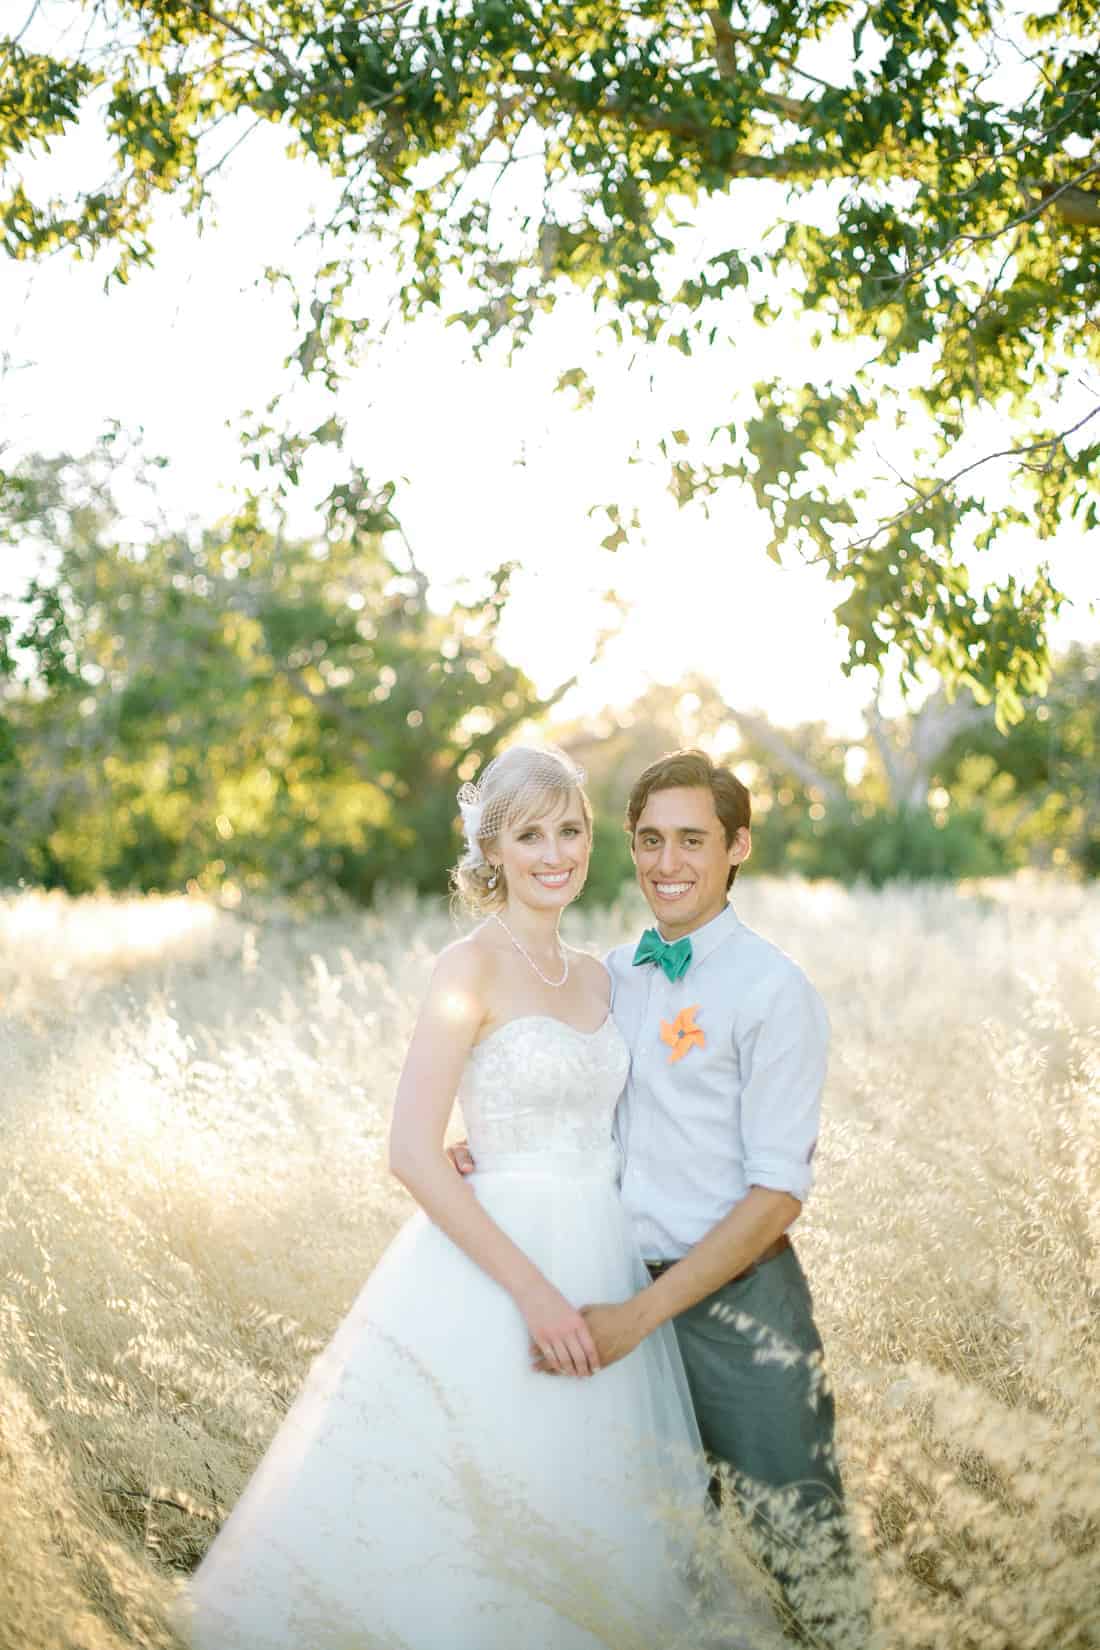
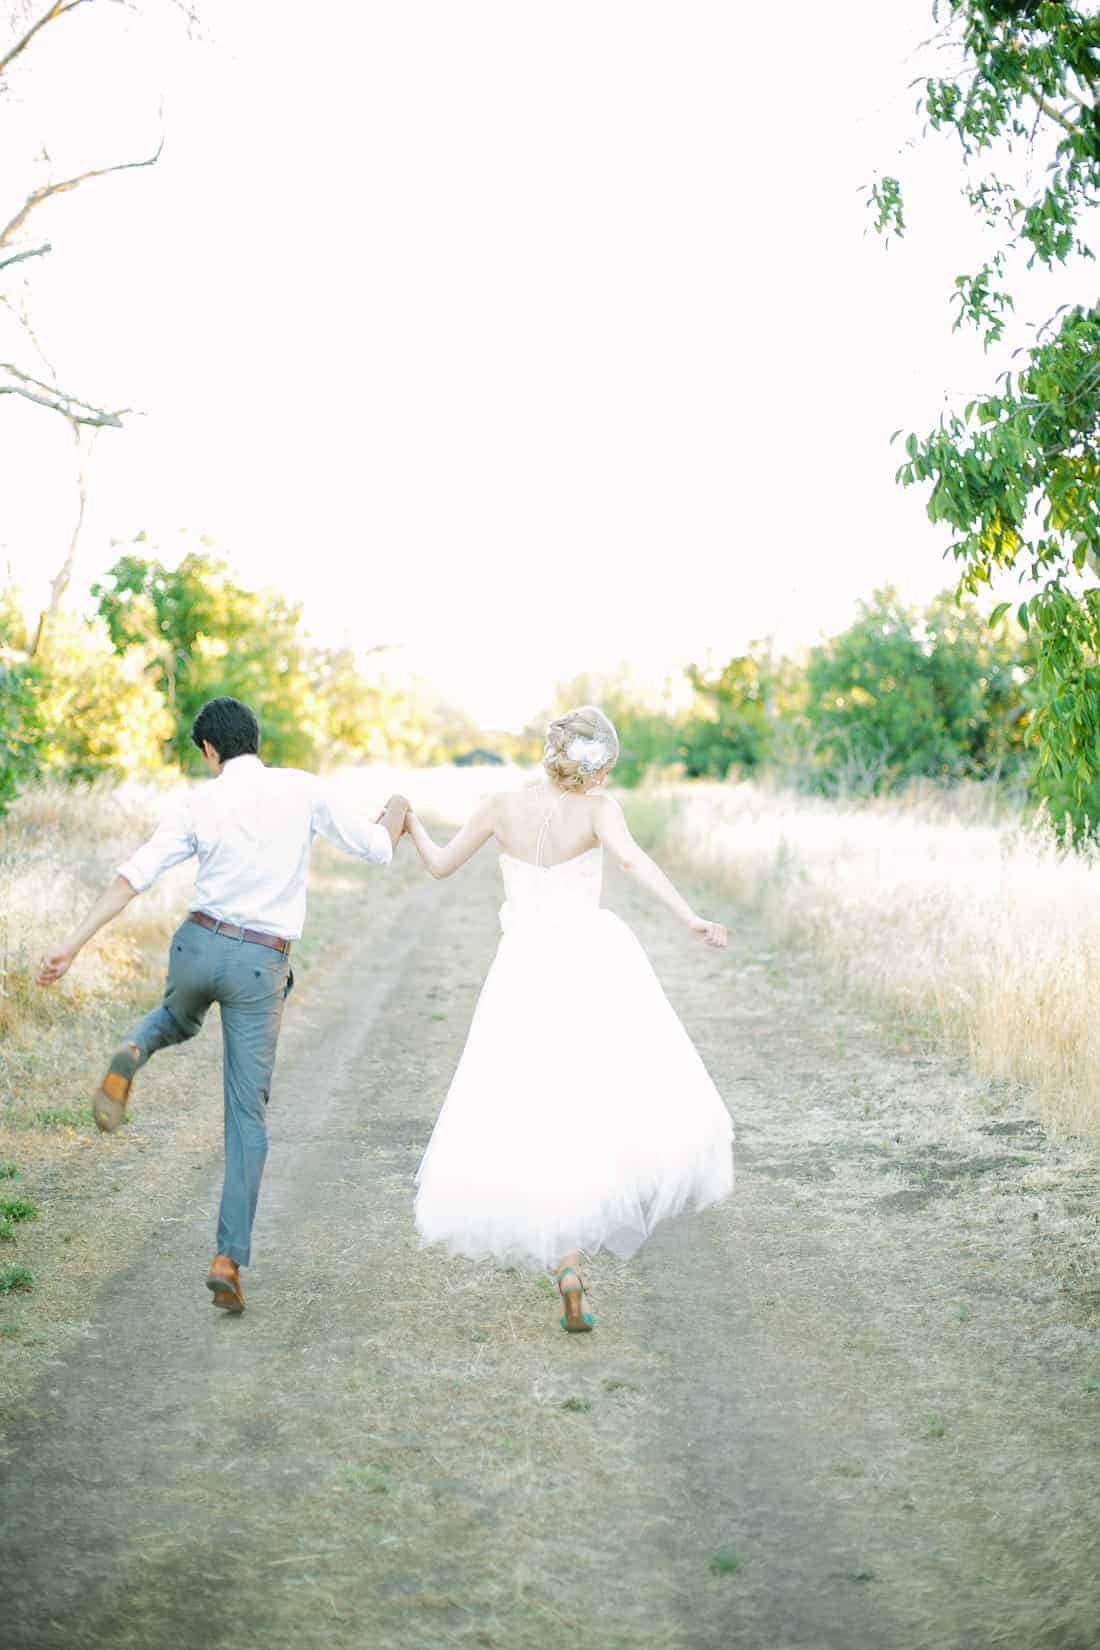
After scarfing down some food, Lucas and I snuck away to take a few happy couple shots in the sunset. Life is good.
Welcome to the reception! I made five of these chalkboard signs using frames I picked up at Goodwill & the clearance section of Michaels. Lucas cut some smooth MDF to fit in the frames that we spray-painted with chalkboard paint. Before drawing, I "seasoned" the chalkboard by covering the entire board in chalk and wiping it off. I printed out scaled down images of my designs, and divided both the image and the chalkboard into sections to make copying them much easier. I drew with a combination of regular chalk that I sharpened with a pencil sharpener, q-tips to wipe things away (like my guidelines with I was done), and chalk ink pen.
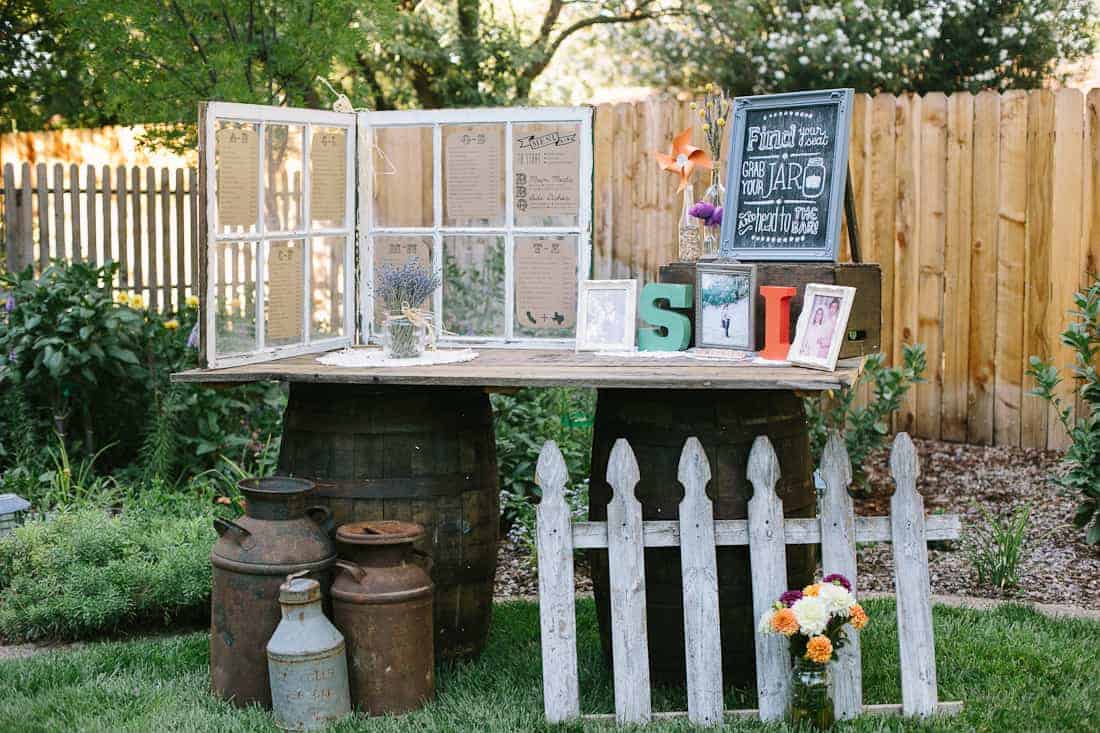
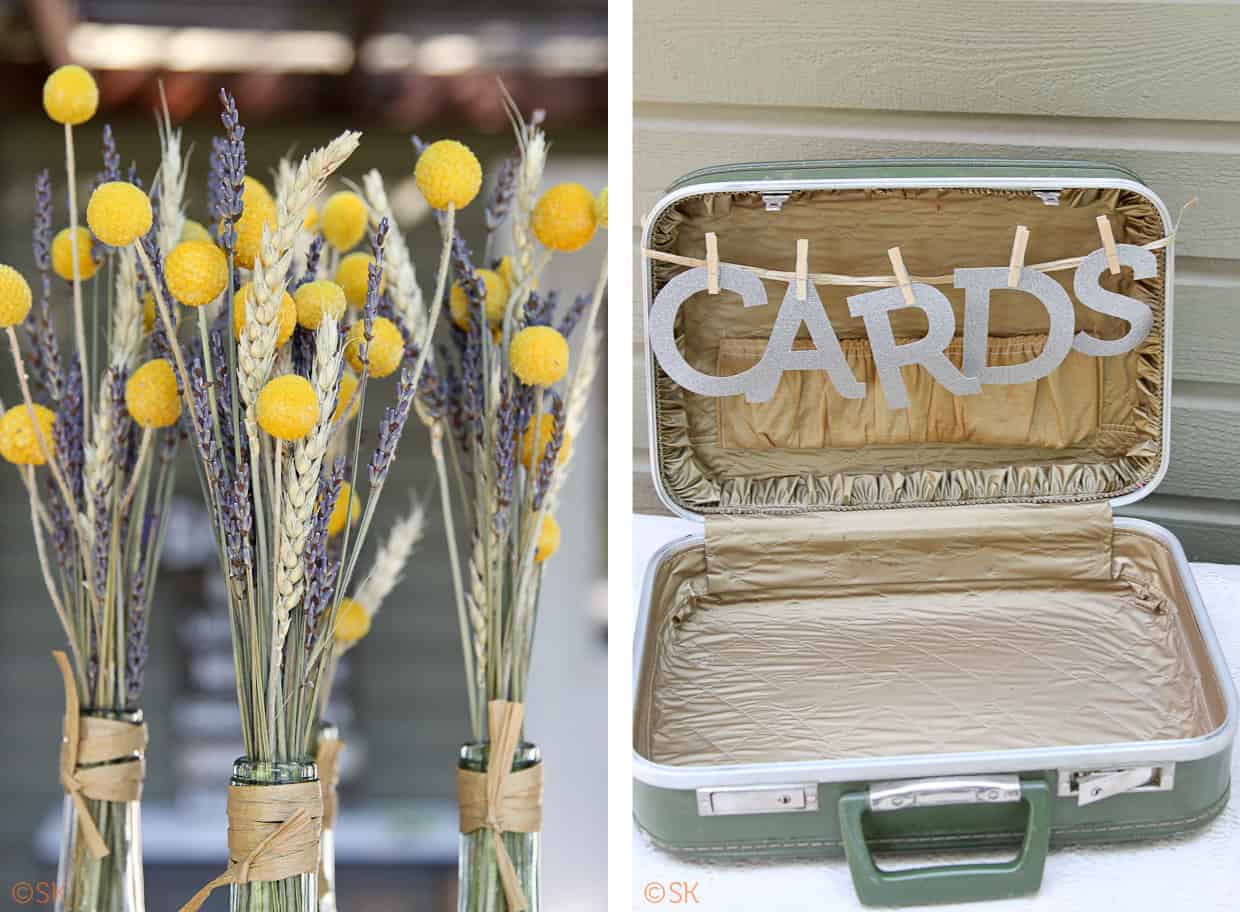
Our entry table is made out of the old fence boards on top of two borrowed wine barrels. We had both of our parents' wedding photos on either side of one of our engagement pics. We used an old hinge to put together two old windows into a stand that we taped our alphabetical seating arrangement to and a copy of our menu. Note: washi tape melts off in 110ºF heat. For some extra decor, a couple of my bridesmaids picked some extra bundles of lavender from our neighbor's yard the day before the wedding.
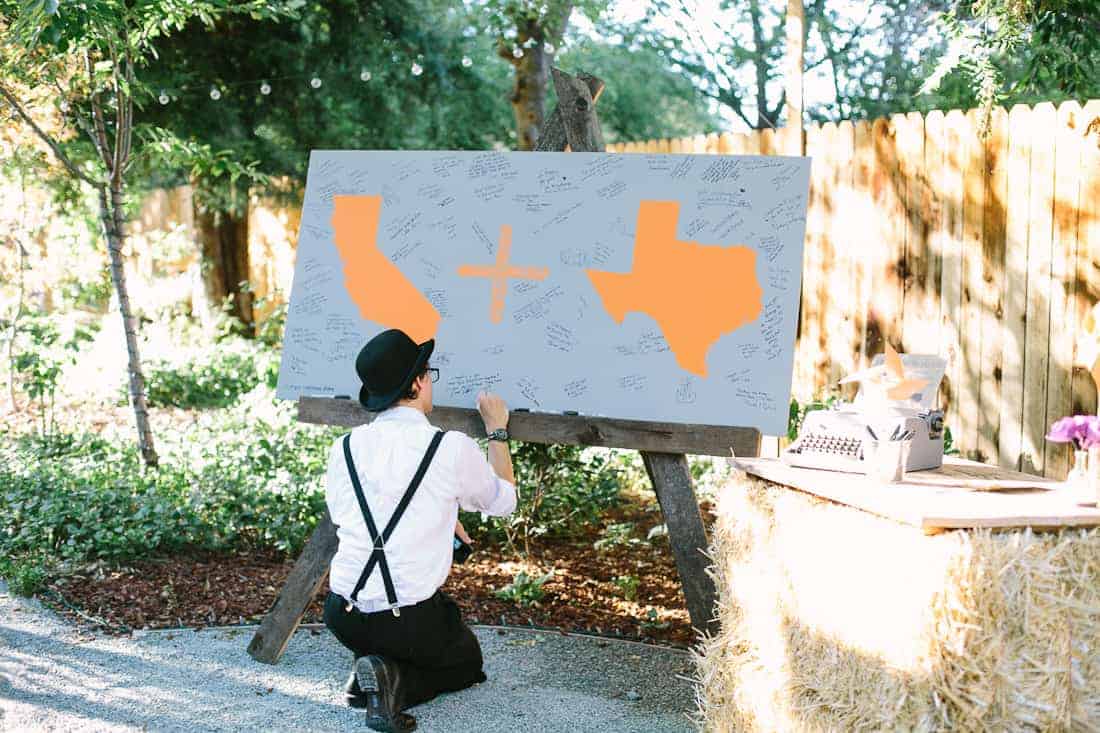
For our guestbook, I painted this CA + TX sign out of an enormous piece of plywood. I started by painting the entire board gray. I then used yarn to divide the board into 6-inch squares; my scaled-down image was also divided into the same number of squares. I pencil-drew the states and then painted over in orange. The vintage typewriter held a note that read, "Please use the sharpies to leave us a message in the gray area of the sign!" After the wedding, we hung the sign on our office wall - room decor and a constant reminder of all the people who showered us with love that day! Someone wrote "HOTTEST WEDDING EVER" unsigned in the bottom left corner. Truth.
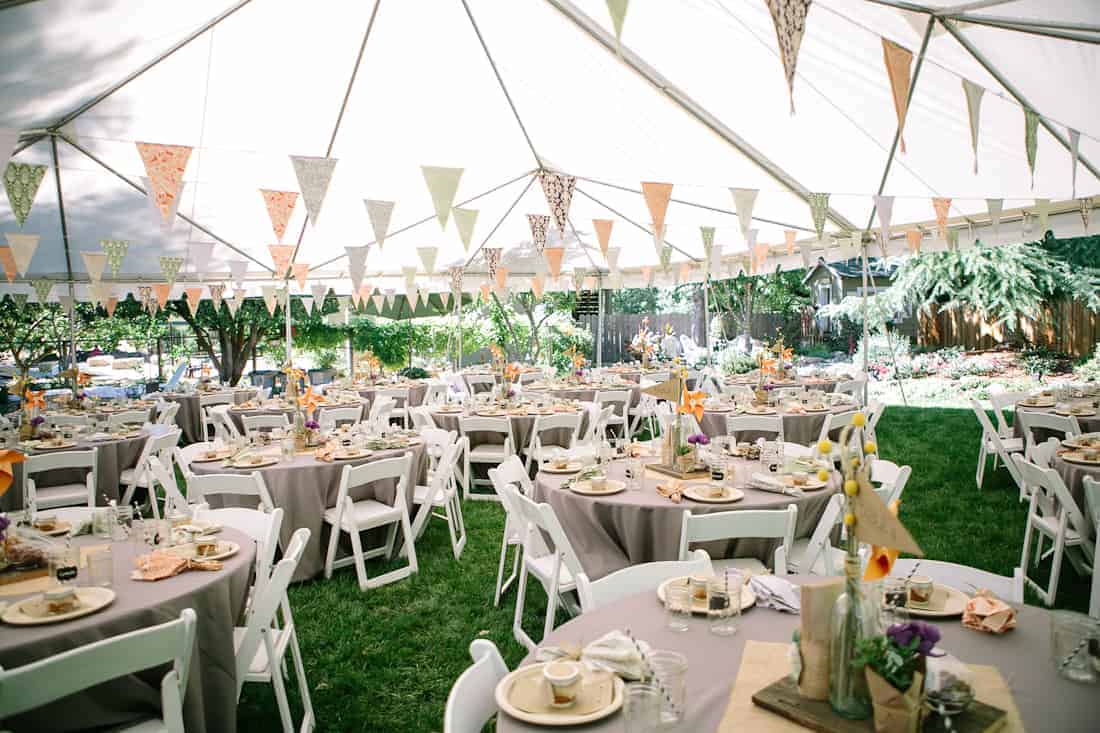
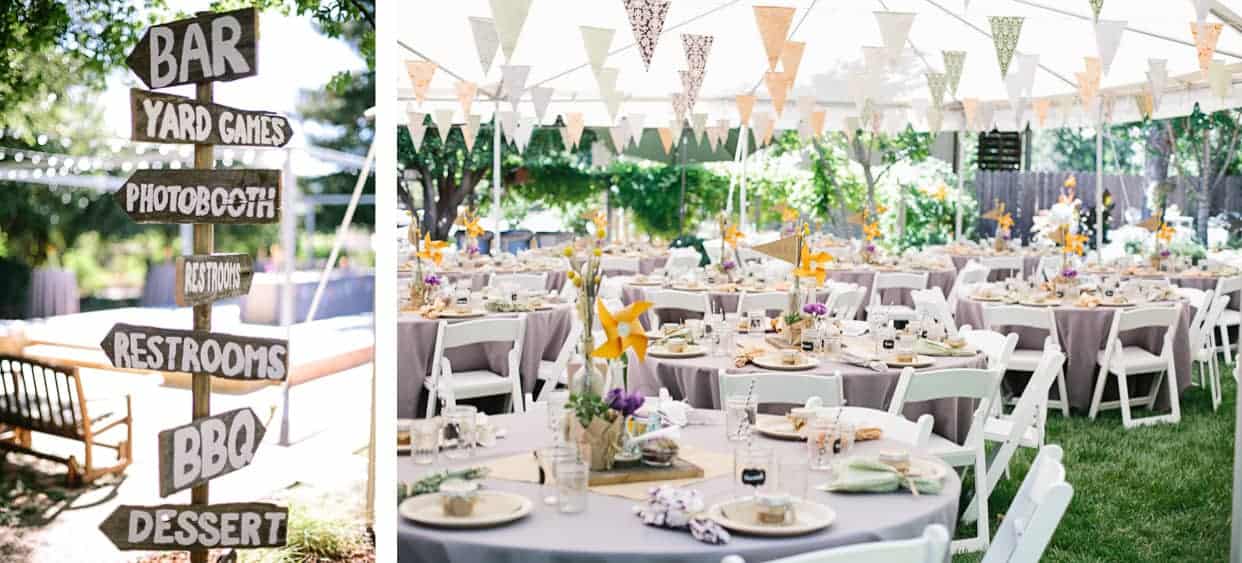
Before telling you about the details of our table settings, I must start by saying that the groomsmen set this all up the morning of the wedding. With the help of a few other key players: Lucas's parents, my brother's girlfriend Alexis, Tyler, and Big Sarah & her close friend Lauren. Impressive right? The week before the wedding, my mom and I divided all of the table decor into separate boxes - one for each table (complete with seating diagrams).
Quite a few months before the wedding, my bridesmaid Corey & I cut 29 yards of fabric (in 8 prints) into 200 napkins and 144 bunting flags. Lucas and I bought a majority of the fabric from JoAnn Fabric on Black Friday at 7am. Thank goodness for Corey's: a) enormous dining room table b) rotary cutter and c) cutting mats. My friend (and former landlady) Cordula spent several weeknights helping me sew the bunting flags into 9 rows along a rope of thick jute twine. We had quite the rhythm going. I kept and washed all of the napkins and plan to turn them into a memory quilt.
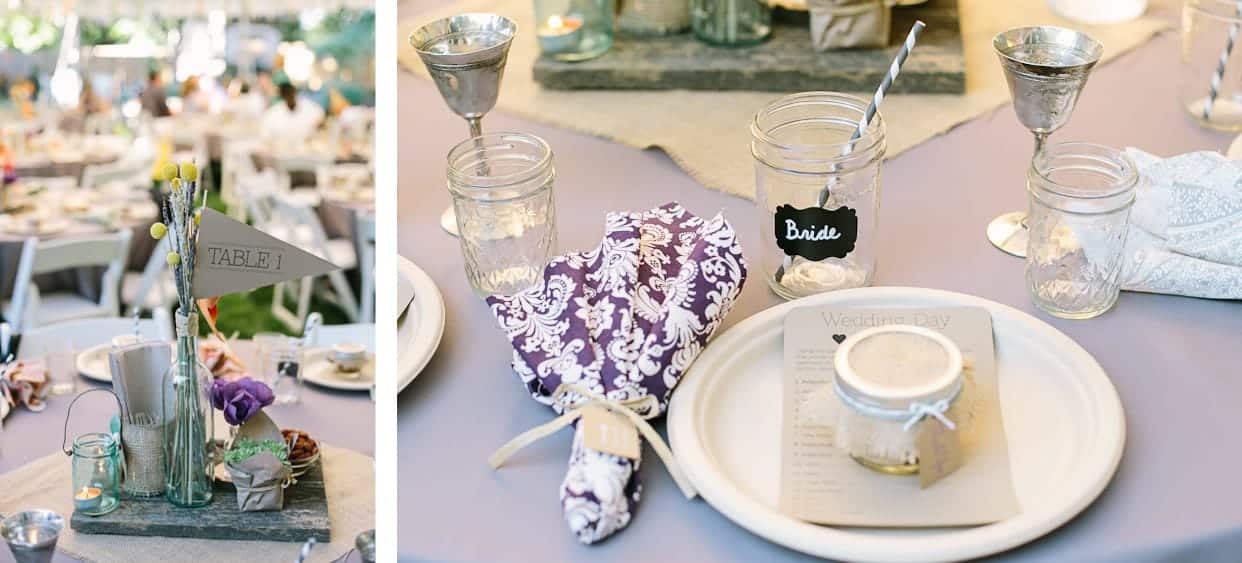
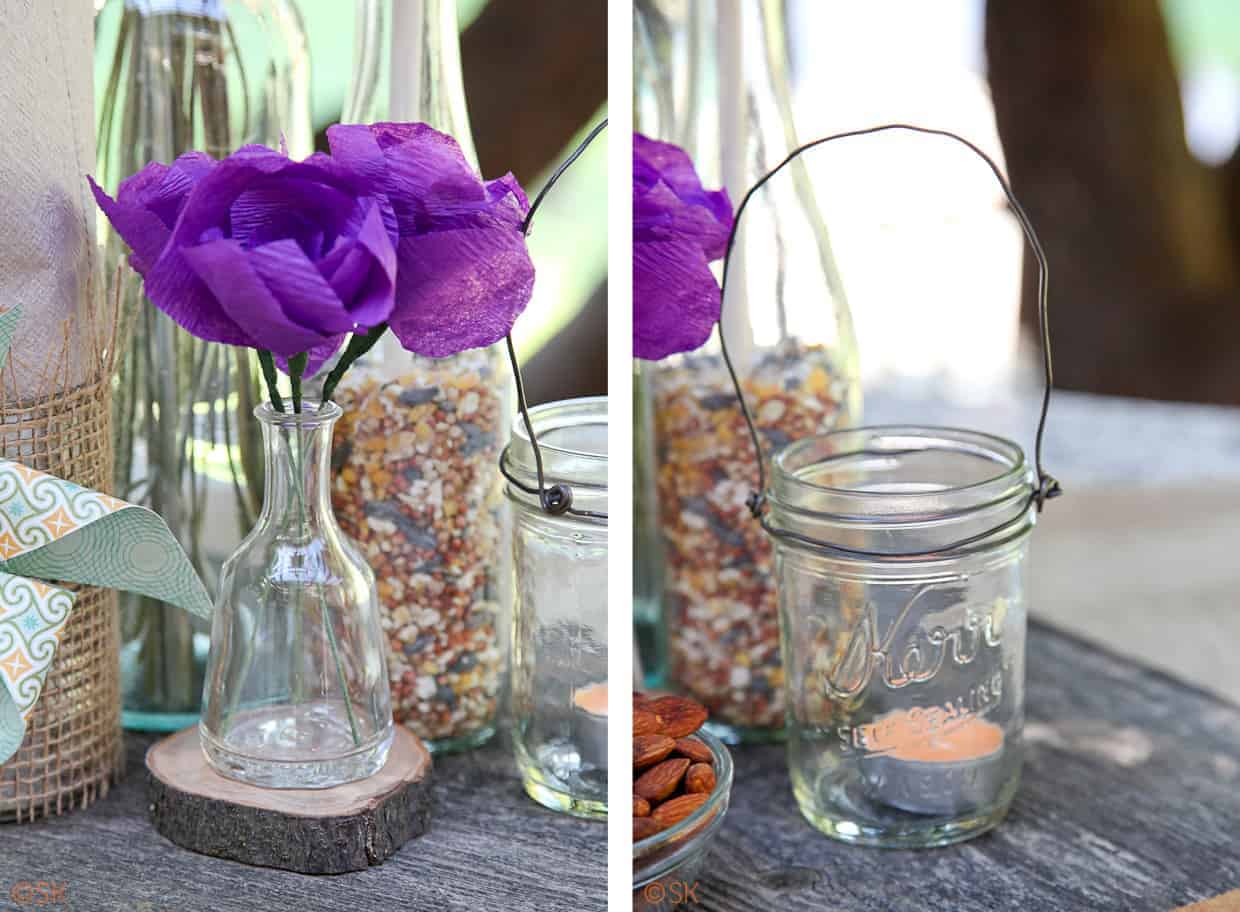
I put together the centerpieces using a hodgepodge of random things:
- Clear wine bottle with raffia around the neck, filled with dried billy balls, lavender, and wheat grass (bought online here and here)
- Clear soda bottle with an orange pinwheel sticking into multi-colored birdseed
- Small glass vase with purple flowers I made using crepe paper from the dollar store, some wire stems, and floral tape...sitting on top of a wooden coaster from a tree that fell down in my parents' front yard
- Small bowl full of my mom's famous tamari almonds
- Mason jar candle holder with a wire handle I twisted onto it
- A small jar with golf pencils (for the madlibs)
- Succulent wrapped in kraft paper (that my mom later planted all together into an arrangement for our porch!)
- Napkin holder made out of a burlap-covered soup can with a small green pinwheel glued to the front.
- All on top of a piece of recycled fence board atop a piece of burlap.
- Repeat 21 times.
Phew! I'm pretty sure that those candles were melted long before they ever got lit. (Ps. I calculated that the centerpieces cost us about $7 each). We rented our table linens online for literally half as much as it would have been from a local shop. A quick pop in the dyer with a wet towel and they were wrinkle-free (Thanks, Mama V, Daniela, and Alexis for taking on de-wrinkle duty!).
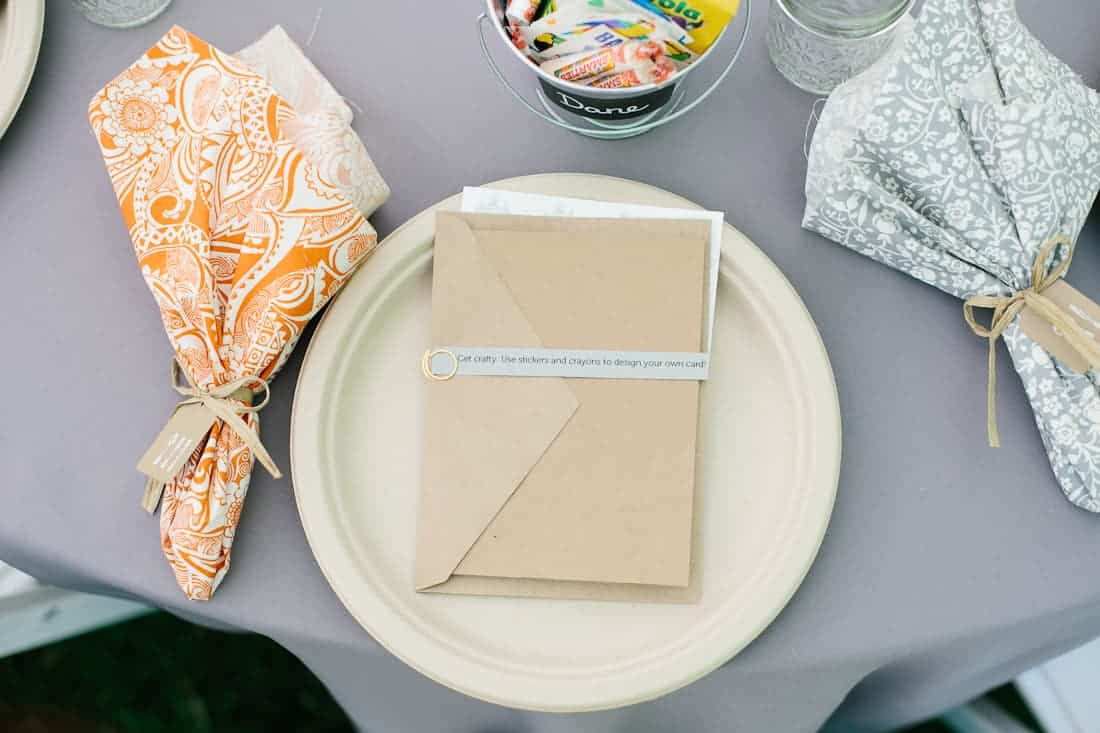
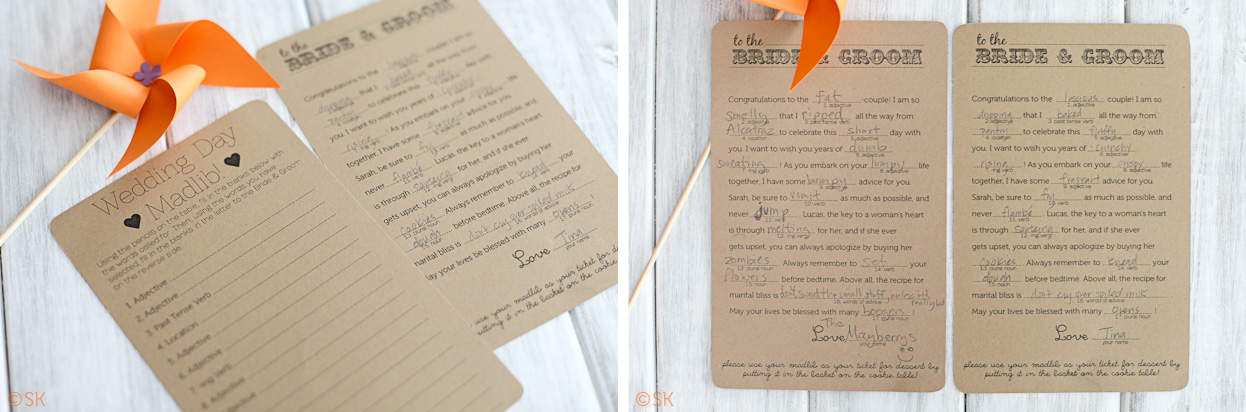
For place cards, my nana and I used a decorative puncher to cut stickers out of chalkboard contact paper that we then stuck onto mason jar cups and I wrote each person's name in chalk ink. After the wedding, my mom tossed them all in the dishwasher and, while the chalk washed away, the labels stayed put! Each setting also had a smaller 8-ounce mason jar cup to use for water. On top of each wheat straw paper plate, we put a custom wedding-themed madlib, which we collected at the end of the night as a fun keepsake. All those mason jars and only one got dropped - at the end of the night as we were all walking to the shuttles (way to go, Bob!).
Instead of the mason jar cup and madlib, the kids got chalkboard labeled metal pails filled with crayons, stickers, and candy, along with a DIY card kit that read "Get crafty. Use stickers and crayons to design your own card!" Much to our surprise, most of these handmade cards wound up in our CARDS suitcase - best wedding cards ever! Flower girl Lola and her sister Layne Grace also completed a madlib in which they told us to "always remember to flip your pineapple before bed." Good advice, folks.
Click to enlarge the below photos to read a couple Madlib samples.
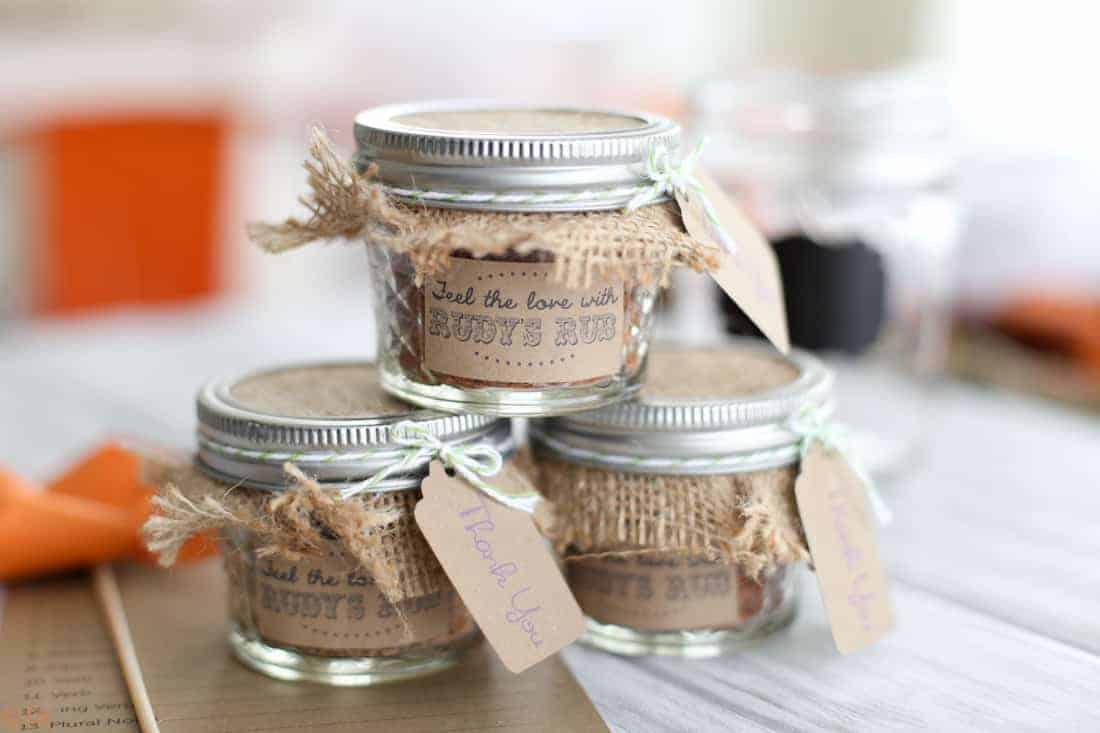
Since our wedding was in California, we wanted to make sure we brought in Lucas's Texan roots as much as possible. We served Texas-style BBQ and as our thank you favors, gave each of our guests a little jar of BBQ spice rub. Rudy's Rub - straight from Texas. We bought it in bulk from the restaurant and, with face masks and rubber gloves, Cas and I divided the 28lbs of spice rub into 200 small jam jars. We'd originally planned to try to make our own BBQ sauce, but the thought of handing out 200 jars of spoiled BBQ sauce to all our favorite people terrified me. As it was, this project took the good portion of a day - I can't imagine if we'd tried to make something too!
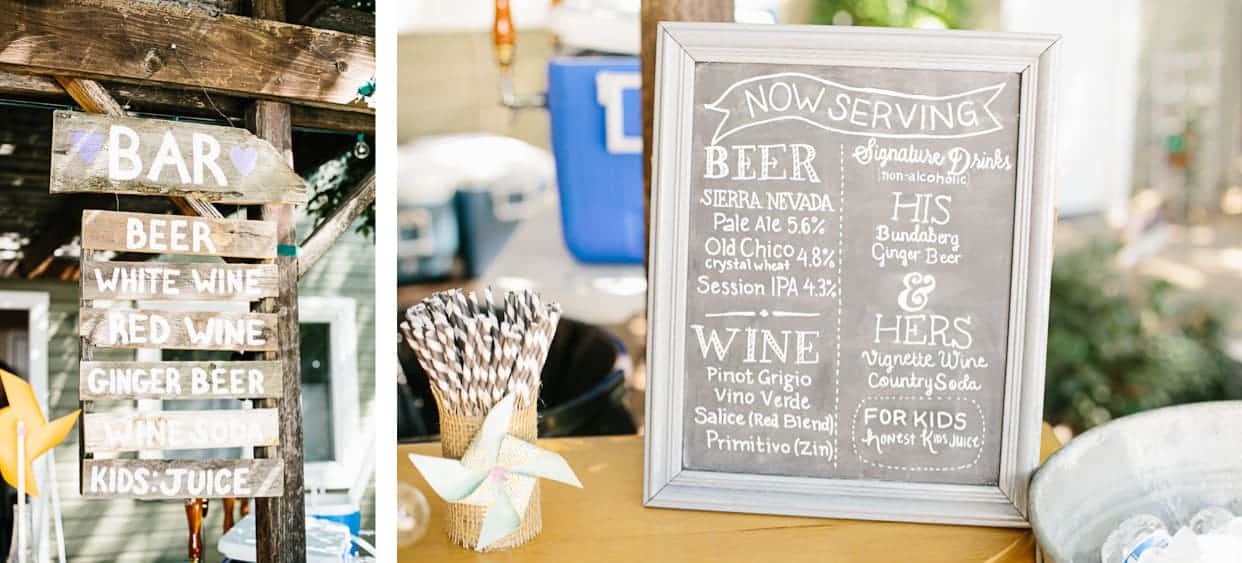
Lucas and I don't drink, but our friends sure do. Lucky for us, my brother works for Sierra Nevada and took charge of the beer selection. Mom was on wine duty. We still wanted to have His & Hers signature drinks, so we stocked up on Lucas's favorite ginger beer and my favorite Vignette Wine Country Soda made by a Berkeley-based company. Surprisingly, no one wanted to sip on red wine in the heat (hint: if you buy your wine from Trader Joe's, they'll take back any unopened, un-chilled bottles after your event).

This straw holder is the same one I made to hold napkins on the tables.
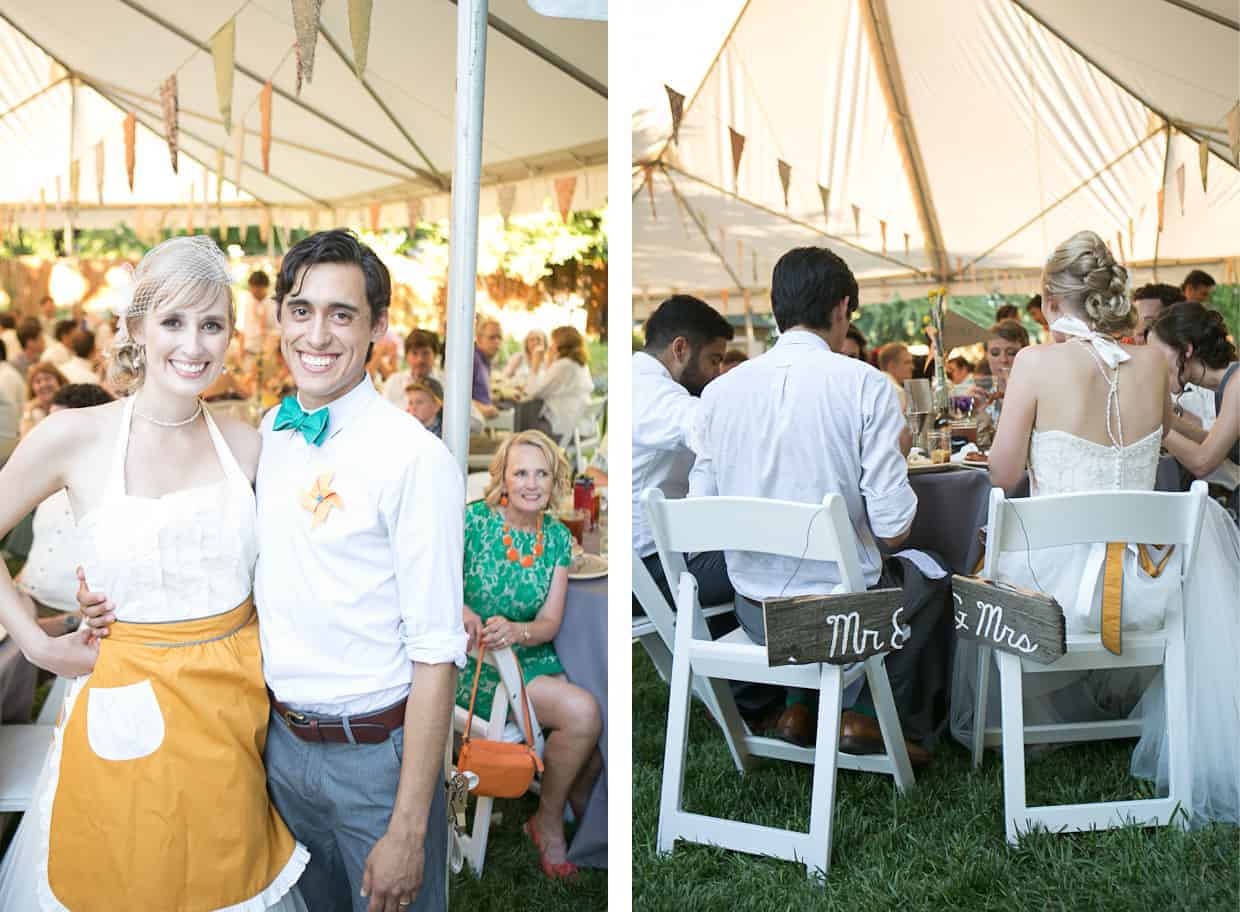
I bought the Anthropologie apron I'd been eyeing for months to wear during dinner. Let's be completely real for a minute, me + white dress + BBQ sauce drenched ribs + baked beans = disaster. And, I'd like to report, I did get BBQ sauce on the apron. Those Mr & Mrs signs you see hanging from our chairs? More upcycled fence boards! I did quite a bit of painting. These are now hanging outside our bedroom door.
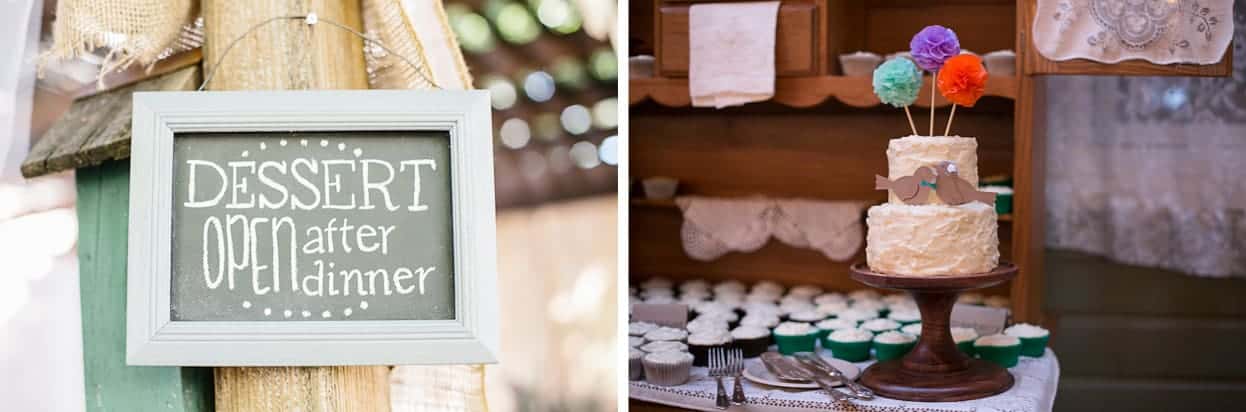
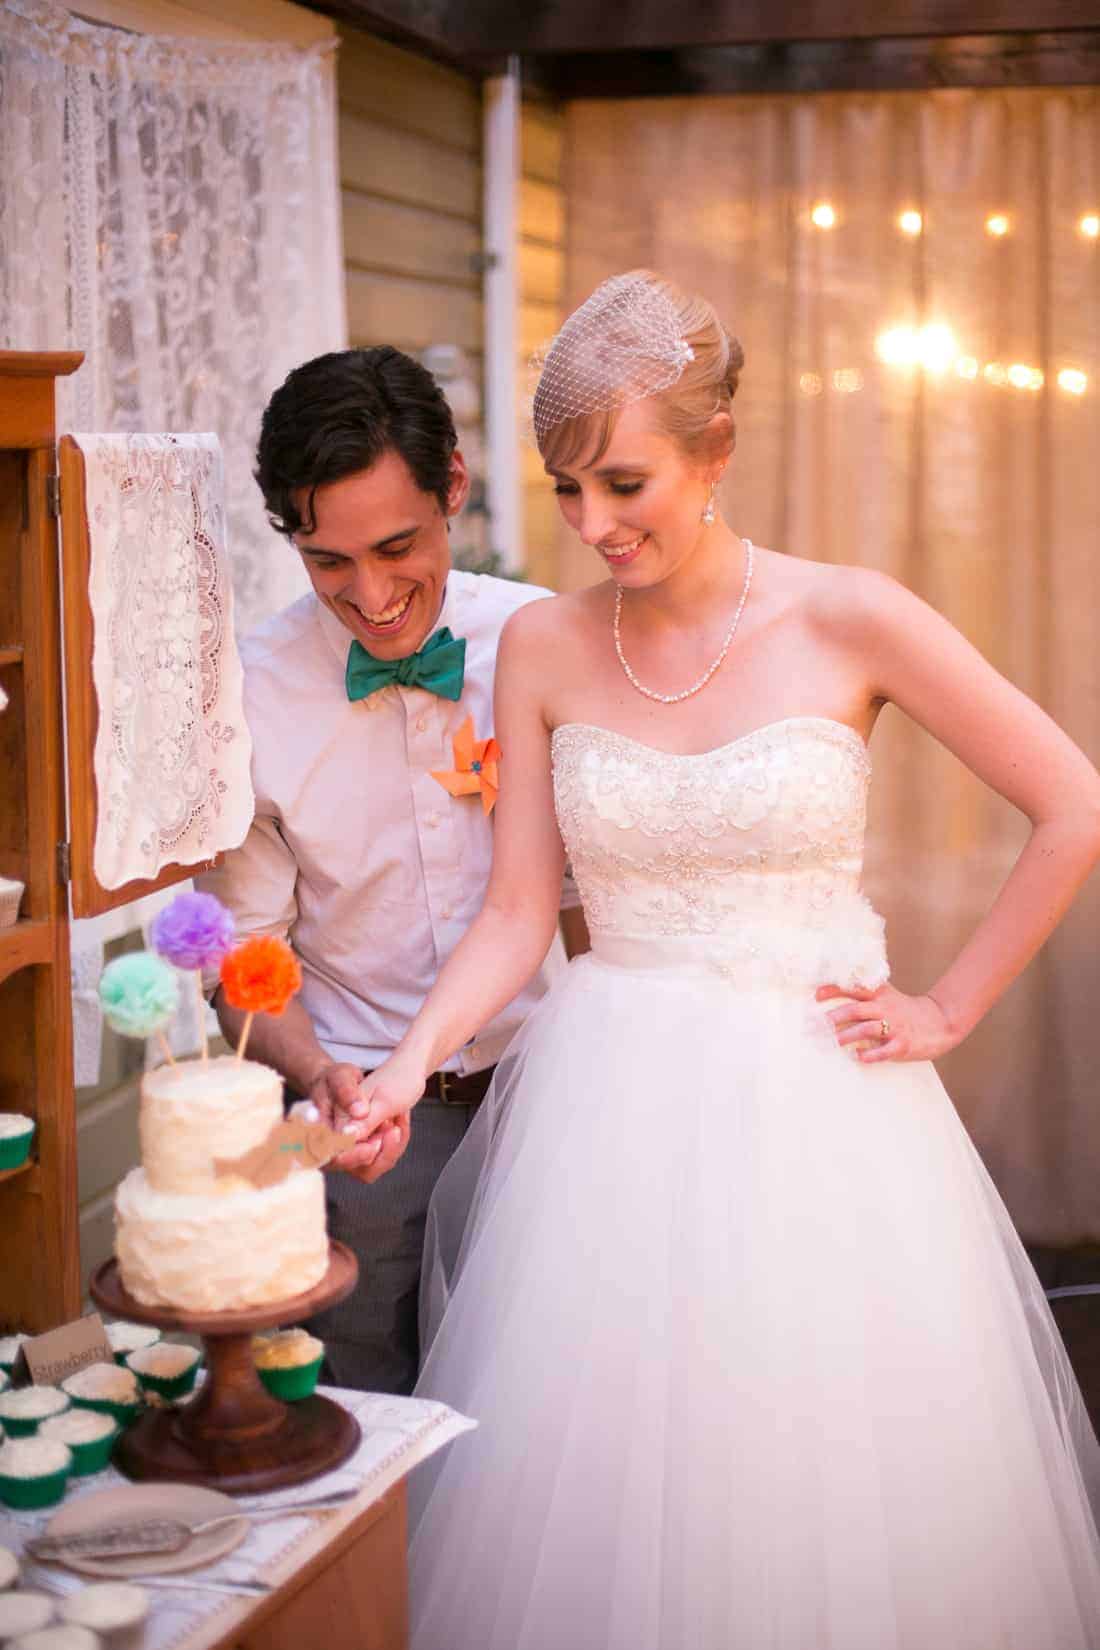
For the past couple of days, I've heard you all groaning, "yes, but what about the food?!" This is supposed to be a food blog. One of my dear high school friends - Melissa - baked all of the cupcakes and a tiny cut cake. Strawberry lemonade (with a gluten-free version using Cup4Cup flour), honey pumpkin, and red velvet. She went to culinary school for baking, so I had complete faith in her, but we used it as an excuse to get together anyway. We spent an entire day baking a few months before the wedding taste-testing the recipes, and even though it'd been a few years since we'd last seen each other, it felt like old times. I had the little bird cake toppers die-cut at a local scrapbook store and my bridesmaid Jenny added the teeny-tiny bow tie and veil. I've been blessed with some pretty talented female friends.
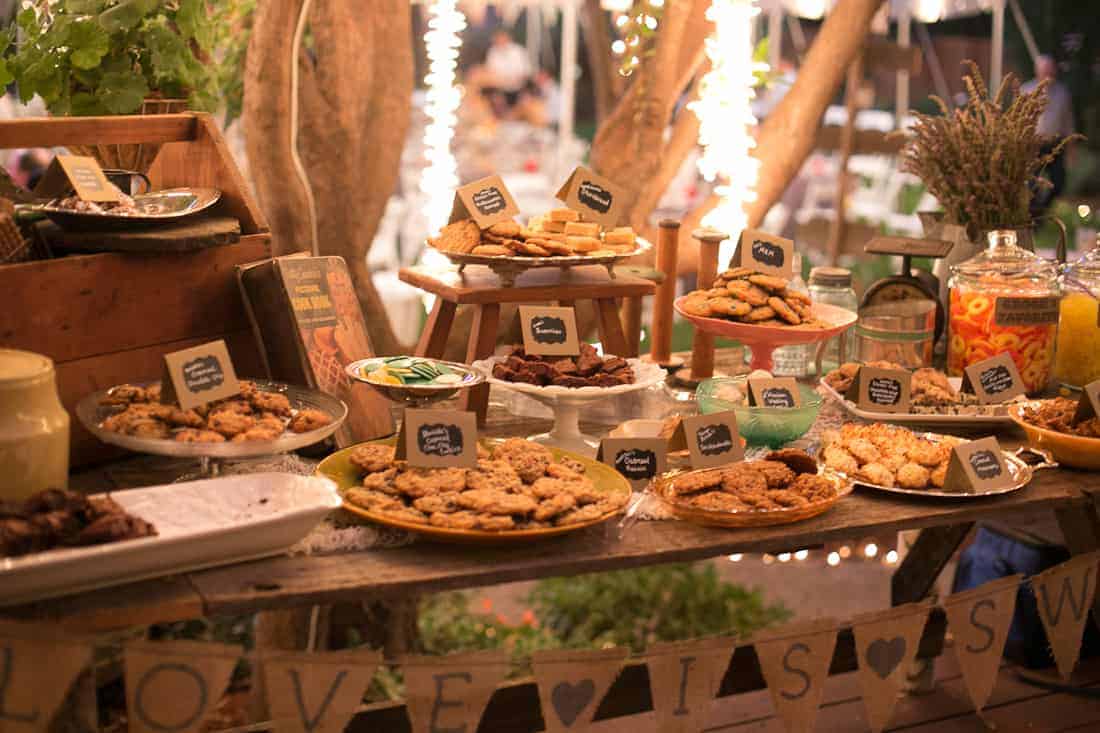
Speaking of incredible women, that cookie table you see is not any ordinary cookie table - it holds the time-tested and well-loved recipes of my aunts, cousins, nana, and family friends. The women in my life can bake a mean cookie. The cookie table was my favorite part because it showcased the family recipes of the women I love - the perfect personal touch. My namesake Sarah arranged the cookie table decor using some vintage platters and pieces from her kitchen and my mom's. Oh, and because I'm a candy-fiend, we had large jars filled with the Bride's Favorite - lemon drops - and the Groom's Favorite - peach rings.
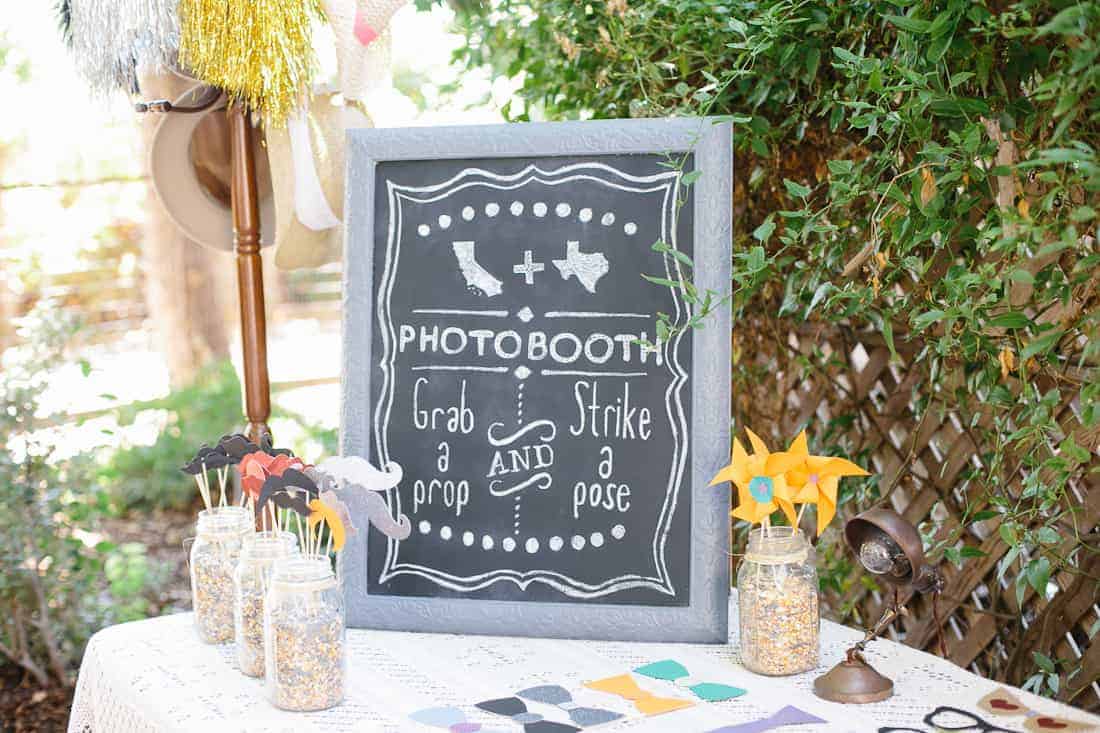
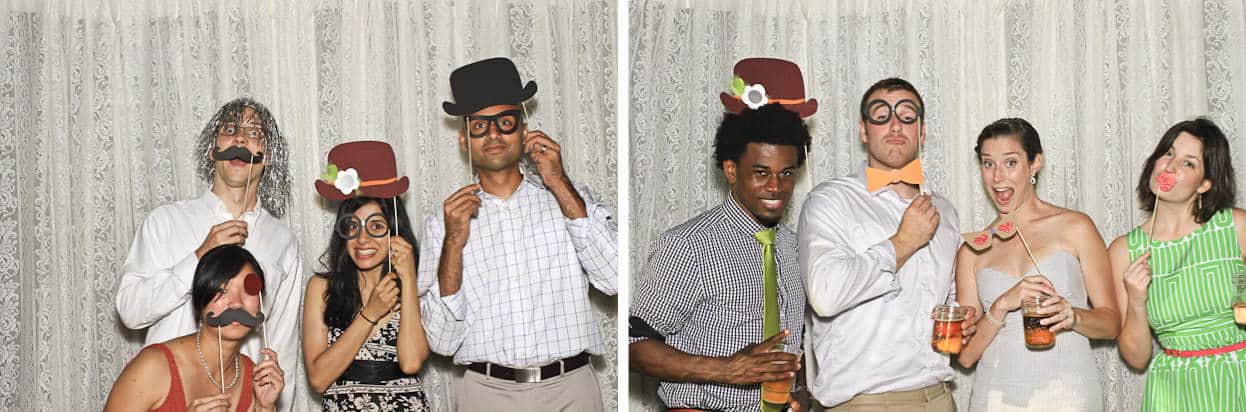
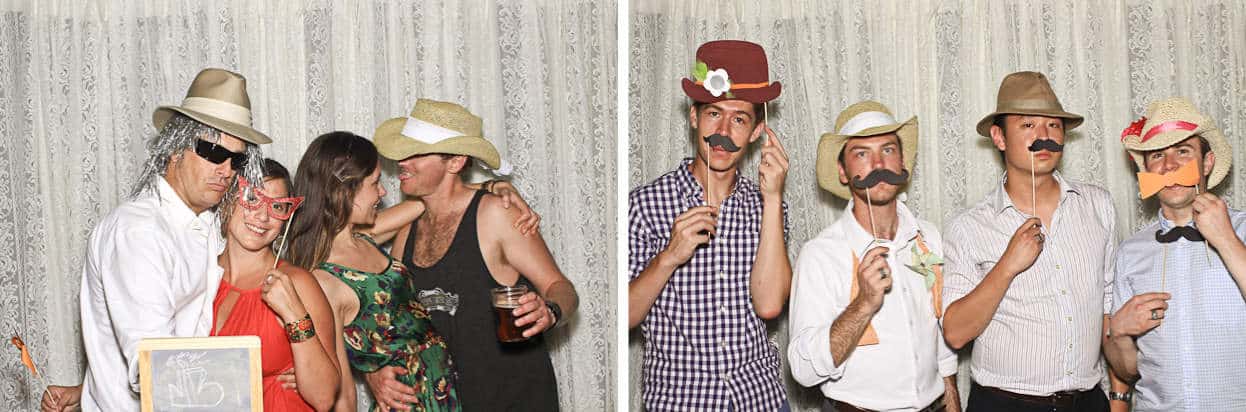
With the help of my new sister-in-law Daniela, we made all of the cut-out props for the photobooth out of card stock, an exacto knife, and some skewers. A few of the mustaches were die-cut at the scrapbook store. In addition to all the cut-out props, we set up a coat-rack filled with hats and a few chalkboards that we glued to paint stirrers to make signs.
That creepy-looking dude in the tank top in the bottom left? That's my brother. Earlier in the evening he was wearing a dress shirt and bow tie, but it transformed into this black tank top within 5 minutes of delivering his toast. Keepin' things classy.
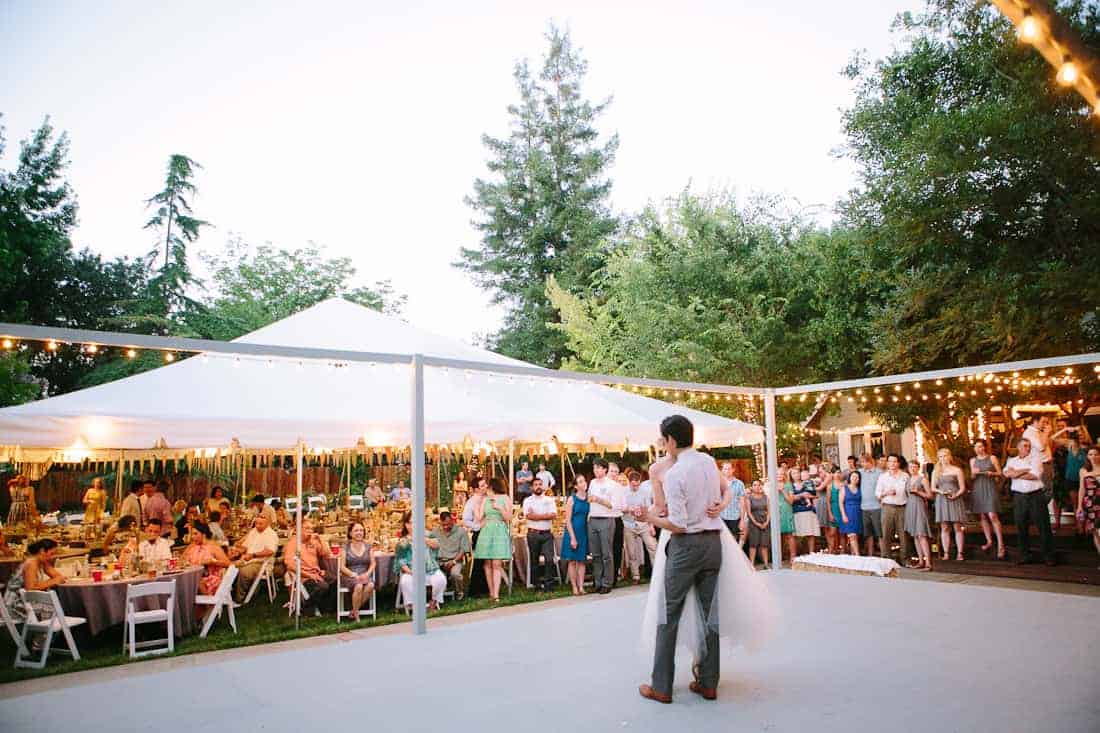
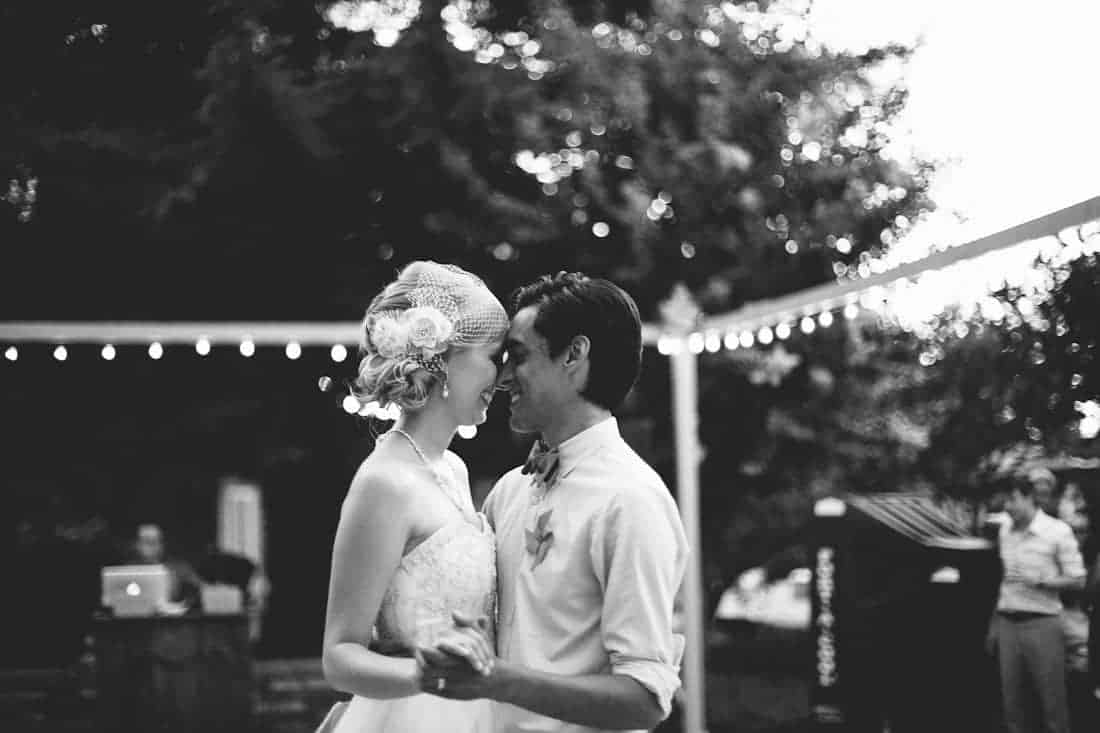
Right after cutting the cake (delicately and with no cake to the face), we twirled out to the dance floor for our first dance as husband and wife - Gotta Have You by The Weepies. For the father-daughter and mother-son dances, our respective parents chose the songs and they were kept a surprise: Father & Daughter by Paul Simon & My Wish by Rascal Flatts. One minute and 30 seconds into each of the parent dances, we invited all of the fathers & daughters, and mothers & sons to join the dance floor. Three new moms danced with their infant sons - picture perfect.
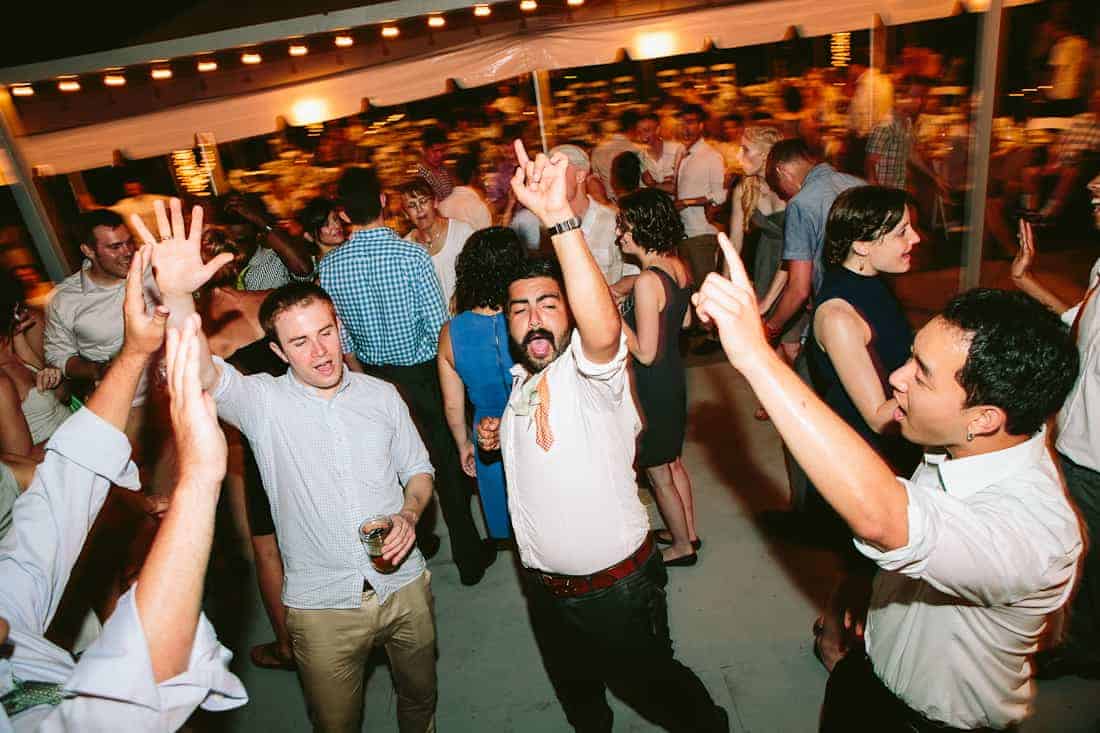
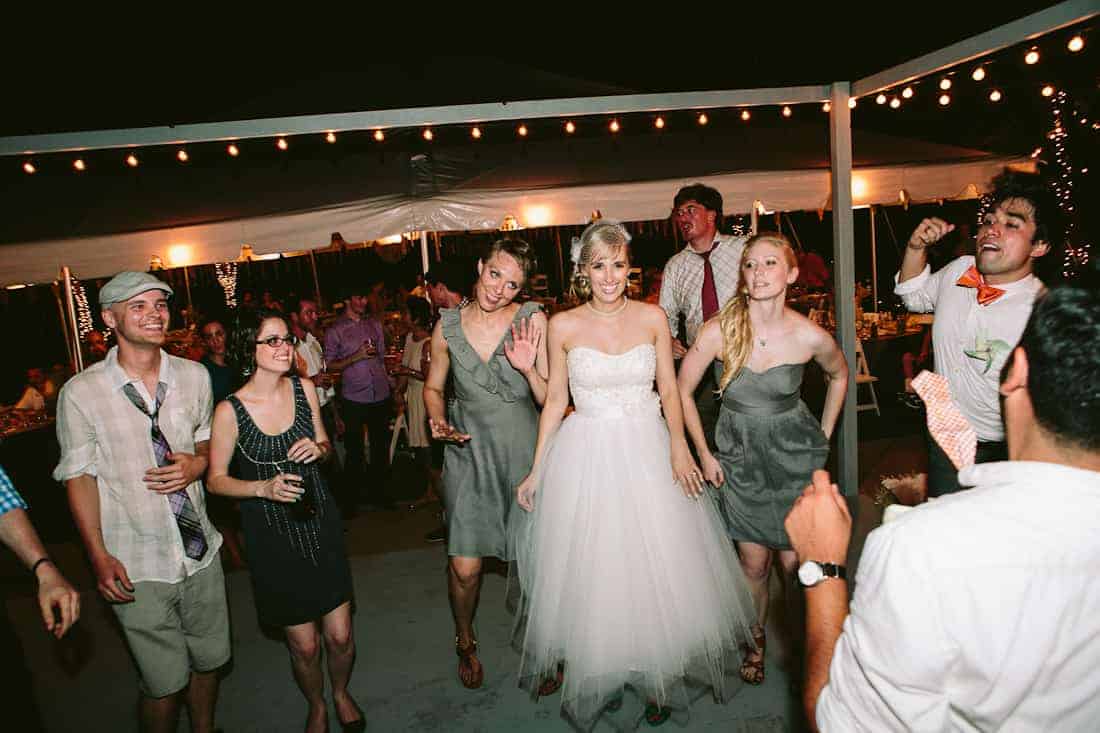
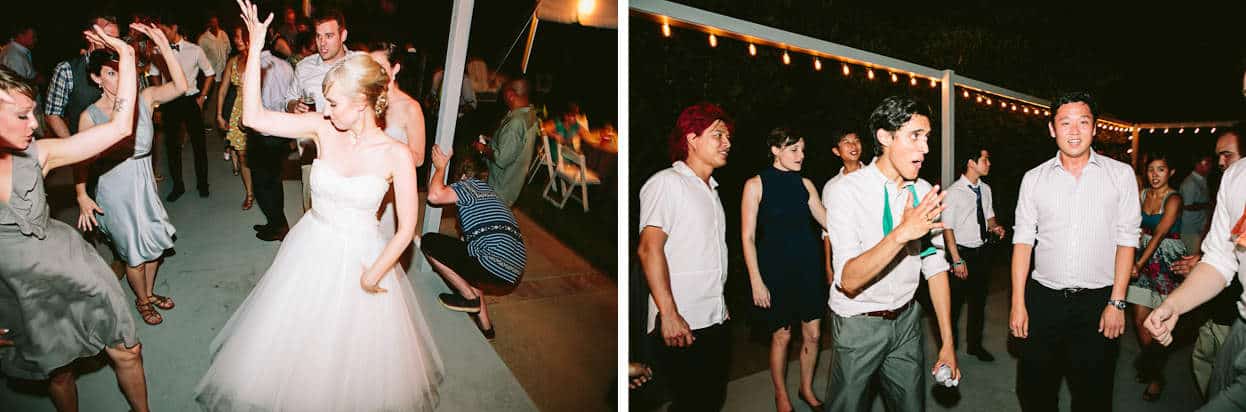
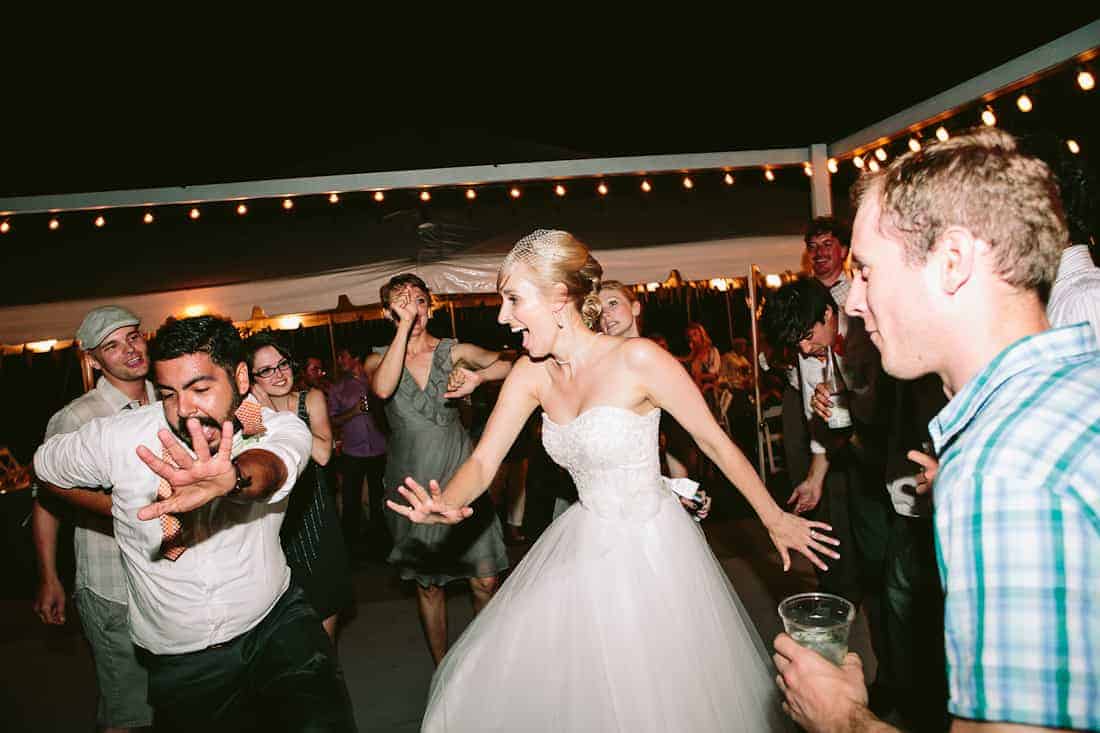
Now we get to the good stuff. The real party. You can finally tell from the sweat dripping off people's faces how extremely hot it was...even after the sun went down. Ten's red hair dye even dripped off, staining his white dress shirt pink. And yet, everyone threw on their dancing shoes and kept the party going all the way 'til 11:30pm - bring on the heat! At Lana's command, our friends tried really hard to put that dance floor into the pool (maybe they just really wanted all that water?). In case you forgot, that dance floor was built over my parents' pool (click to see pictures of the process). When my dad announced his idea to construct a dance floor over the pool, I laughed at him. When he kept a straight face, I figured - what the heck! At least if it did go crashing down into the pool, we'd make the local news!
Since we're both music freaks, we decided that if we hired a DJ, we'd just end up telling the DJ exactly what to play. Instead, we opted to forgo the DJ and plan it all ahead of time. That way we knew we'd hear exactly what we wanted. We made our own playlists and Lucas's cousin Bobby flew all the way from Texas to MC for us (and, of course, the control freak in me created a spreadsheet of all the announcements we knew we'd want). He was fantastic - even getting on the dance floor during the Cupid Shuffle to show everyone what to do. Of all the decisions we made for the wedding, making our own iTunes playlist was one of the best (you know, right up there with deciding to get married in the first place).
Here's the gist of how we DJed our own wedding - our ultimate DIY. We had three main playlists on iTunes: cocktail hour, dinner, and dance. Plus a playlist for the ceremony songs and all of the important moments (first dance, etc.). We spent months on our dance playlist - grouping songs that would go well together, keeping in mind the flow of the night (ex. oldies earlier on, sets of two slow songs followed by a fast up-beat song to get everyone back on the dance floor, and, at a certain point, all fast up-tempo dance songs the rest of the night). Lucas then edited every single song to somewhere between 2 and 4 minutes, making all of the transitions between songs smooth so we could set iTunes to play with a 2 second crossfade. You can read more details and view a PDF version of our playlists here.
Right after we got hitched, I gave you quick anecdote of how our favorite day ever ended with nothing short of magic. Since this is the story of how a craft-obsessed California girl married a design-savvy woodworking Texas boy, I'll tell you again because every good story needs an end. The backyard dance party ended at 11:30pm with We Are Young blasting and every single guest still at the party joining arms in a gigantic 50+ person (sweaty) circle around me and my new husband. Some shirtless, some shoeless, and all dancing, stomping, and screaming along at the top of their lungs. And in the last 20 seconds, everyone stormed the center into a gigantic mob of hugs and love. It was magical. The stuff of movies. You couldn't recreate it if you tried.
Thanks for (virtually) coming to our wedding! The story of how I married the love of my life. To keep you from having to scroll up, here's the link to part 1 (first look and ceremony details).
In the ultimate of budget-wedding moves, we sold more than half of the decor to other brides. Check out my recipe for a flourless salted almond chocolate cookie inspired by the deep dark chocolate cookies Big Sarah baked for the cookie table.
Photography: Brent Van Auken Photography | Cake: Melissa Haskins | Invitations: Printed by GreenerPrinter (designed by bride & groom) | Catering: Steelhead B.B.Q. Co. | Day-of coordination: Chico Event Specialists | Bride's Dress: Casablanca | Hair & Makeup: Lindsey Lifur @ Mecca Salon | Venue: Private residence in Chico, CA. | Music: Bride & Groom

Kayla -
Hello!
I am just starting to plan my wedding and stumbled upon your photos. So gorgeous!!! I am interested (and trying to convince my fiancé) that compostable plates are the way to go for a BBQ reception. He wasn't convinced until I showed him the set-up that you had. Did you leave the plates on the table then have the guests bring them to the buffet when ready to eat? When guests were done eating did you have someone take their plates or did they throw it away when done? Also, what did you do for silverware?
Thank you!!!
Sarah Menanix -
Hi Kayla! Congrats on your wedding! Thank you so much! We did leave the plates on the table and then when the MC called tables to the buffet, he just reminded folks to bring them with them. I didn't like the look of completely empty tables so that's why I did it that way! I also had a few extra plates on the buffet in case folks forgot. We also placed our favors on top of the plates so they wouldn't blow away in the case of wind. We had a large compost can and a large trash can on each end of the tent that were labeled and covered with burlap so they wouldn't be so ugly. Many folks threw their own plates away, but our caterer also had two folks that came around and cleared trash off the tables after dinner was over. For flatware, I also did compostable flatware which we wrapped up with a wet wipe in homemade fabric napkins that were set out on the table. Hope this helps!
Donna -
Hello, I have a question regarding your BBQ favors? where do you purchase your labels from:? I am doing the same type of favors. I really love your BBQ wedding.
thanks
Sarah Menanix -
Hi Donna, I made the labels myself and just purchased kraft paper labels from amazon (something like this)!
Kristen -
Hi, I am doing a similar wedding on September 2nd this year, and wanted to ask you about your plates. With BBQ I want something practical so our guests can fit a lot on their plates, and enjoy the food. Did you consider going with fancier plates, or did your guests have anything to say about your choice of plates?
Thank you!!
Kristen
Sarah Menanix -
I actually always knew I wanted a casual backyard BBQ feel so I think the compostable plates worked great for that. They matched the decor (we had a lot of kraft paper and burlap) and no one even said a word about them not being fancy enough! Congrats on your wedding!
Kristen -
Thanks Sarah!! Were the 10in plates big enough to hold all of the things that go along with a delicious BBQ?? We are having ribs, pulled pork, chicken, baked beans, cheesy corn, broccli salad..think these plates are sturdy enough??
Thanks again any help I can get is greatly appreciated!!
-Kristen
Sarah Menanix -
They were plenty big enough - we actually asked our caterer what plate size he recommended and the 10" is what he said he provides normally so we got those and they were definitely sturdy enough, though if I remember correctly, we doubled them up because they were sold in such a big quantity anyway - so folks got two layers just in case!
Kim -
HI, I would love to see more of your wedding program! Love this idea!
Nells -
This is Amazing!!! You DIY so much. Im curious as to how much you ended up spending in total. what was your budget and for how many people? It seems like you would have had a lot of savings!
Sarah Menanix -
Thank you! I can't remember exactly how much we spent, but I think it ended up being around $23K for 176 people - that included everything (my dress/hair/make-up, renting toilets & a tent, bridal party gifts, etc.). Our goal was to stay under $25K (gosh, that sounds like an insane amount of money!). We then sold much of what we made afterward and made about $2K back. I was super thrifty on everything I bought and made, but weddings sure do add up quickly! Our biggest budget items were the photographer, photobooth, and food/alcohol (and even still we got a deal on the alcohol because my brother works for a brewery!).
Rachel -
What about the lighting? I'm especially curious about the vertical hanging lighting in the trees?? Did you do that your self?
Sarah Menanix -
Yes! My husband hung all the lights himself (oh boy was that a project!). For the bulb lights, we got them at Target and strung them up with fishing line for extra support. The vertical clumps you see behind the dessert table are just white xmas lights that he sort of folded and twisted back on themselves a few times! And lots and lots of extension cords - so many extension cords;)
laurasmess -
This is AMAZING. You're so beautifully creative, I love how both your and Lucas' personalities (and craft/woodworking skills!) were evident in each aspect of your wedding! Super impressed and so glad that you both had the most memorable of wedding days! xx
Sarah Menanix -
Thank you so much Laura! It now seems like so long ago, but it was so much fun spending the few months leading up to it doing wedding crafts! xo,
Jill -
I love your shoes! Where did you get them?
Sarah Menanix -
They're from Zappos and they're Miz Mooz brand - I haven't been able to find them lately, but they have lots of other similarly cute shoes!
ashley st pierre -
can I ask what you did for serving alcohol? I see you the mason jars on the table but did you still rent a bartender? this is the part I'm having a hard time with my wedding whether or not it can be self served.
Sarah Menanix -
Hi Ashley! We put two sets of mason jars on the table - one large with a chalkboard label and one small that was meant for water. At the entrance, we had a sign that said "find your seat, grab your jar, and head to the bar" to suggest to people that we wanted them to use their mason jars as their primary drink cup. Next to the tea/lemonade we also had some compostable plastic cups (that ended up melting in the 110 degree heat!) and the bar also had compostable plastic cups in case people wanted more than one drink (i.e. they could put tea in their mason jar and still get a beer in the plastic cup).
For the open bar, we did just beer, wine, and sodas, and bought all of our own alcohol (my brother works for Sierra Nevada and we got our wine at Trader Joes - which I highly suggest because they'll take back any unopened bottles after your event). We set up the three kegs and about 8 ice chests behind the bar and had a college-aged family friend and his good friend bartend (and we set out a tip jar for them). This worked out great since we were just serving beer and wine (we didn't need someone to mix drinks or anything). I think it was really nice for people to have someone serving them - plus then they didn't have to see the "behind the scenes" of the keg and mismatched ice chests.
We did, however, have a decorative bucket that we filled with mini water bottles that were self-serve. Also, at the ceremony, we had an old wheelbarrow that we filled with ice and waters (and I think some bottles of beer...I didn't actually see it the day of because I was so busy:).
Hope this helps!
Dawn -
Ohmygoodness! I love everything that you did for your wedding and reception. Your wedding seems to have been a huge success and everything was PERFECT. I'm like one of the other readers -- I wish I was one of your friends -- looked like a blast! My daughter is getting married this fall and we will be getting some inspiration from your DIY wedding! You're beautiful, Lucas is beautiful, your wedding and all your words are too!
Okay now I need to pick your brain :) What type of fabric did you buy for your DIY cloth napkins? Did you sew them? Or do anything to them special? What size did you cut them? I'm considering buying them but after seeing the beautiful colors of yours, I'm so tempted but I'm not the best one to operate a sewing machine.
Thanks for sharing :)
Sarah Menanix -
Oh my goodness, Dawn - you're too sweet! We just bought cotton fabric at JoAnns. All of the ones I bought were from the Keepsake Calicos and Quilter's Showcase collections. They usually have really great sales/coupons if you watch for them - I bought about 75% of my fabric on Black Friday for $1.99/yard.
AND you'll be happy to know that I just cut them - no sewing needed. I pre-washed the fabric, then used a cutting mat and a rotary cutter to cut squares approximately 18x18-inches. After the wedding, we washed all the napkins and the edges frayed just a tiny bit and I actually really liked the look. So you could either just cut and use them as is, or else wash the cut napkins to get a bit of a frayed edge.
Christina{Colorful wedding cards samples} -
Such a romantic wedding. Both of you are looking great together. Even your wedding details, favors and accessories is also giving a very gorgeous and graceful look. God bless you! Love xx
Catering Santa Rosa -
This was such a cute, sweet post! I love how you wore an apron before eating your BBQ. So cute!
Sarah Menanix -
Aw- thank you! The apron was a must - I'm the messiest person you've EVER met. And put me in white?! Dangerous.
Veronica -
I love your love story! It was a beautiful ceremony! The music was wonderful, venue was amazing, food was delicious, beverages were ice cold and that dance floor we never stopped dancing! We are so happy for you both!
Sheri -
The two Mama's and Papa's were happy as can be to be part of this wonderful day!! The photo's and stories remind us all of what this day was really all about!! And it was perfect!
Chris @ Shared Appetite -
I'm speechless. I can't even begin to understand how much work you put into this wedding. SO many amazing details! It really looks like your beautiful, perfect day!
Tina -
My MadLib advice is pretty spot on, I think ;)