

These soft cut-out gluten-free sugar cookies are decorated with super-easy icing and festive sprinkles. Made with almond flour, they taste like a classic tender sugar cookie and hold their shape when baked. The perfect gluten-free holiday cookie to leave out for Santa!

With an easy almond flour dough that holds its shape when baked, this gluten-free sugar cookie recipe is the only one you need all year long. Almond flour gives them the classic nostalgic sugar cookie flavor, while keeping them perfectly tender so they melt in your mouth!
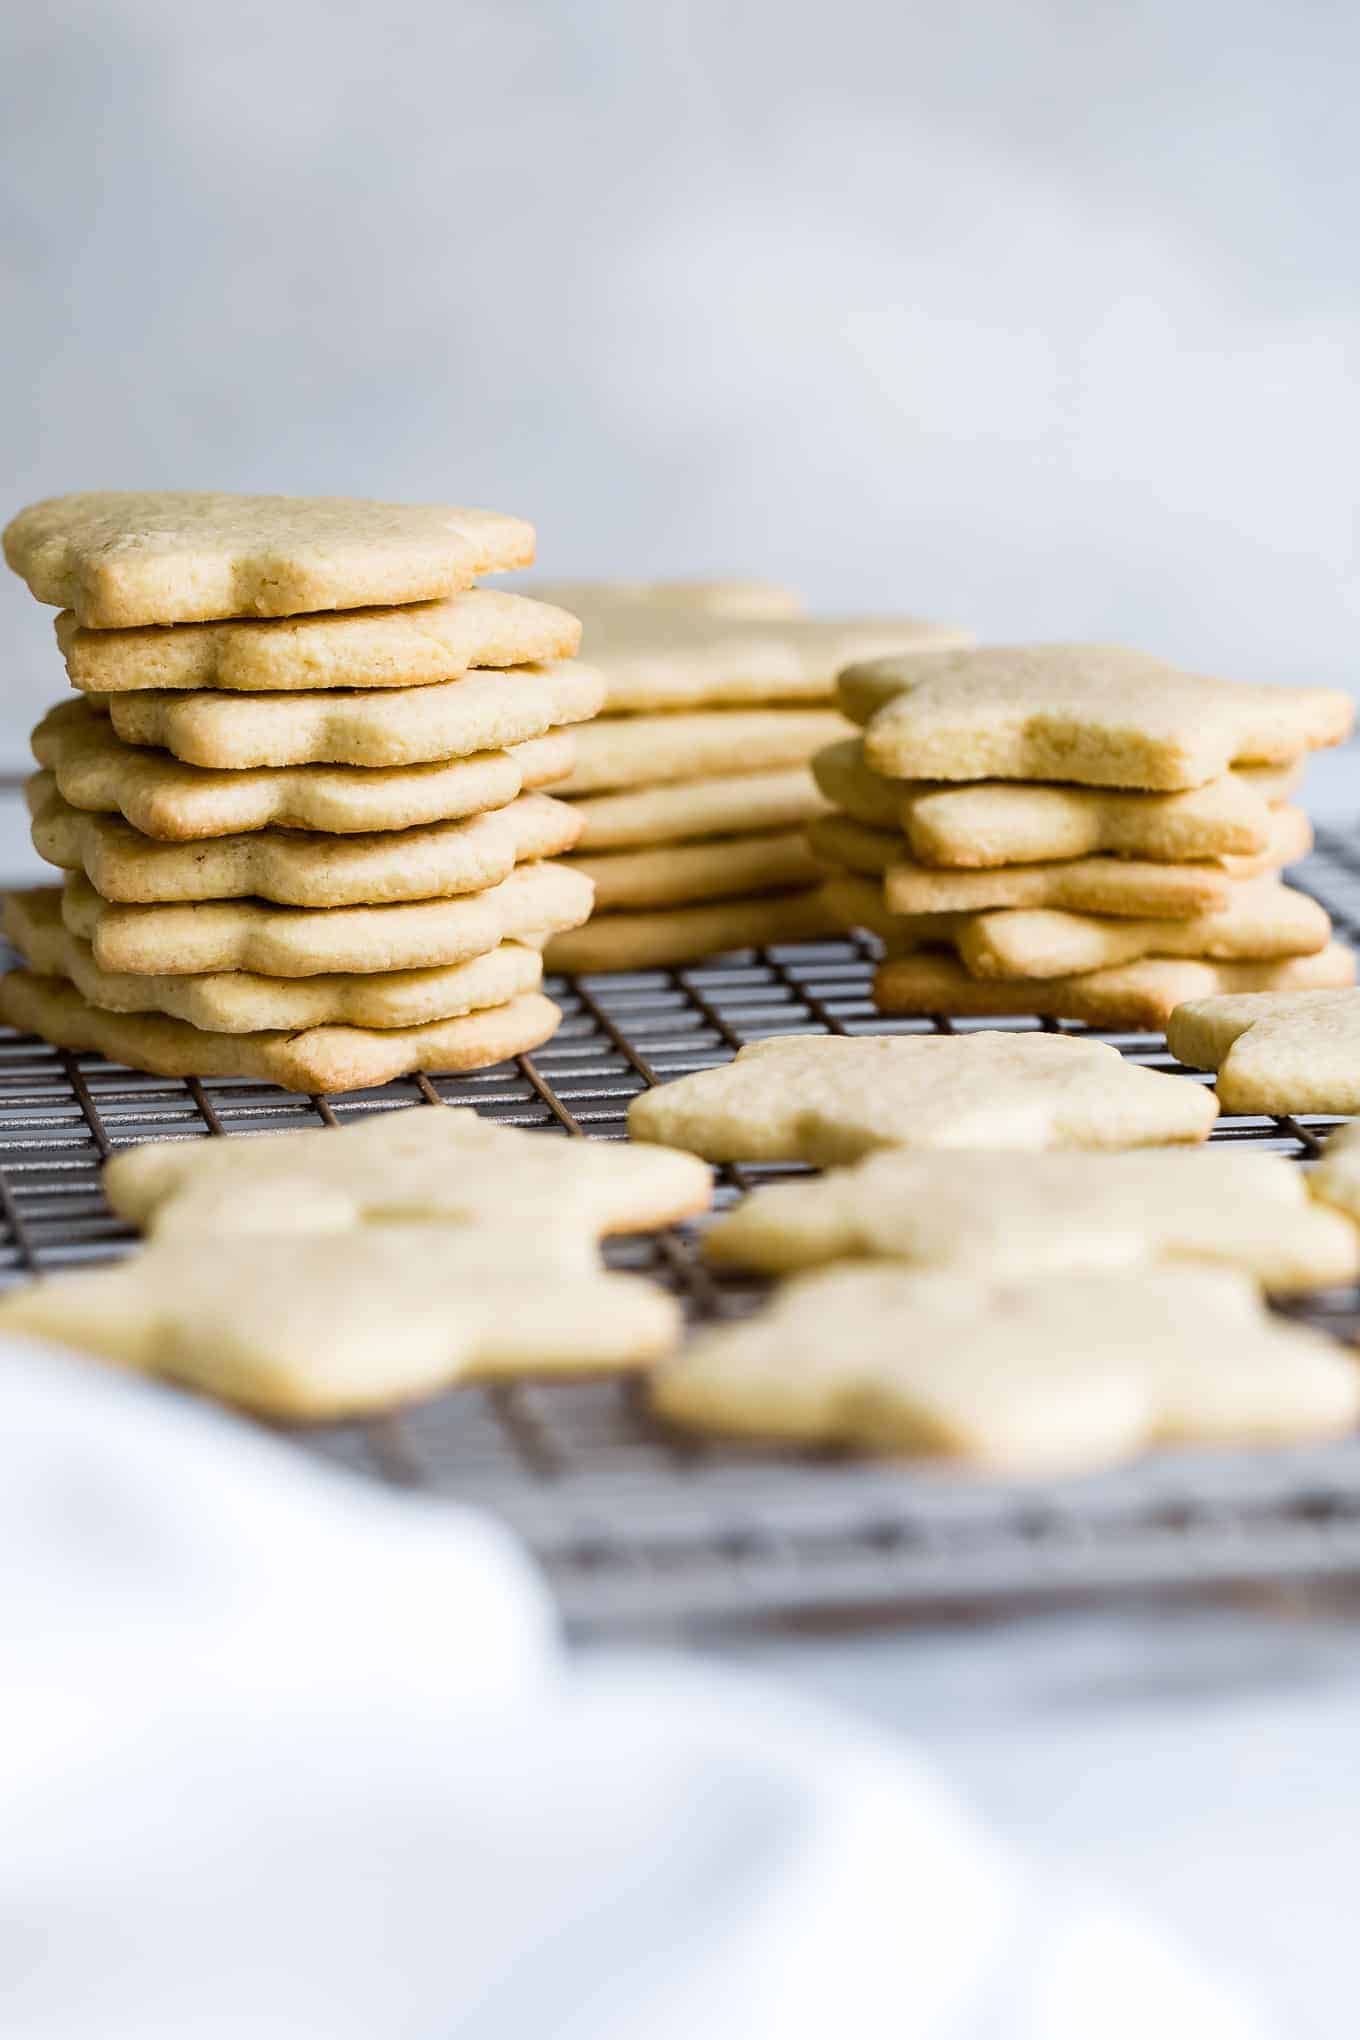
Whether you prefer your sugar cookies snappy through and through, with crisp edges and soft centers, or soft and pillowy, this recipe delivers. For soft cookies right off the pan, bake for less time. For crisp edges or snappy all the way through, bake longer.
These gluten-free sugar cookies are delicious the instant the icing hits the cookie. But here's my sugar cookie secret: they're even more fabulous a few hours later or the next day, if you can wait that long. The moisture from the icing softens the cookie into clouds.
These sugar cookies mature with age, making them the ideal cookie for gifting, arranging on a dessert platter, or leaving out for Santa. And they're so good no one will suspect that they're gluten-free.

Tips for making gluten-free sugar cookies
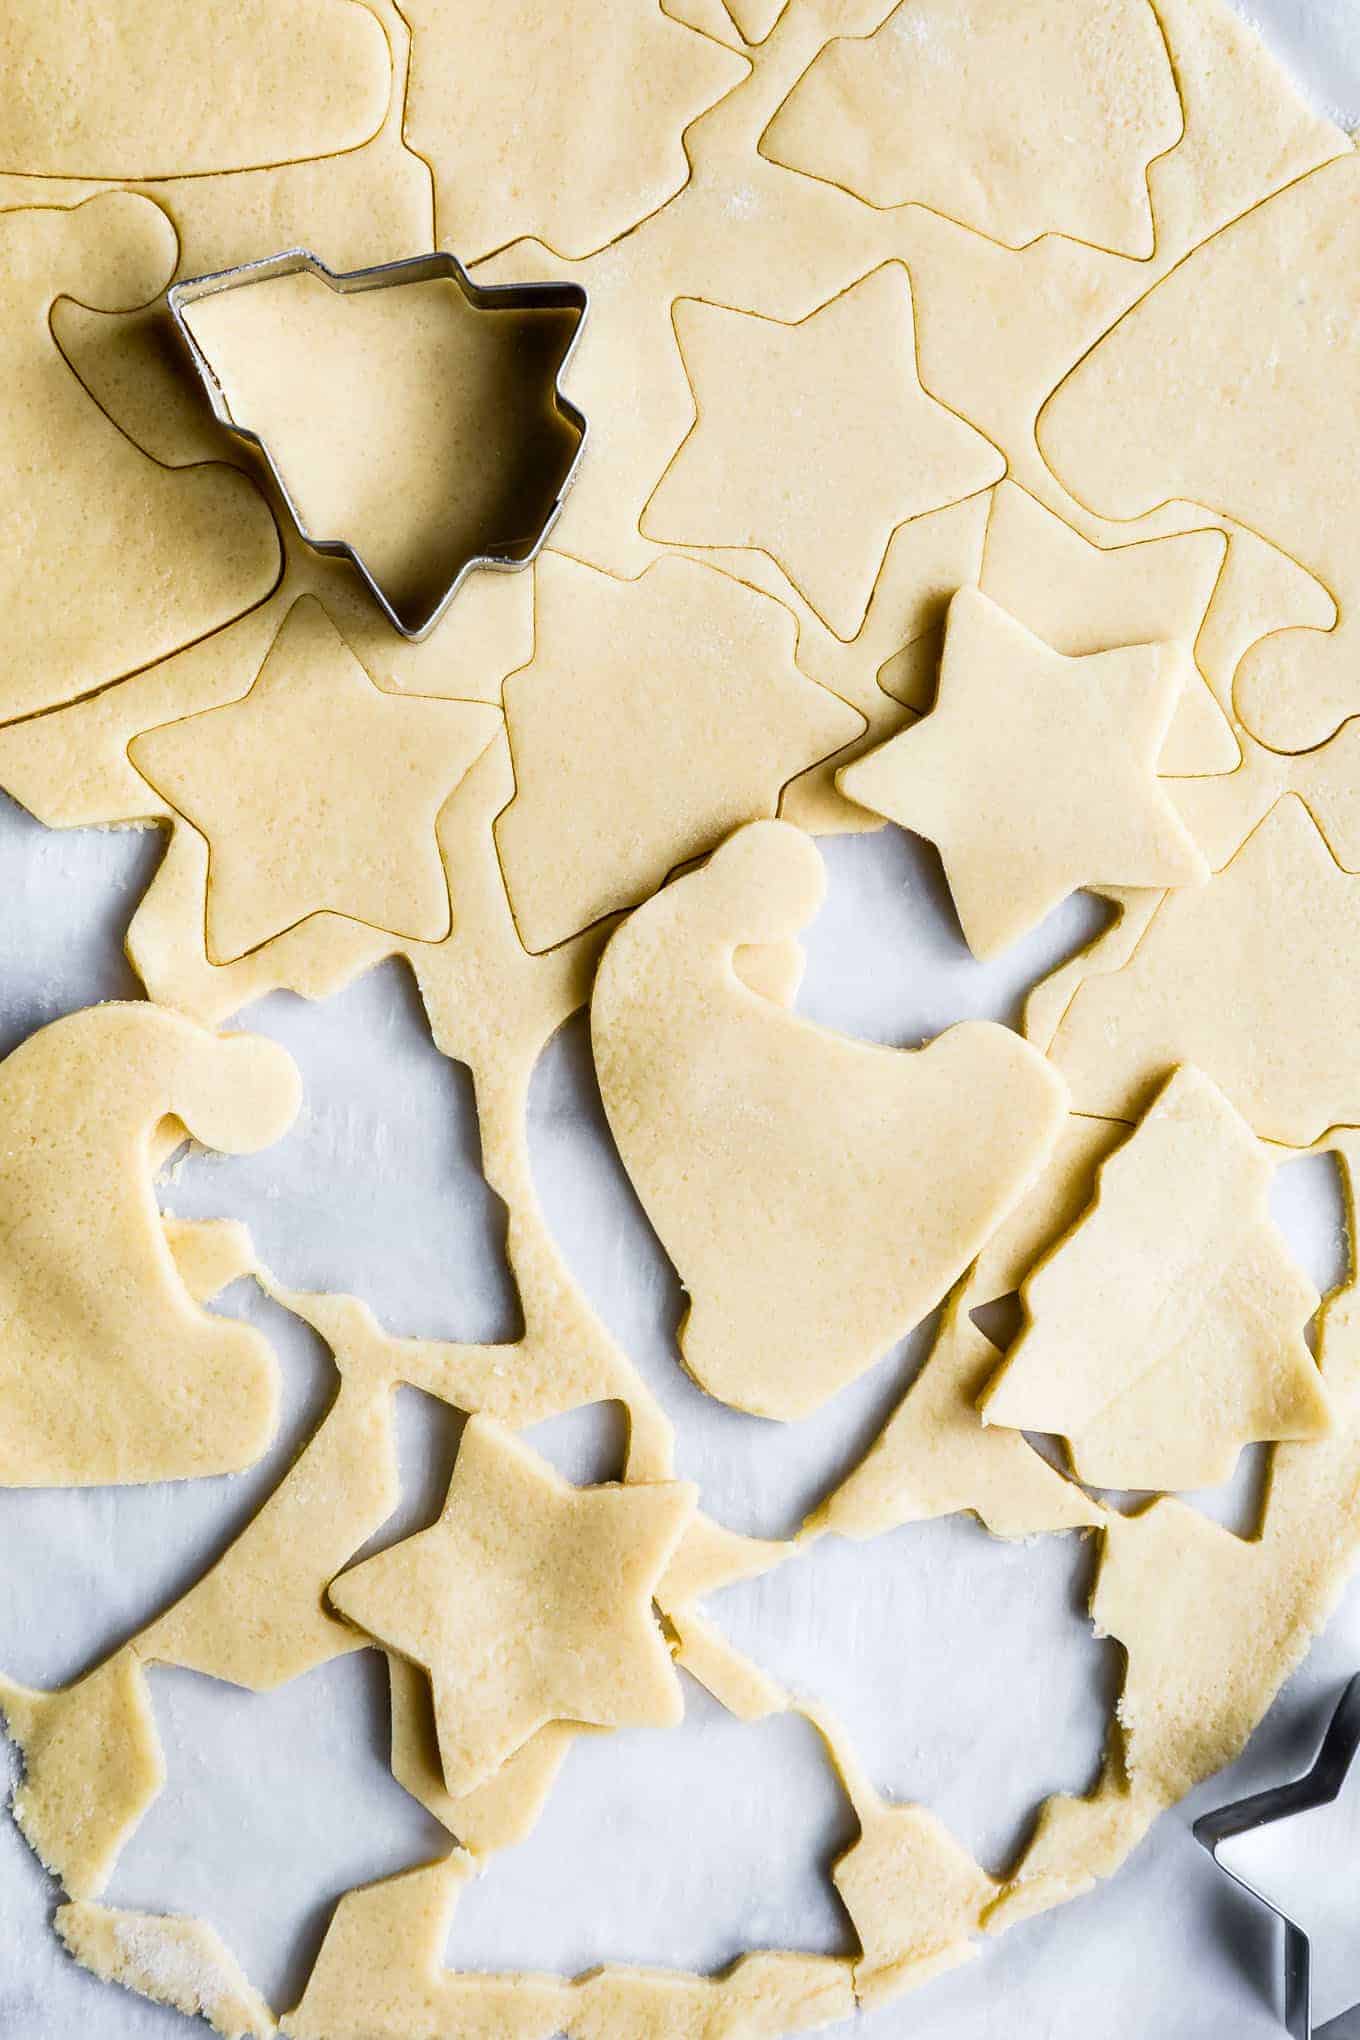
- Chill the dough. To keep these gluten-free cut-out sugar cookies from spreading into flat blobs, you must chill the dough. My speed-it-up hack is to chill the dough after rolling it out into two sheets. Chill the slab on a baking sheet, and if you've got the space, chill them in the freezer to speed things up even more! After you cut your shapes and arrange them on the baking sheet, chill them again.
- Roll out as few times as possible. I've also found that the more times you roll out the gluten-free sugar cookie dough, the more your cookies will spread. Try to cut your shapes as close together as possible to keep from having to roll the scraps out again and again. Plus, the more you handle the dough, the softer it gets. Speaking of chilling, you may have to chill the dough again after re-rolling, depending on how long it's been out.
- Bake by size. Divvy them on baking sheets based on the size of the shape. Smaller shapes take less time to bake, so separating by size will keep the little ones from getting too dark while the larger shapes bake through. If you find that after you've finished cutting them out they're too soft and delicate to move on the baking sheet, just chill the sheet for a few minutes first.

Easy icing that hardens and glistens
It doesn't get much simpler than this sugar cookie icing. Unlike with royal icing, we're not messing with egg whites. To get sugar cookie icing that hardens and glistens, you can do without corn syrup as well. The trick is adding just a bit of honey.
The icing will firm up in about 10-15 minutes on the cookies, making the cookies stackable without messing with your beautiful artwork!

Gluten-Free Project Recipes
New year, new you! Try your hand at mastering these gluten-free staples to add to your collection!
Recipe

Gluten-Free Sugar Cookies with Easy Icing
Ingredients
- 1¾ cups + 2 tablespoons (210 g) super-fine blanched almond flour
- 1¼ cups + 3 tablespoons (210 g) millet flour
- 1¾ cups + 2 tablespoons (210 g) Bob's Red Mill tapioca flour
- ½ teaspoon baking powder
- ½ teaspoon kosher salt
- 1 cup (2 sticks) unsalted butter, slightly softened
- 1½ cups (309 g) granulated sugar
- 2 large eggs, room temperature
- 1 teaspoon pure vanilla extract
- 3 cups powdered sugar, sifted
- 3-4 tablespoons milk
- 2 teaspoons honey or brown rice syrup
- 1½ teaspoon pure vanilla extract
- Pinch kosher salt
- Optional: gel food coloring and sprinkles
INSTRUCTIONS
- In a medium bowl, sift together the almond flour, millet flour, tapioca flour, baking powder, and salt. Set aside.
- In the bowl of a stand mixer fitted with the paddle attachment or a mixing bowl with a hand mixer, cream the butter and sugar together on medium high speed until light and fluffy, 3-5 minutes. Add the vanilla and mix until combined.
- Add the eggs, one at a time, mixing just until combined after each egg, scraping down the sides and bottom as needed.
- With the mixer on low, slowly add the dry ingredients. Increase the speed to medium and mix until just combined, scraping down the sides as needed.
- Divide the dough in half and form into two discs. Roll out each disk between two pieces of parchment paper dusted well with millet flour to ⅛-1/4 inch thickness. Chill on a baking sheet for at least an hour in the fridge or 15 minutes in the freezer.
- Working with one half at a time, use cookie cutters to cut out your shapes. Roll the scraps up with more millet flour dusted on the table and cut out cookies again, chilling the dough for 5-10 minutes as needed as the dough gets softer. Transfer your cut cookies to a parchment-lined baking sheet, 1.5 inches apart.
- Chill the cookies on a parchment-lined baking sheet in the fridge for 30 minutes or in the freezer for 15 minutes.
- Meanwhile preheat the oven to 400°F. One sheet at a time, bake the cookies for 5-7 minutes, until just set and the very bottom edges begin to turn golden. For softer centers, aim toward the lower end and crispy edges, the higher end (and this will vary depending on the size of your cookies!).
- Let the cookies cool on the baking sheet for 5 minutes before using a thin metal spatula to transfer them to a wire rack to cool completely before icing. Repeat with remaining baking sheets.
- While the cookies cool, make the icing. In a medium bowl, whisk the powdered sugar with 3 tablespoons of milk, honey, vanilla, and salt until smooth. Add another teaspoon of milk at a time until the icing is the proper consistency. When you lift the whisk up and drizzle icing back into the bowl, the stream should sit on top for a few seconds before incorporating back into the bowl. Divide icing between cups and color with gel food coloring as desired.
- To pipe the icing, fill a small pastry bag fitted with a small round tip with icing. Pipe an outline around the outside of the cookie with icing. Begin to flood the outline with more icing using the tip or a toothpick to move the icing to the edges. Top with sprinkles and let sit for 10 minutes until the icing sets.
- Enjoy immediately or, if you prefer softer cookies, store them in an airtight container overnight and enjoy them perfectly soft the next day. In my opinion these cookies are best on day 2!
Notes


Kim -
Is their a nut-free flour I can replace the almond flour with?
tori -
Hi do you know what I can substitute the eggs withinstead? My niece/newphew are allergic.
Anne -
These taste amazing, but no matter what we tried they always spread, even the first batch. Any thoughts? We did not weigh the butter, so I suppose that could be it. We just stuck with the shapes that still looked good a bit blobby :-)
Anne -
Wait! Figured it out in the last batch! Thickness mattered for us - the last batch was a solid 1/4" thick and did not spread. Who would have thought??
Sarah Menanix -
Interesting - thanks for coming back and updating! Were you rolling it out thicker or thinner in the times that it spread? I've never had to be super precise for them not to spread! Could it be the brand of flour used - did you use all Bob's Red Mill flours?
Anne -
They were spreading when they were thinner. My flours were probably nuts.com (though I buy Bob's at the store when I run out, so there could be a mix), so that could have something to do with it as well. Whatever it was, they taste amazing!
Gia Forakis -
Loving your recipies! Thank you! Two questions: #1) Is Tapioca Flour the same as Tapioca Starch? #2) Can the Millet Flour be replaced with Rice Flour or Coconut Flour or what other GF options might you suggest?
Many Thanks!
Sarah Menanix -
So sorry for the delay - I missed your comments! 1. Yes! Tapioca flour and tapioca starch are the same. 2. I would not replace the millet flour with coconut flour as it behaves very differently. I would try replacing with sorghum flour first then possibly rice flour, but I haven't tried it so if you do, please let me know how it works!
Maggie -
Definitely we'll do it. Can't wait to taste them. But could you tell me how many grams is your 1 cup of butter?
Sarah Menanix -
Great question! 1 cup butter is 226g. I'll update the recipe to reflect this! Thanks!
Maggie -
Thank you. And what about corn strach? It's in the description but not listed on ingriedent list.
Sarah @ Snixy Kitchen -
Oh thank you so much for catching that! When I first wrote the recipe I used 66 g of corn starch in place of some of the tapioca starch. Then I tested the recipe using all the tapioca starch and couldn’t taste any difference so to simplify it - I switched to all tapioca starch! I must have forgotten to change the instructions! I will update that in a few minutes when I’m not holding both of my children Ha!
Georgina -
So pretty!!! I bet they are delicious too!! And my 3 year old is the same - it takes him forever to eat an iced cookie - the icing usually ends up absolutely everywhere!
Veronica -
You had me at sprinkles! These cookies are so pretty! Where did you purchase your sprinkles they are so festive? Yes I notice things like sprinkles!
Sarah Menanix -
I got them on sale at Joann - I love them! Here's a link to the brand - and they're still on sale!