
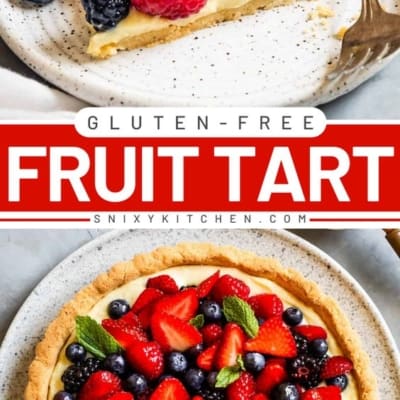
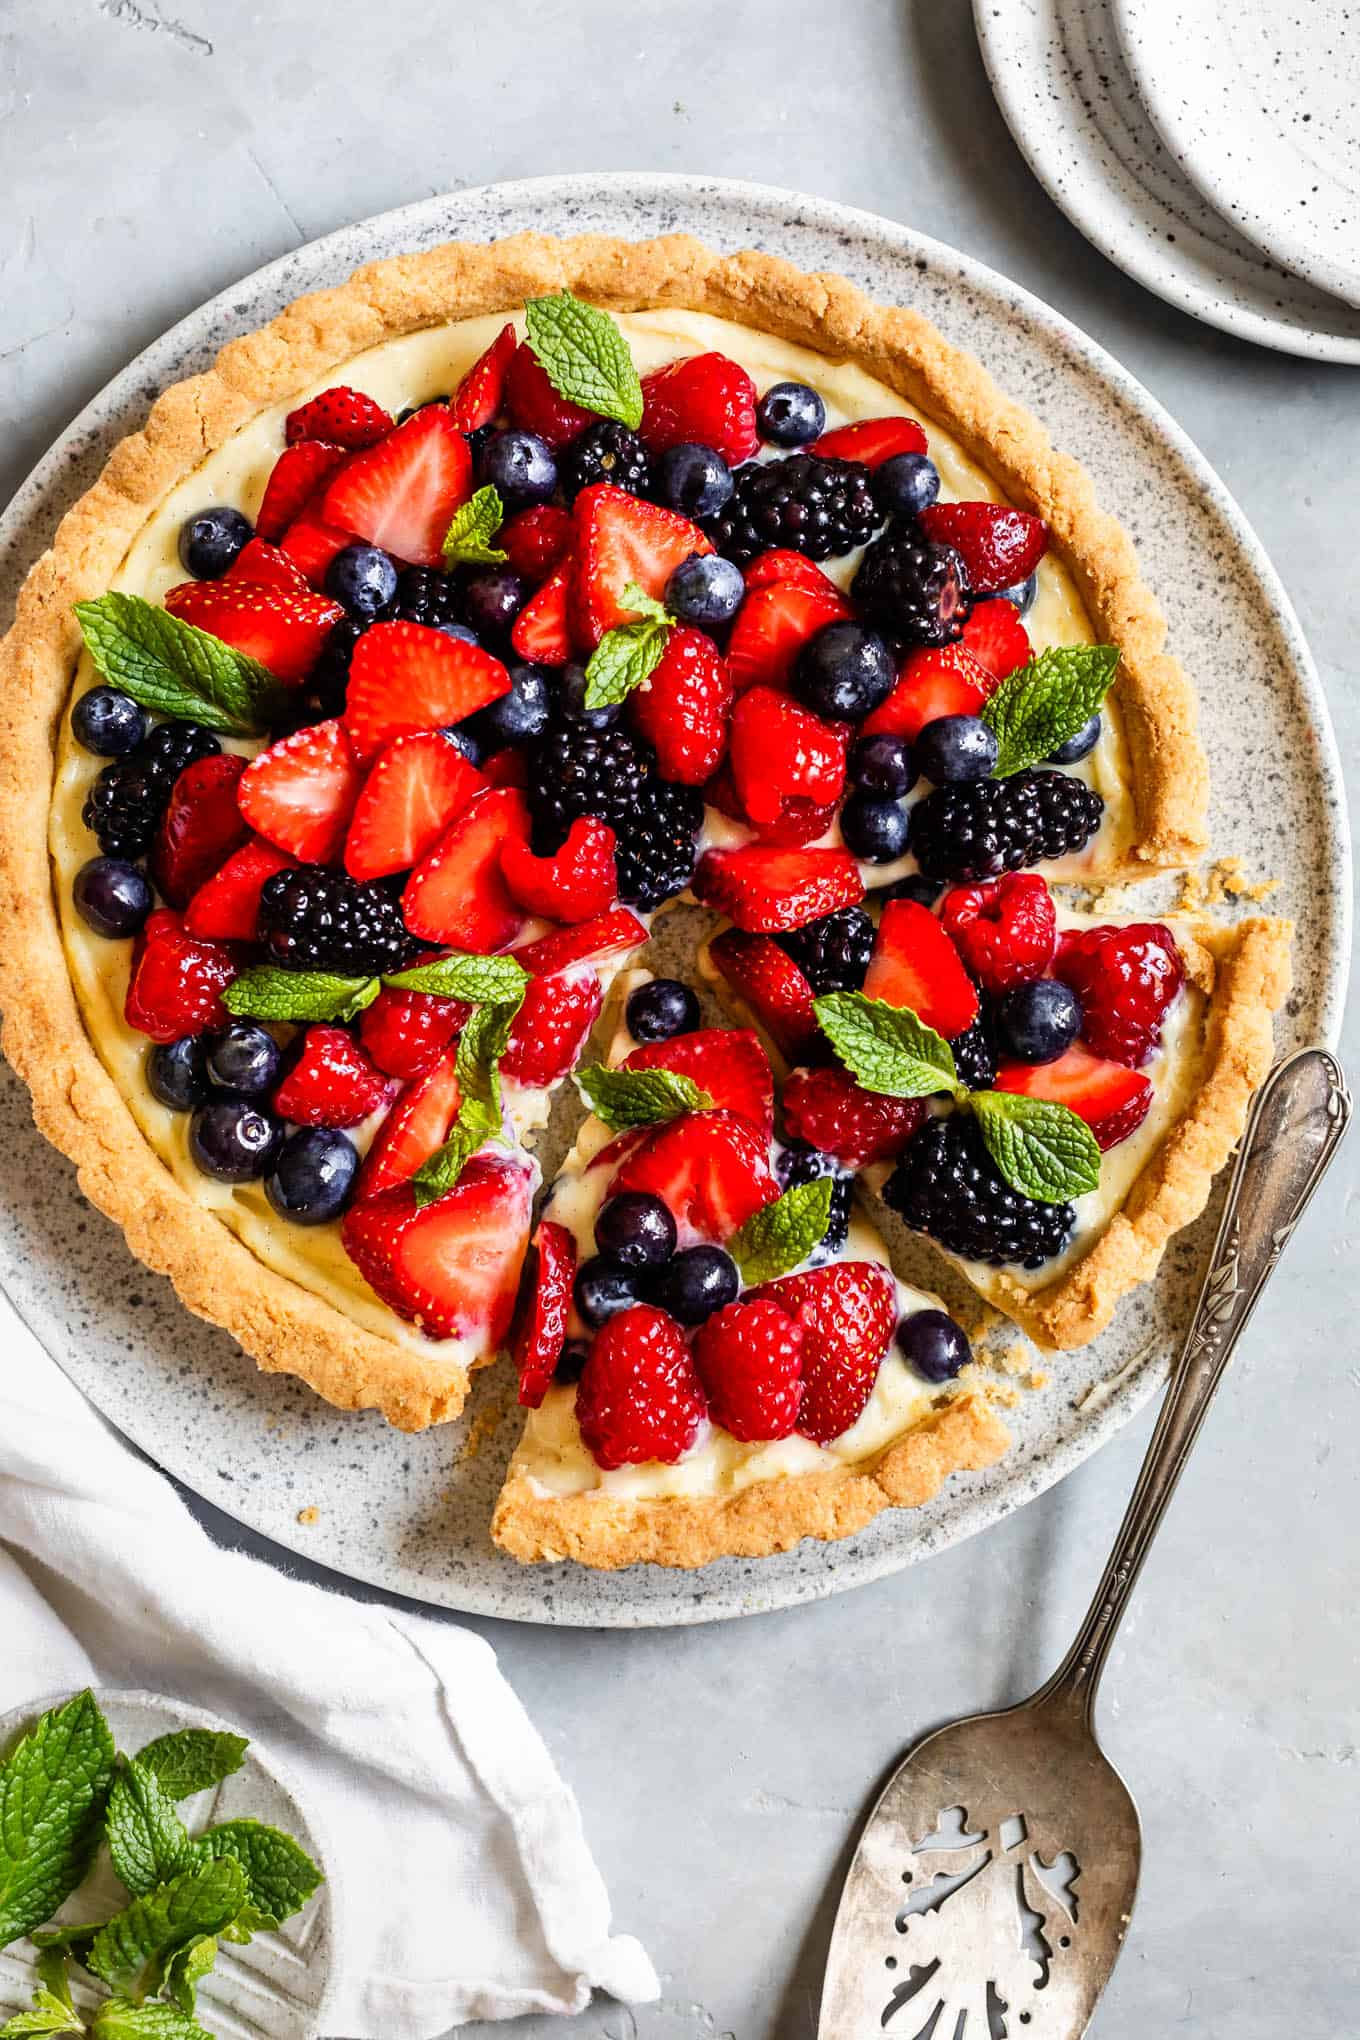
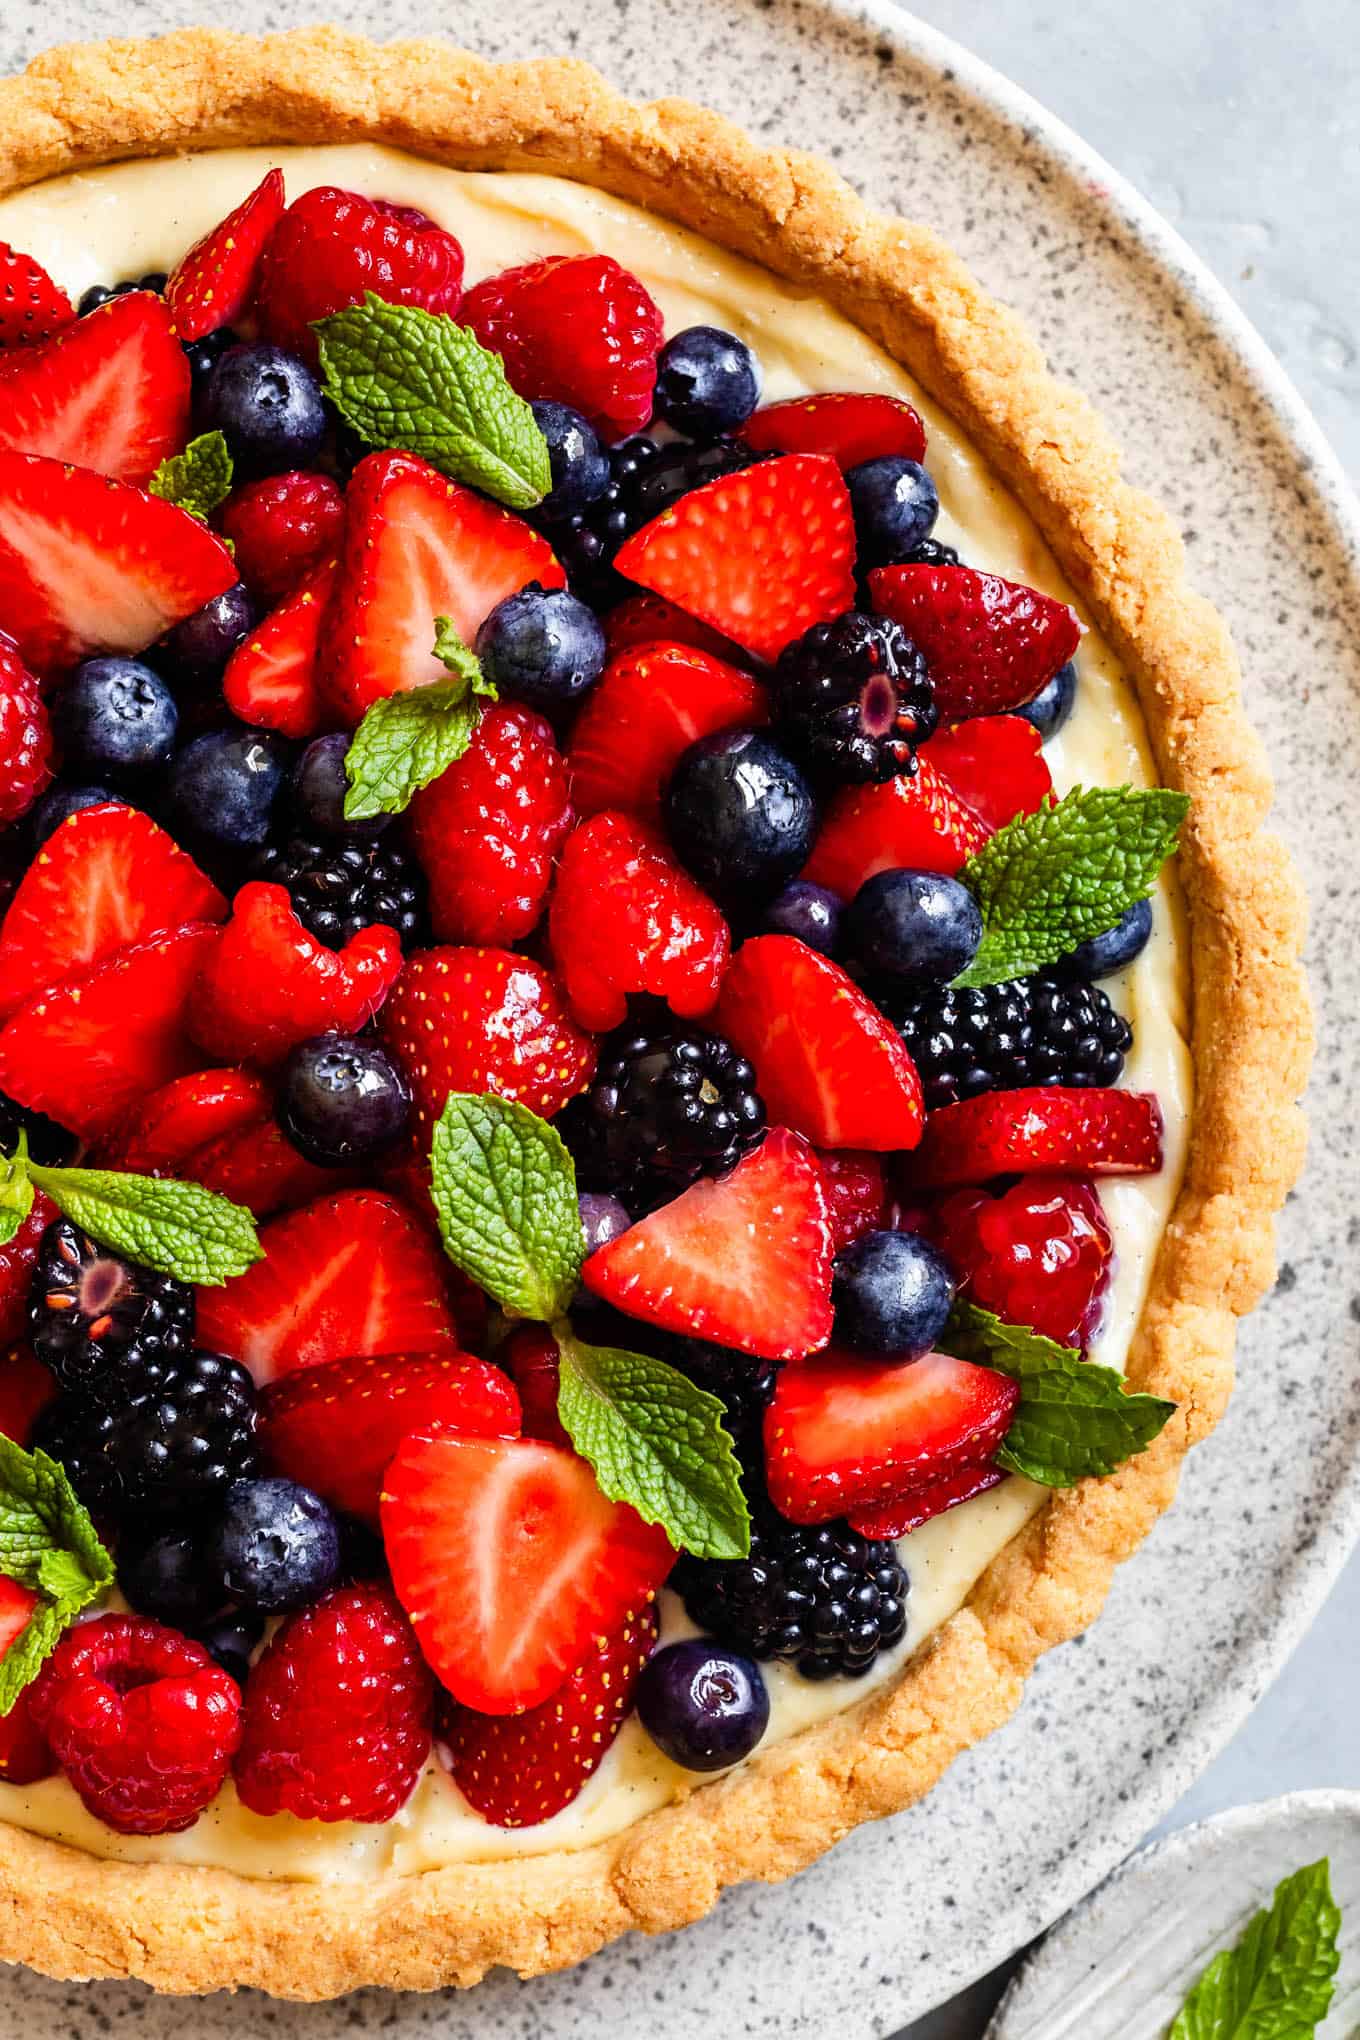
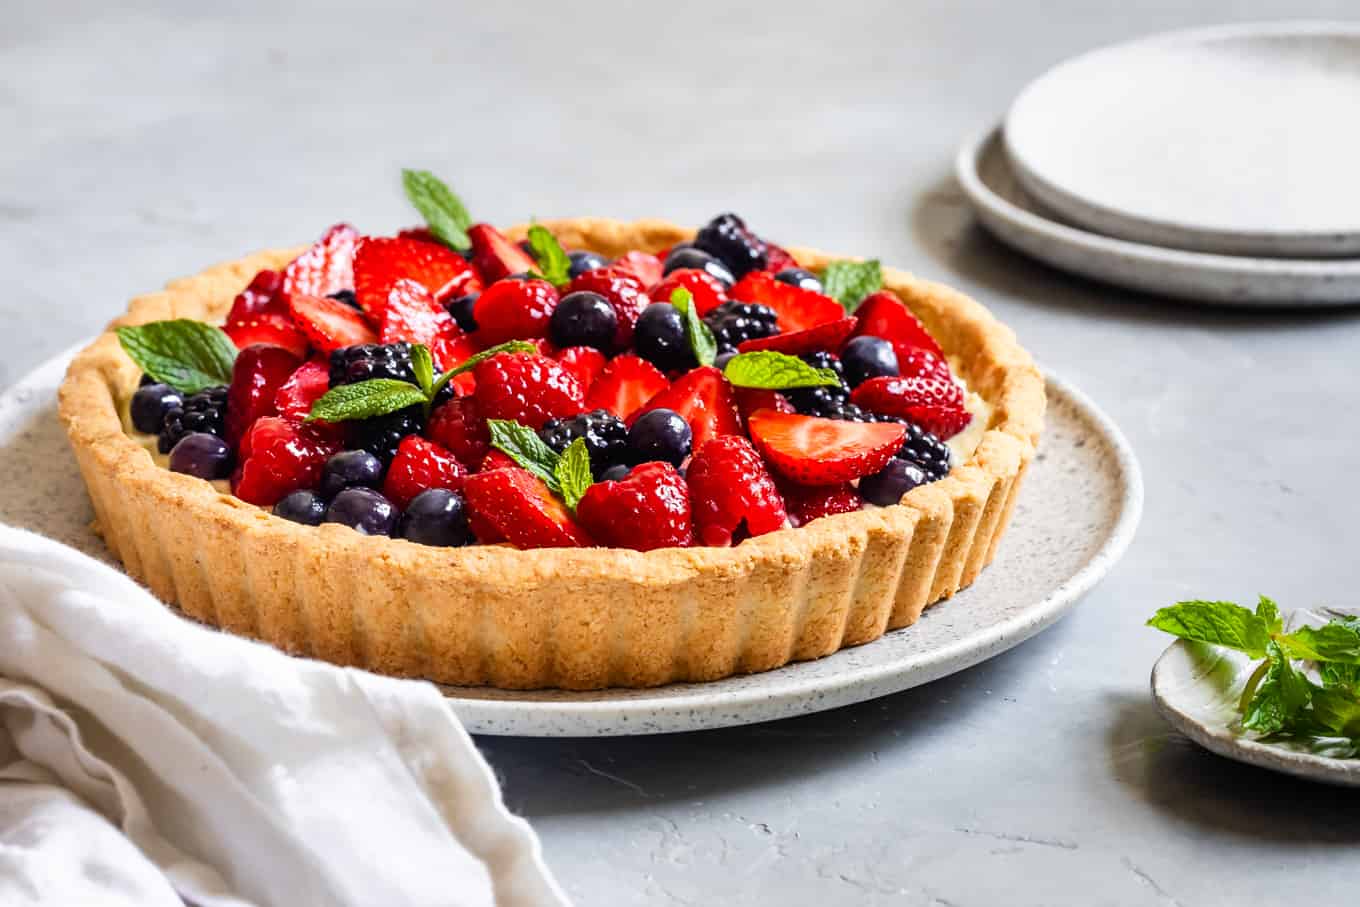
This classic French gluten-free fruit tart has a vanilla pastry cream spread into a gluten-free tart crust and topped with glistening fresh berries. Easily made ahead, this easy tart is nestled into a buttery crisp shortbread cookie-like crust made with almond and coconut flours.
I made you a little something to celebrate summer. She's wearing all of summer's hot jewelry with none of the fuss. No need to spend a fortune at a French bakery. This bright & summery gluten-free fruit tart is easy to make at home! You can whip up the crust and filling in advance with little hands-on work, then swiftly assemble the masterpiece to serve between sips of bubbly rosé. Summer is all about ease and relaxation, after all.
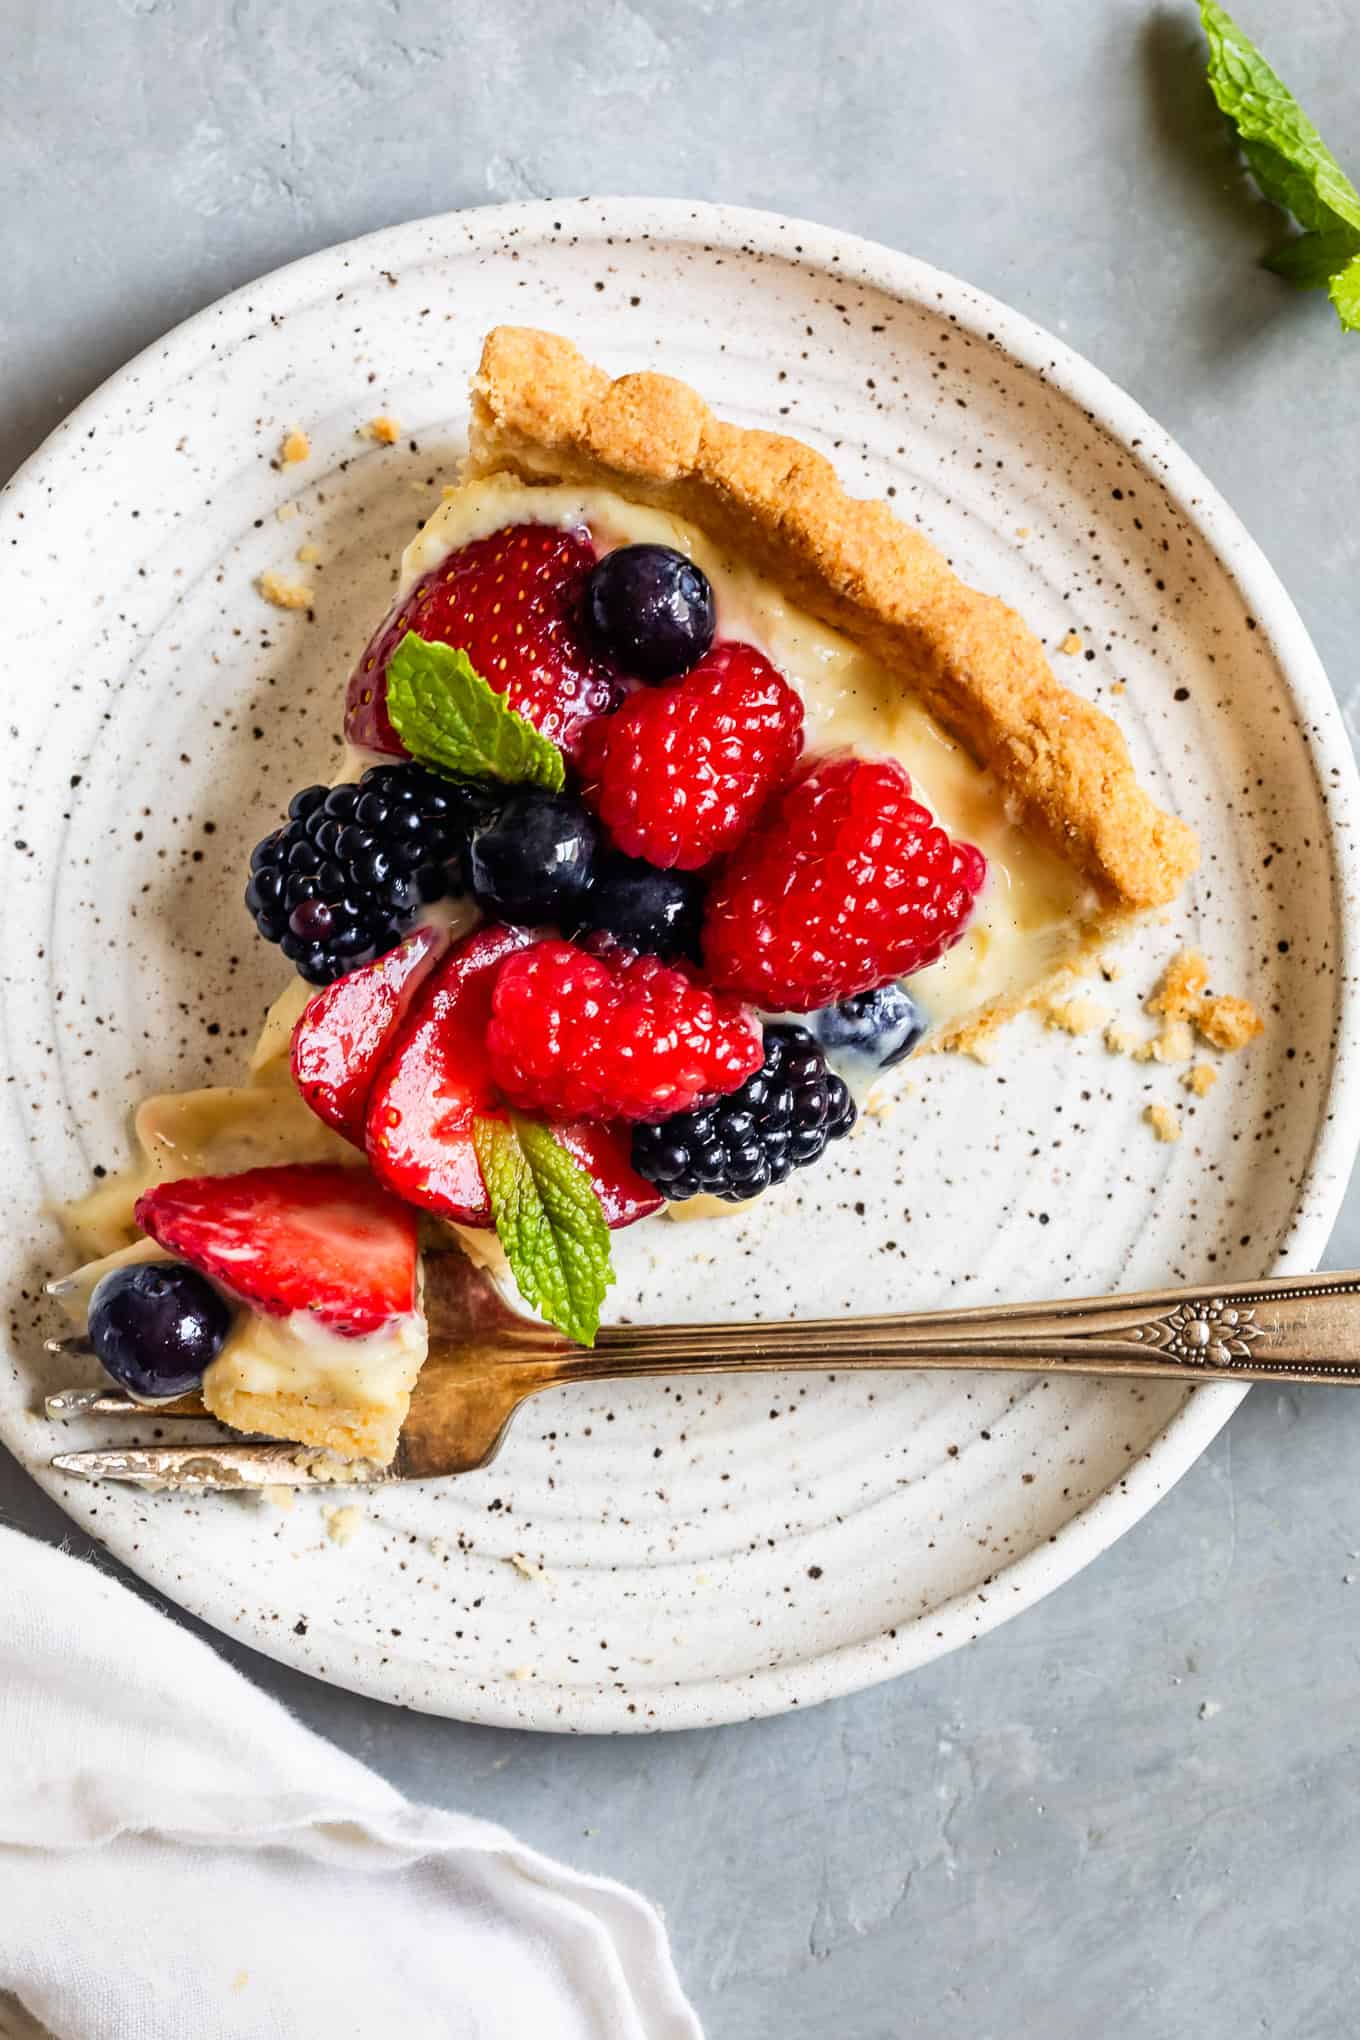
The pastry cream for this classic fruit tart is a pudding-like custard called crême pâtissière. The same cream used for eclairs, it's creamy and smooth with a rich vanilla flavor that pairs perfectly with fresh fruit.
I hope you're already heading to the kitchen because you need this glistening gluten-free fruit tart.
Mastering the quick timing of a fruit tart:
The key to whipping this tart up swiftly is all in the timing and order of each step, so there's no wasted waiting time.
- Make the gluten-free shortbread crust. Toss it in the freezer to chill while you...
- Make the pastry cream: Steep the vanilla bean and milk. While steeping, prepare the ice bath, then whisk together sugar, cornstarch, and egg yolks. Temper the egg yolks with the warm milk, before whisking it all together and cooking until thickened. Transfer to a bowl, cover tightly, and rest in the ice bath to chill while you...
- Bake the tart crust: Then let it cool completely before filling
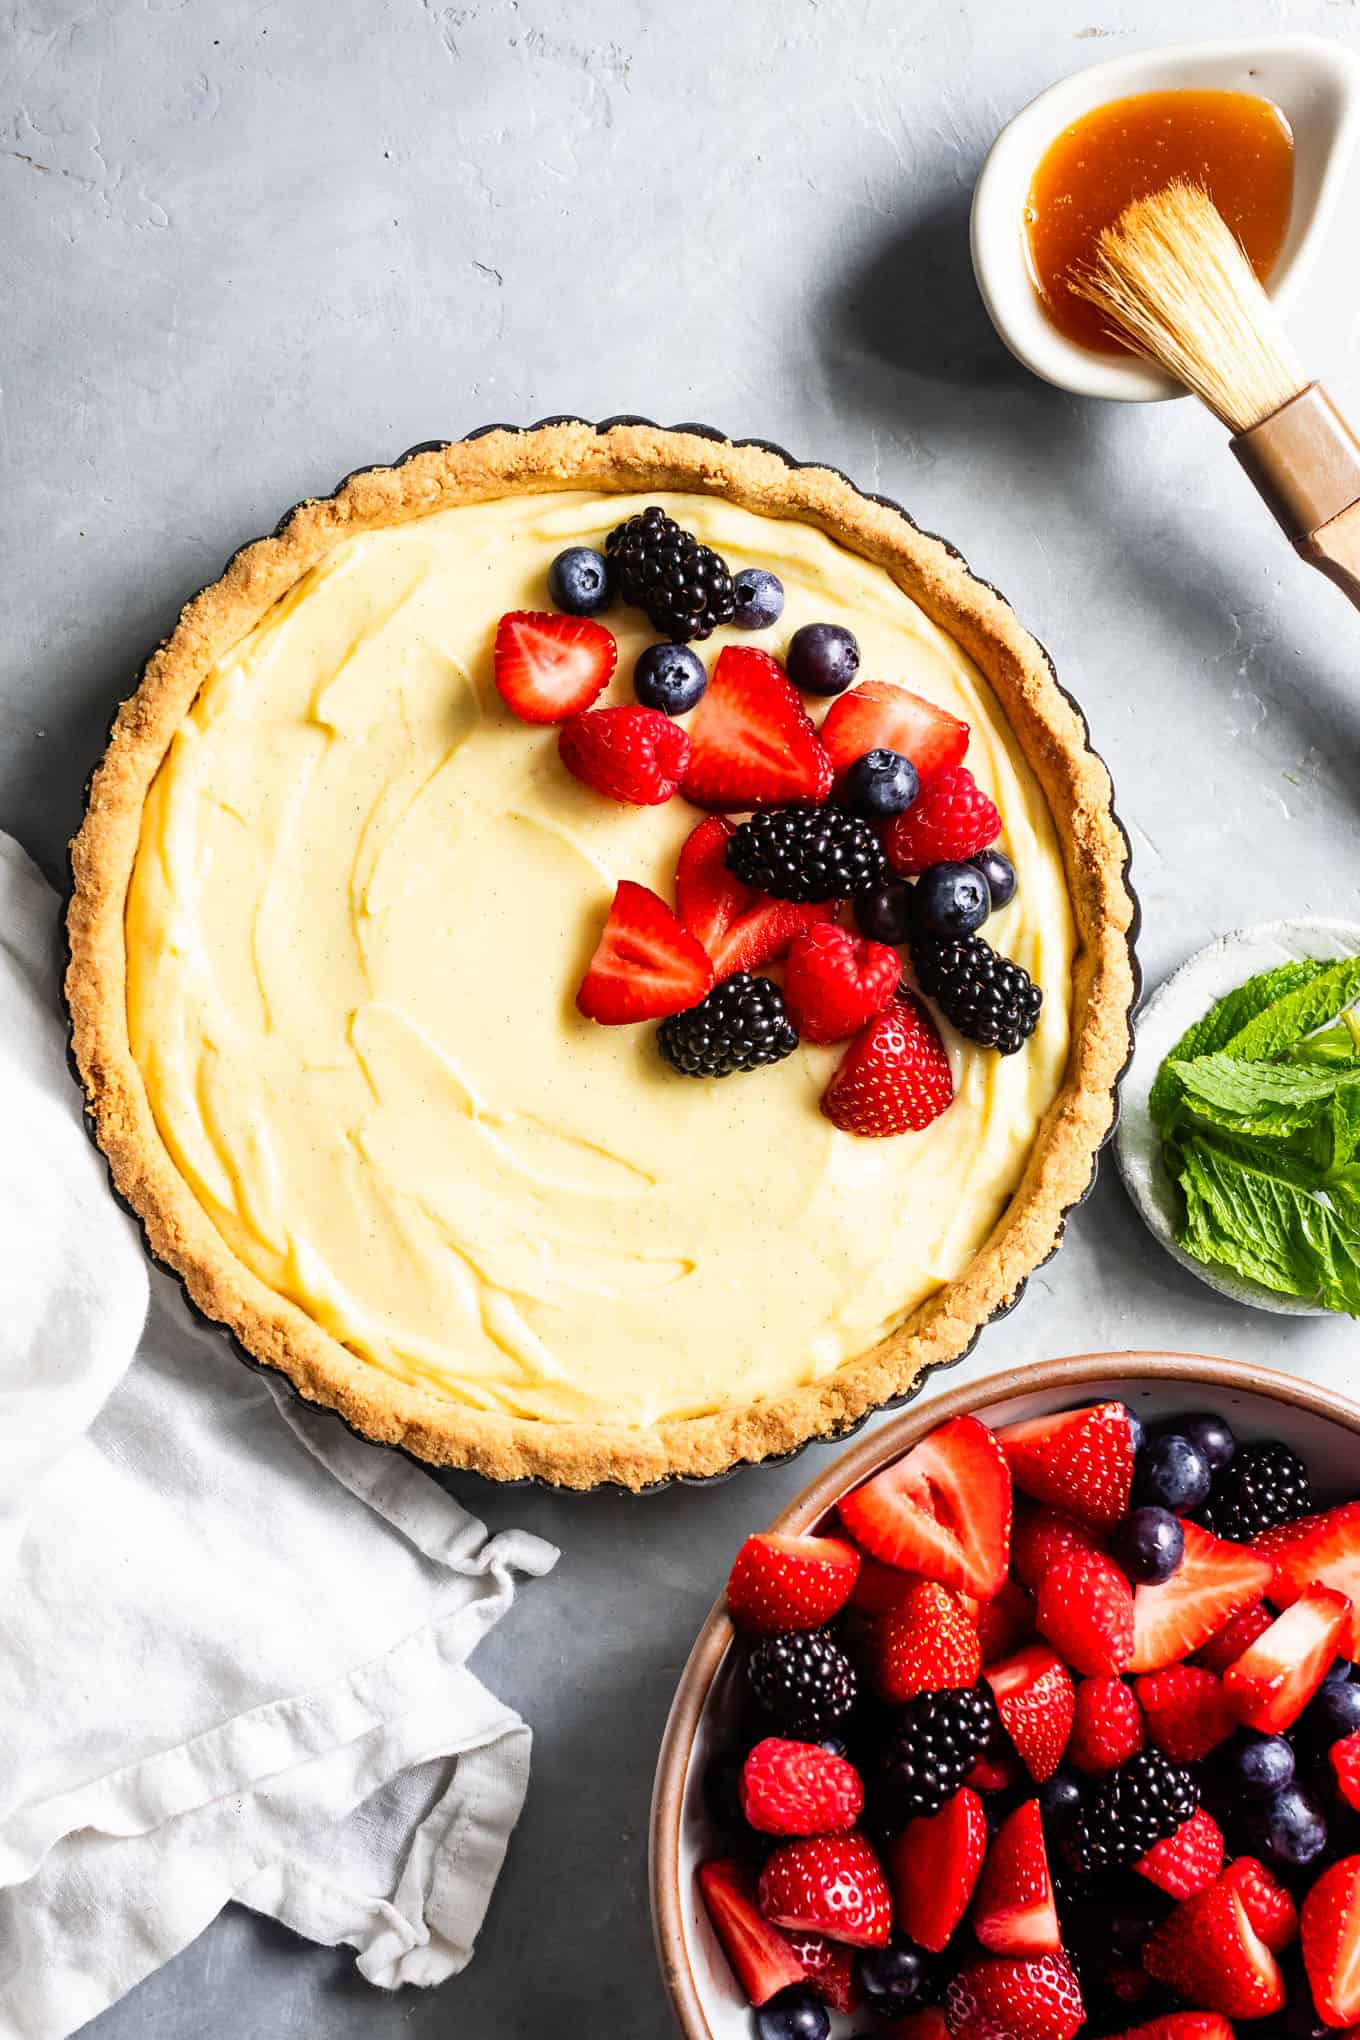
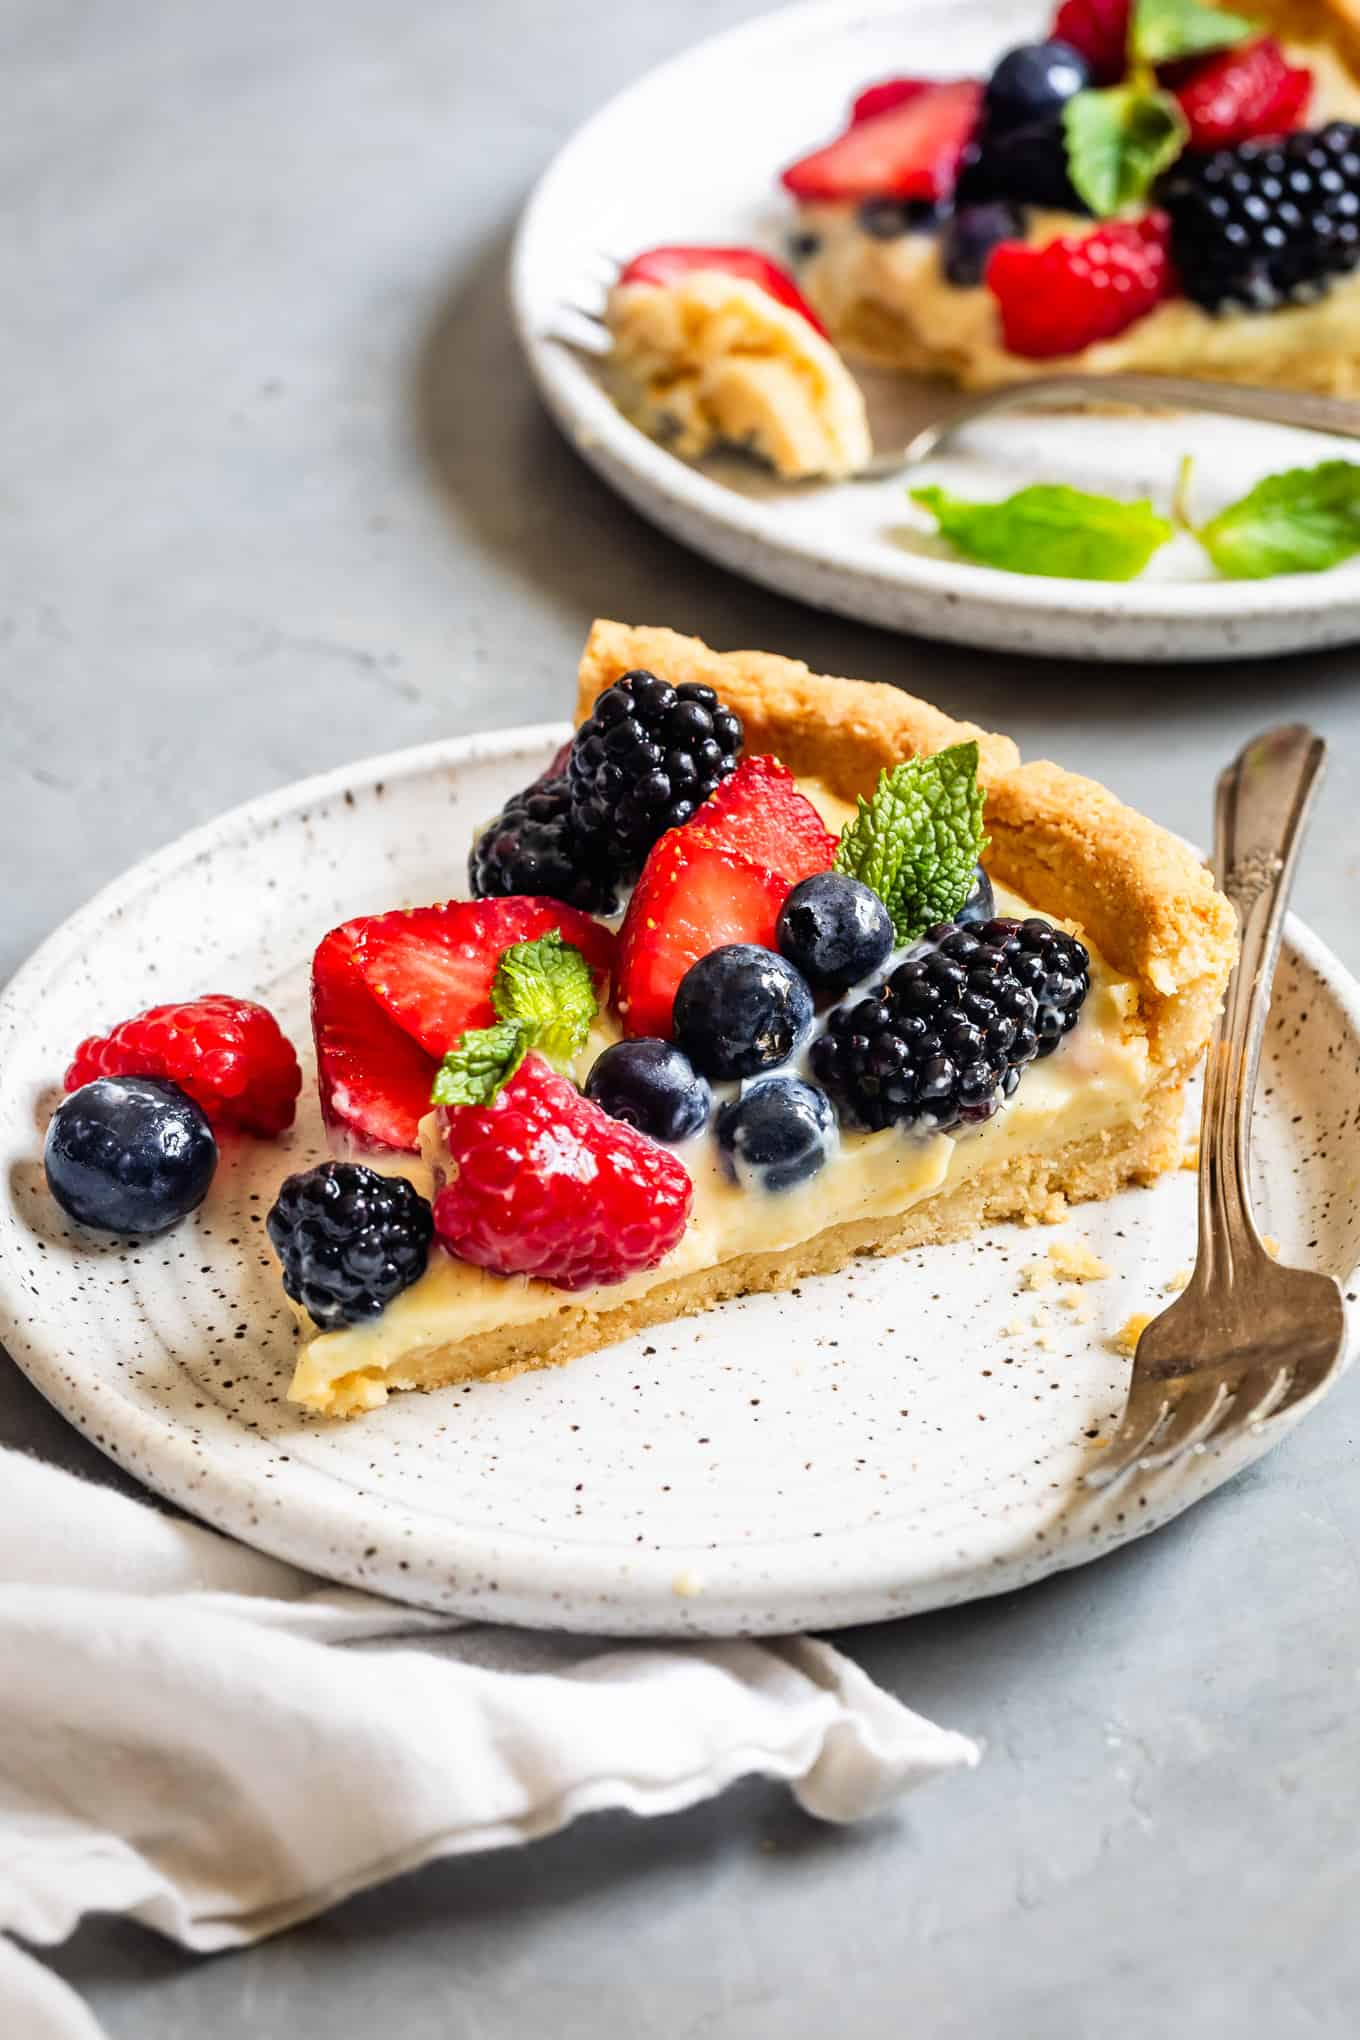
- Assemble: Spread the cooled pastry cream over the cooled tart crust, and generously top with fruit.
- Glaze tart: Brush fruit with apricot glaze.
- Chill: Until ready to serve.
What kind of fruit for a fruit tart?
This gluten-free fruit tart is versatile with the seasons. While I used piles of mixed berries, many traditional french fruit tarts use a variety of fruit, so swap in whatever seasonal fruit inspires you!
- Mixed berries: strawberries, blueberries, black berries, raspberries.
- Stone fruit: plums, nectarines, apricots, peaches
- Citrus: mandarin wedges, oranges, grapefruit
- Tropical fruit: mango, kiwi, star fruit, pineapple, bananas
- The sky's the limit! Try currants, grapes, pomegranate
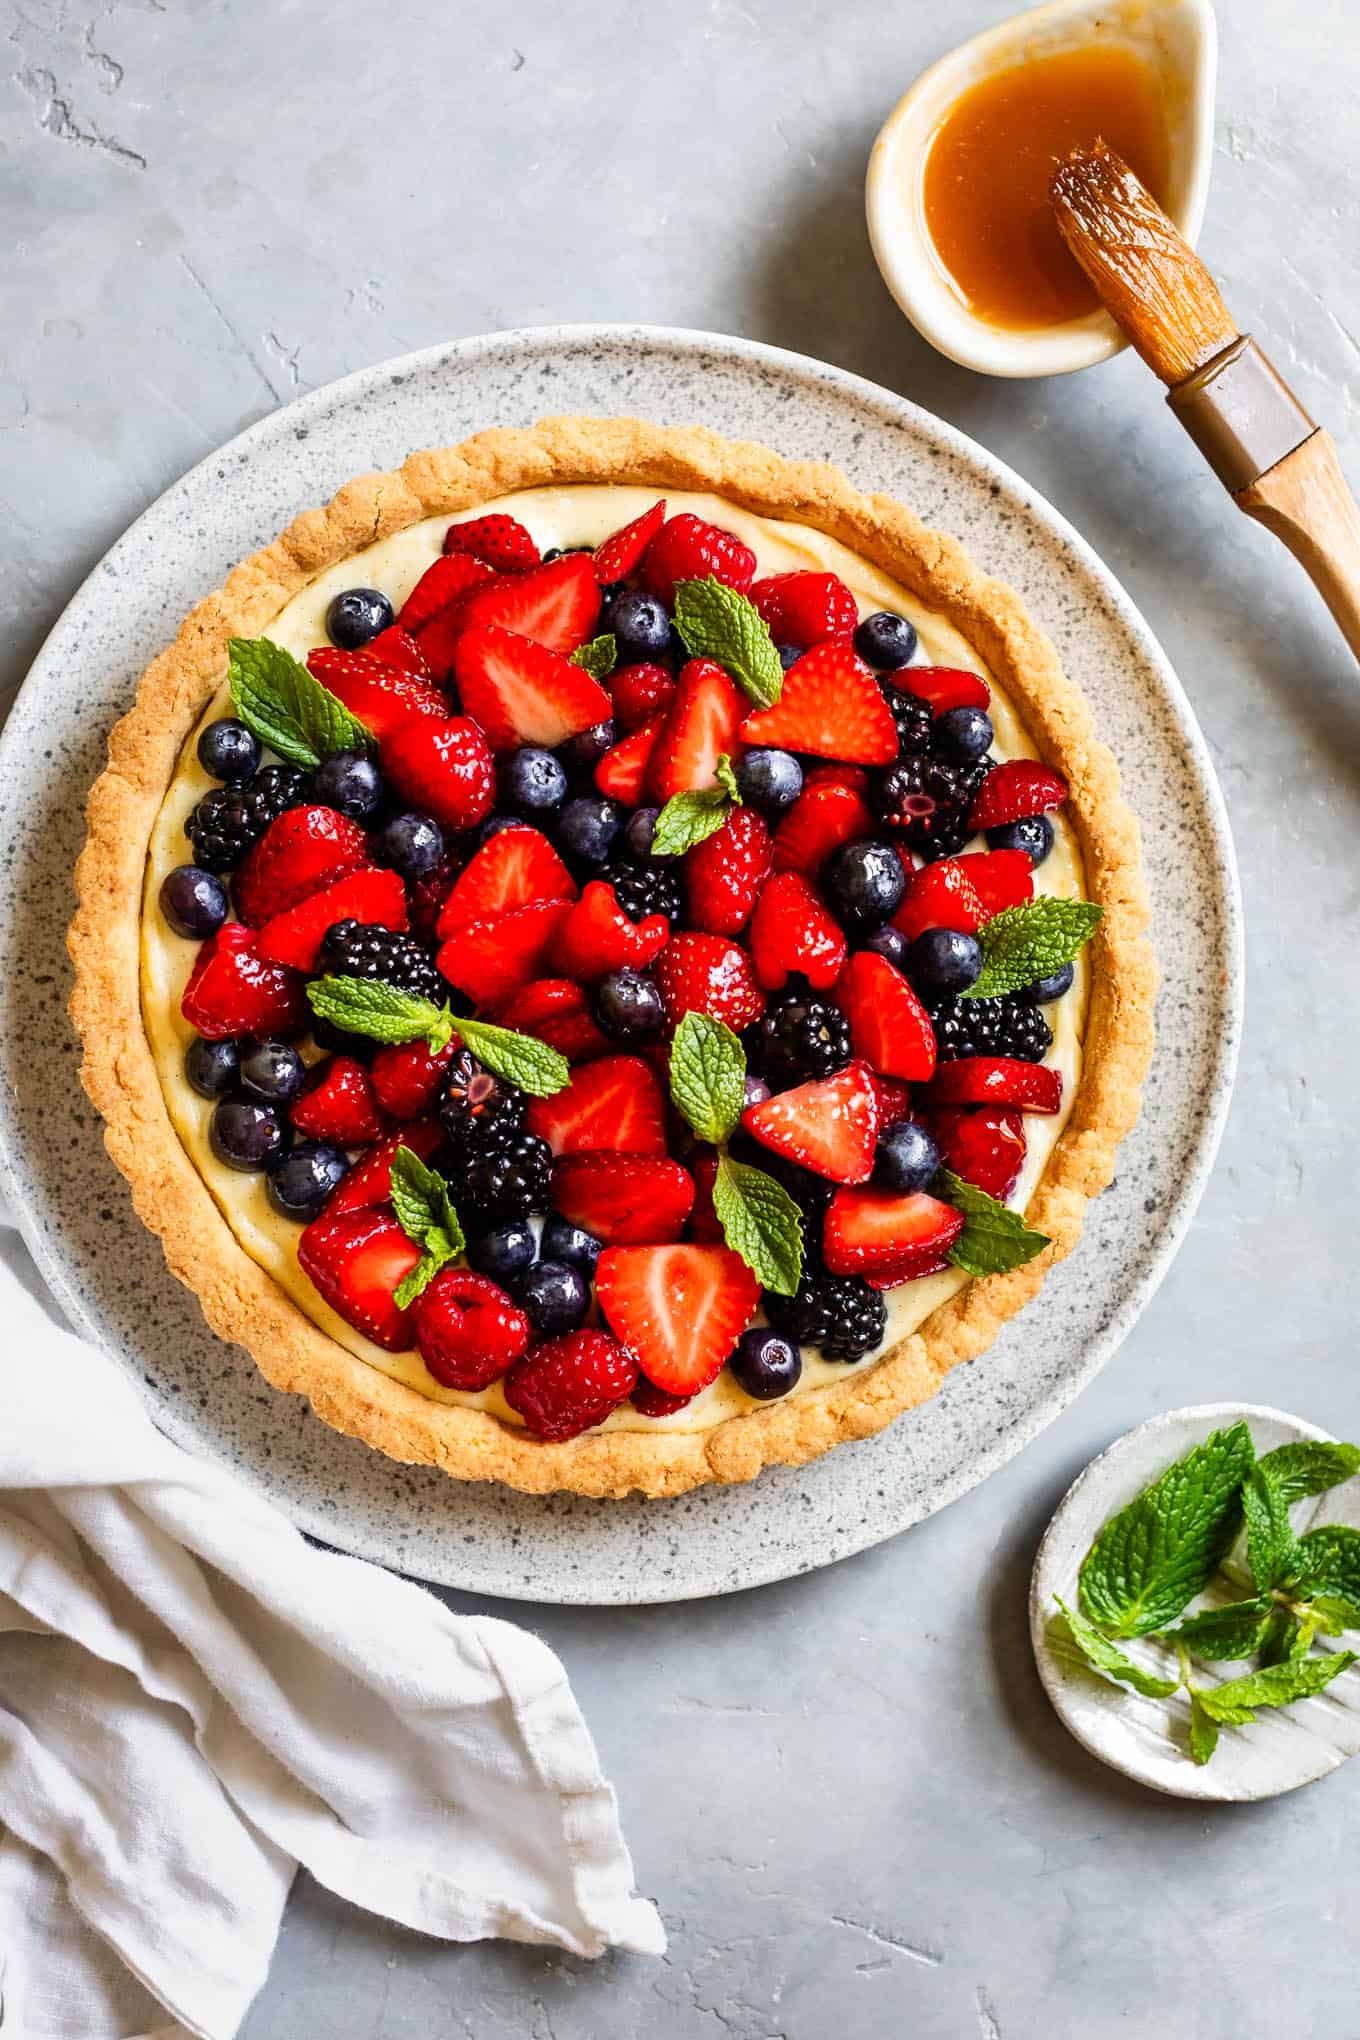
The Magic of an Apricot Fruit Glaze
Brushing the fruit with an apricot glaze will make your fruit glisten like that in a French pastry shop window. The glaze also keeps the fruit fresh while it chills, so it doesn't dry out. You can sub in any other light-colored jam, such as apple jam. Berry jam works too, but your fruit may be slightly tinted pink.
Keeping This Gluten-Free Fruit Tart Crisp
With a creamy filling, this gluten-free berry tart is best served the day it's assembled, as the longer it sits, the moisture from the filling will begin to soften the crust. If you'd like to make the tart a day or two in advance, make all the parts, but wait to assemble it until you're ready to serve.
All that being said, leftovers are still very delicious! Cover and store any leftovers in the fridge for up to 2 days.
Recipe

Buttery Gluten-Free Fruit Tart
Ingredients
- 1 9-inch gluten-free tart crust, fully baked
- Optional 1.5 ounces of finely chopped white chocolate, If assembling tart in advance
- 2 cups whole milk
- 1 whole vanilla bean, split and scraped or 1 tablespoon vanilla extract or paste
- ½ cup (100 g) granulated sugar
- 3½ tablespoons cornstarch
- ¼ teaspoon kosher salt
- 4 large egg yolks
- 2 tablespoons unsalted butter
- 2-3 cups fresh fruit, such as mixed berries: strawberries, blueberries, blackberries, and raspberries (see above for other fruit options!), washed and dried
- Optional: Fresh mint for garnish
- ¼ cup apricot jam or preserves
- 1 tablespoon water
INSTRUCTIONS
- Prepare the gluten-free tart crust according to the recipe, baking fully and letting cool completely before filling. Note: if you plan to fully assemble your tart several hours or a day in advance, see make-ahead note below about adding a white chocolate moisture barrier.
- While the dough chills before baking, prepare the pastry cream. Combine the milk and vanilla bean seeds and pod in a medium saucepan and heat over medium heat, whisking, until just beginning to simmer, but not boil. Remove from heat, cover, and let steep for 20 minutes. Note: if using the vanilla extract or paste, don't add it at this step. Instead, just heat the milk, but no need to steep it.
- In a large bowl, prepare an ice bath by filling it with ice and cold water. Set aside.
- Whisk together sugar, cornstarch, and salt. Whisk in the egg yolks until it becomes pale yellow and smooth. Tip: place the bowl on a kitchen towel to help keep it still while you whisk. At first, it'll look dark yellow and clumpy, but after a few minutes, it'll become pale and smooth.
- Once the milk has steeped, scrape and remove the vanilla bean pod, then, slowly pour about ¼ cup of the hot milk into the egg yolk mixture, while constantly whisking. This tempers the eggs to keep them from scrambling. Continue pouring the remainder of the hot milk into the egg yolks, whisking until smooth. Pour this mixture back into the saucepan and return to medium-low heat.
- Cook, whisking constantly, until the pastry cream begins to boil (stop whisking every 30 seconds to check for bubbles), then cook, whisking for just 1 minute longer. The pastry cream will have thickened to a pudding-like consistency. Remove from heat and stir in the butter until completely melted and combined.
- Strain the pastry cream through a fine-mesh sieve into a medium bowl, then press plastic wrap directly over the surface of the cream to prevent a skin from forming. Place the bottom of the bowl into the prepared ice bath and let cool completely, 30 minutes to 1 hour. Refrigerate until ready to use.
- Once the cream and the tart are both completely cool and you're almost ready to serve, whisk the chilled pastry cream until smooth. Spread the pastry cream in an even layer on the bottom of the tart pan with an offset spatula. Top with plenty of fresh fruit, whole or sliced.
- Heat the apricot jam in the microwave for 15-20 seconds, then stir in 1 tablespoon of water. Strain and press it through a fine mesh sieve to remove any chunky bits, then carefully brush it over the fruit to make it glisten and keep the fruit from drying out.
- Remove the tart from the pan and chill until ready to serve. Tip: To remove the tart from the pan, slide a thin knife along the bottom edge where the removable bottom meets the side ring and gently tilt the knife to pop the tart out of the pan. Then slide a thin knife or long offset spatula under the tart to pop it off the base.
- Note: This tart is best served within 2-4 hours after being assembled, but all the pieces will keep separately for a few days until ready to serve. If planning to make the entire tart further in advance, see notes below about adding a thin layer of melted white chocolate to keep the crust from soaking in the moisture from the pastry cream. Store any leftovers, covered, in the fridge for up to 3 days.
Notes
Make-ahead gluten-free fruit tart
Perhaps one of the best parts of this recipe is the ability to make some of all of it in advance! Here are some options for making it in advance:- Prepare pastry cream: Prepare the pastry cream up to the step you press plastic wrap directly to the surface and chill it for up to 4 days in advance.
- Prepare and chill the tart dough: Prepare the tart crust up to the step where you prick it with a fork. At this point, cover the tart dough completely with plastic wrap and then freeze it for up to 2 weeks in advance. Bake it straight from the freezer, as directed. This is my recommended method if making more than a day in advance for the freshest crust!
- Fully baked tart crust: You can bake the tart crust up to 2 days in advance. Once cooled, cover it and store in the fridge for up to two days.
- Fully assembling tart in advance: If you're planning to assemble the tart several hours or a day in advance, create a moisture barrier with white chocolate to ensure the crust stays crisp. Sprinkle 1.5 ounces of finely chopped white chocolate in the warm tart and let it sit for several minutes to melt before spreading it with an offset spatula or spoon into an even later.
Making Mini Tarts
This tart can also be baked in mini tart pans for individual servings. The same recipe will make four 4-inch mini tarts. You'll follow the recipe the exact same way, but bake the crusts for about 5 minutes less.
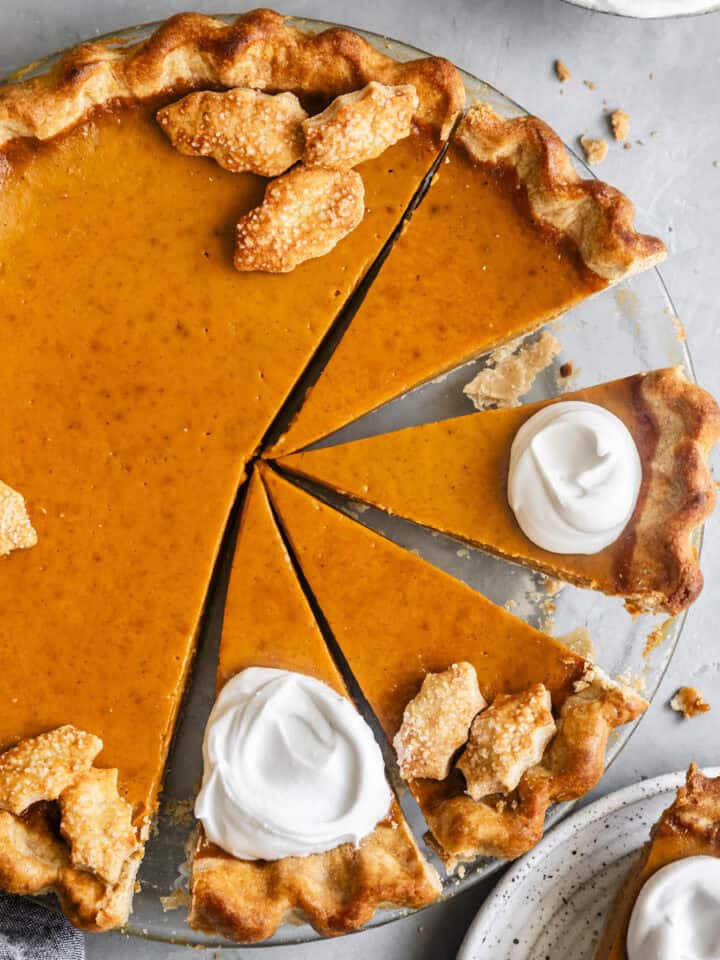
Your Visual Guide to Making Pastry Cream
- Steep milk and vanilla bean.
- Prepare an ice bath.
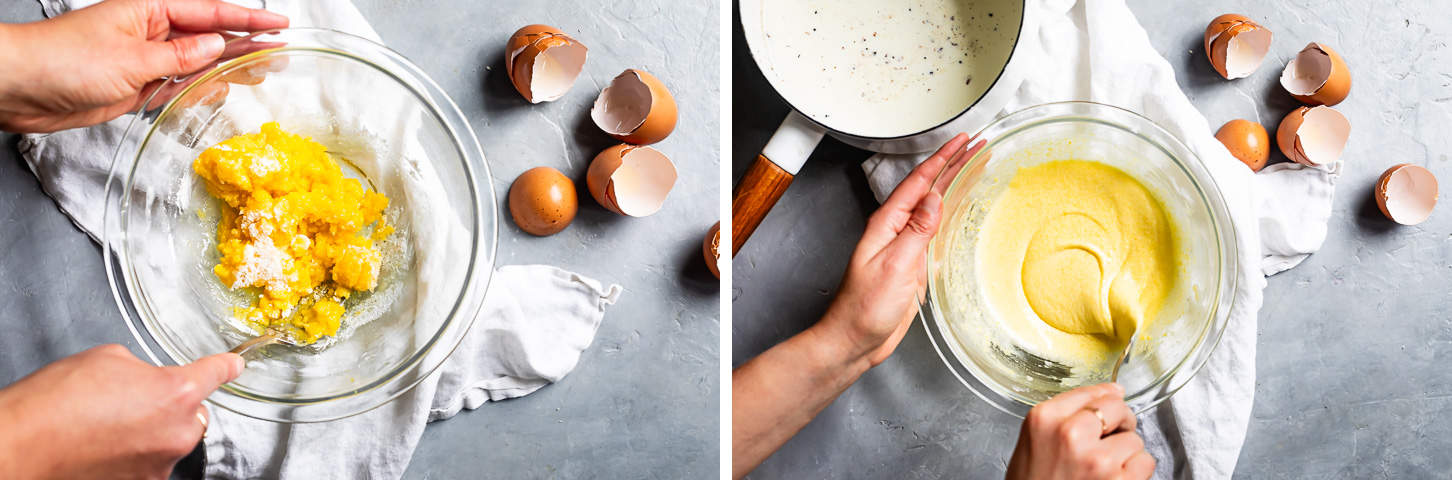
- Whisk sugar, cornstarch, salt, and egg yolks until pale yellow and smooth.
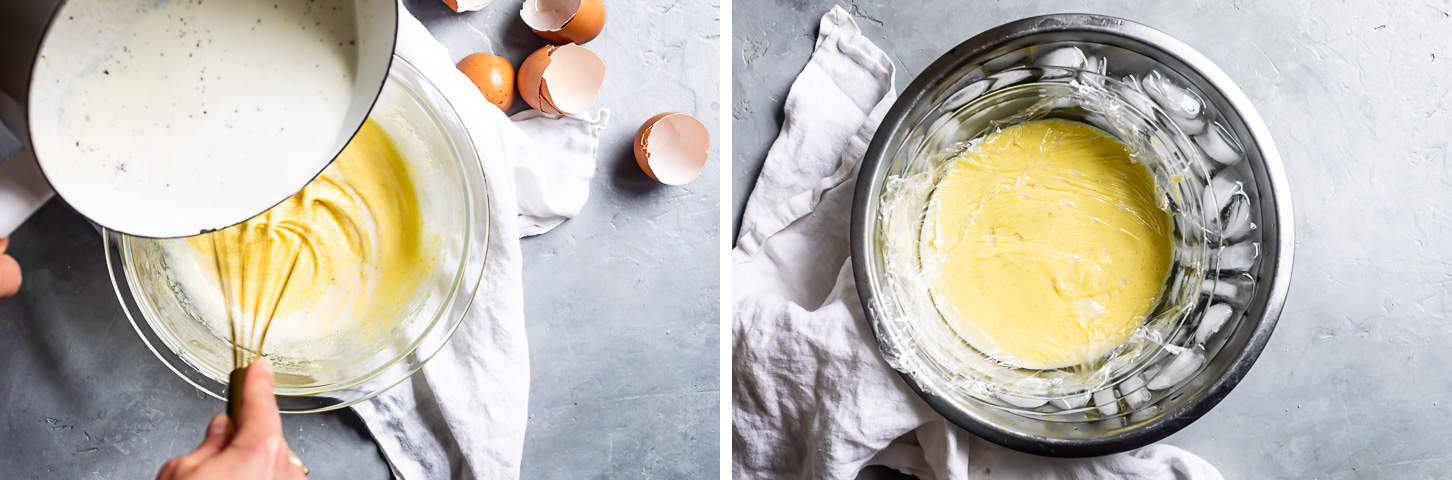
- Temper the egg yolks. While constantly whisking, slowly pour about ¼ cup of the hot milk into the egg yolk mixture. This tempers the eggs to keep them from scrambling. Slowly pour the rest of the hot milk into the egg yolks, whisking until smooth.
- Cook the cream into a pudding and stir in the butter.
- Strain and transfer to ice bath. Press plastic wrap directly over the surface of the pastry cream to prevent a skin from forming. Place the bottom of the bowl into the prepared ice bath and let cool completely.

Barb -
Easy and delicious!